Build a Free SQL GUI in 5 Steps
SQL is a powerful query language that’s used to unlock valuable insights stored in databases.
No matter how large our database is or what we’re using it for, we need a streamlined, accessible way to interact with our data. But we also need to do this in a controlled, secure manner.
That’s where an effective SQL GUI comes in. A GUI - graphical user interface - is an application that allows us to interact visually with our data, rather than relying solely on written commands.
This could range from performing simple CRUD actions to more advanced database operations.
The bad news is that buying a SQL GUI to manage databases isn’t always an easy decision. There are many things to consider, such as licensing, access control, user volumes, app installs, and custom workflows.
Budibase offers an alternative approach.
The key thing here is that our GUI aligns with the actions we want to enable users to take regarding our data. That is, we need a tool that supports the specific ways we want to interact with our database.
Today, we’re showing off how Budibase makes this a breeze.
Specifically, we’re building a SQL GUI that allows different user types to do two things:
- Perform defined CRUD actions on our database tables.
- Write, test, execute, and save custom queries.
Budibase is the security-first low-code platform that helps IT teams turn data into action.
You might also like our guide to building a REST API GUI .
First, let’s think a little bit more about why we would opt to build our own GUI rather than going for an off-the-shelf option.
What is a SQL GUI?
A SQL GUI is a tool that allows us to interact with our database using visual elements, rather than soley relying on textual commands. For instance, with buttons, form fields, tables, or other UI components.
This facilitates a few key things:
- Querying - providing a visual editor to write, test, and send SQL queries, including syntax highlighting and debugging,
- Database management - allowing users to manage our database’s structure, schema, or stored values, without needing to write manual queries,
- Data manipulation - using or editing stored data, often in a spreadsheet-like interface,
- Visualization - including for relationships, schemas, data structures, or aggregated values,
- Import/export - allowing us to perform bulk actions on stored data,
- Managing integrations - including connecting our database to external tools,
- Performance monitoring - tracking key metrics relating to our database’s usage and performance.
The core value-add here is providing a more efficient and accurate experience for interacting with our SQL database. On the one hand, this means enabling non-technical colleagues to manage databases.
On the other, it means that we can perform common tasks in a faster, less labor-intensive fashion.
What is the best GUI for SQL?
The right GUI depends on your needs. Some are more popular than others. For example, phpMyAdmin is the most ubiquitous option.
Others cater to very specific needs. For instance, these could be proprietary for a specific database engine or service. Or, you might have dedicated GUIs for more specific internal use cases.
Here are some points to consider when you pick a SQL GUI (or if you build your own):
- License cost - be it one-time, monthly, or yearly.
- Licensing limitations - number of users, number of instances.
- Local or web-based - some are accessible online, others only work as desktop installations.
- Databases supported - some work with a specific database, and others can work with multiple databases.
- Ease of use - how complex the interface is or how well it’s optimized for particular use cases.
- Customization - if it’s possible to add new features to it via plug-ins or even editing the source code.
- Reliability - if the tool works all the time or if it breaks.
- Security and user management - including authentication, authorization, credential management, and access control.
With this in mind, some of the top off-the-shelf SQL GUIs include:
- DBeaver,
- MySQL Workbench,
- pgAdmin,
- SQL Server Management Studio,
- Heidi SQL,
- Datagrip,
- Toad,
- Navicat,
- Sequel Pro,
- Acqua Data Studio.
Alternatively, in recent years more and more teams have turned to SQL Database-as-a-Service platforms. These are generally cloud-based services, where a managed SQL database, GUI, and hosting are offered within a web-based UI. Examples include NeonDB for Postgres or Aiven for MySQL. This can be a great approach for quickly managing a SQL database, without needing to set up your own GUI.
Another key consideration is the type of license offered for specific platforms. Many teams will want to prioritize an open-source GUI for SQL databases, for cost, security, and maintenance reasons.
You might also like our round-up of open-source form builders .
What are we building?
As we said earlier, our SQL GUI provides two clusters of capabilities, with each one accessible to a different set of end users. To achieve this, we’re making heavy use of Budibase’s role-based access control.
Budibase offers custom RBAC. We can use these to configure which data sets and operations users have access to within Budibase’s Data section.
Then, all we need to do is autogenerate UIs or even automations and customize them to suit our needs.
For our SQL GUI, we’re using an existing MySQL database, representing an employee time management system.
We’re going to create one set of screens so that users with a role called Employees will be able to perform CRUD actions, allowing them to create and view their own timesheets.
Our second cohort, called Query Editors, will be able to write, send, test, and save custom database queries, as well as viewing a complete history of queries that have previously been sent from our GUI.
Here’s what our CRUD screens look like.
And our query editor.
How to build a SQL GUI in 5 Steps
Let’s dive into creating our SQL GUI. If you haven’t already, sign up for a free Budibase account to build as many apps as you like, for free.
We’ll provide the queries you need to create the database tables we’re using in our example a little bit later.
1. Configuring our database connection
We’re starting by creating a new Budibase application, which we’ll simply call SQL GUI.
Once we’ve created our app, the first thing we’re prompted to do is select a data source. Budibase offers unrivaled connectivity for external databases, including dedicated connectors for a huge range of relational databases, NoSQL tools, APIs, and custom sources.
Today, we’re choosing MySQL, although the same principles apply to building a GUI for any SQL database.
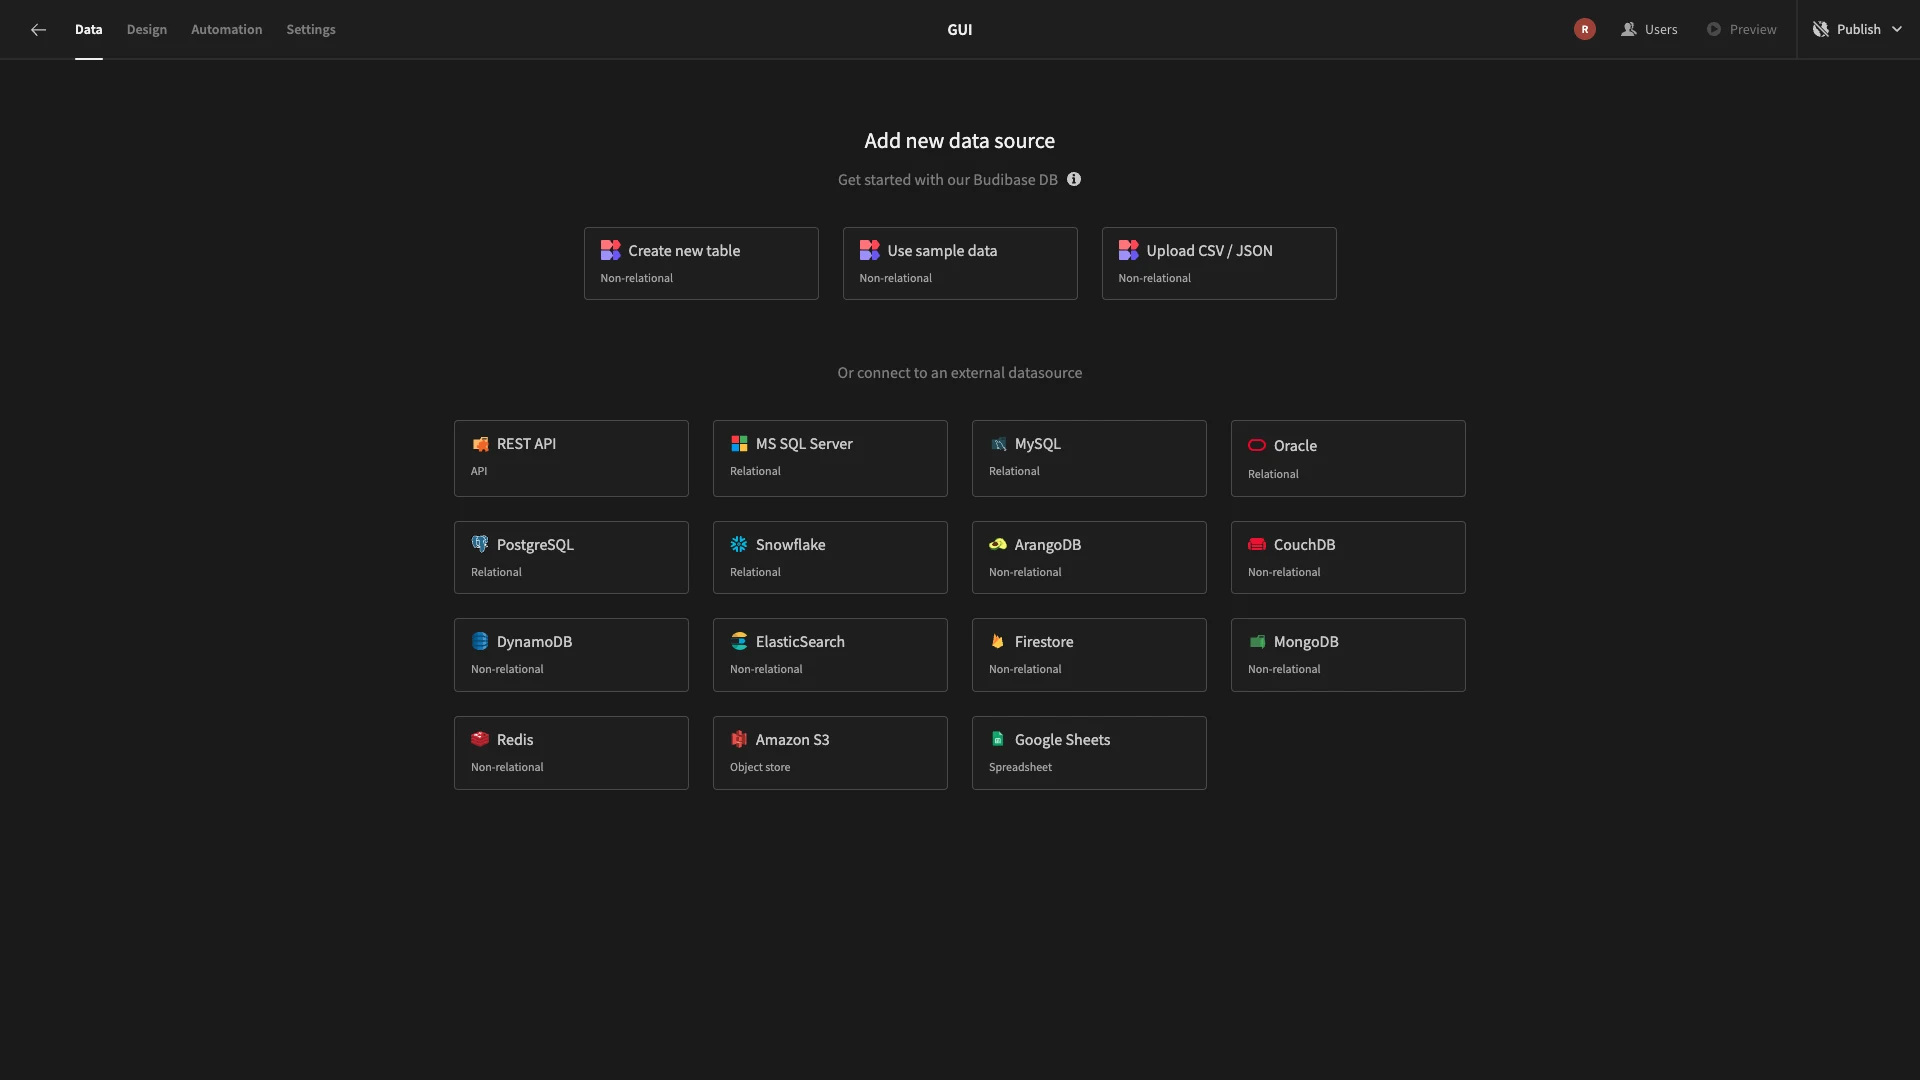
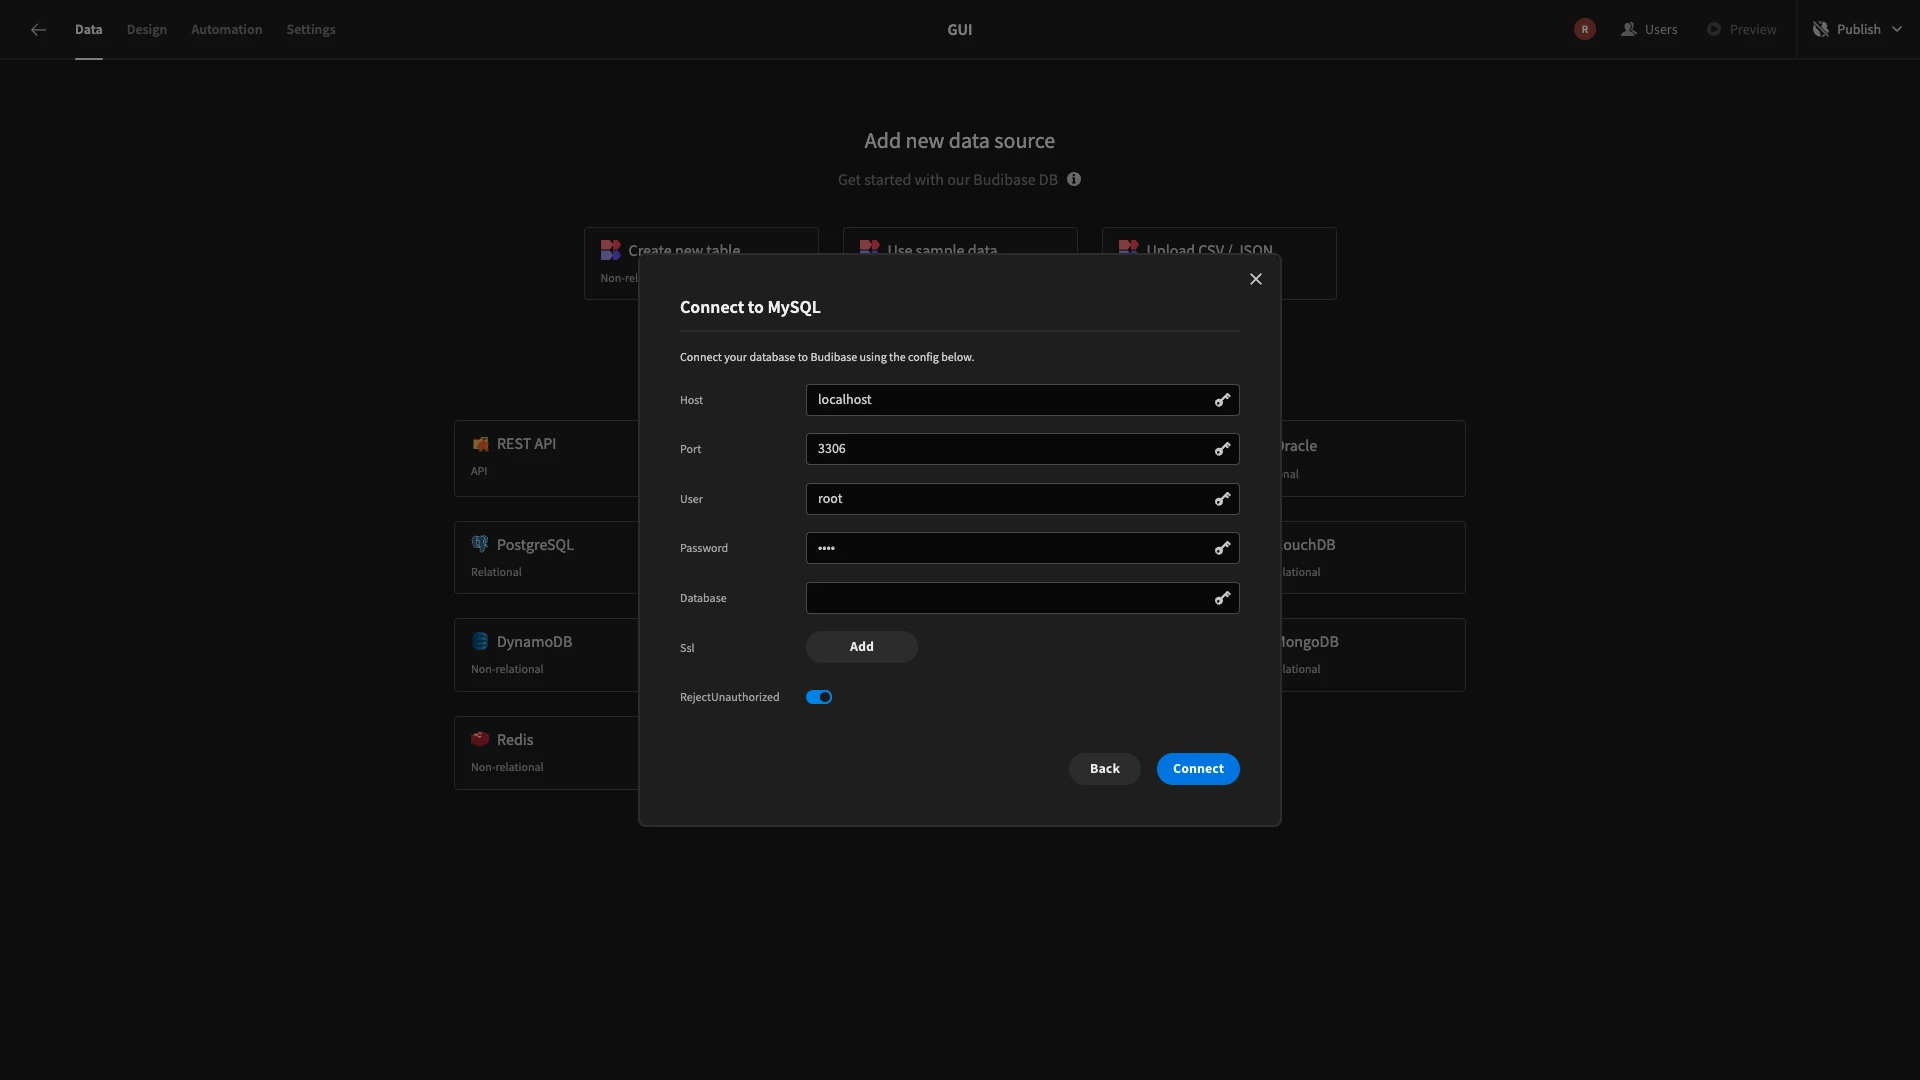
When we choose MySQL, we’ll then be prompted to add our configuration details using a modal form.
Once we’ve successfully connected to our database, we can choose which of its tables we’d like to fetch. This pulls the tables we select into Budibase. We can then view and edit them in our Data section or use them to build UIs and automations.
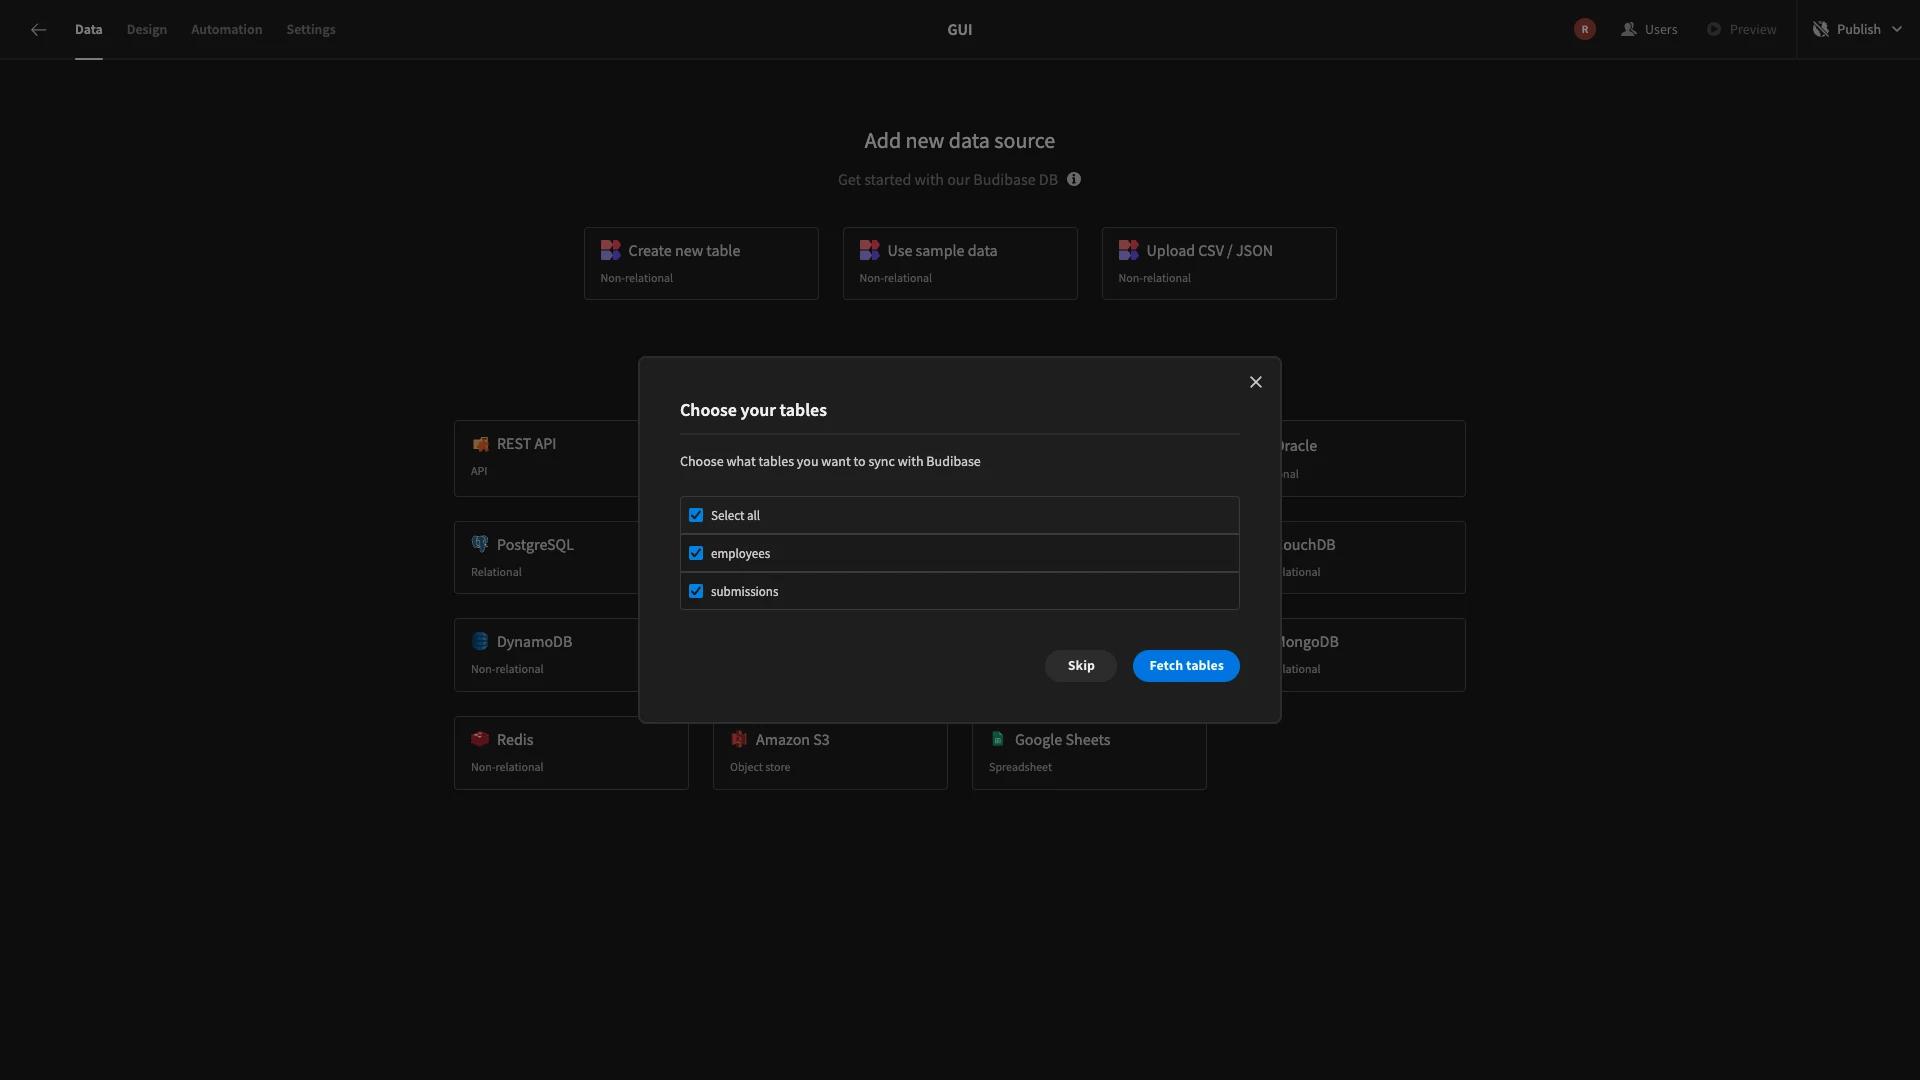
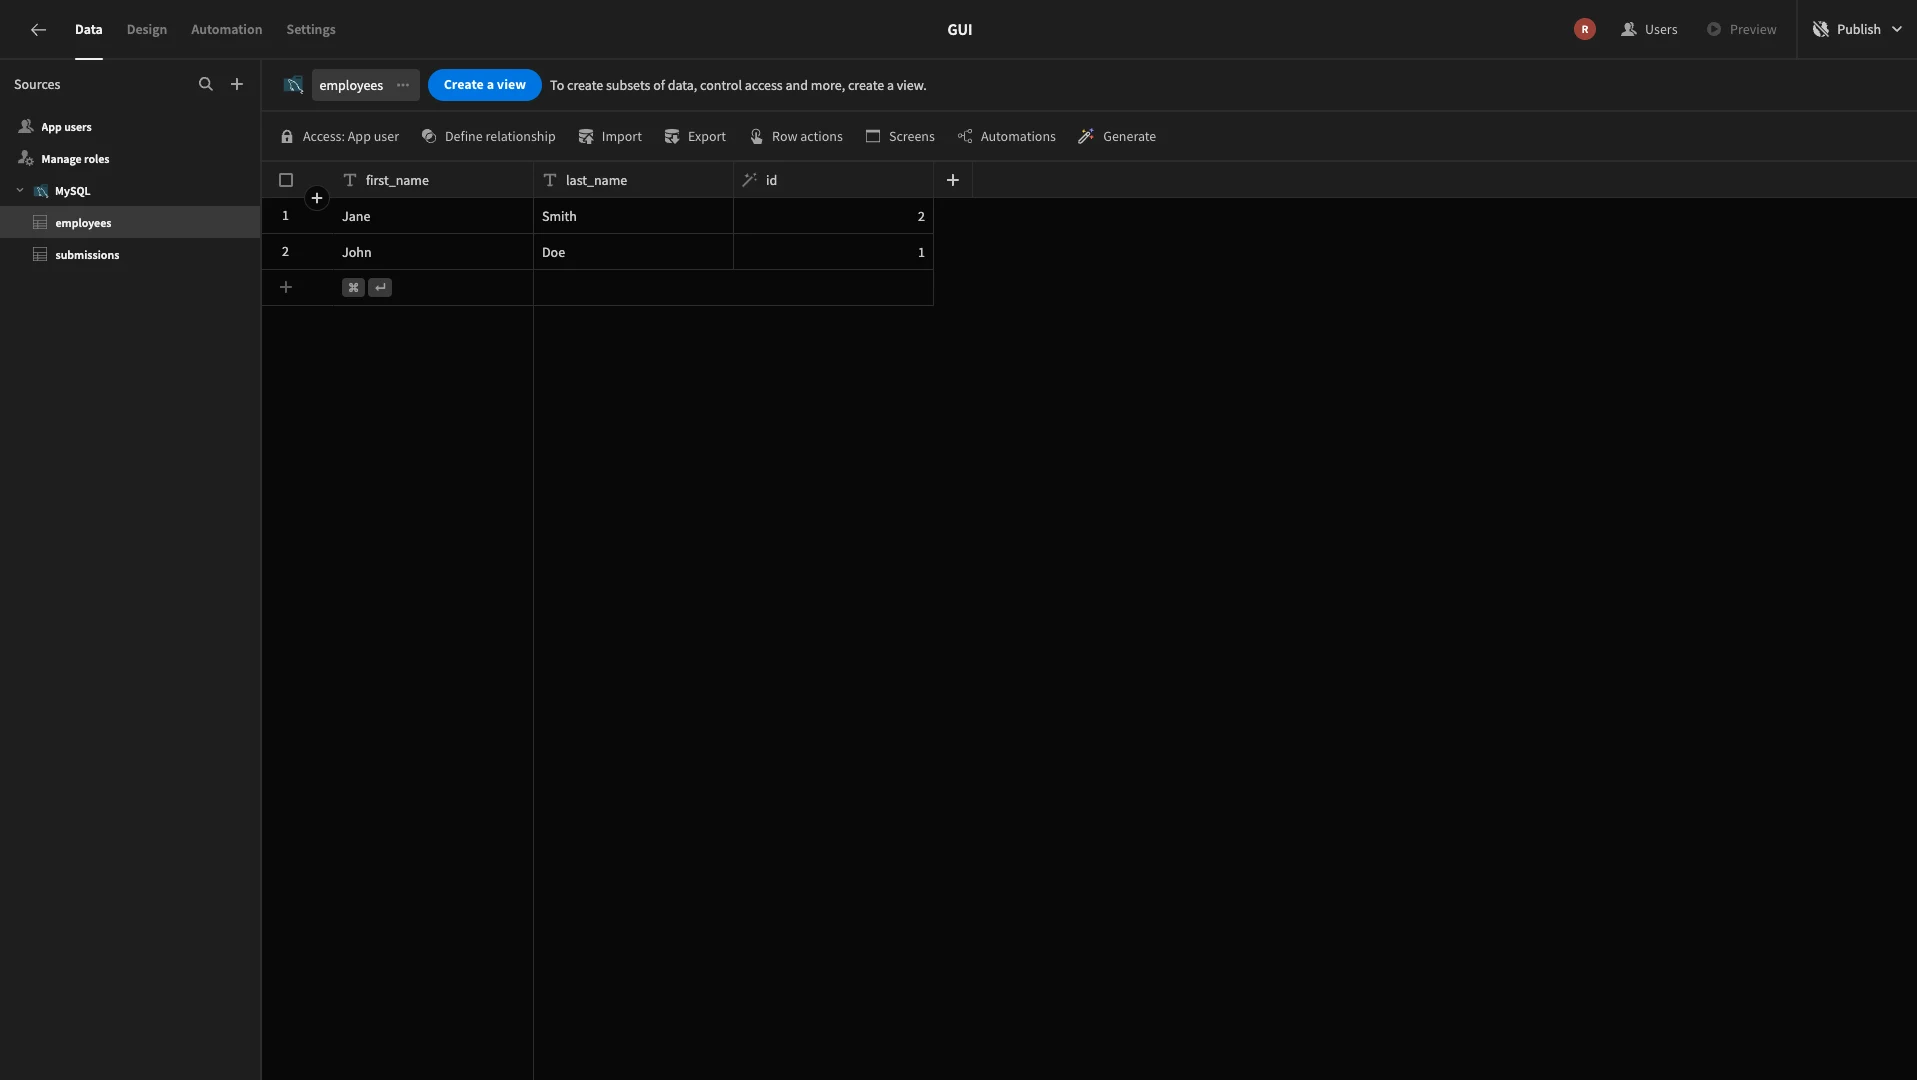
Our database contains two tables called employees and submissions. The employees table stores attributes called first_name and last_name, as well as a unique ID.
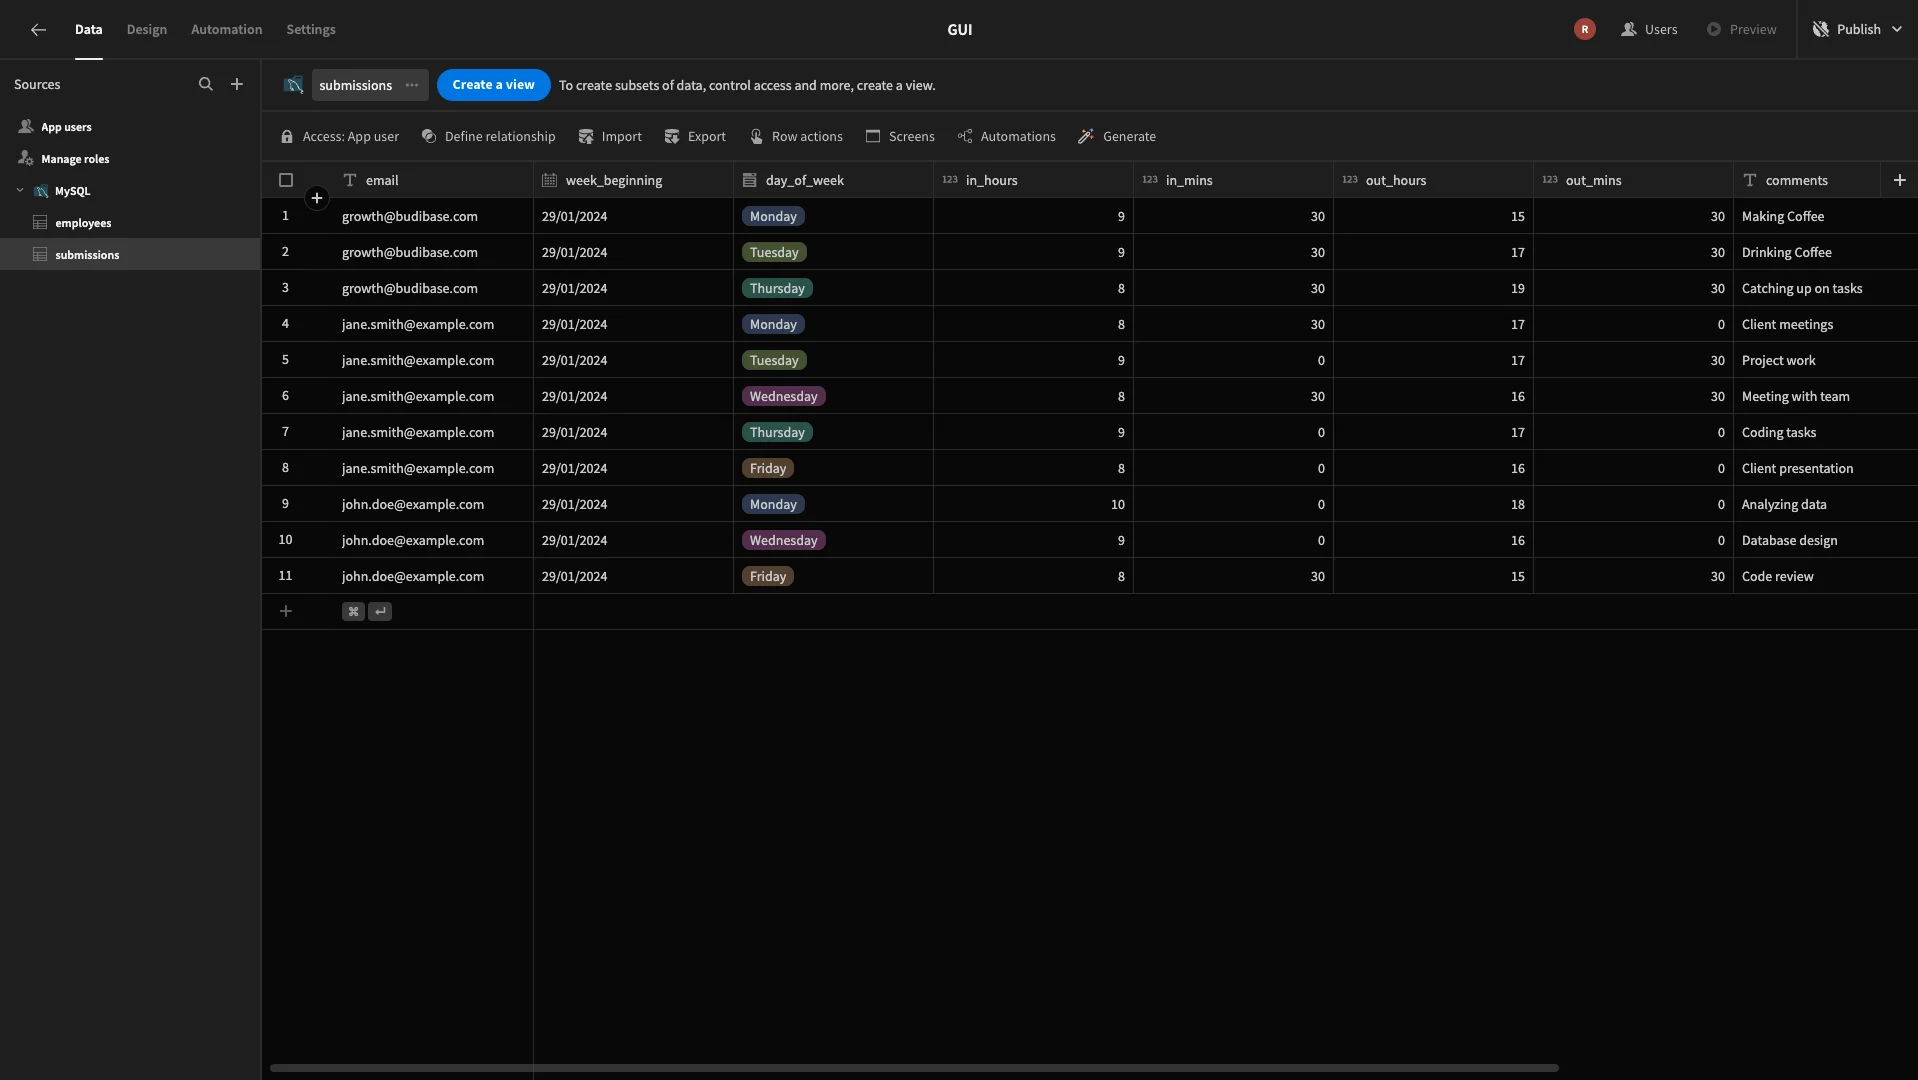
The submissions table stores our timesheets. This includes the submitters information, attributes for the date and time of the submission, a comments section, a unique ID, and an attribute called employee_id which corresponds to a row in the employees table.
Here’s what these look like in Budibase’s Data section. First, employees:
And, second, submissions:
If you’d like to create lookalike tables so you can build along with our tutorial, you can use the following queries.
This one creates the employees table:
This query creates the submissions table:
 1-- Create the table
 2
 3CREATE TABLE timesheet (
 4
 5  submission_id INT,
 6
 7  email VARCHAR(255),
 8
 9  week_beginning DATE,
10
11  day_of_week VARCHAR(10),
12
13  in_hours INT,
14
15  in_mins INT,
16
17  out_hours INT,
18
19  out_mins INT,
20
21  comments VARCHAR(255),
22
23  employee_id INT
24
25);
26
27-- Insert the data
28
29INSERT INTO timesheet (
30
31  submission_id, email, week_beginning, day_of_week, in_hours, in_mins, out_hours, out_mins, comments, employee_id
32
33) VALUES
34
35(32, 'jane.smith@example.com', '2024-01-29', 'Monday', 8, 30, 17, 0, 'Client meetings', 2),
36
37(33, 'jane.smith@example.com', '2024-01-29', 'Tuesday', 9, 0, 17, 30, 'Project work', 2),
38
39(34, 'jane.smith@example.com', '2024-01-29', 'Wednesday', 8, 30, 16, 30, 'Meeting with team', 2),
40
41(35, 'jane.smith@example.com', '2024-01-29', 'Thursday', 9, 0, 17, 0, 'Coding tasks', 2),
42
43(36, 'jane.smith@example.com', '2024-01-29', 'Friday', 8, 0, 16, 0, 'Client presentation', 2),
44
45(37, 'john.doe@example.com', '2024-01-29', 'Monday', 10, 0, 18, 0, 'Analyzing data', 1),
46
47(38, 'john.doe@example.com', '2024-01-29', 'Wednesday', 9, 0, 16, 0, 'Database design', 1),
48
49(39, 'john.doe@example.com', '2024-01-29', 'Friday', 8, 30, 15, 30, 'Code review', 1);
This one creates our employees table:
 1-- Create the employees table
 2
 3CREATE TABLE employees (
 4
 5  id INT,
 6
 7  first_name VARCHAR(50),
 8
 9  last_name VARCHAR(50)
10
11);
12
13-- Insert the data
14
15INSERT INTO employees (id, first_name, last_name) VALUES
16
17(1, 'John', 'Doe'),
18
19(2, 'Jane', 'Smith');
2. Building our CRUD tools within our SQL GUI
Now that we’ve got our table in place, we can start creating our GUI. As we said earlier, we’re going to show off two distinct methods for creating interfaces to interact with SQL data in Budibase.
First, we’re going to create some simple CRUD interfaces. Later, we’ll add UIs to write custom database queries.
This is going to allow users with the Employee role to create new records on our submissions table - or view and edit their own previous submissions.
In Budibase, we can start by configuring our data, including who can access it and which actions they can perform. Then, we can use this to autogenerate secure interfaces at the press of a button.
Let’s see how this works.
Add a user column
Before we create our interfaces, we’re going to make a few tweaks within the Data section.
The first thing we need to do is set our tables up so that we can associate individual rows in each one with specific Budibase users.
To do this, we’re going to add a single user column to both tables. This is a special data type that creates a relationship with Budibase’s internal users table. We also offer a multi-user column to assign a single row to multiple users.
Hit the plus icon to create a column on the employees table. We’ll select the single-user type and call our new column bb_user.
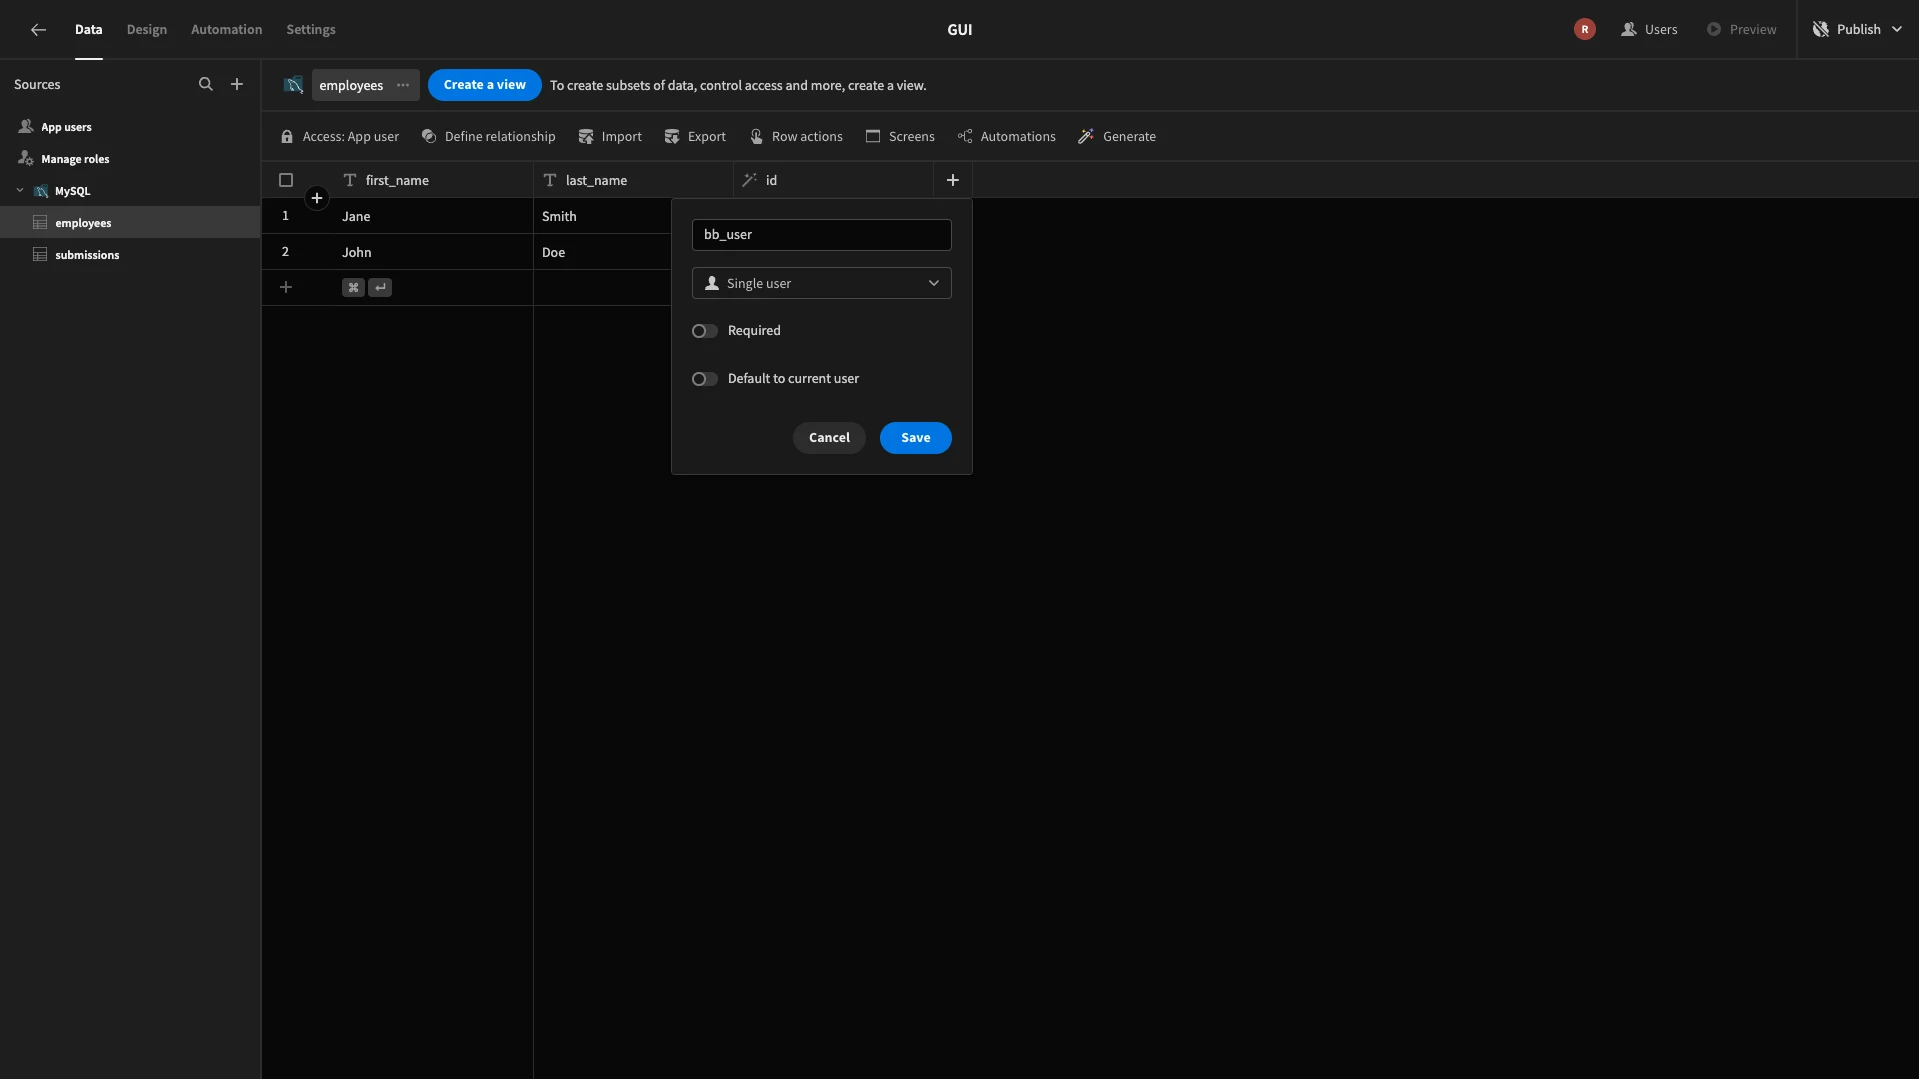
We’ll then repeat this process for the submissions table, calling our user column submitted_by. This time, we’ll also select the option to Default to Current User. That way, the column will automatically be populated to the appropriate end-user when a row is created.
In our test data, we have two employees called John Doe and Jane Smith. For testing purposes, we’re going to link our own user account to John Doe’s rows in both tables.
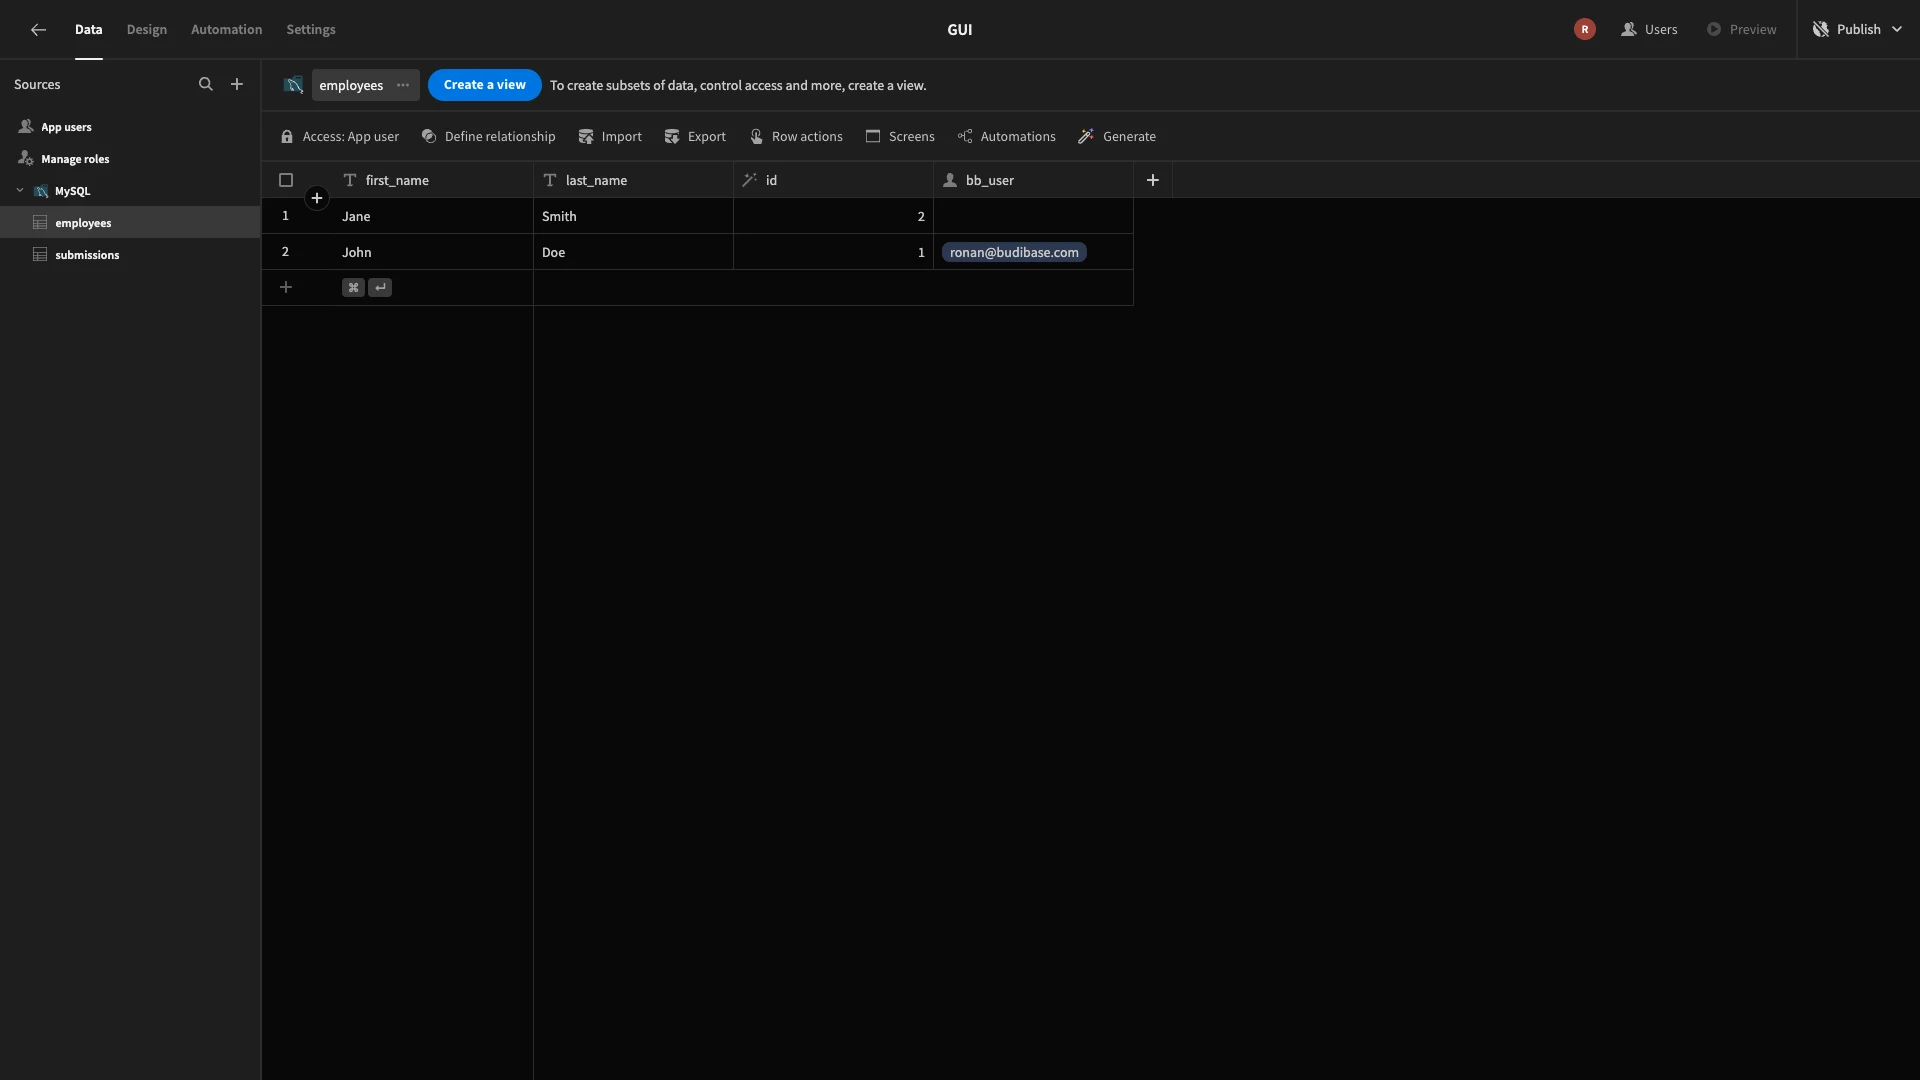
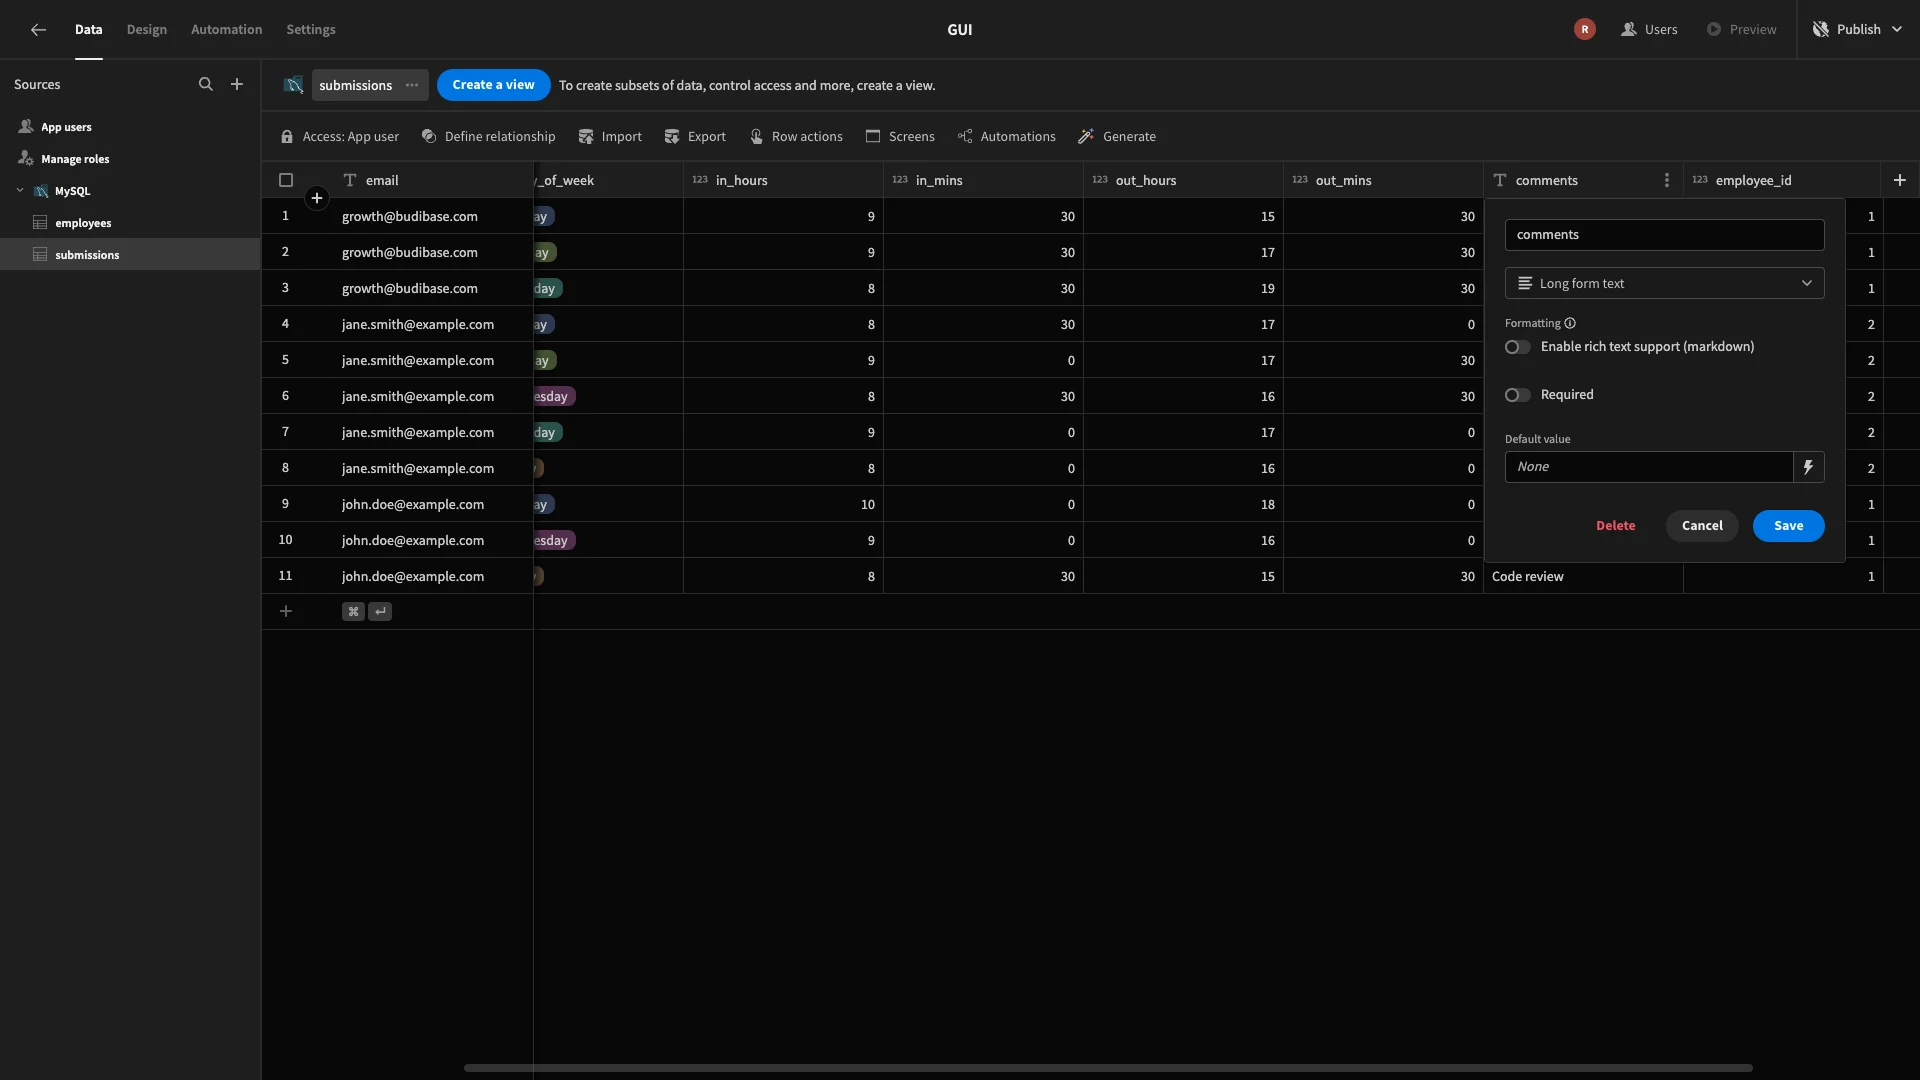
While we’re here, we’re also going to make one more tweak. Specifically, the employees table stores a text attribute called comments.
We’re going to update this by changing it to the long-form text type. When we generate screens later, this will give us a larger text box within forms.
Set up relationships
Next, we can configure the relationship between our two tables in Budibase’s data section. Recall that our submissions table already has an attribute called employee_id that corresponds to the unique ID in the employees table.
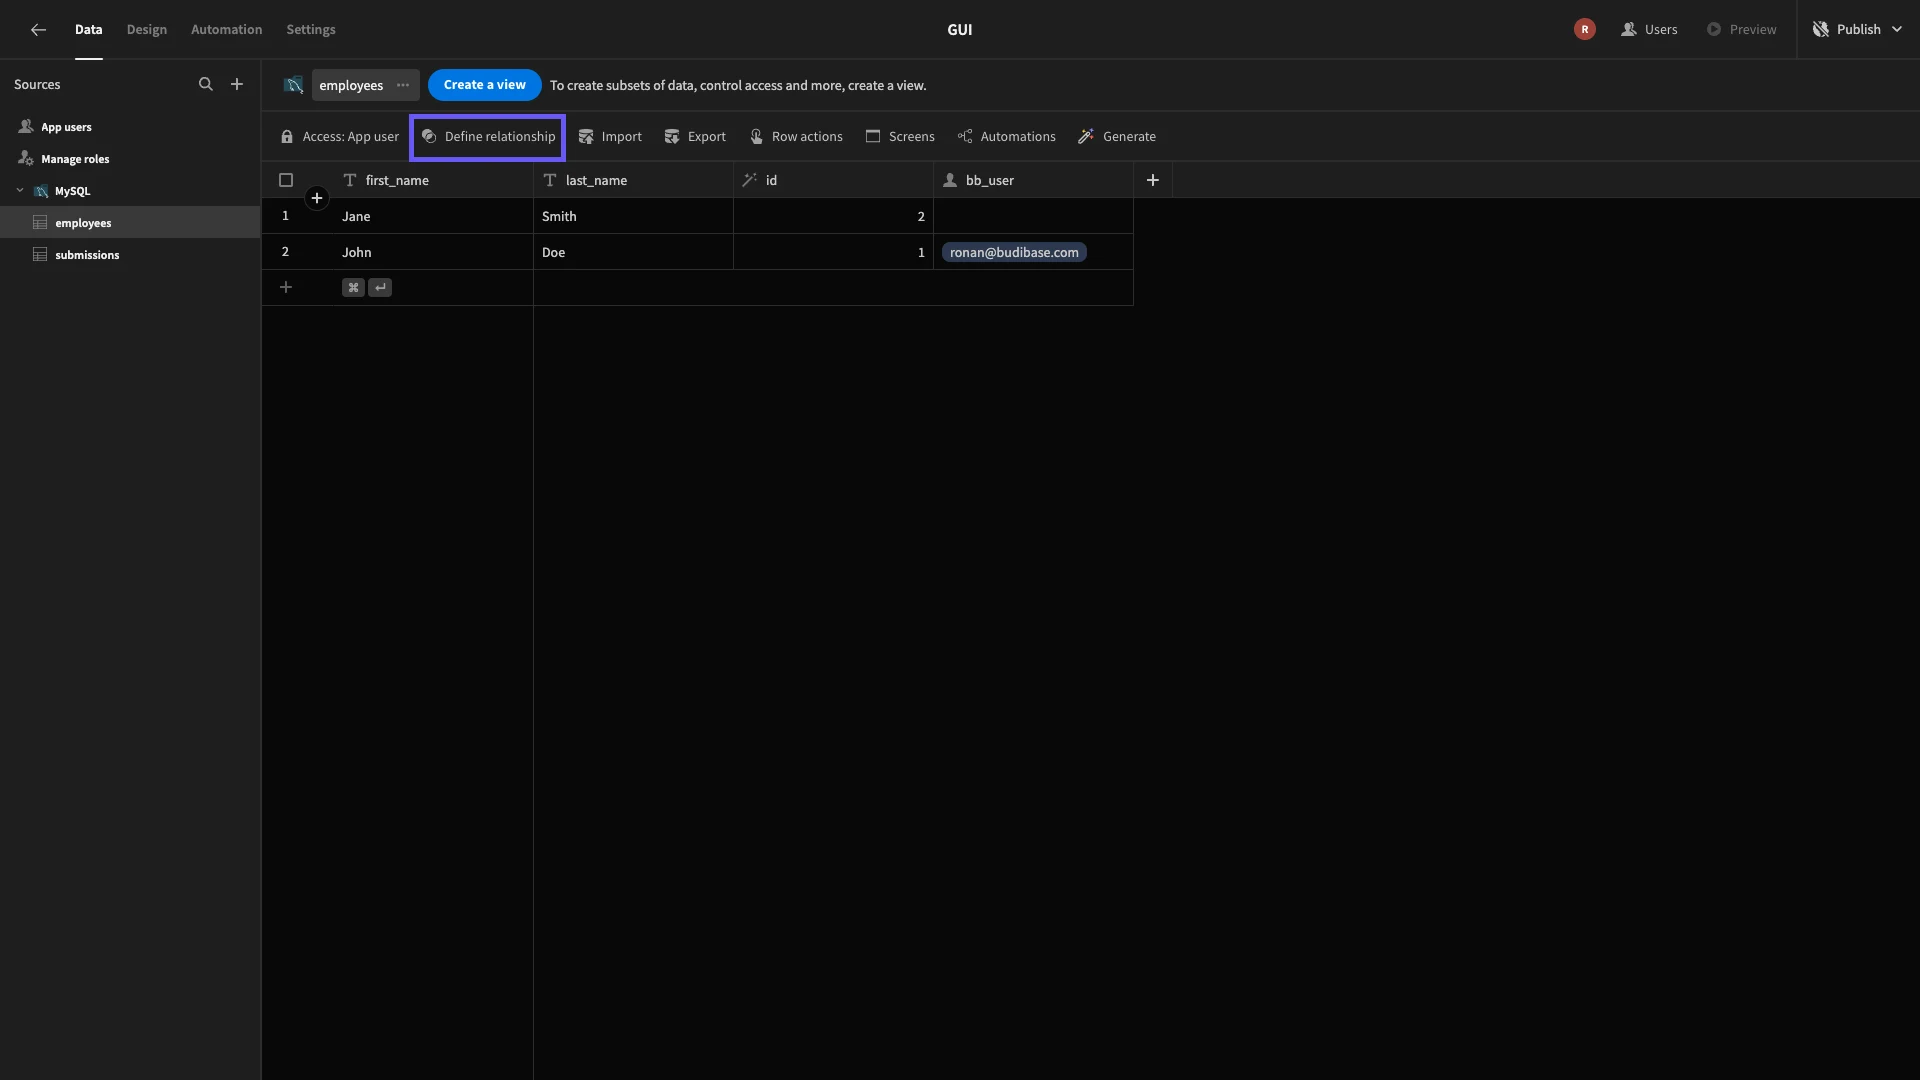
We simply need to define this in Budibase. From the employees table, hit Define Relationship.
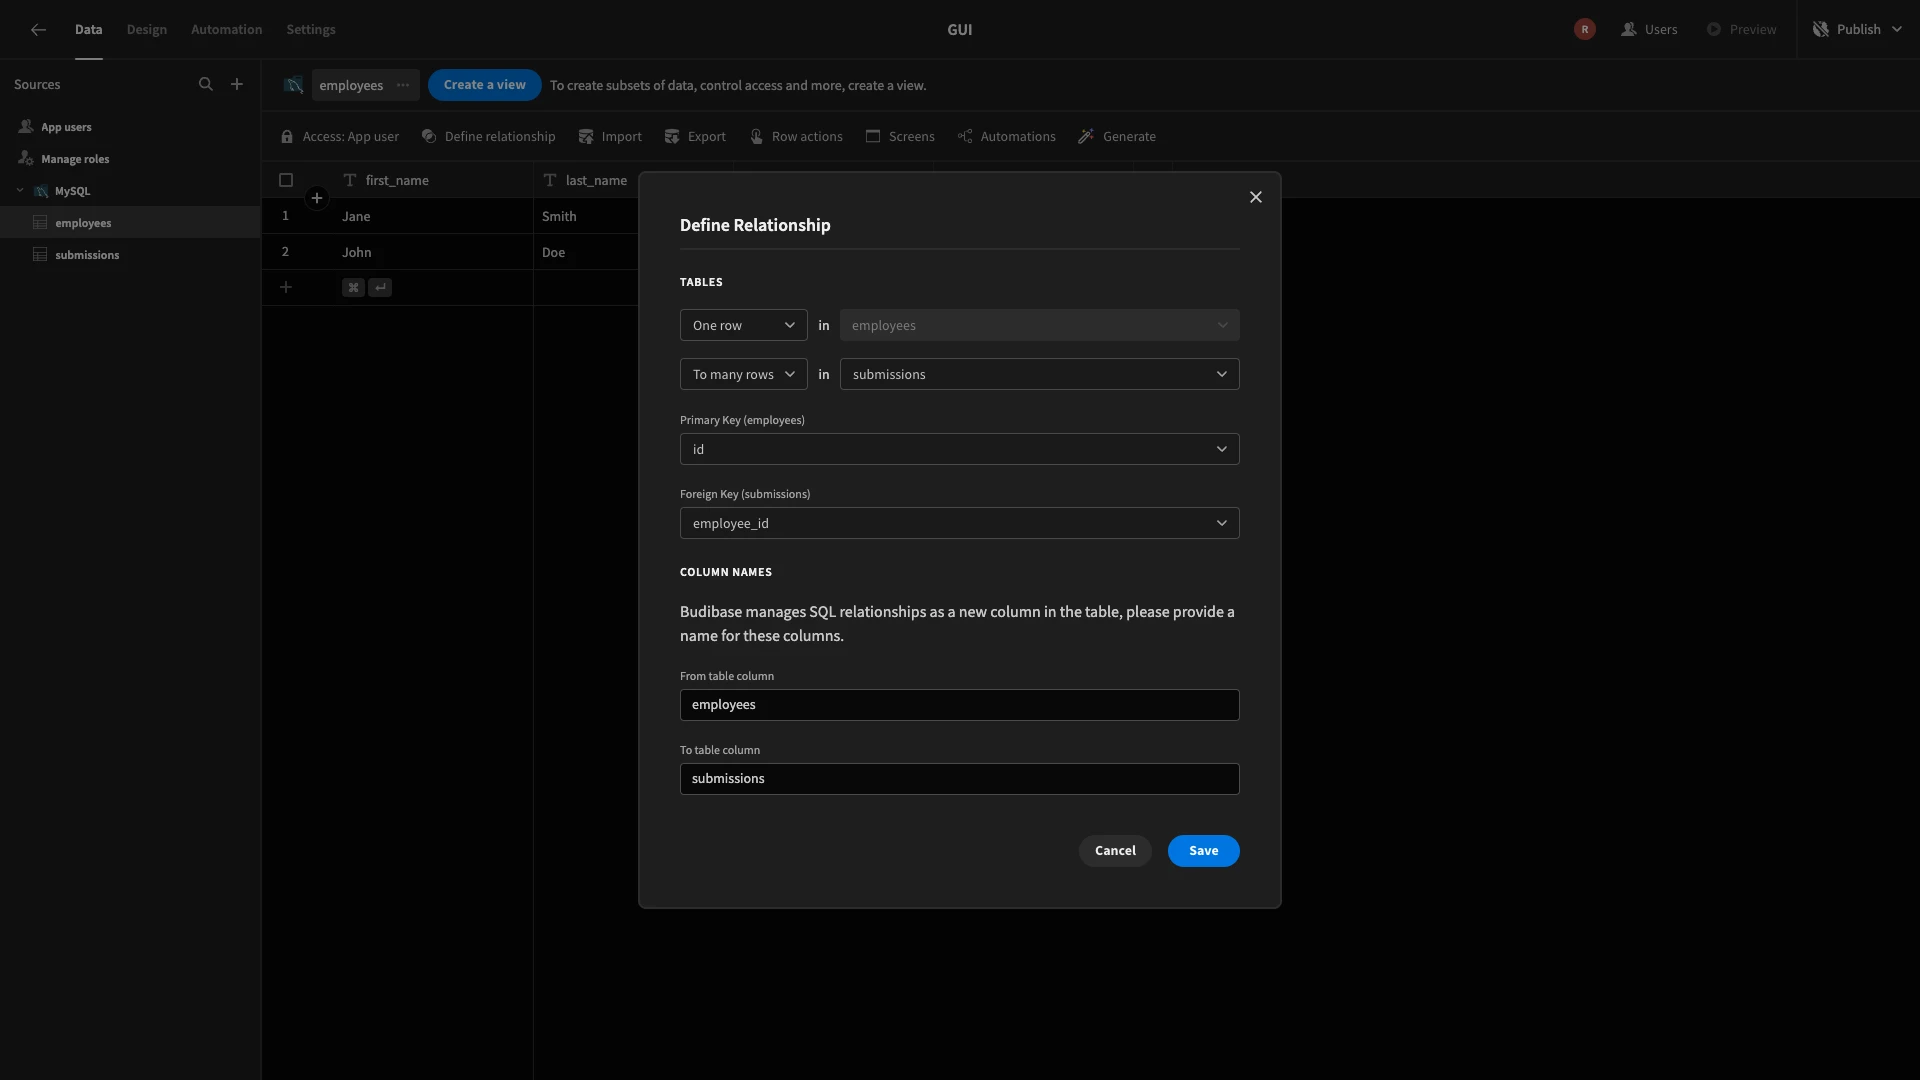
This opens a modal form where we can set up our relationship. We’re creating a one-to-many link. Our primary key will be the ID attribute in our employees table. The foreign key is the employee_id attribute in our submissions table.
Create a filtered view
Next, we’re going to use Views to set up our data access rules. Views are used to create subsets of our data for specific purposes and user groups. So, we can set these up, configure them for a particular role, and then generate screens or automations.
That way, we can give users the exact level of data exposure they need to perform their required tasks.
From the submissions table, we’ll hit Create a View. We’ll call this user_filtered.
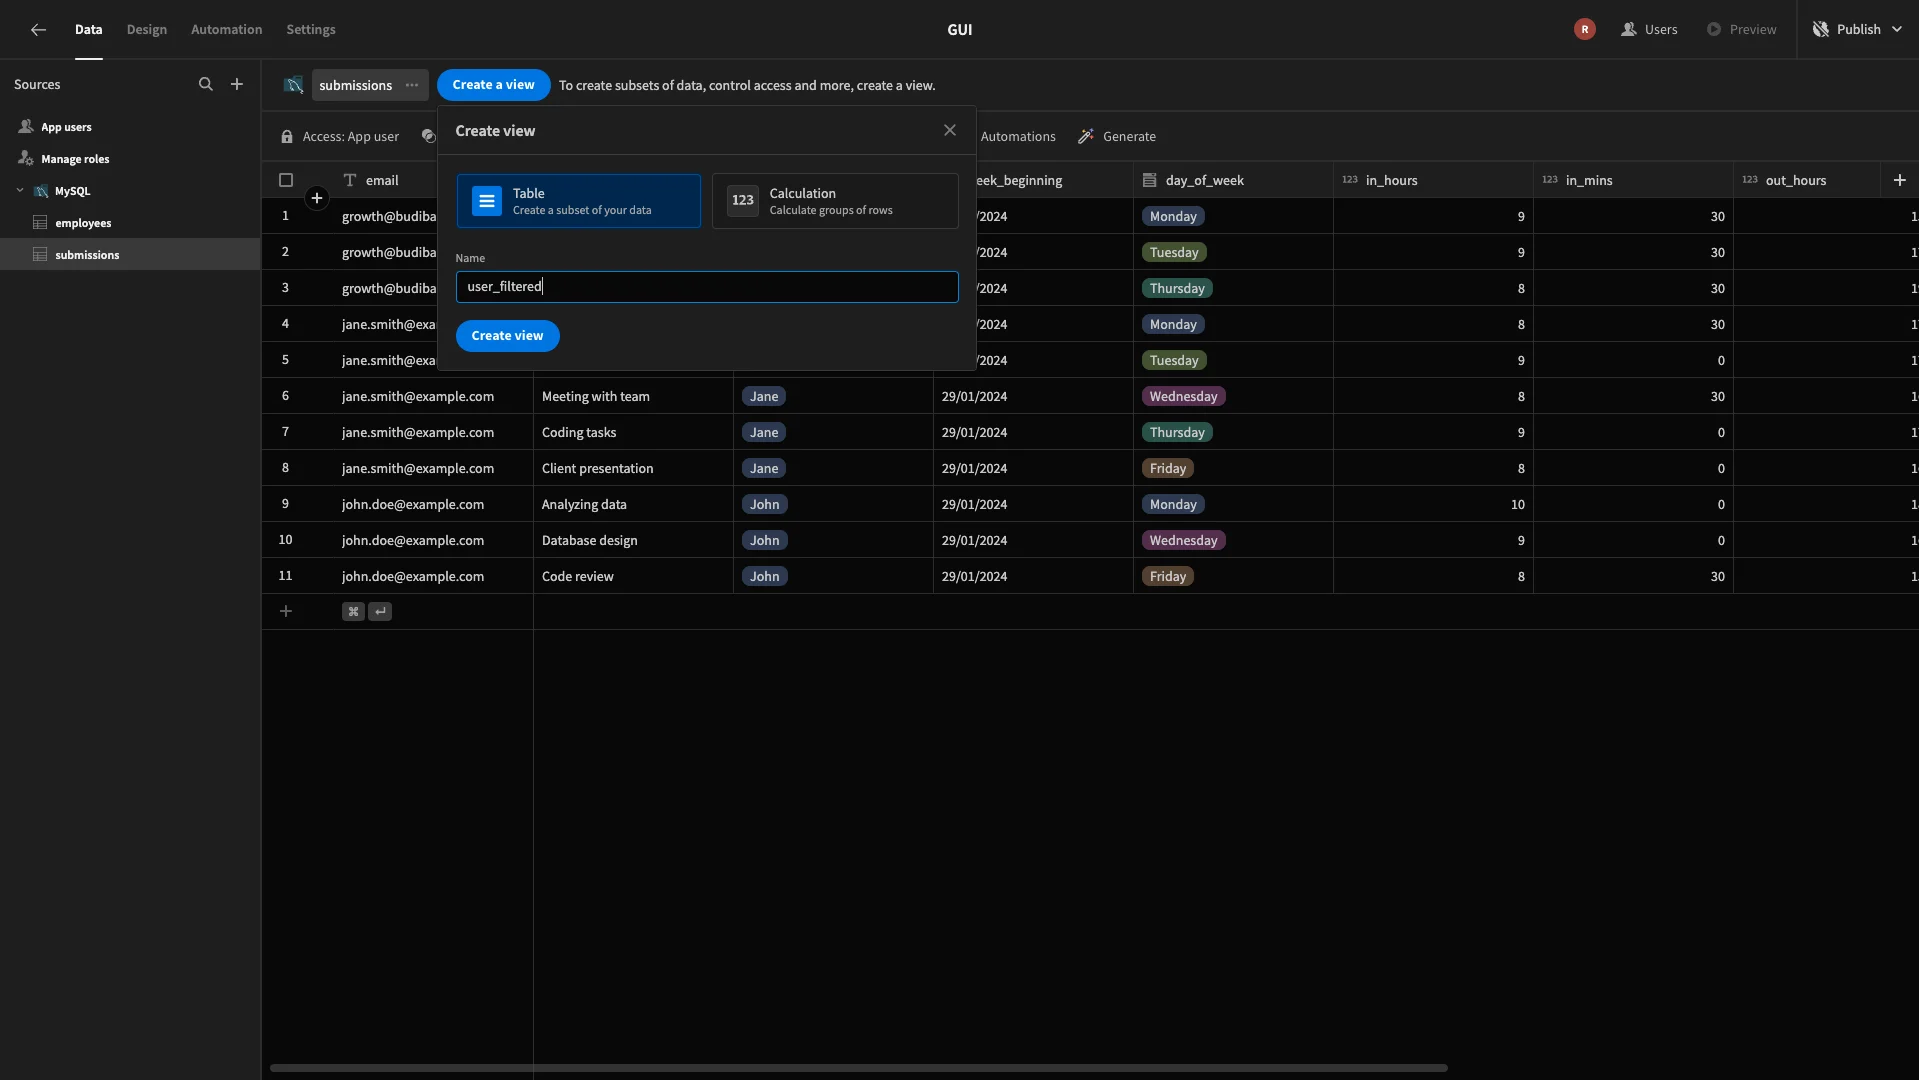
We’ll set the Access for this to our Employees role.
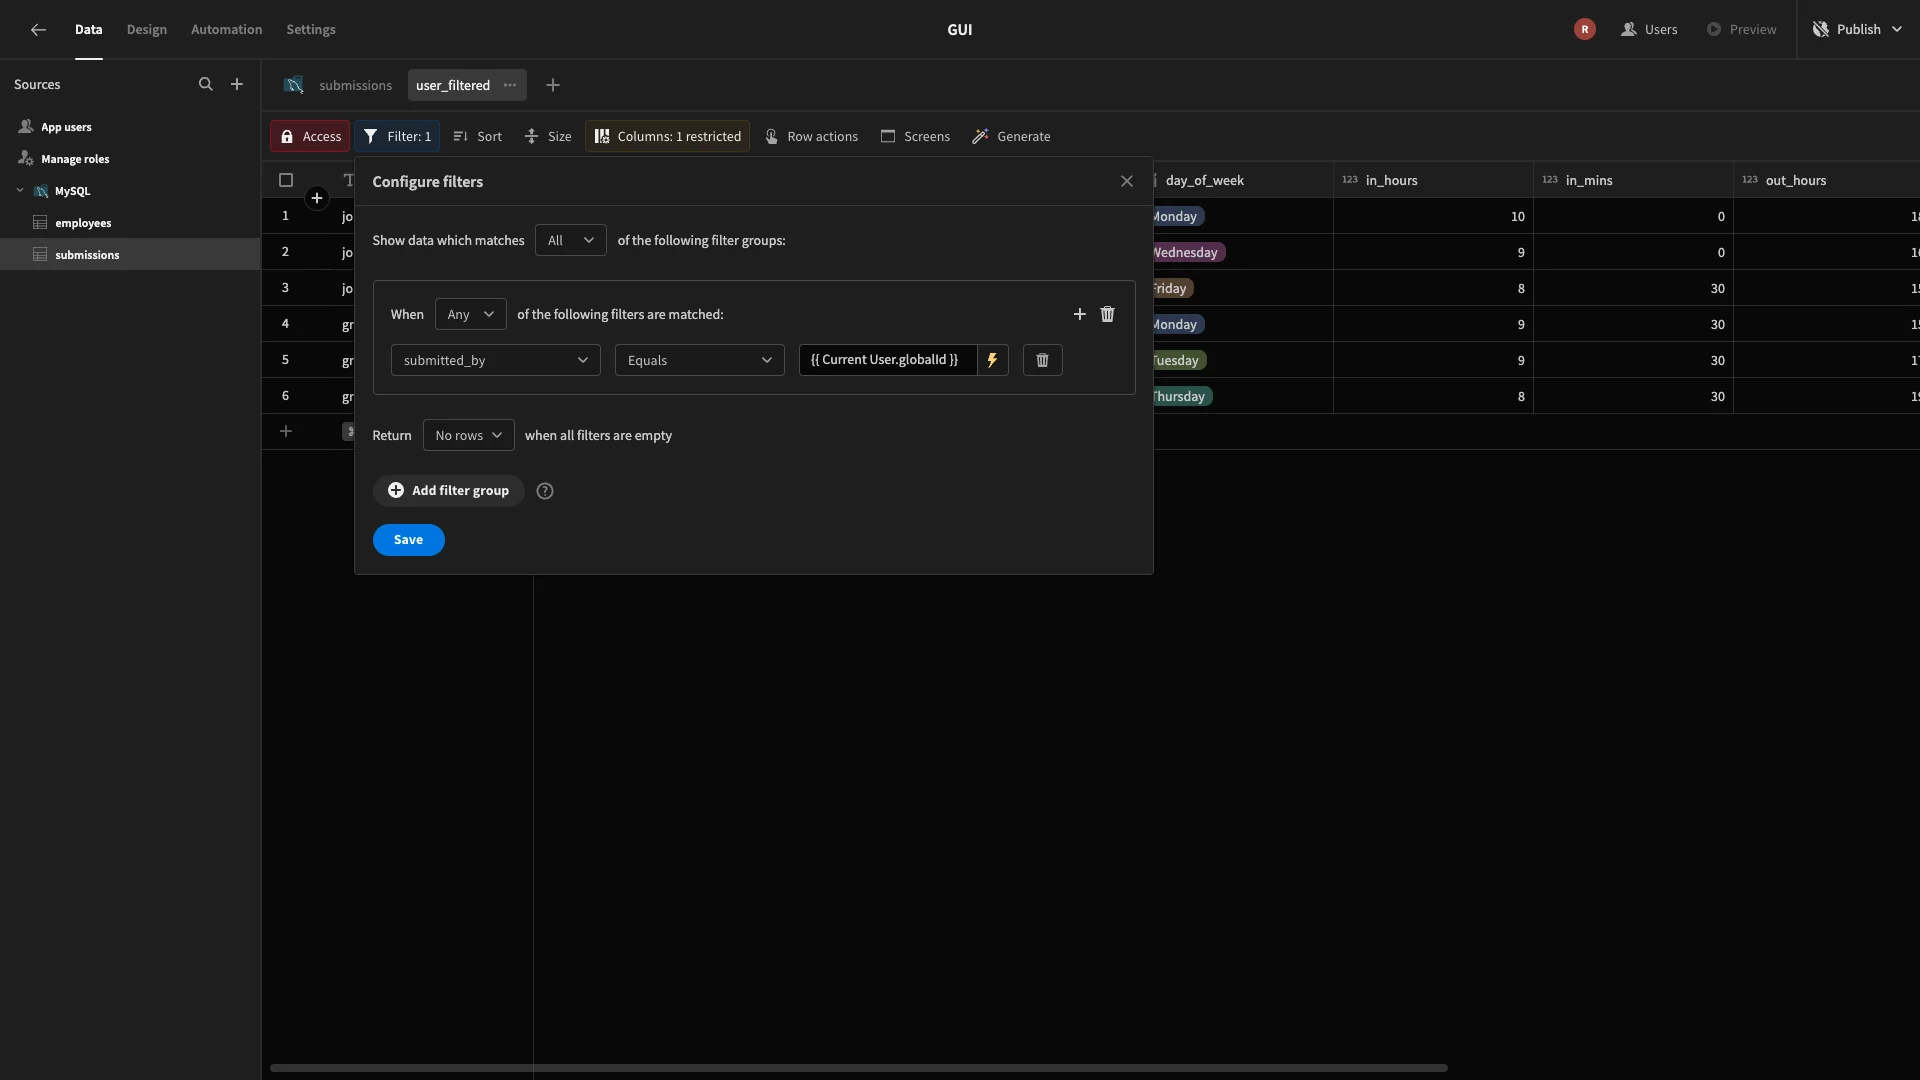
We can also use filters within Views to control which rows users can view or edit. For our purposes, we want to create a filter so that end users can only access rows that are related to their entry in the internal users table.
We’ll start by hitting the Filter button to open the filtering modal.
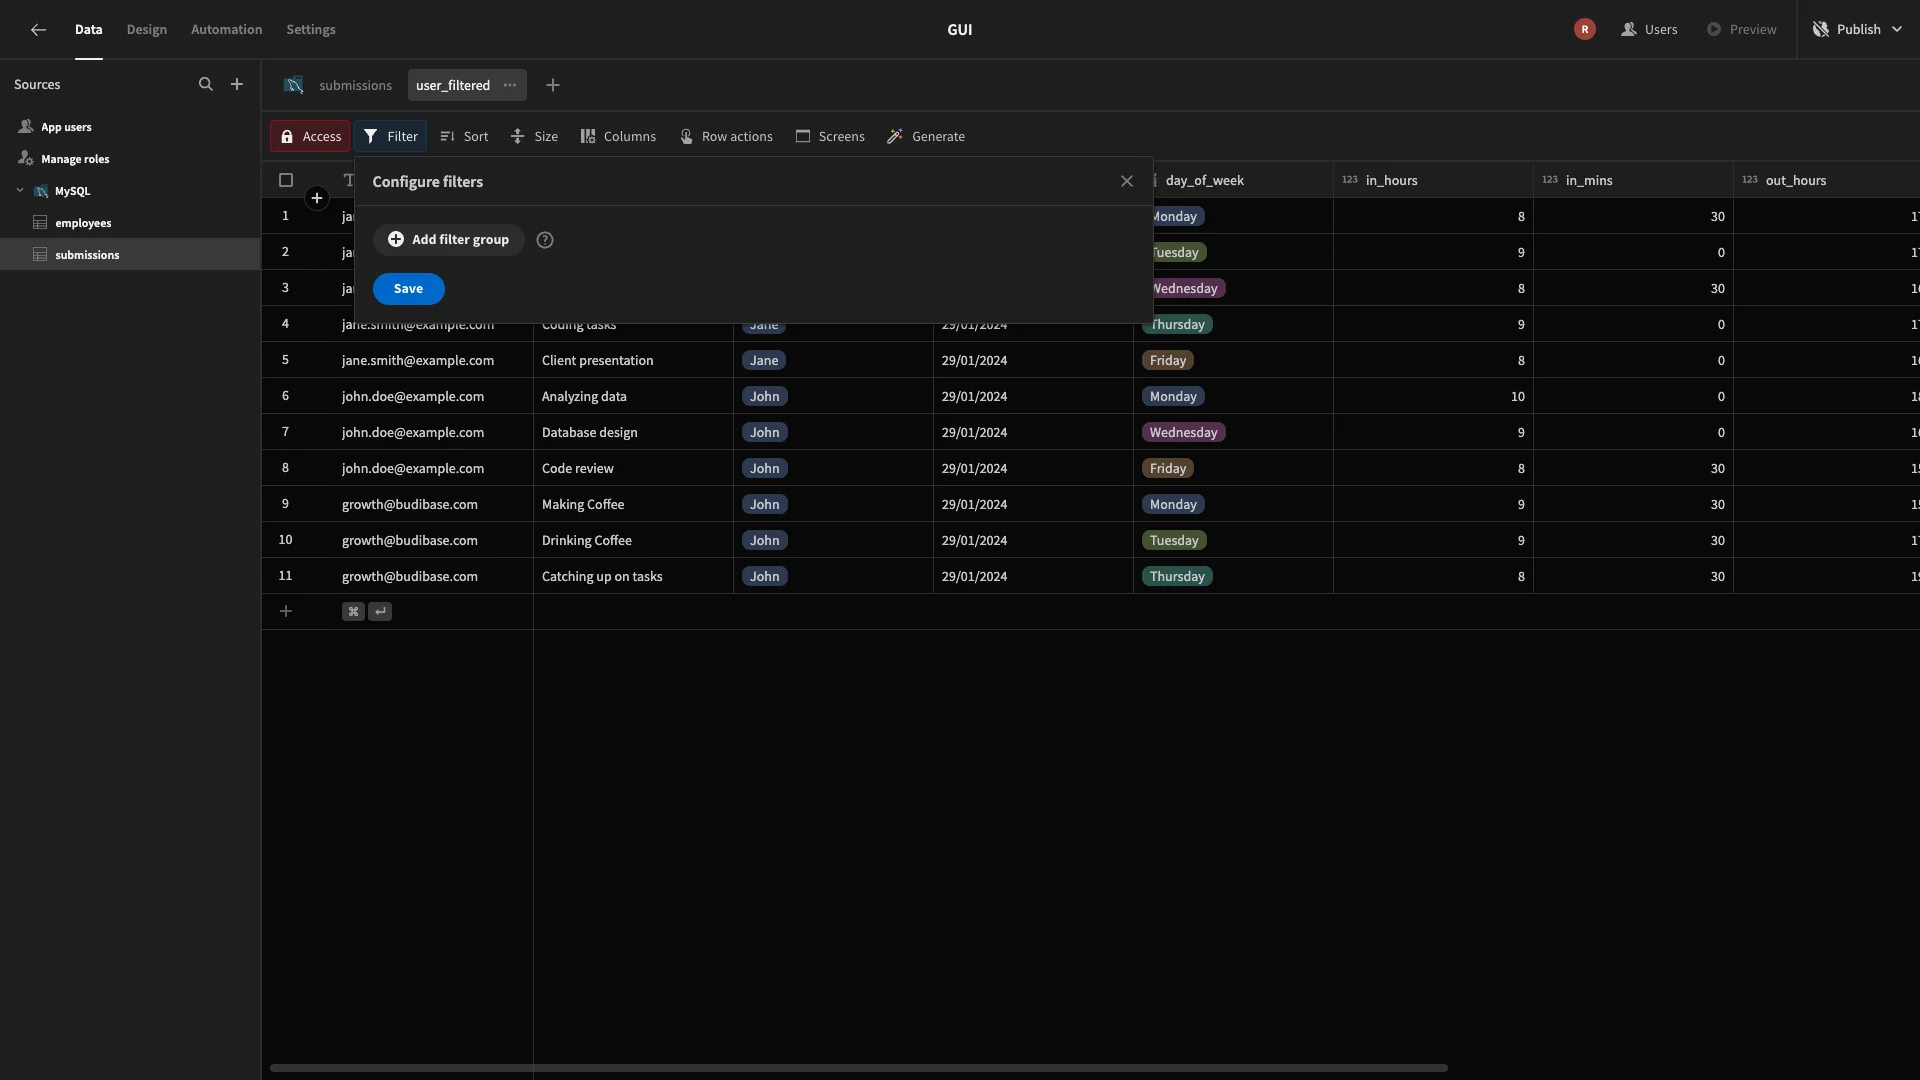
Here, we’re going to create a rule so that we’ll only include rules where submitted_by is equal to {{ Current User.globalId }}. We can select this from the Bindings menu by hitting the lightning bolt icon.
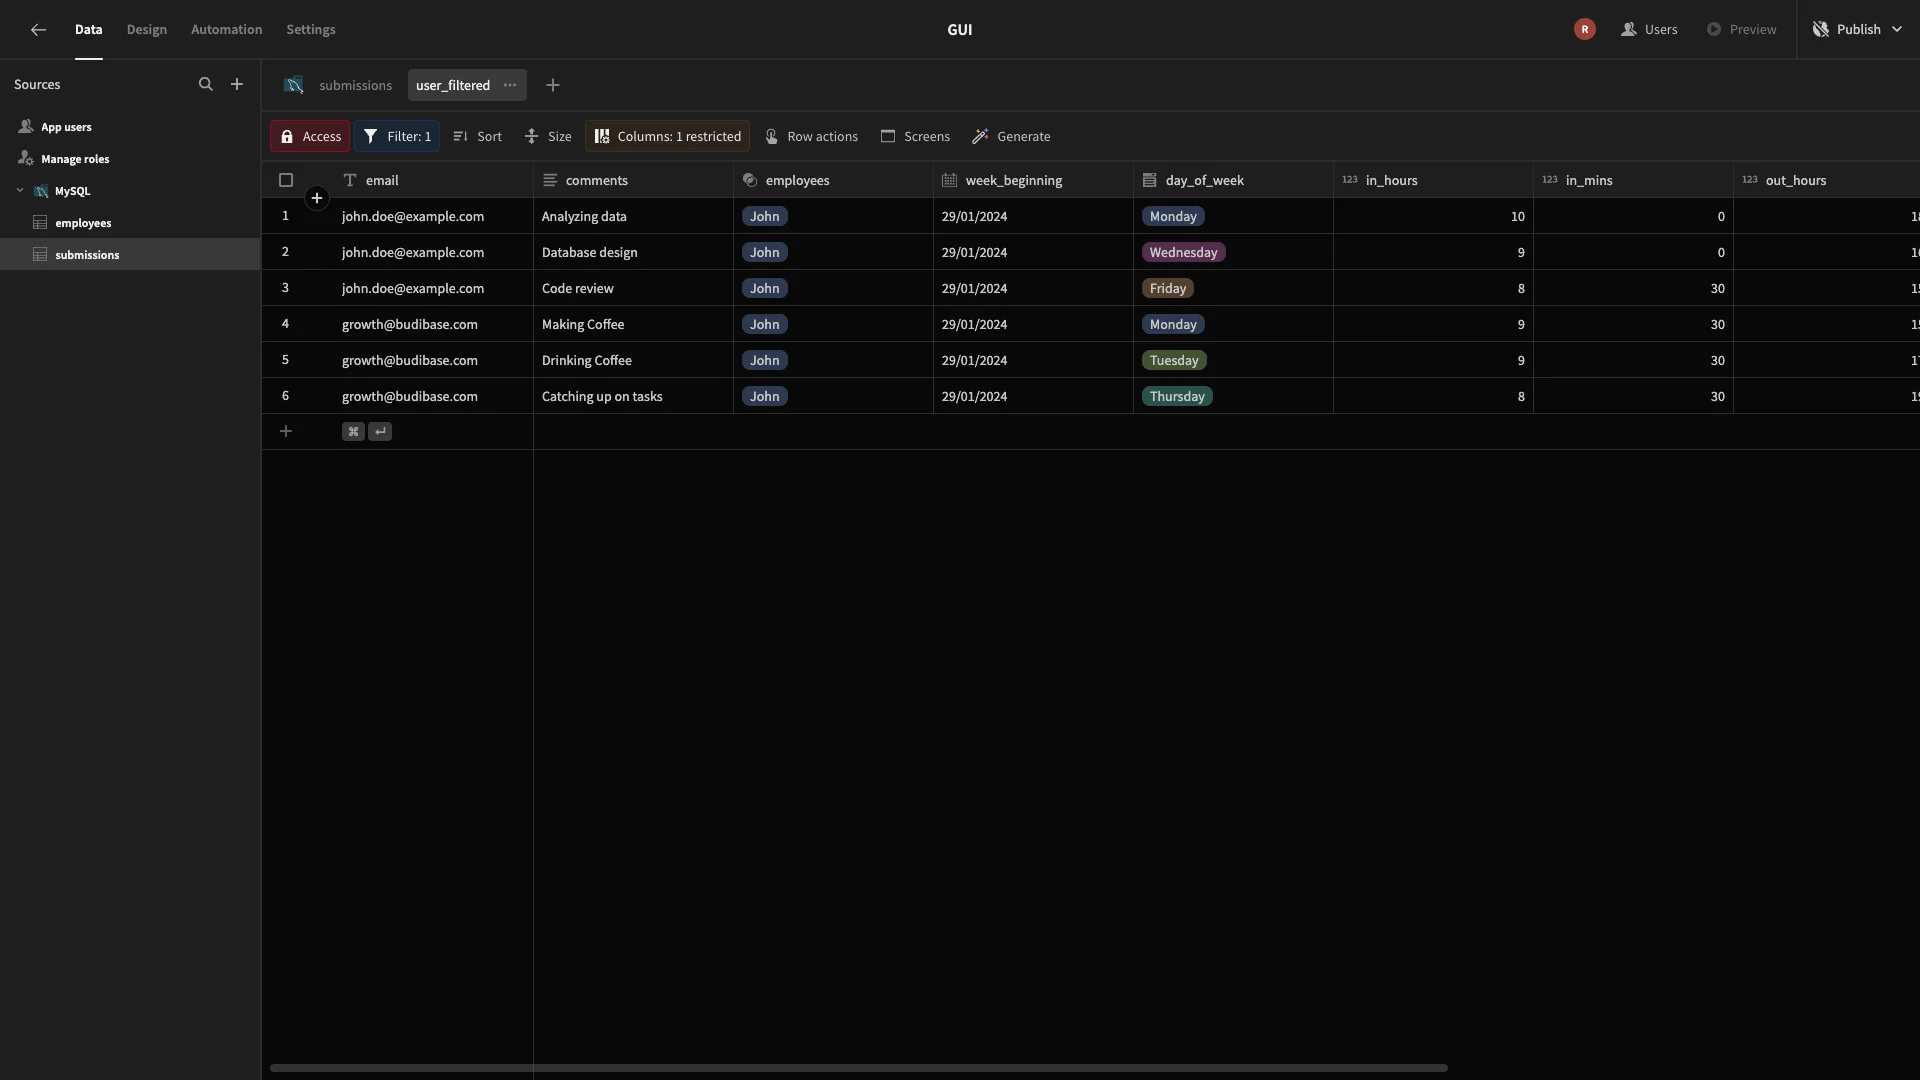
Here’s what our completed view will look like.
Generate CRUD UIs
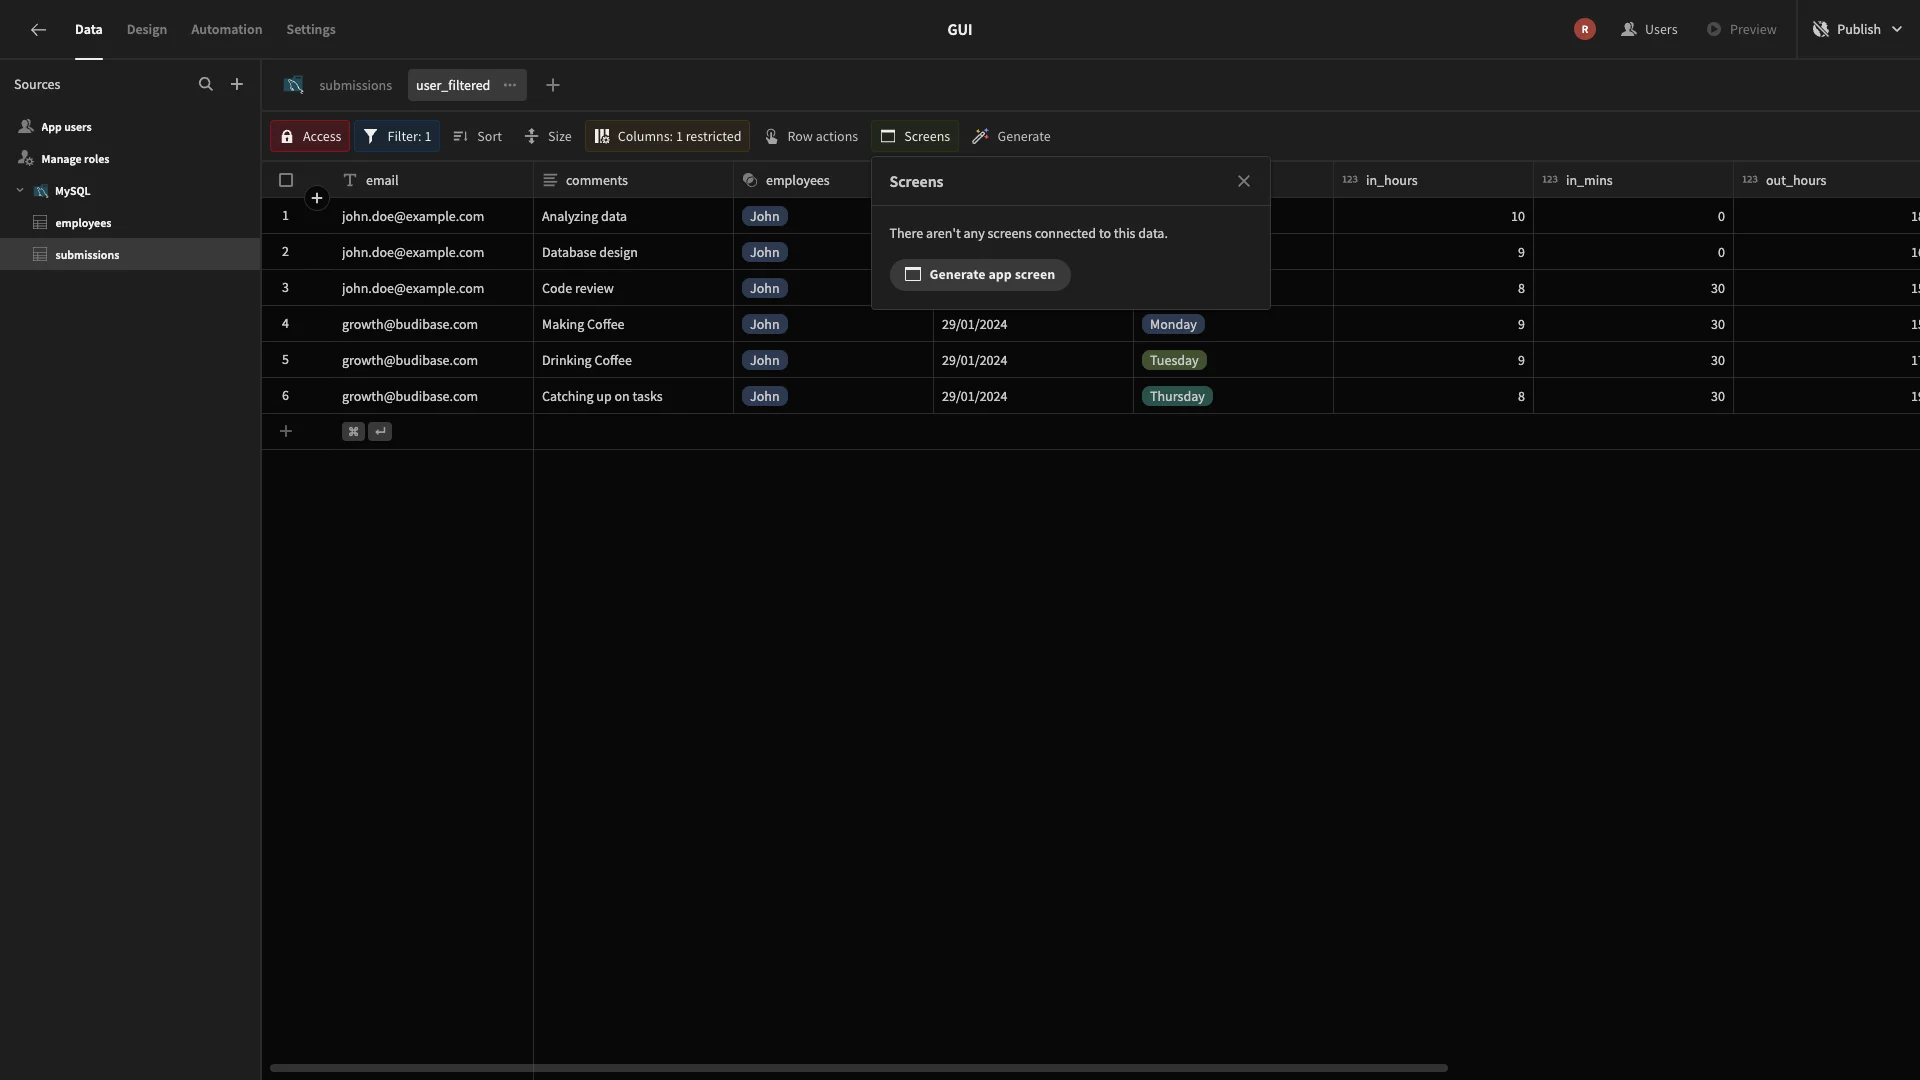
With our data set up, we can start building our UIs. In Budibase, we can autogenerate our app screens from the Data section. Start by hitting Generate App Screen under Screens.
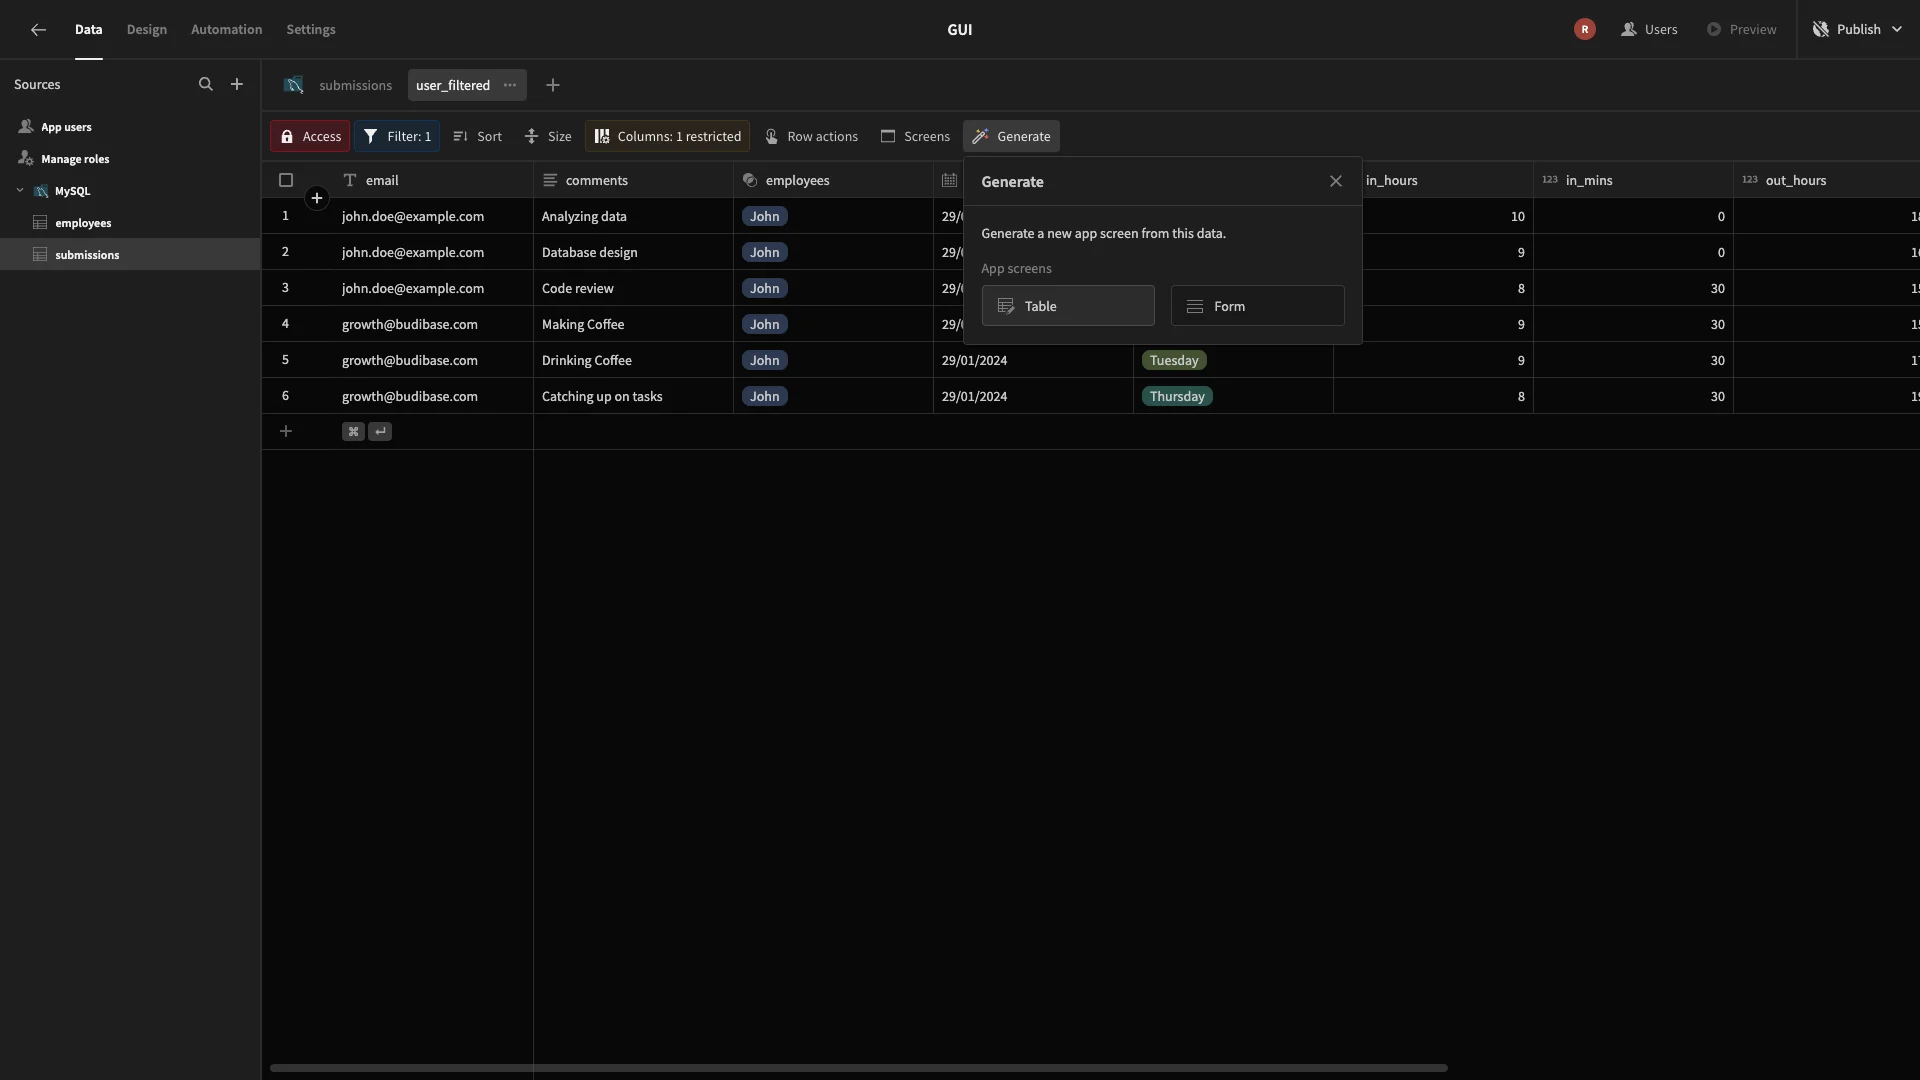
Then, we can choose between a Form or a Table layout. We’re choosing Table.
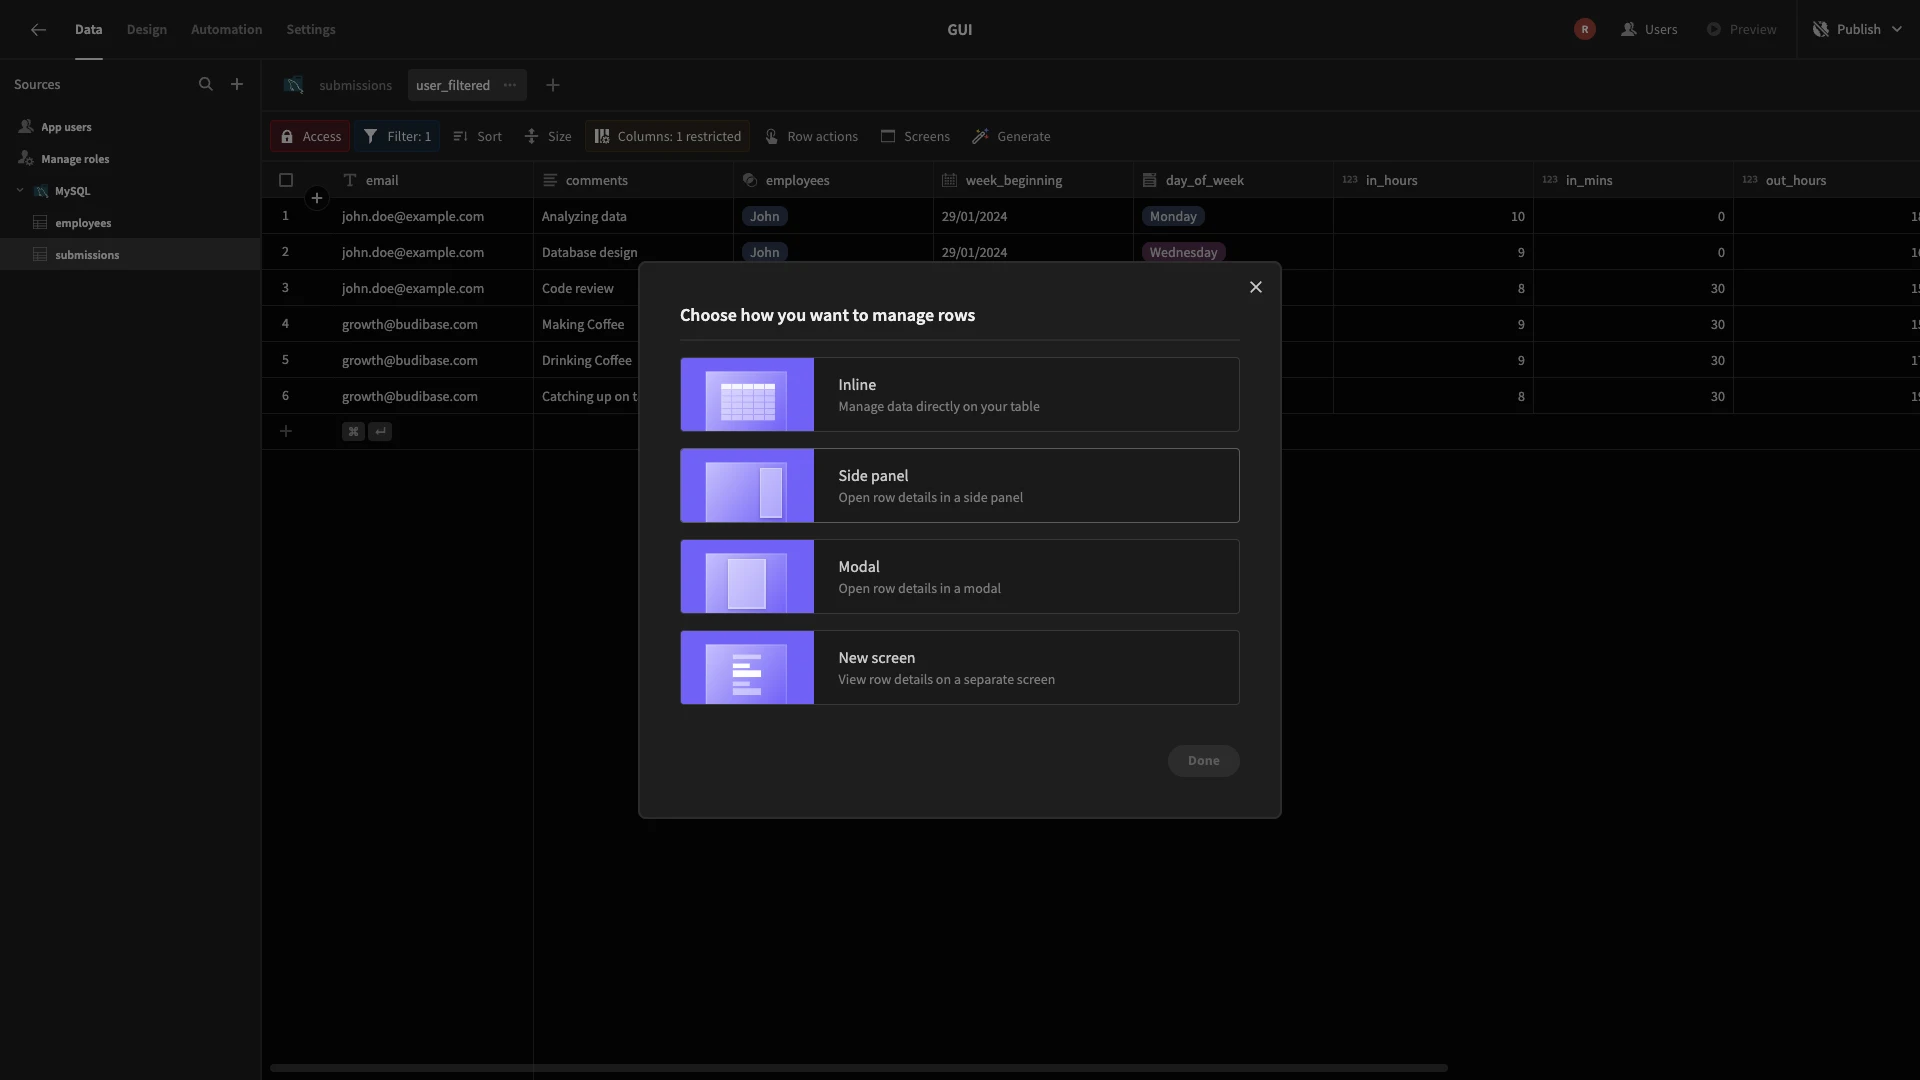
Then, we’ll be presented with a few options here. All of these are centered around a table UI, with different ways to present our create and update forms.
We’re going to use side panels.
Here’s what our screen looks like.
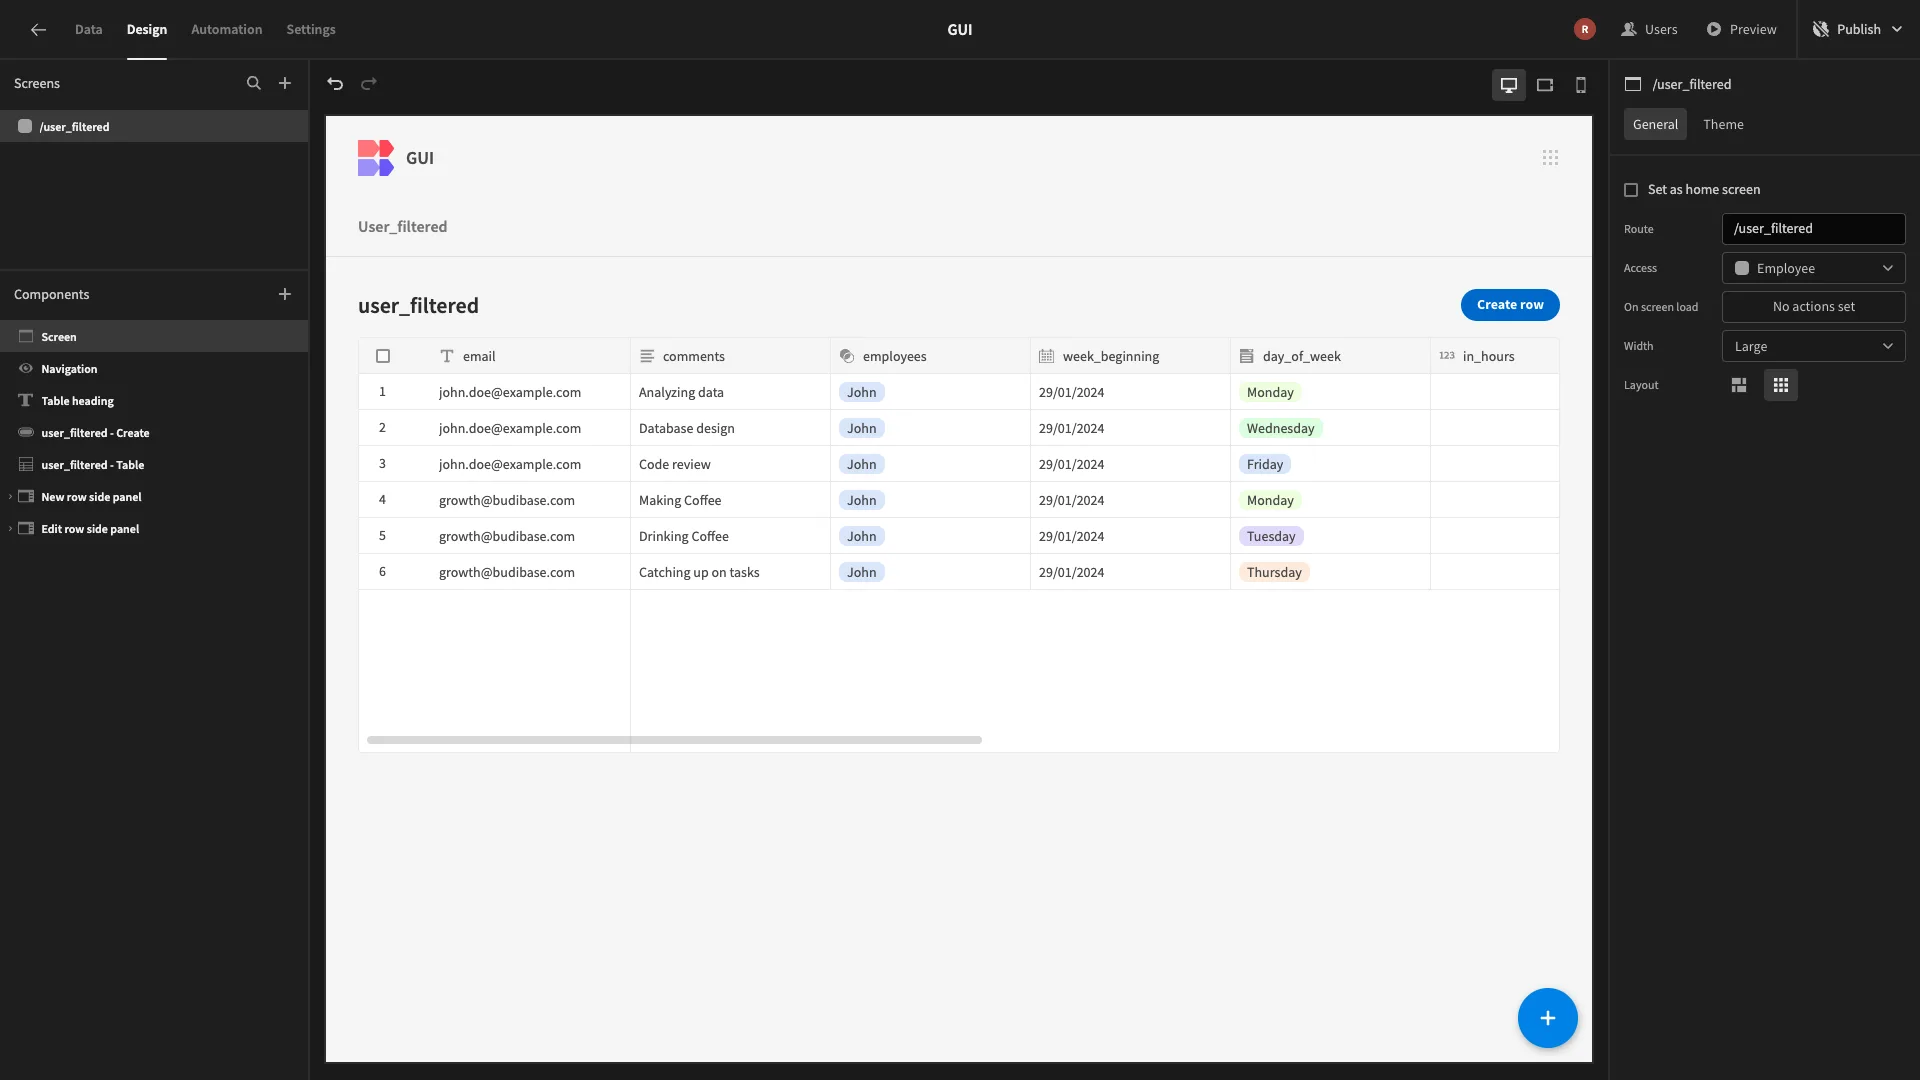
This is fully functional straight out of the box, but we’re going to make a few adjustments to better suit our purposes.
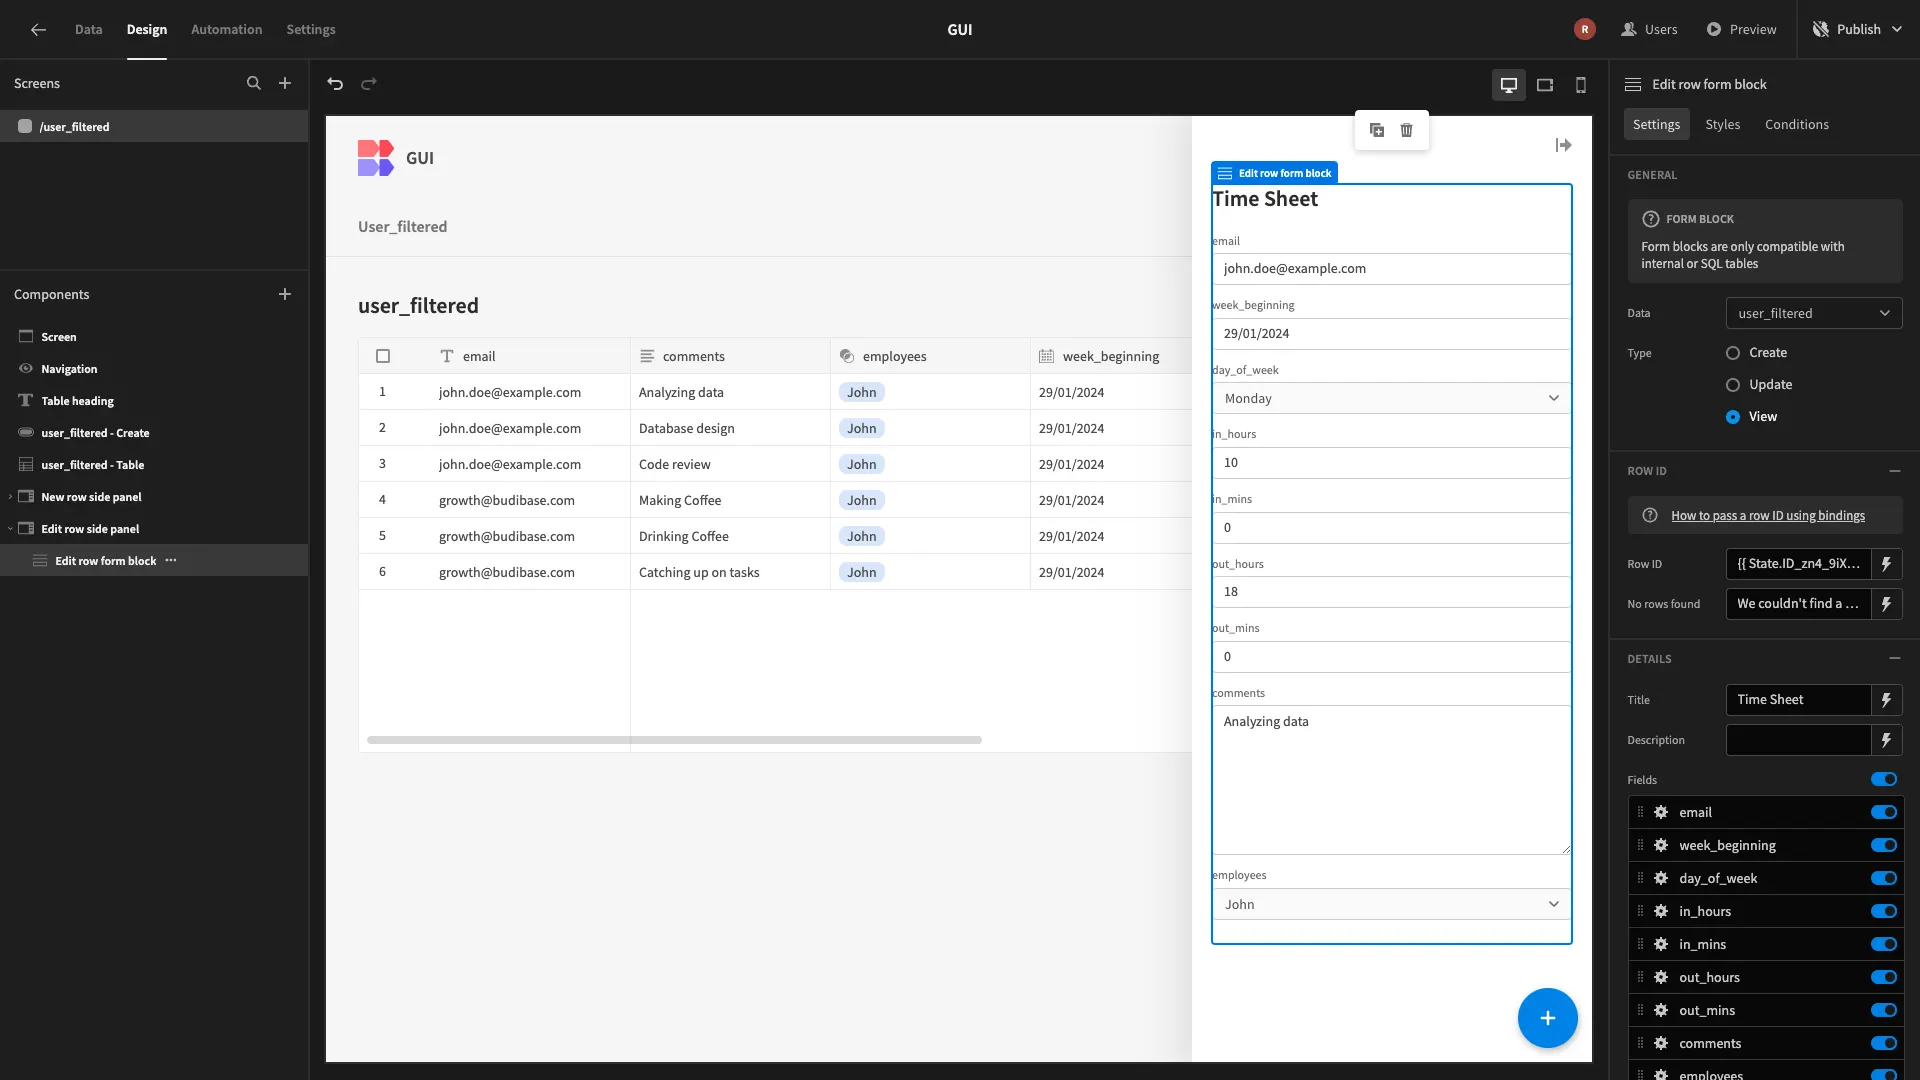
Firstly, we don’t need our users to be able to edit their submissions, so we’re going to make this form read-only by selecting the View option. We’ll also update the Title to reflect this.
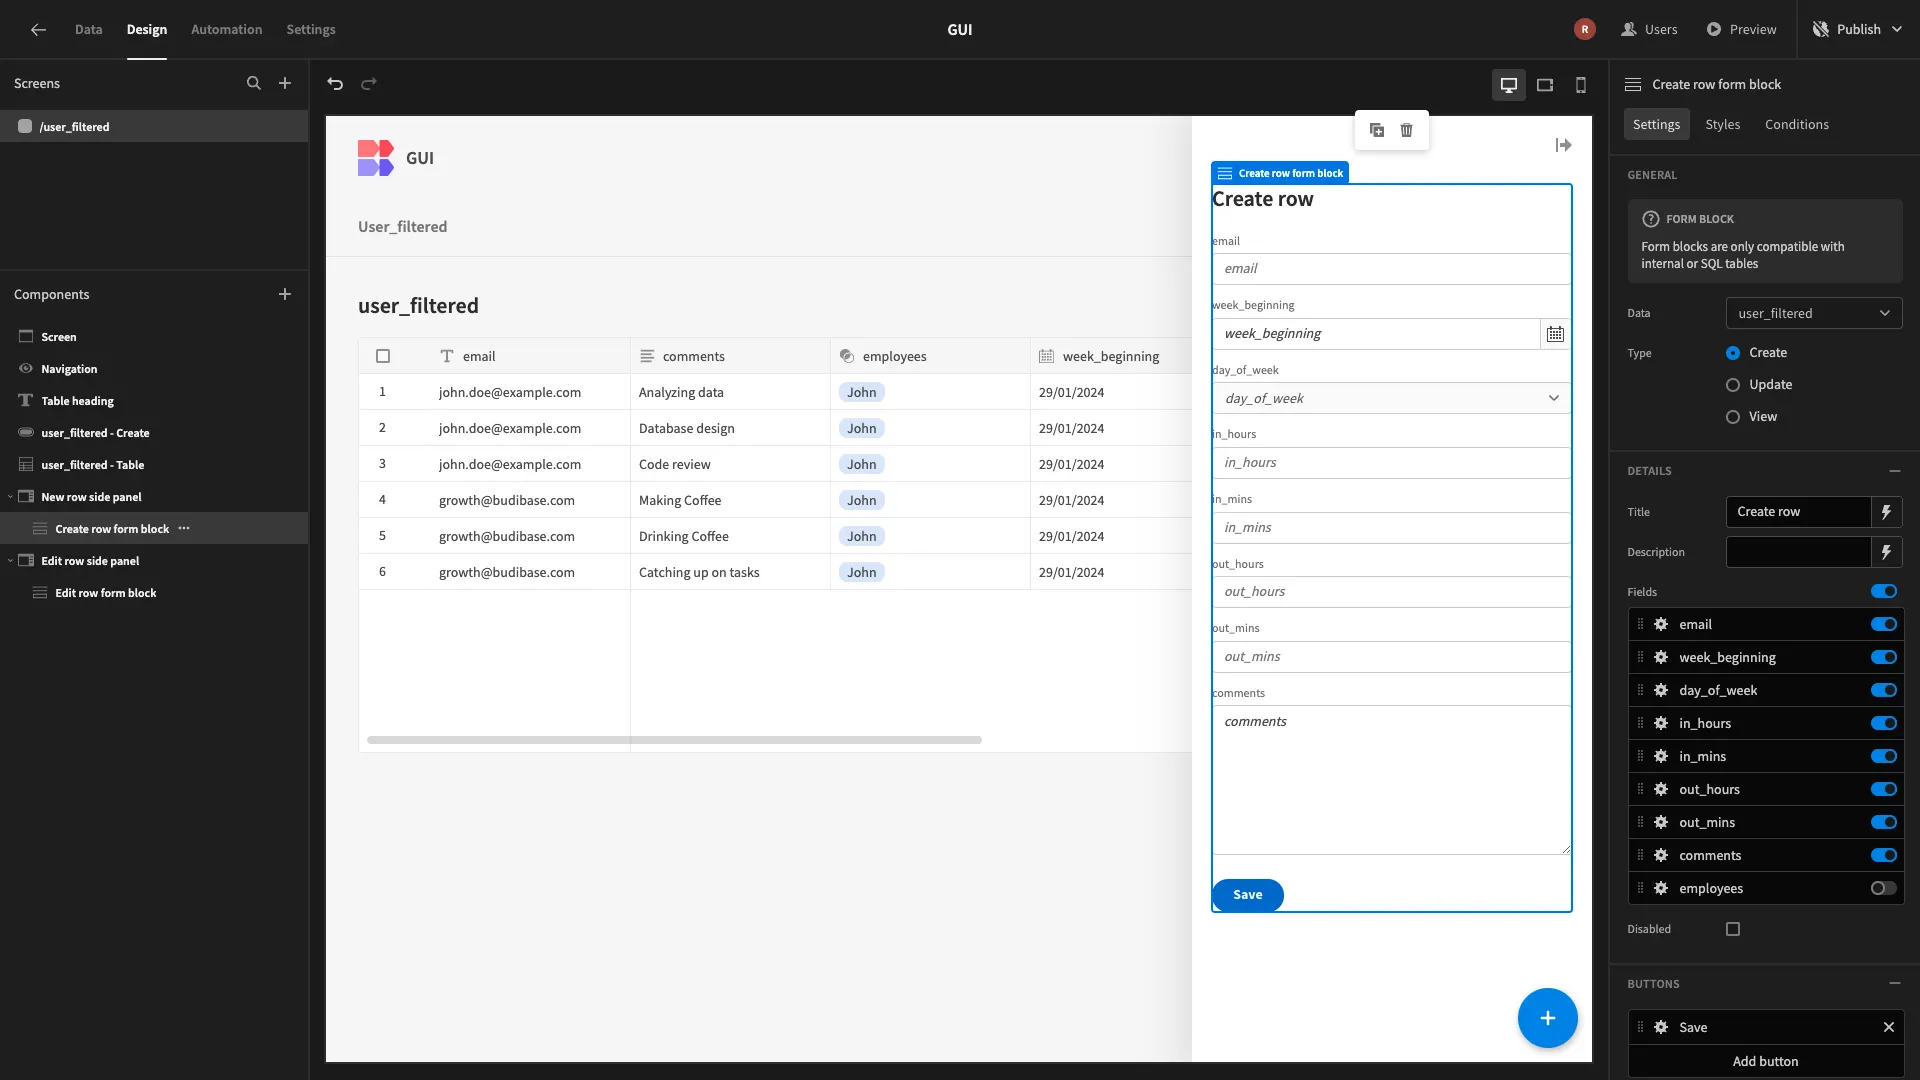
Next, when a user submits a timesheet, we want to automatically populate certain data without them having to fill them in manually.
We’ll start by deselecting the employee field in our form.
We can do this within the Actions drawer for our Save button under the Save Row action. Here, we have the option to add values to our saved row that are populated any time we hit the Save button.
We’ll start by adding employee_id.
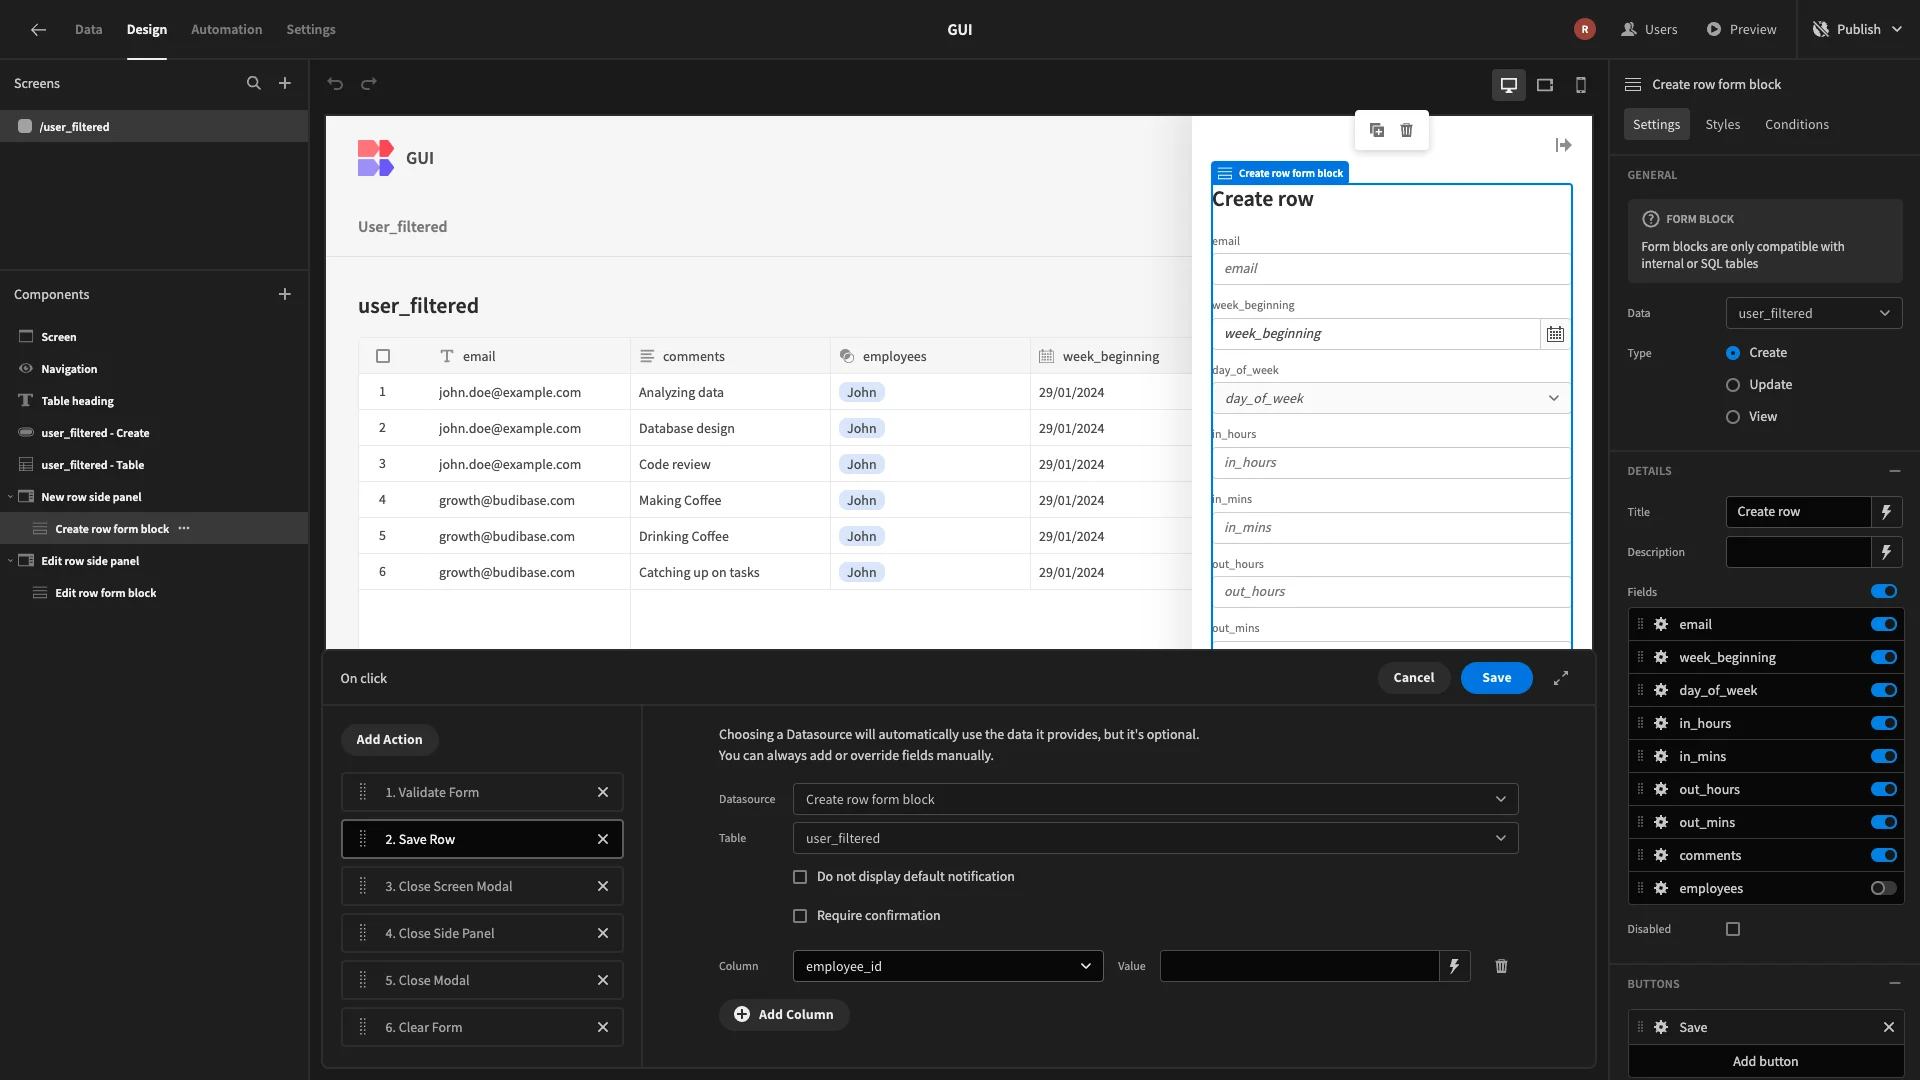
However, our form isn’t currently exposed to the information we need to populate a value for our employee_id field. This should correspond to the ID of the row in the employees table that the current user is linked to.
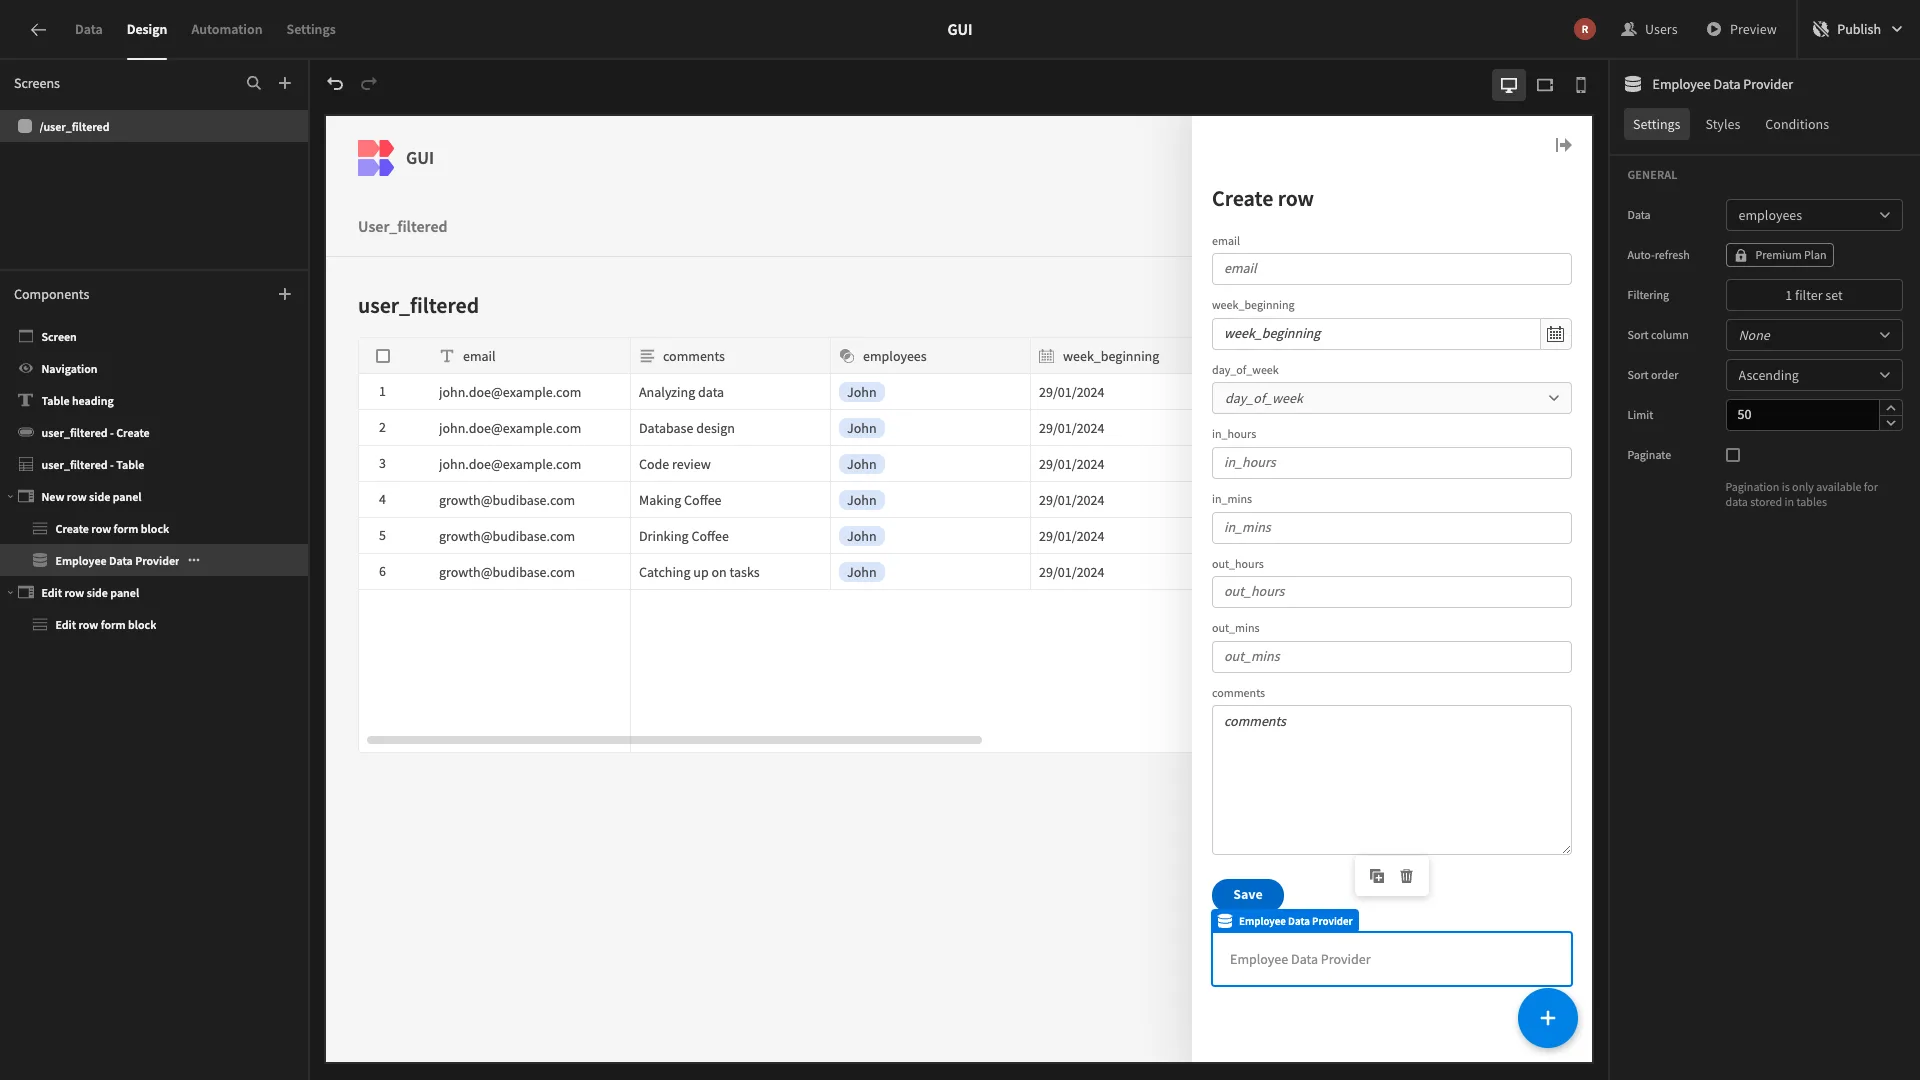
To access this, we’ll need to add a Data Provider component to our app screen. We’ll set the data field for this to our employees table.
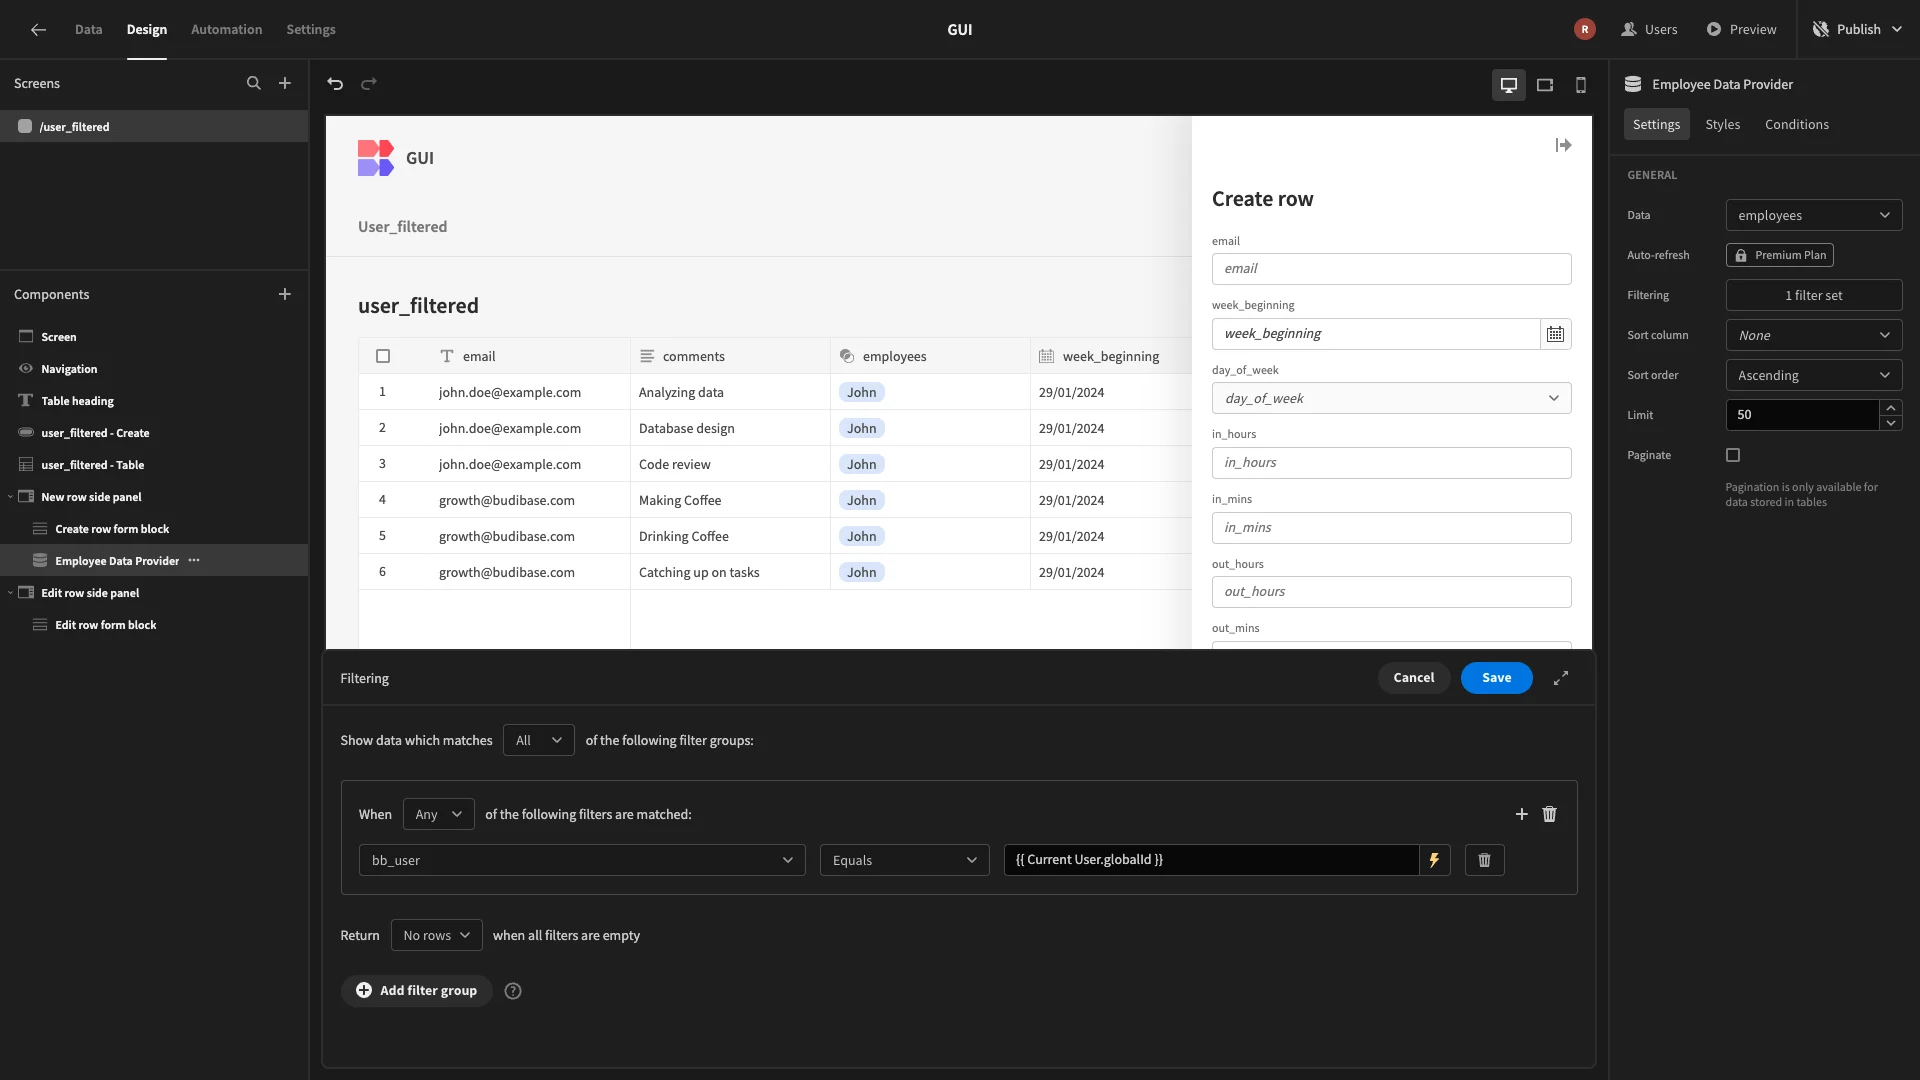
Then, we’ll give it a filtering expression so that it only returns the employees row that’s linked to the current user, where bb_user is equal to {{ Current User.globalId }}.
Now, back under our Save Row button, we can access this with the binding {{ Employee Data Provider.Rows.0.id }}.
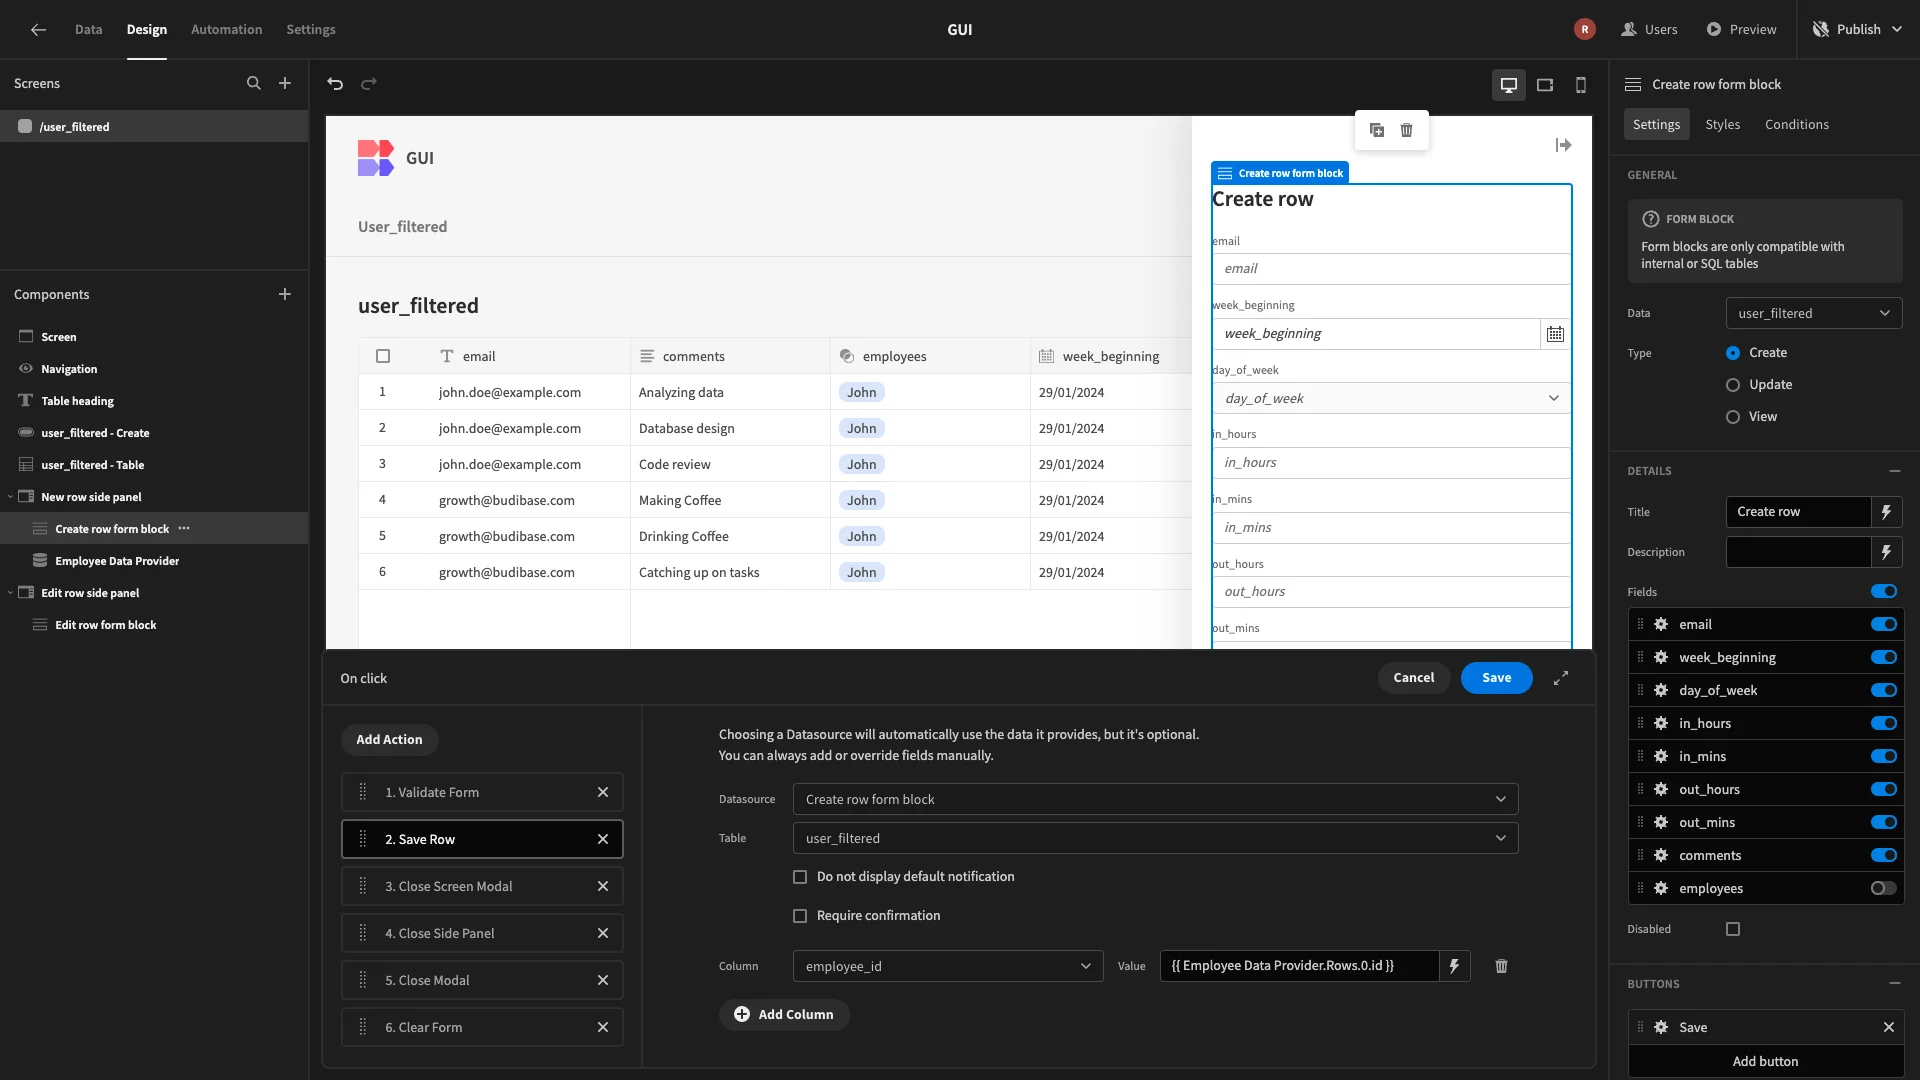
We can then try and save a row to test this out. And that’s it for now. We’ll make a few design tweaks to our UI a little later, but in the meantime, let’s move on to our other method for creating a SQL GUI.
3. Building our query editor
Almost all GUIs also enable users to write and send custom queries from an interface.
As we said earlier, the second capability we’re going to build will enable users with a higher level of access to write, test, and save custom queries to our database.
Adding a prepared statement
Depending on which type of SQL database we’re using, the next couple of steps will be a little bit different.
For example, in some databases, we can handle dynamic SQL by wrapping them in an EXECUTE IMMEDIATE statement. However, MySQL doesn’t support this.
So, in order to send dynamic queries from our app front-end, we’ll need to create and execute a prepared statement to replicate EXECUTE IMMEDIATE.
However, it’s important to note that this approach comes along with security implications relating to SQL injection. Because of this, we’re using a prepared statement that only allows users to send single SELECT queries, disallowing more dangerous keywords.
For example, this could be used by our data team to return simple insights from our database, or we could use this to test queries on a dummy database.
If you want to do something similar, you’ll need to determine appropriate security measures for your needs. Generally though, this approach could be viable for testing data, but wouldn’t be suitable for production databases.
Alternatively, you could rely on the existing, already secure query testing and saving tools in Budibase’s Data section for more complex use cases.
The prepared statement we’re relying on is:
1CREATE PROCEDURE execute_immediate(IN query TEXT)
2
3BEGIN
4
5 -- Trim any trailing semicolon
6
7 SET query = TRIM(TRAILING ';' FROM query);
8
9 -- Check if the query contains only a single SELECT statement (case-insensitive)
10
11 IF UPPER(LEFT(query, 6)) = 'SELECT'
12
13 AND INSTR(UPPER(query), 'INSERT') = 0
14
15 AND INSTR(UPPER(query), 'UPDATE') = 0
16
17 AND INSTR(UPPER(query), 'DELETE') = 0
18
19 AND INSTR(UPPER(query), 'DROP') = 0
20
21 AND INSTR(UPPER(query), 'ALTER') = 0
22
23 AND INSTR(UPPER(query), 'CREATE') = 0
24
25 THEN
26
27 -- Execute the query if it's a valid SELECT statement
28
29 SET @sql = query;
30
31 PREPARE stmt FROM @sql;
32
33 EXECUTE stmt;
34
35 DEALLOCATE PREPARE stmt;
36
37 ELSE
38
39 -- Raise an error if the query is not a valid SELECT-only statement
40
41 SIGNAL SQLSTATE '45000'
42
43 SET MESSAGE_TEXT = 'Only SELECT statements are allowed.';
44
45 END IF;
46
47END;We can create this by sending it under the Query tab of our MySQL connection in Budibase’s data section. We can also save this for future reference if we like.
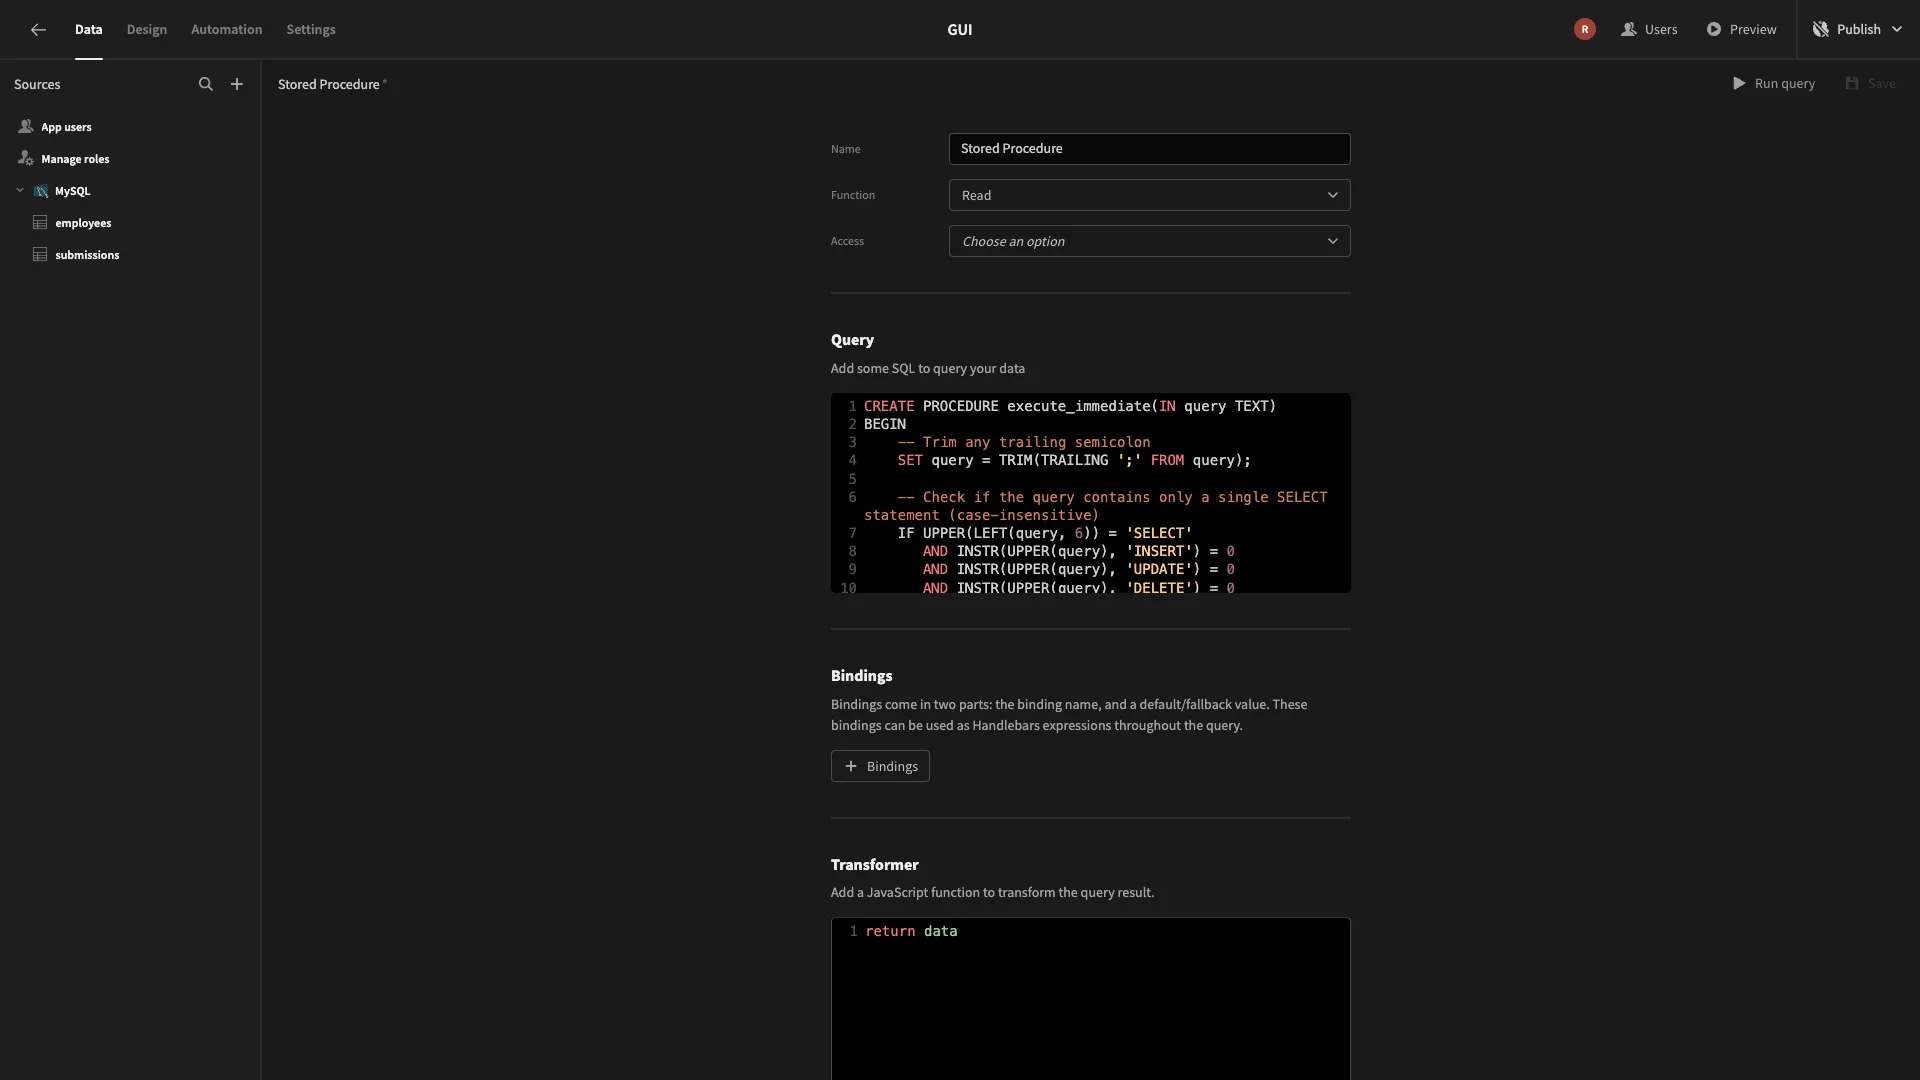
Create a custom query
Next, we need to create a custom query that will execute our prepared statement, passing a user-defined input to it as an argument.
We’ll start by creating a query called Execute Immediate, setting its function to Read and access to Query Editor. We’re also setting the Access to App Admin, so only users with permissions to manage our Budibase app can send this.
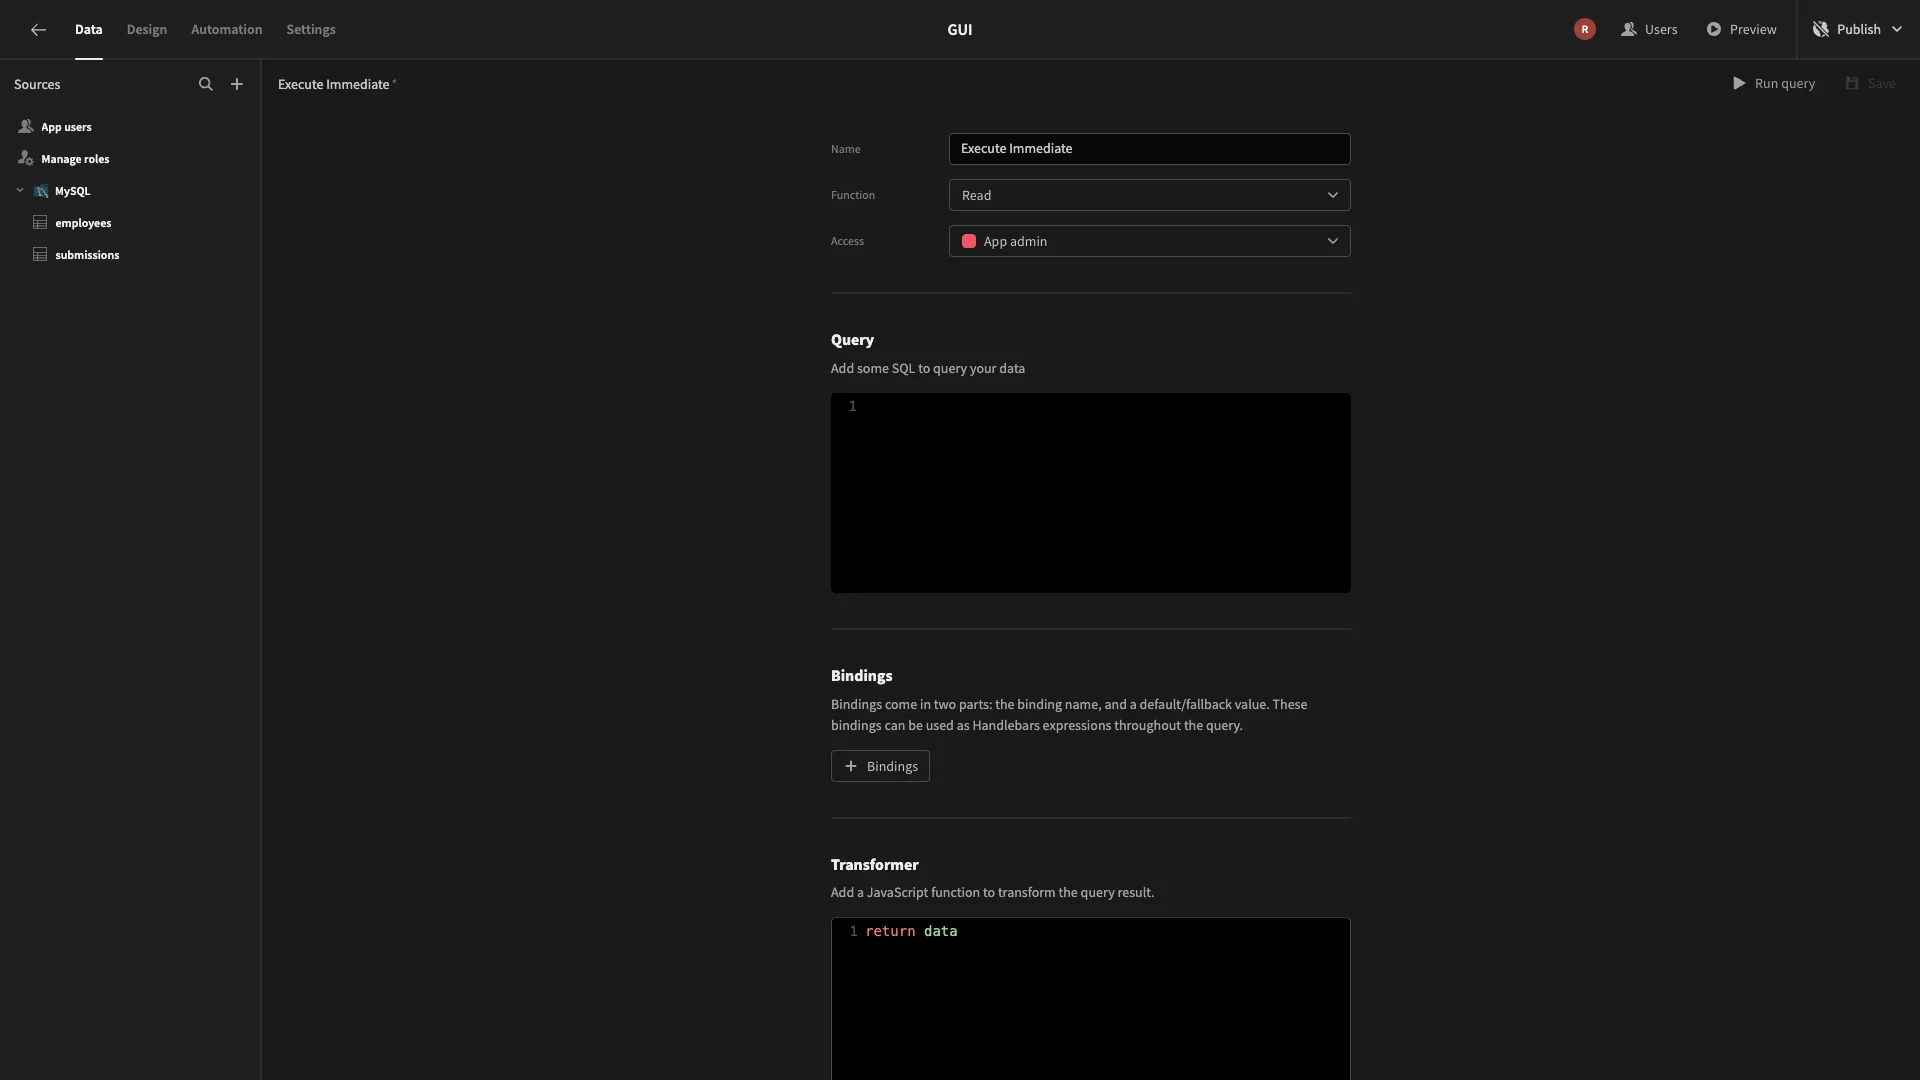
We’ll then need to configure this to accept a user input. To do this, we’ll add a binding and call it query. We can set a default value for testing purposes. We’ll use:
1SELECT * FROM employees;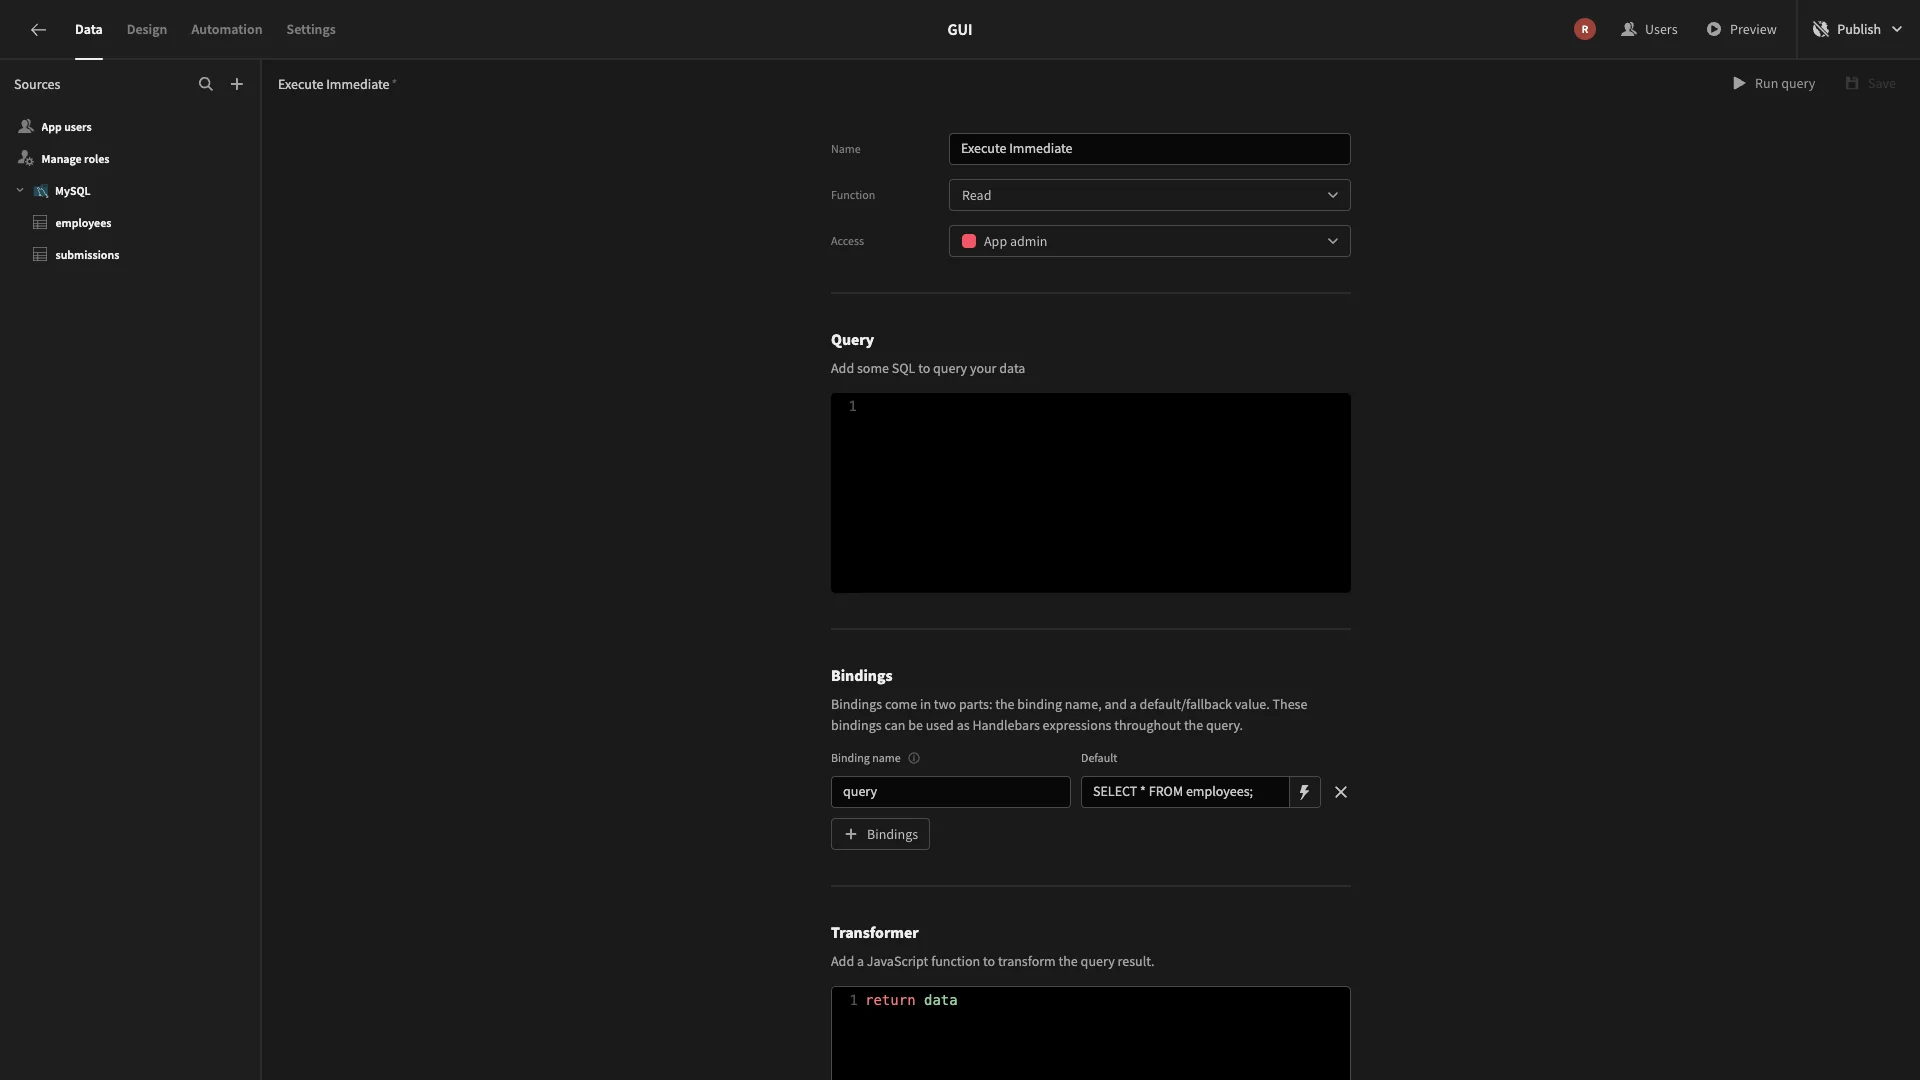
Then, we’ll call our stored procedure with this binding, using:
1CALL execute_immediate( {{ query }} );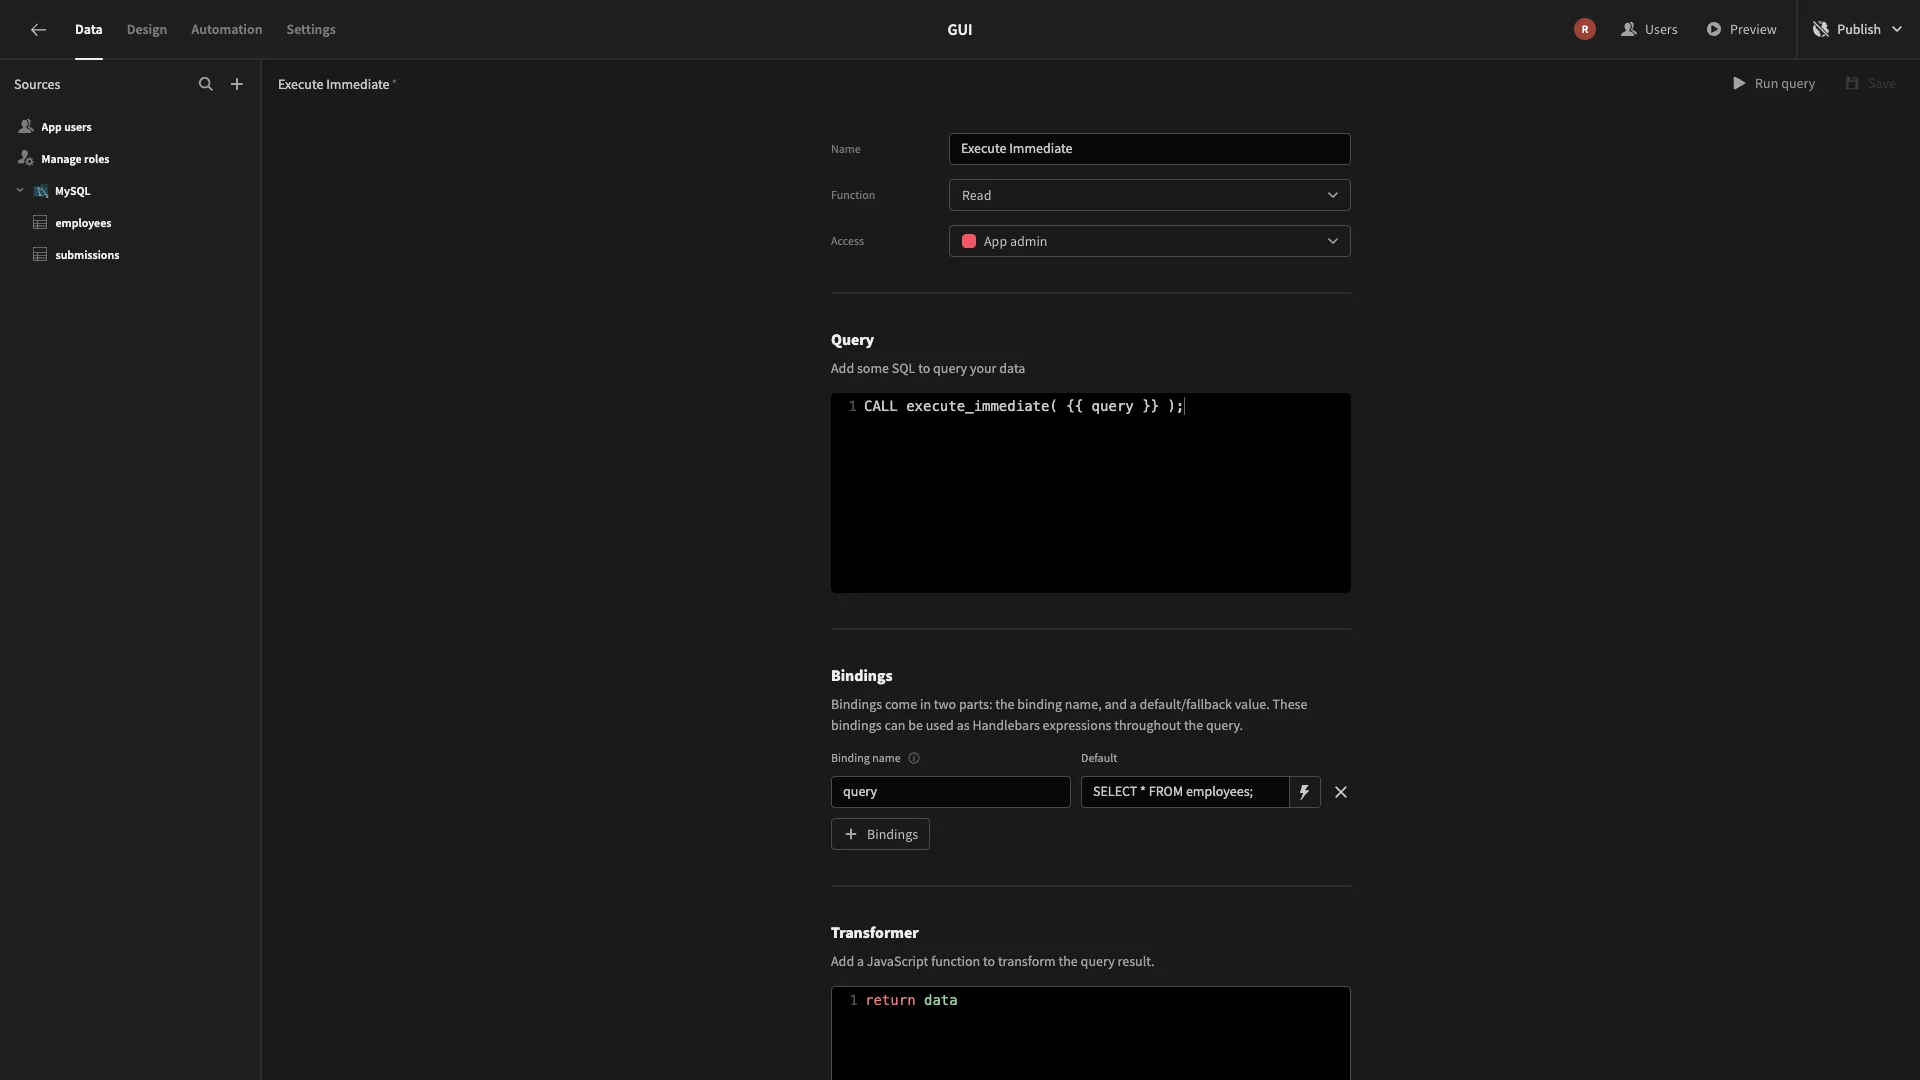
We can then run this.
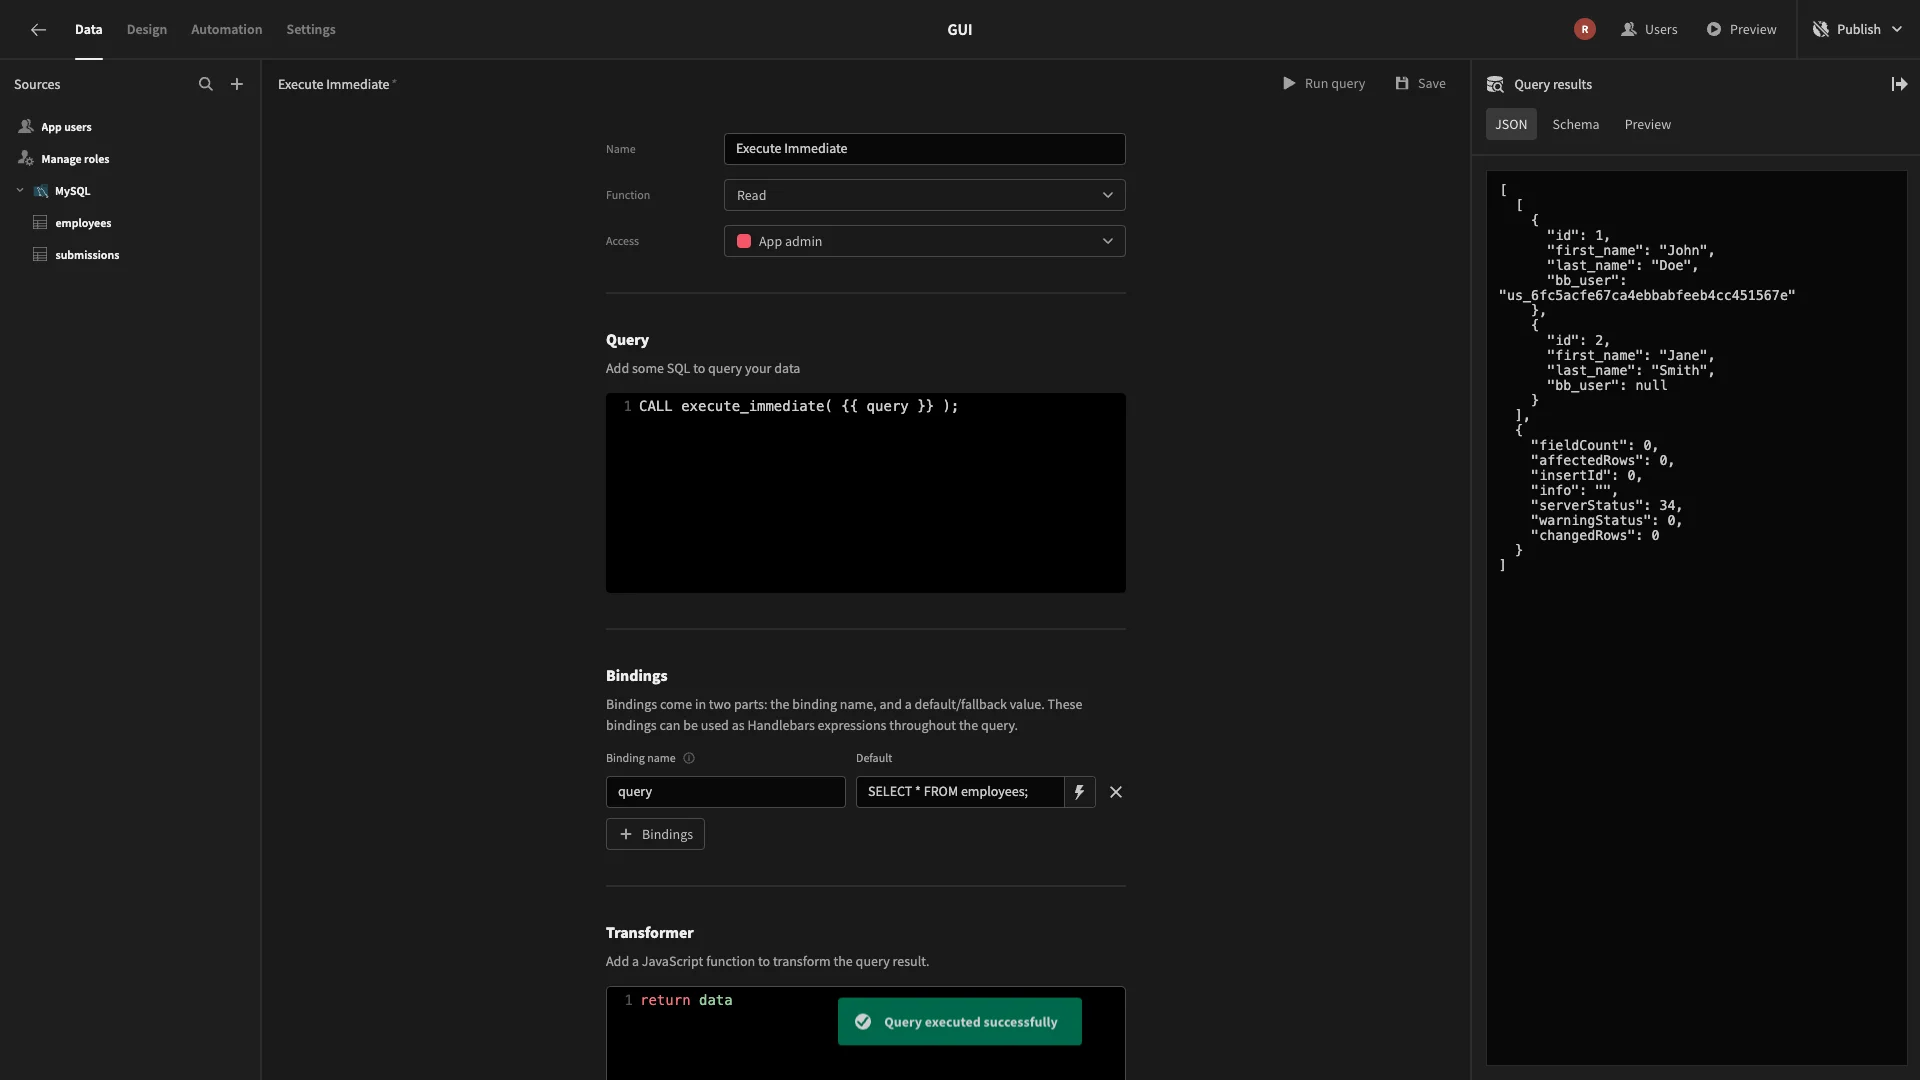
This returns more data than we need. We only want the first part of the response, with the actual returned values from the query. So, we’ll add the following JavaScript transformer.
1return data[0];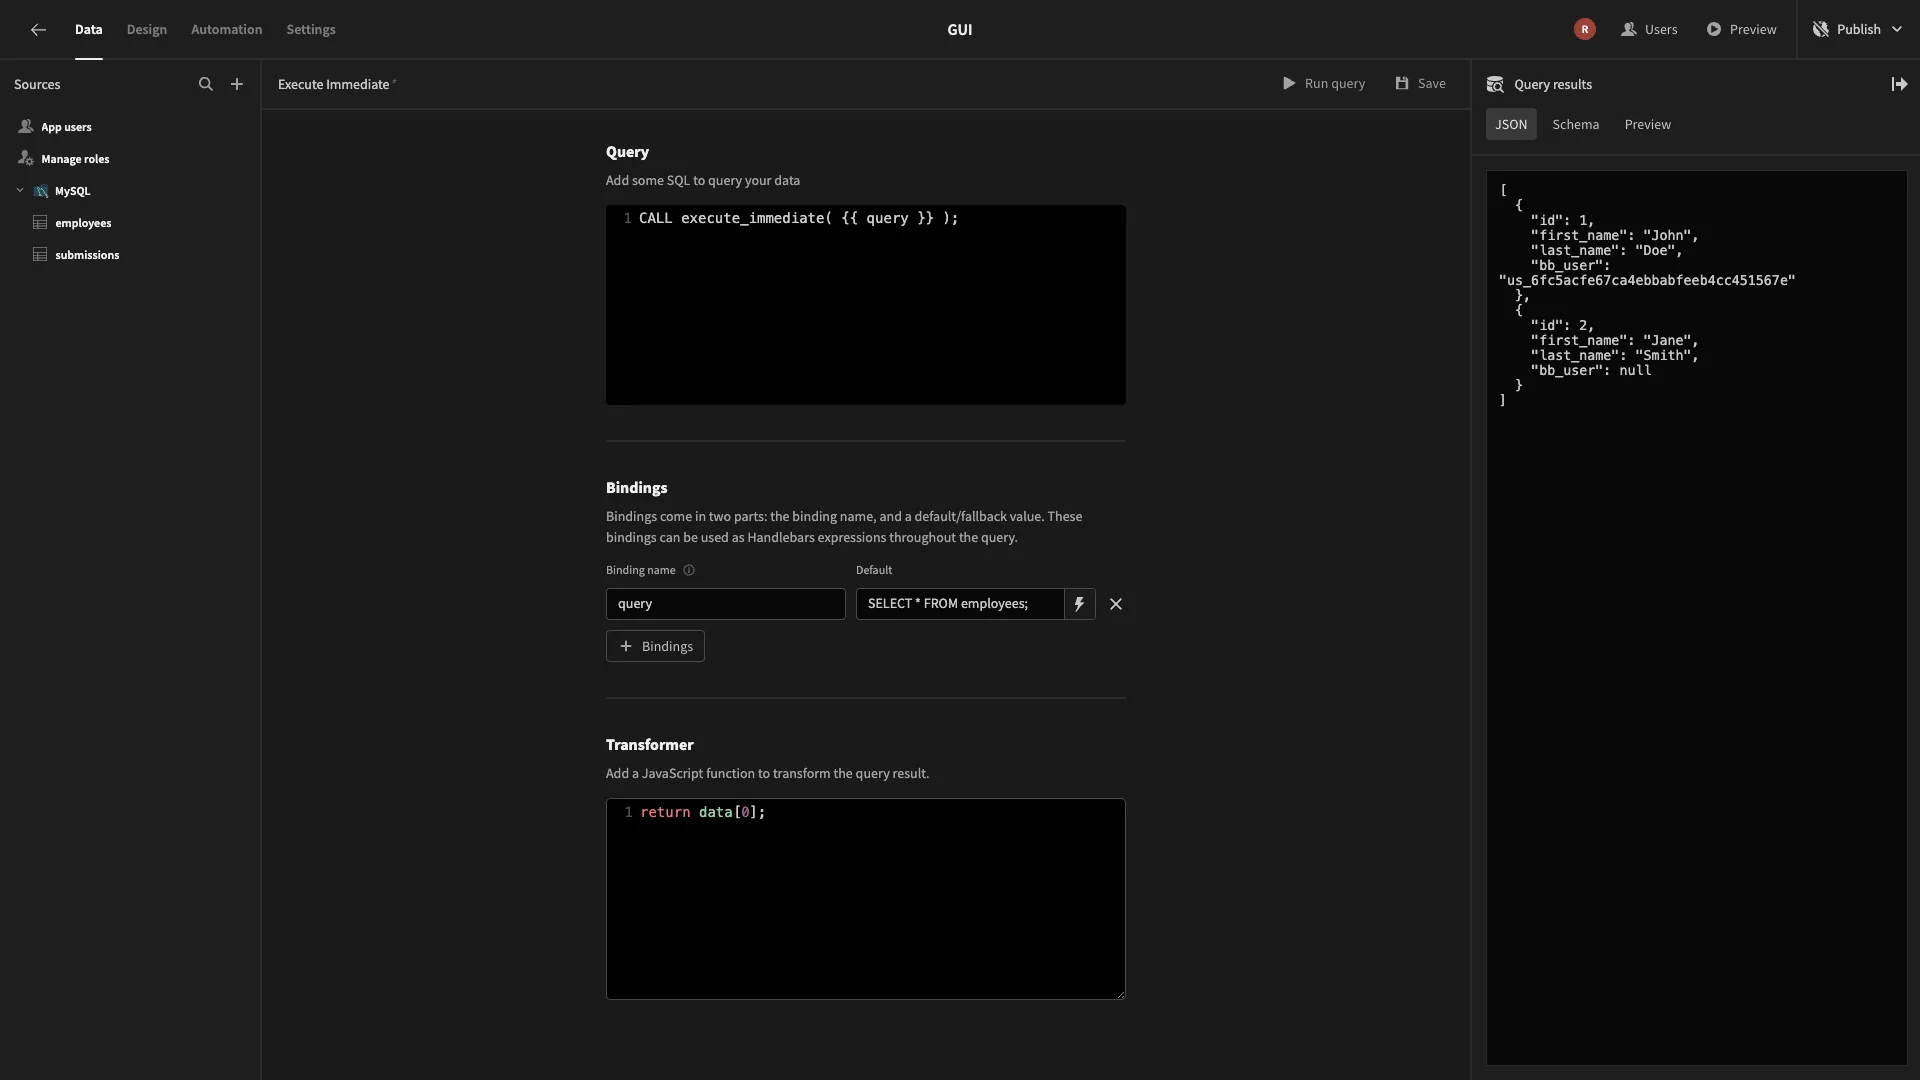
When we’re happy, we can hit save.
Add internal tables
The core functionality of our GUI will be to enable users to write and save queries from the app UI, as well as creating a record of queries that have previously been executed.
To achieve this, we’re going to create two tables in Budibase’s internal database. One will be used to handle saved queries, and the other will record our GUI’s history. Both of these will have their Access set to App Admin.
We’ll start hitting the plus icon to add a new data source, this time selecting the option for an internal table.
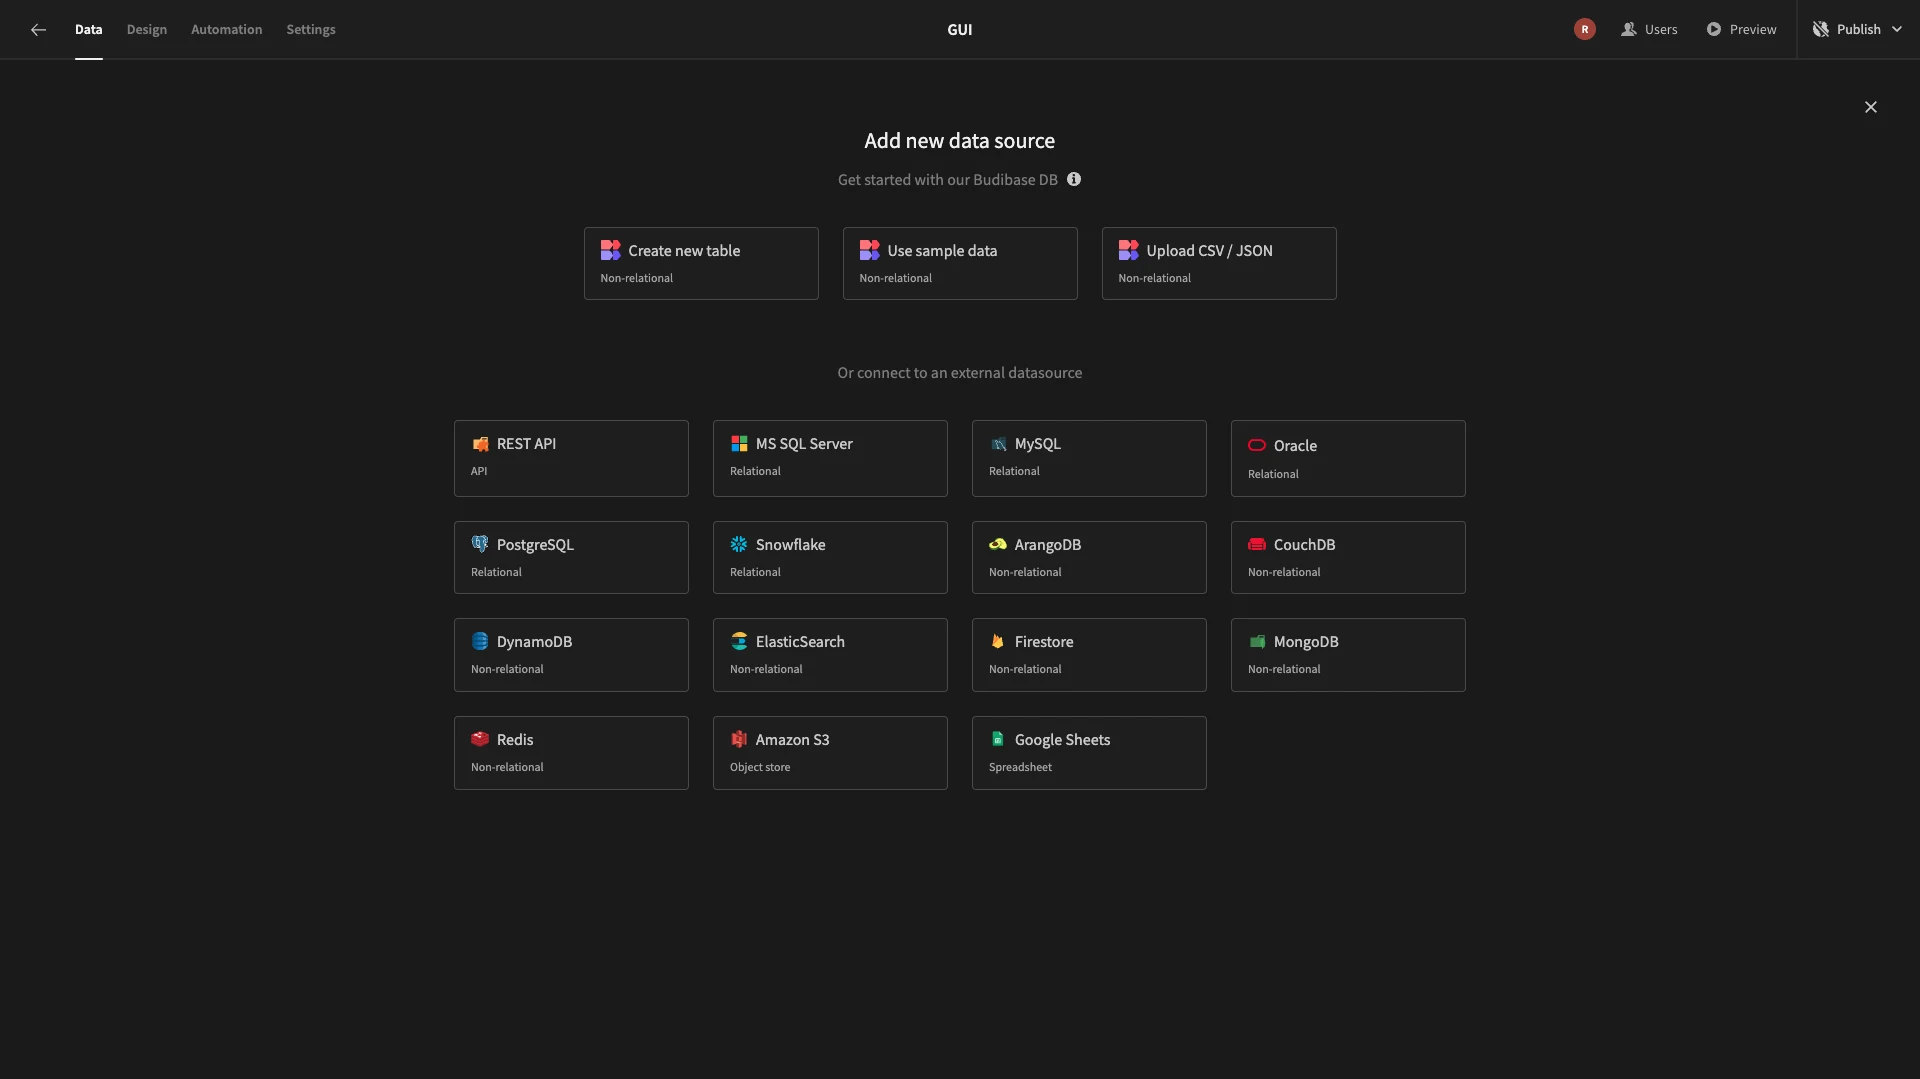
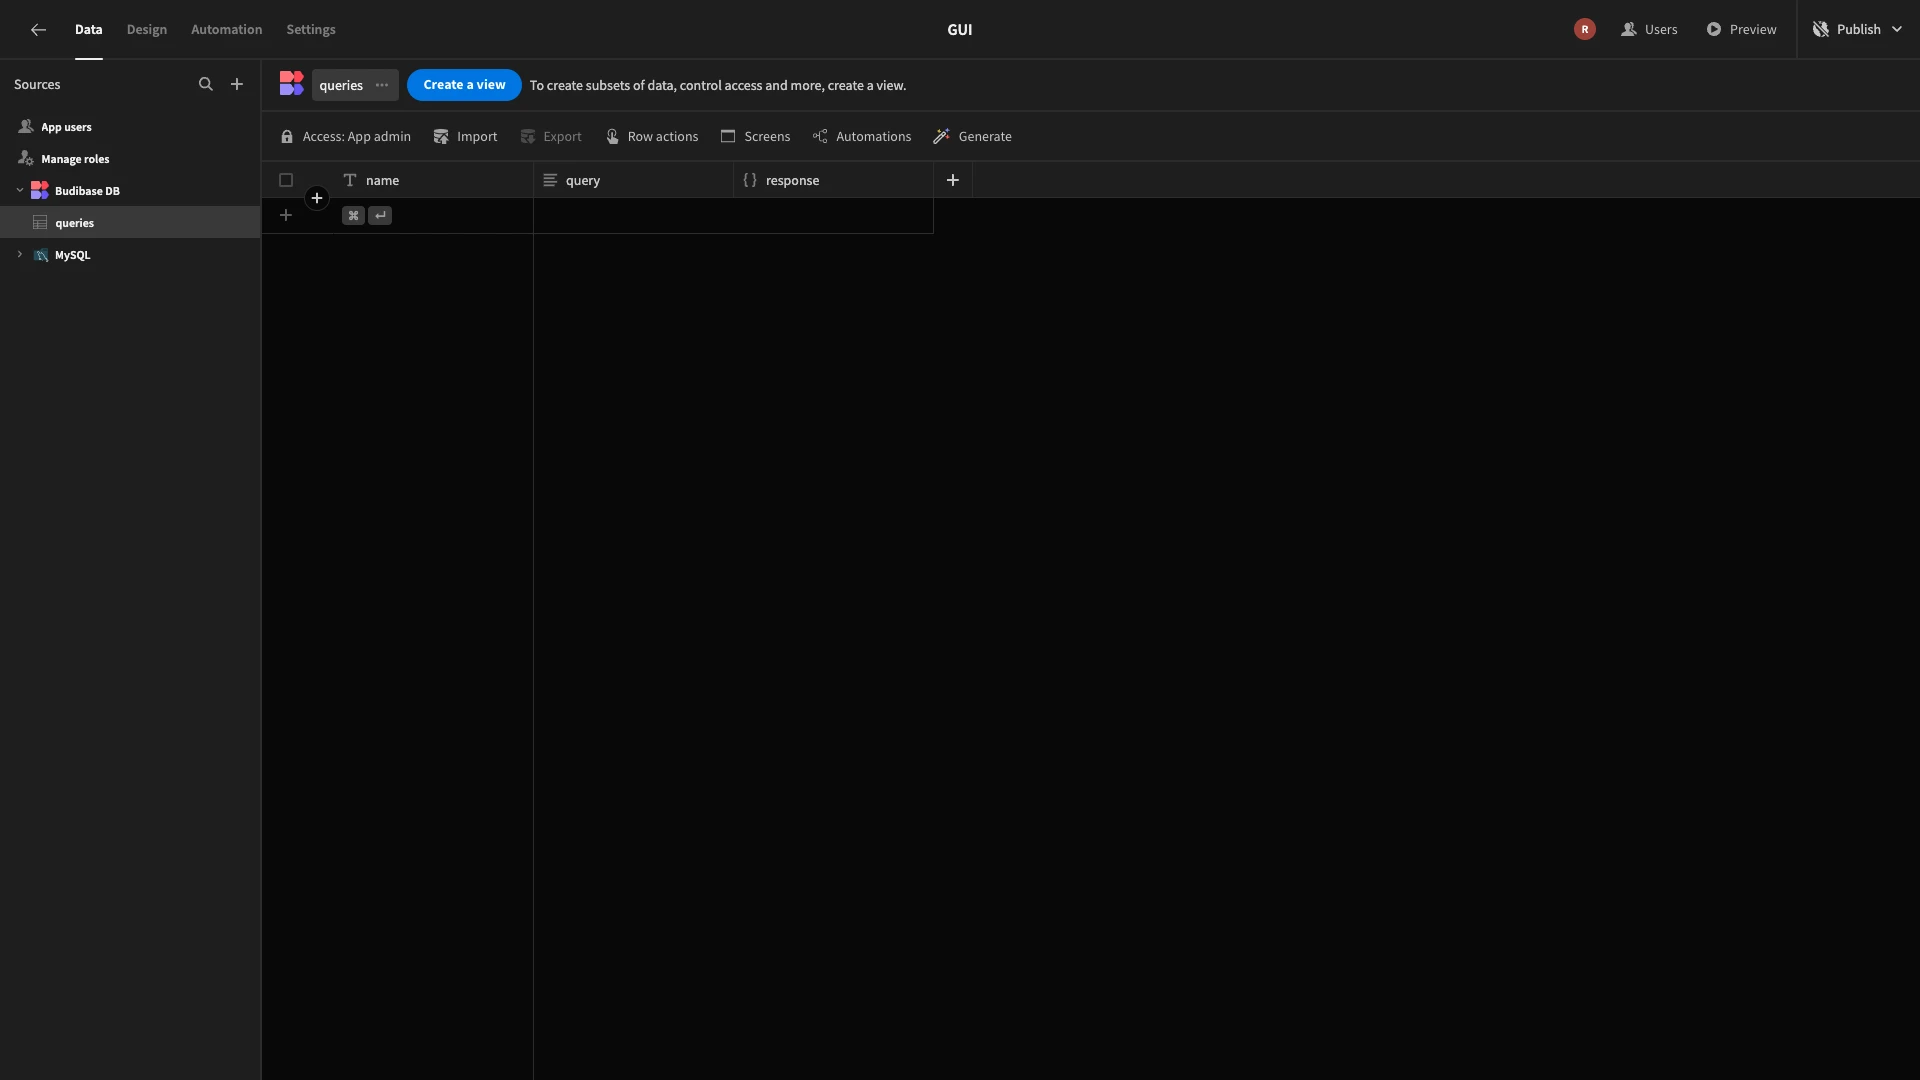
First, we’ll add a table called queries. This will store the queries that our users save. We’re going to add three columns with the following names and data types:
- name - Text,
- query - Long-Form Text,
- response - JSON.
Here’s how this should look.
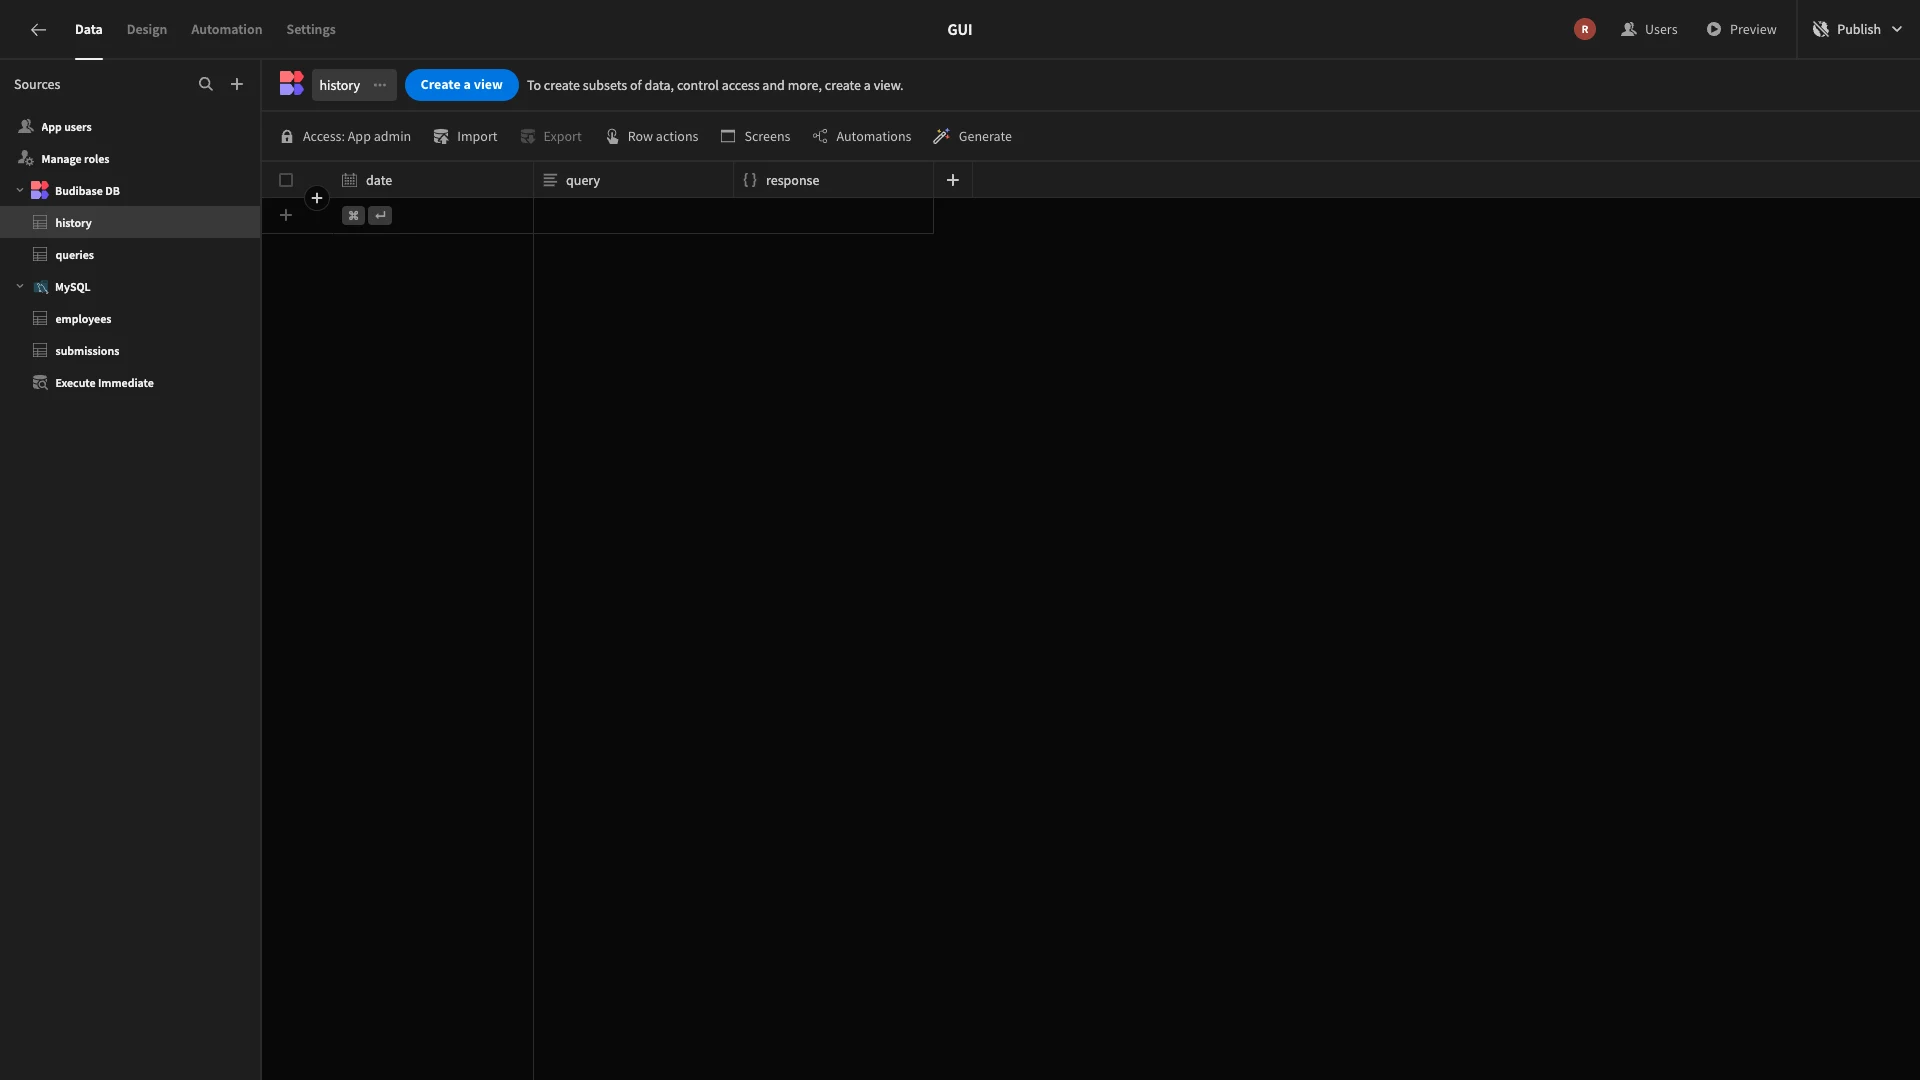
We’ll then repeat this process to create a second table called history, including setting the same access rules.
This time, our columns are:
- date - Date,
- query - Long-Form Text,
- response - JSON.
Generate CRUD UIs
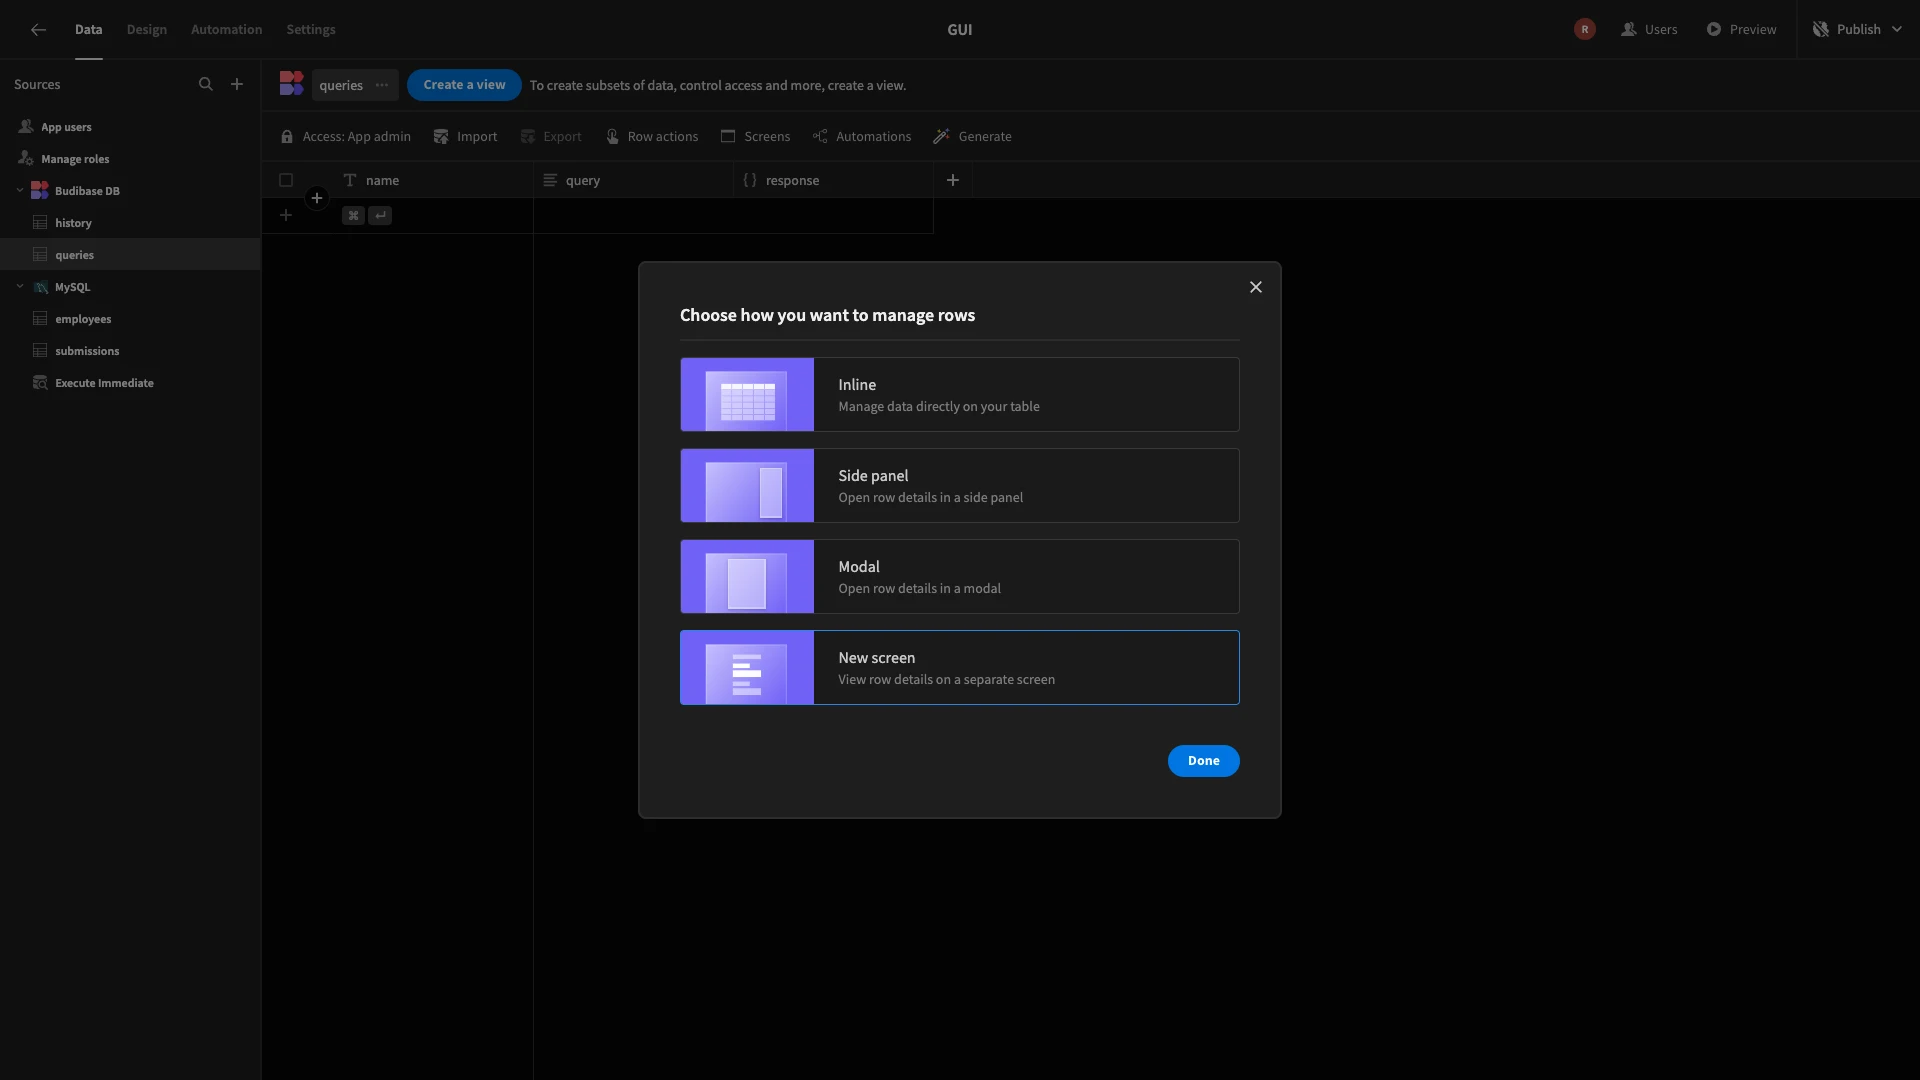
Now, we can start building our query editor. Like before, we’re going to begin by autogenerating Table screens, this time, for the queries table. However, this time, we’re choosing the option for host our Create and Edit forms on separate screens.
Our query editor is going to be based around the Create form that’s output. Here’s what this looks like out of the box.
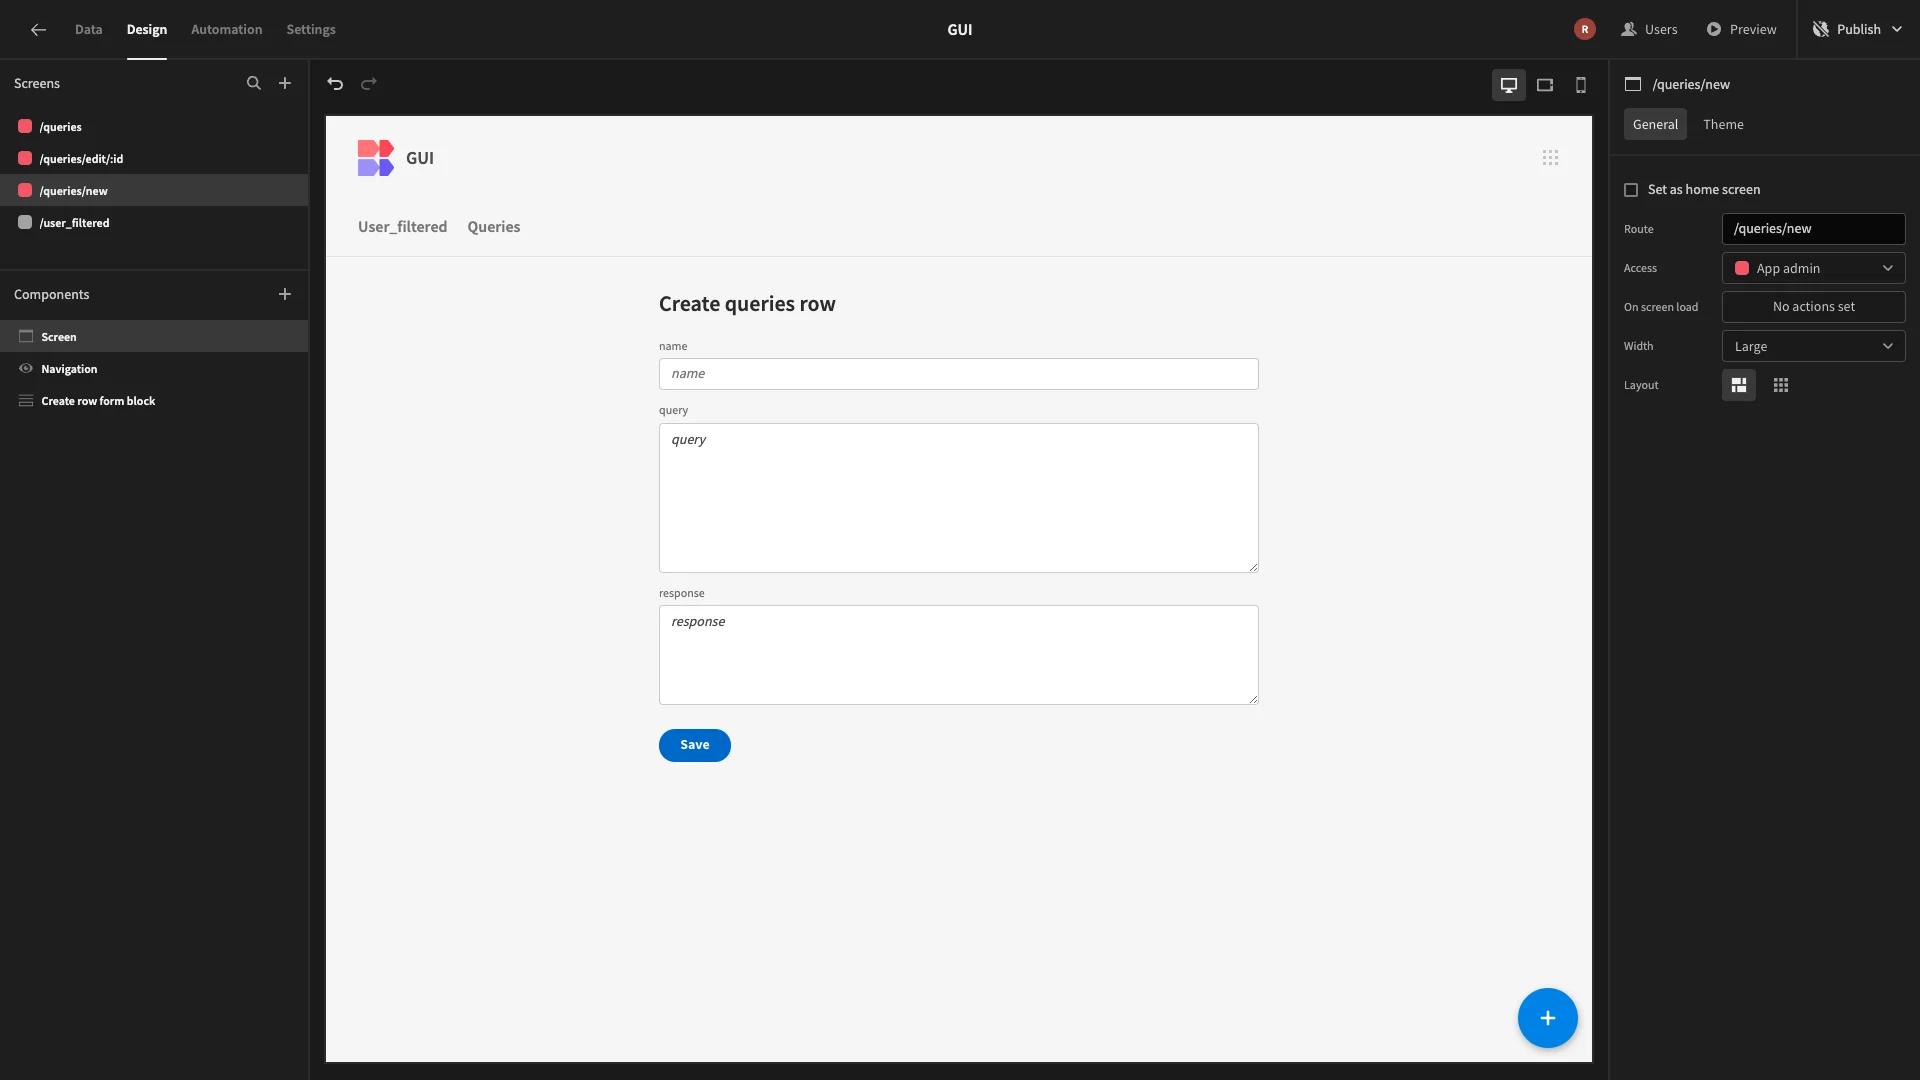
We’re going to make some important changes to this so that users can write and send queries, view the response, and, if they wish, save them.
The first thing we’ll do is deselect the response field, as we don’t want to accept user inputs for this.
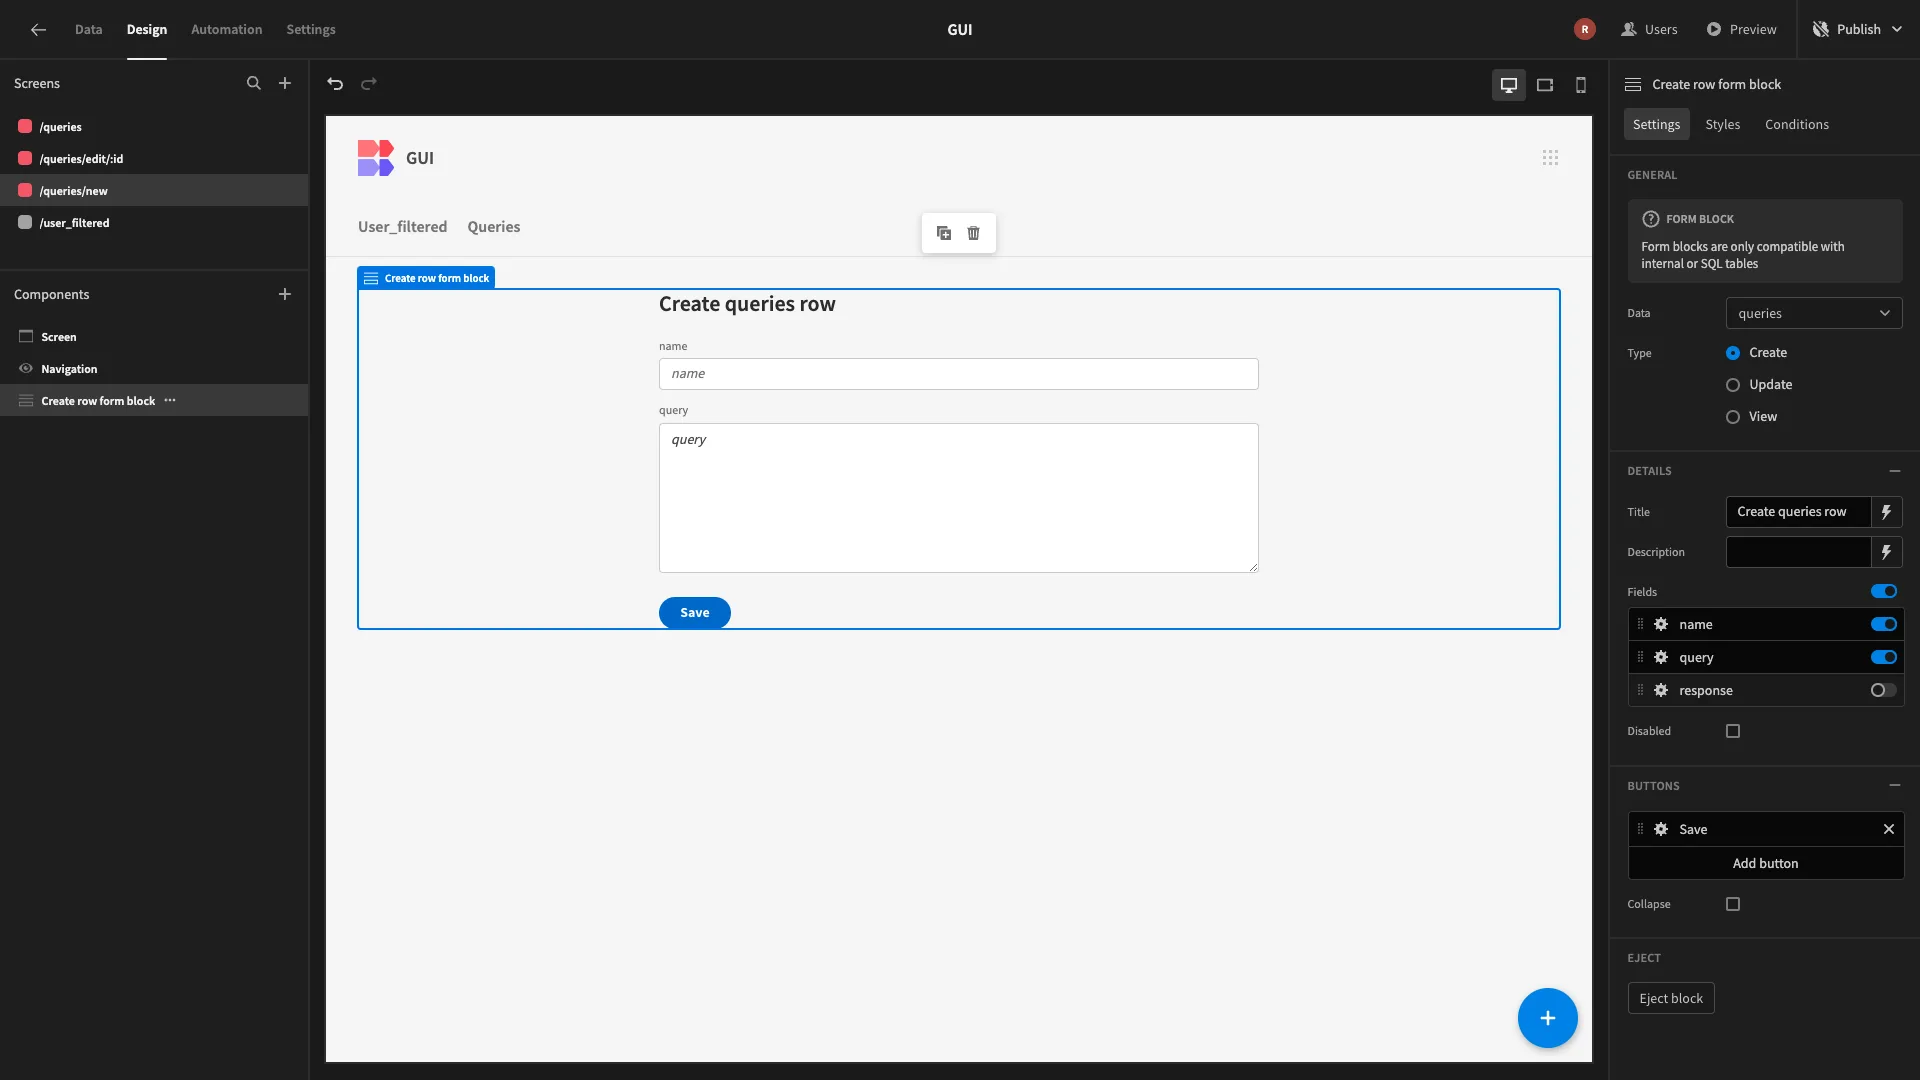
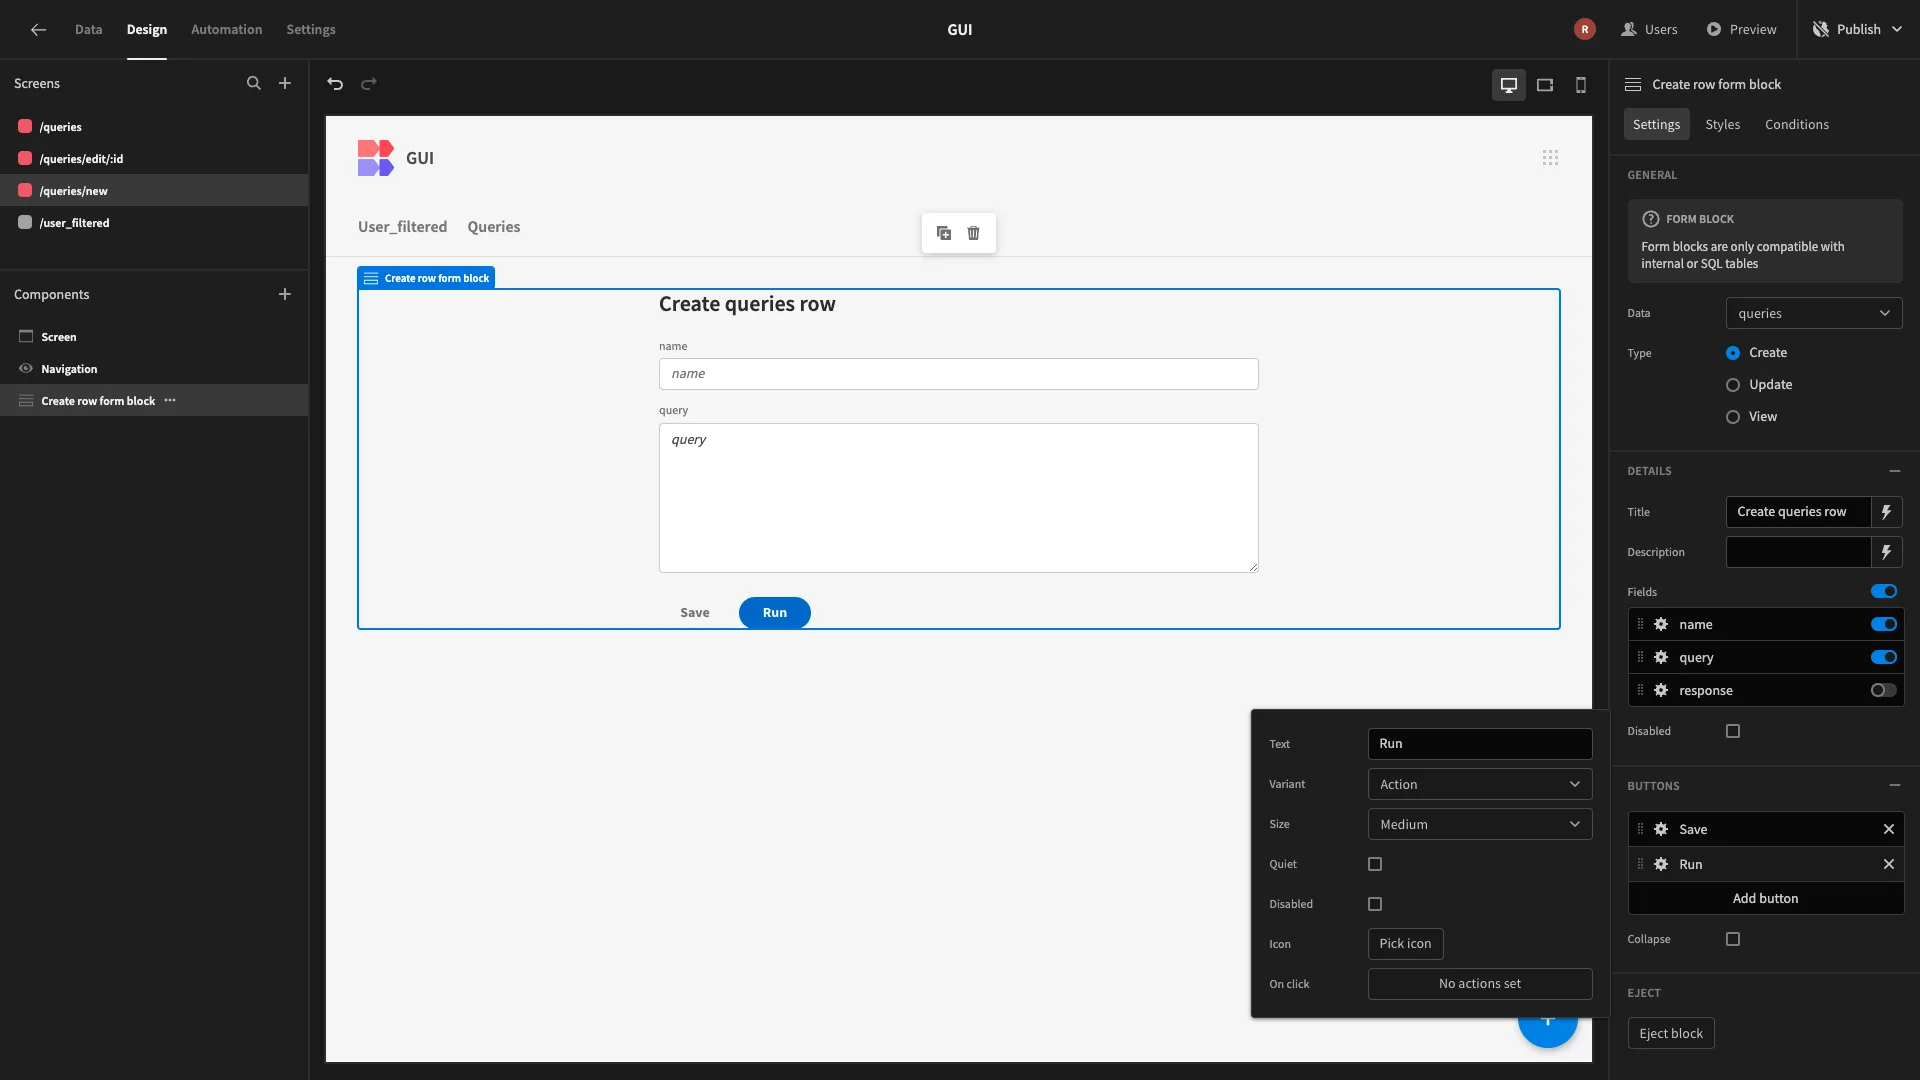
Currently, our form has a single button - Save. We’re going to change the Style of this to Secondary and then add a second button next to it. We’ll set the Style of this to Action and the Text to Run.
Sending queries from the app UI
To enable users to send the query they’ve written, we’ll use Actions menu for our new button.
The first action we’ll add here is called Execute Query. We’re going to point this at our Execute Immediately query that we created at the beginning of this section.
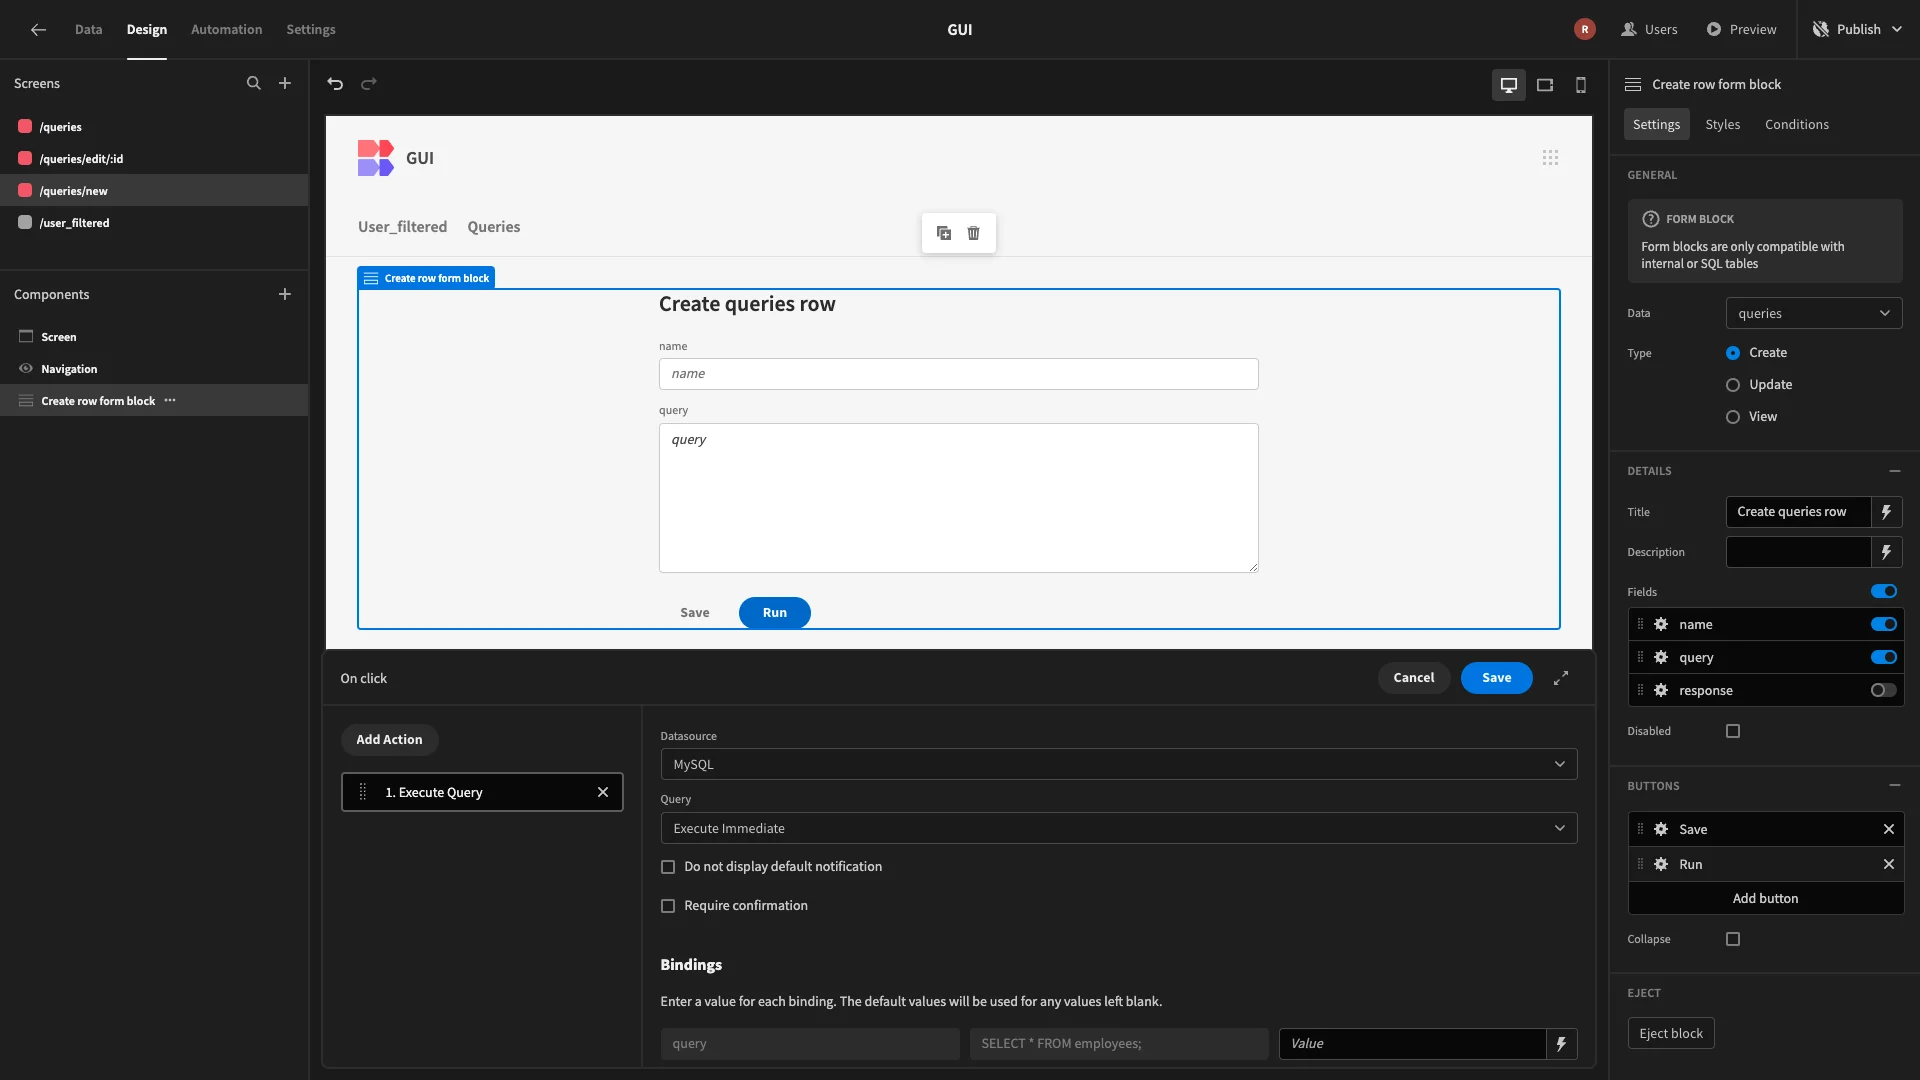
Here, we can populate our query binding that we created in the Data section. We could use {{ Create row form block.queries.query }} to insert the user input exactly as it’s been provided. However, this wouldn’t be ideal from a UX perspective.
More specifically, users will probably want to place more complex statements across multiple lines. For example, if they’re using a WHERE clause in their SELECT statement. This means errors could occur with whitespace.
To enable this, we’ll use a little bit of custom JavaScript. Start by opening the bindings menu and then selecting the JavaScript tab.
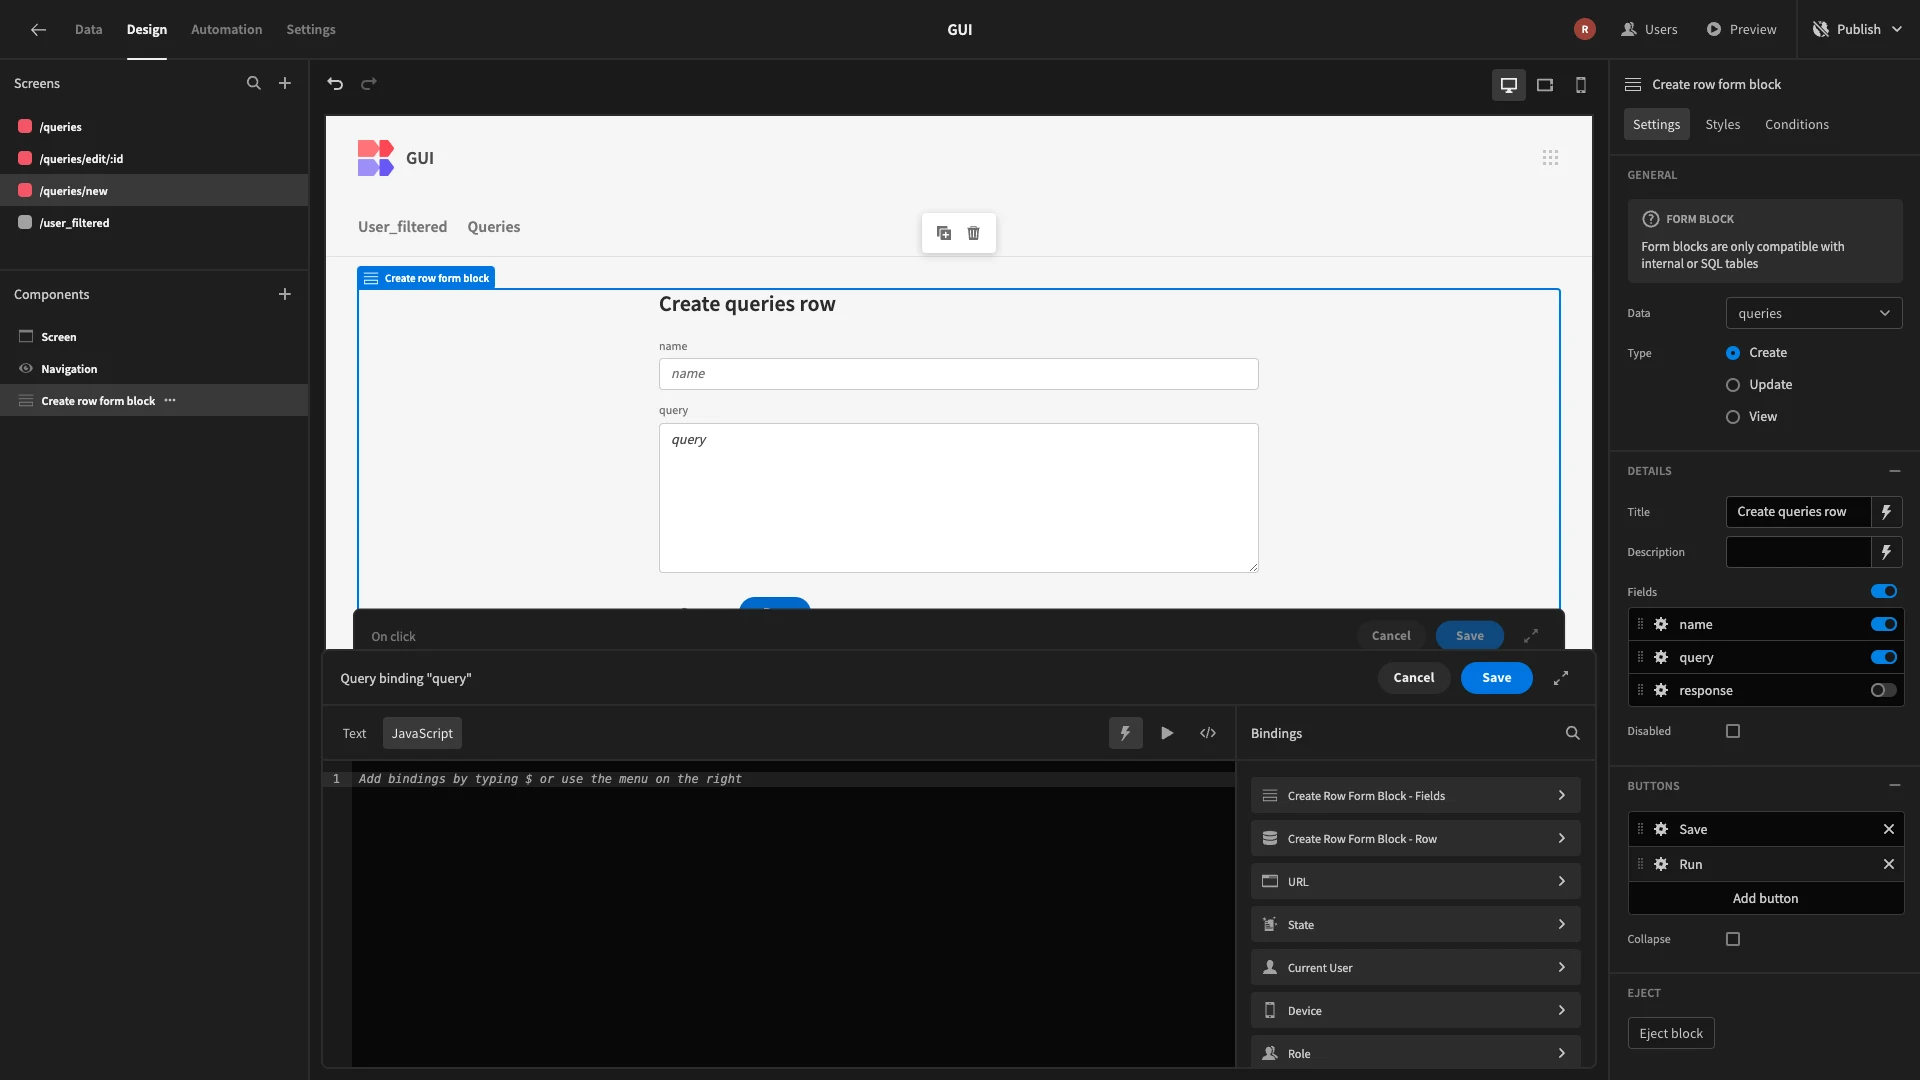
The code we’re going to use is:
1let str = String($("Create row form block.Fields.query"));
2
3// Remove all newline characters (both \n and \r\n)
4
5let cleanedStr = str.replace(/(\r\n|\n|\r)/g, ' ');
6
7return cleanedStr;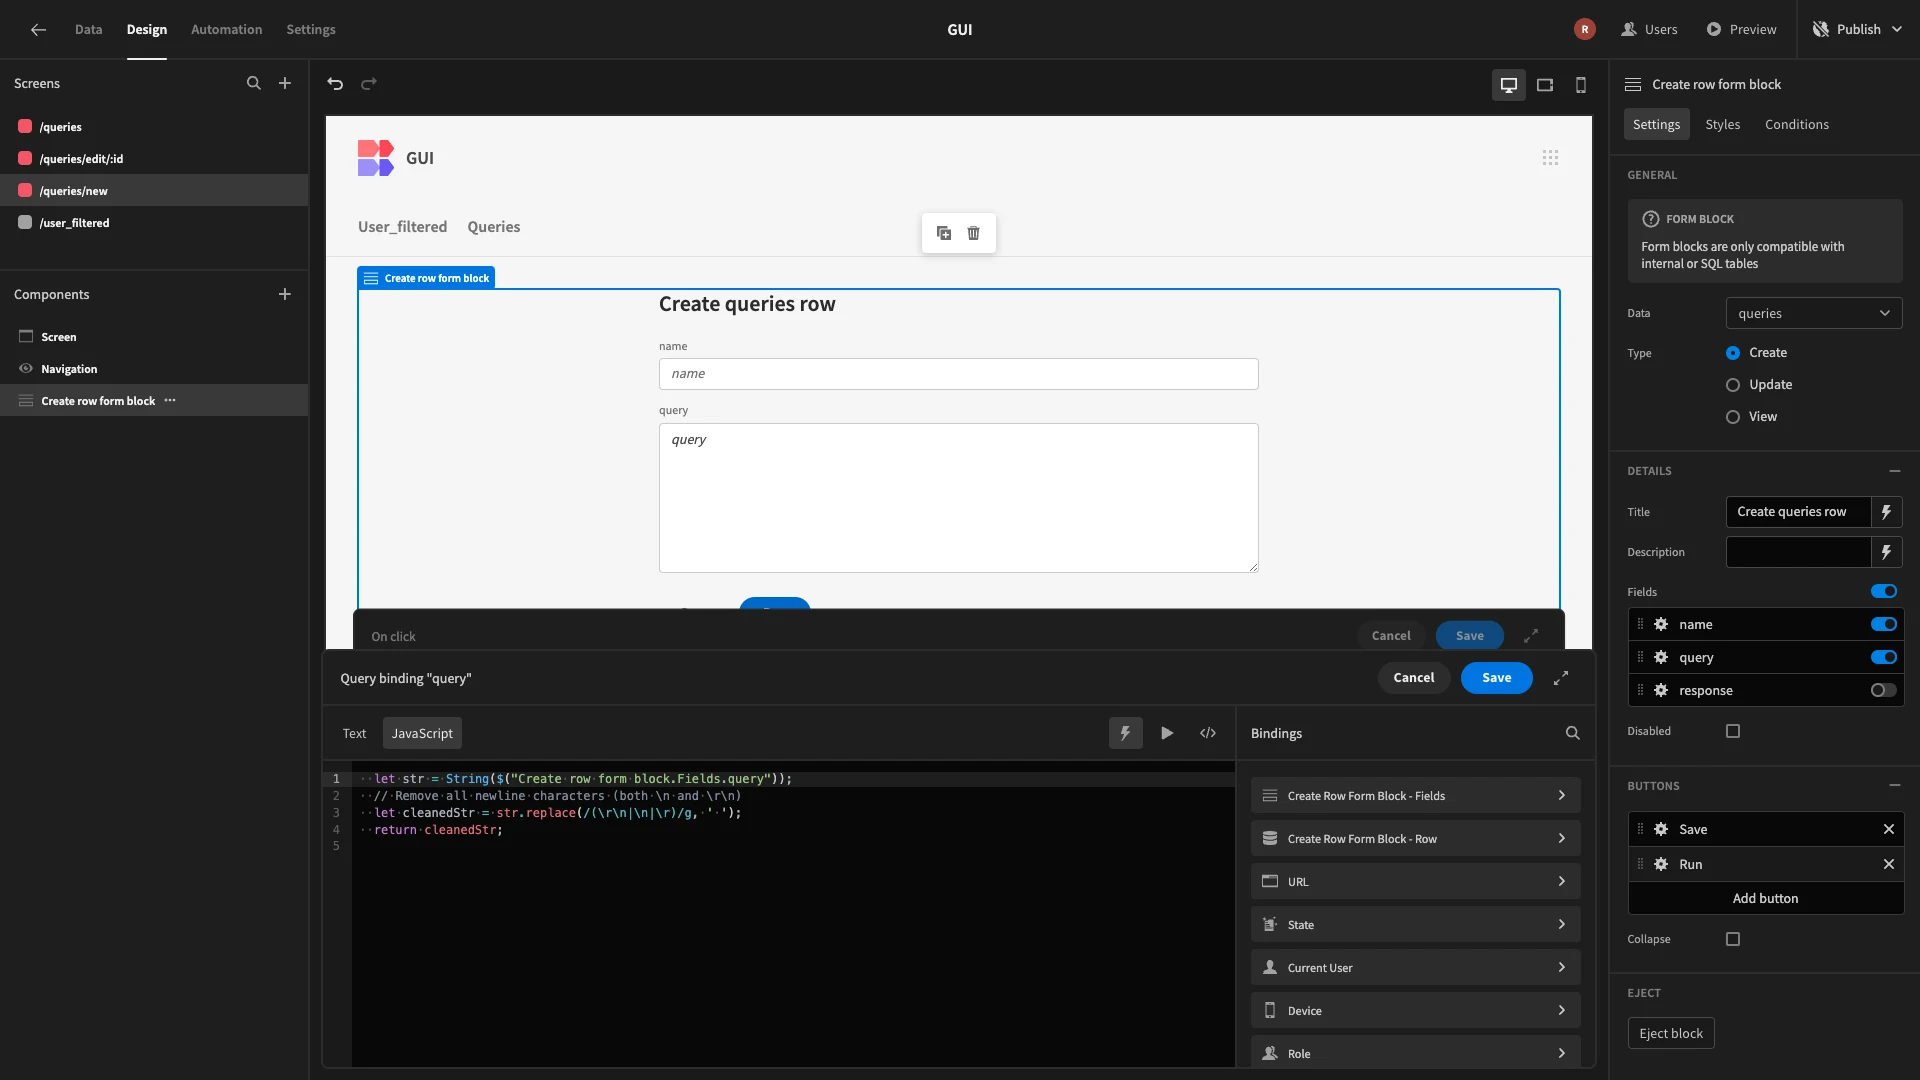
Setting up testing and handling responses
Now, users can send a custom query from the front-end. The next thing we need to do is provide a user experience for reviewing the response of the query.
We’re going to display this in a table UI.
First, though, we need to save our response. We don’t want to save this to our history table just yet, though.
For now, we’re going to save it as a temporary app state.
Within our Run button’s Actions menu, we’ll add a second step. This time, we’re choosing Update State. Here, we’ll create a new state called response.
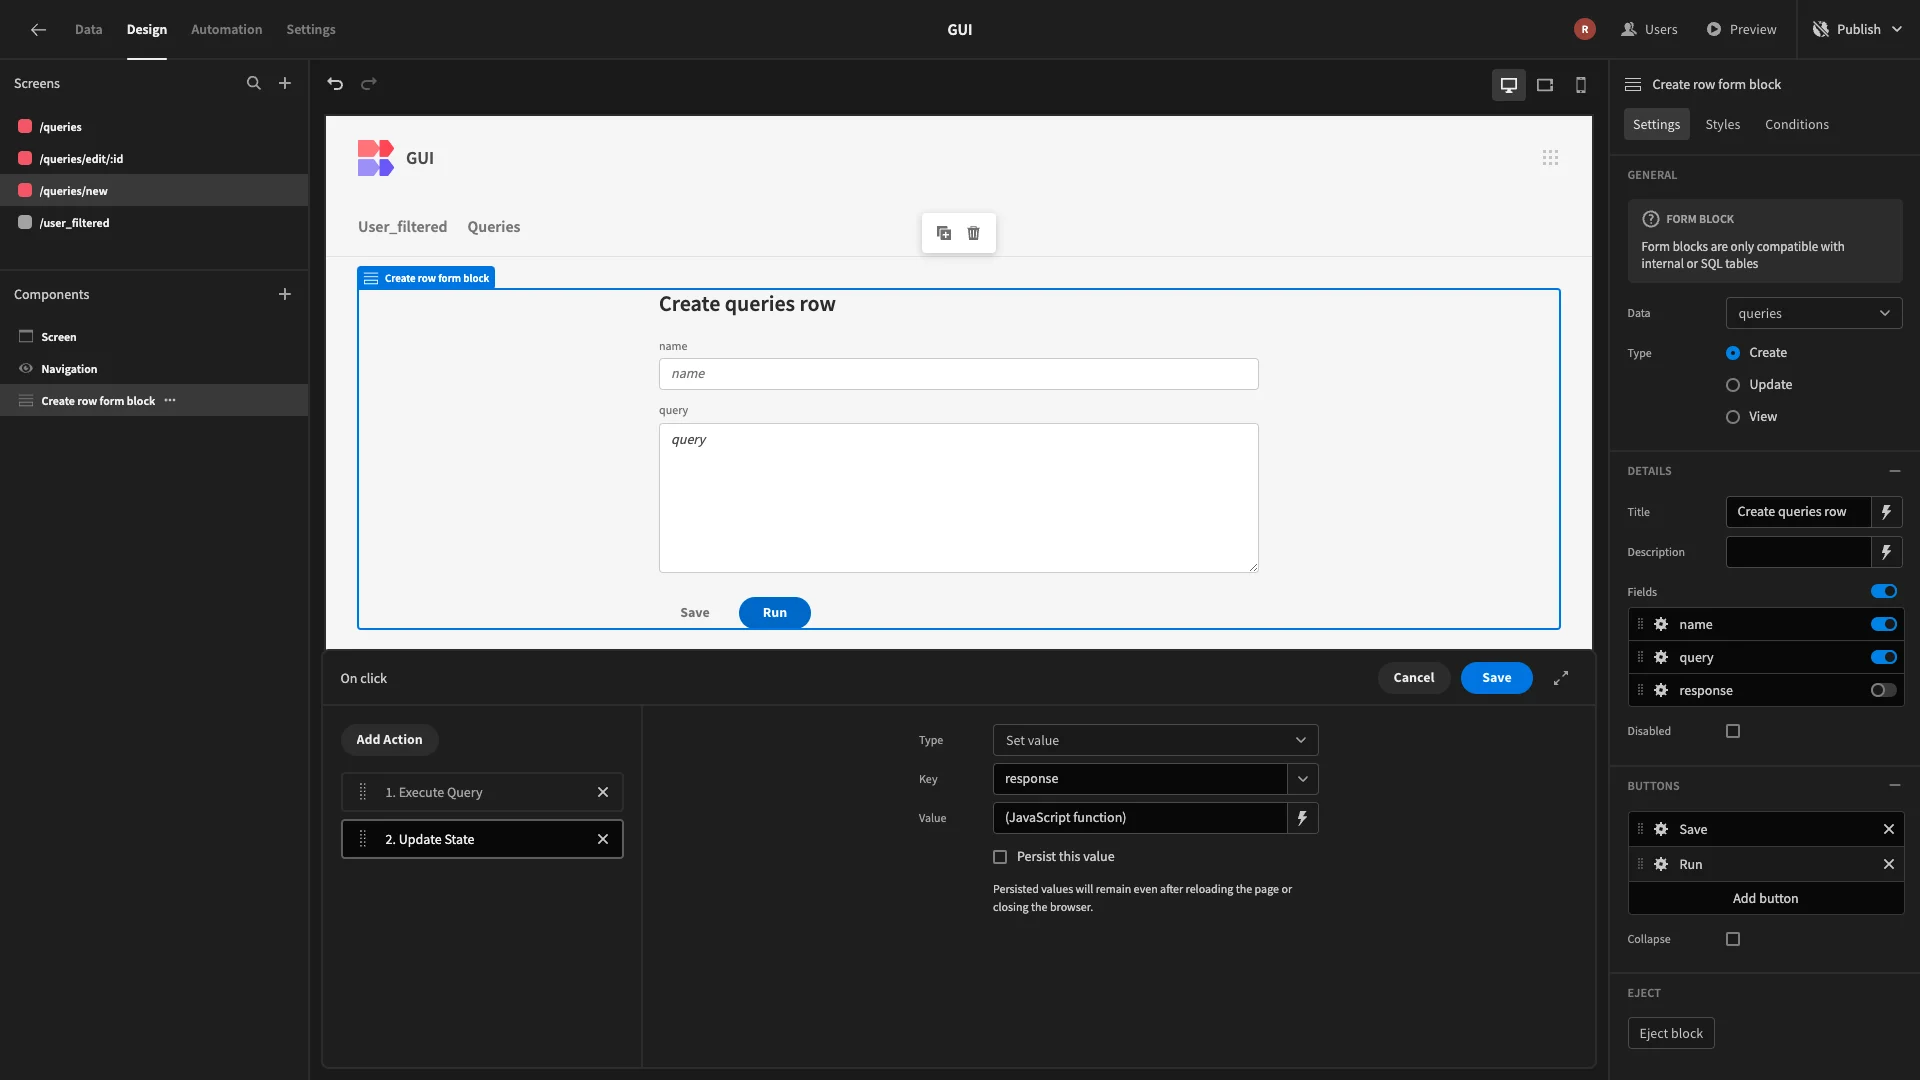
We can access the output of the previous action within the bindings menu. We’re going to populate a value for our state using the following JavaScript expression to format the data object from our response as JSON:
1const jsonObj = $("Action 1.Query result")
2
3return jsonObj.data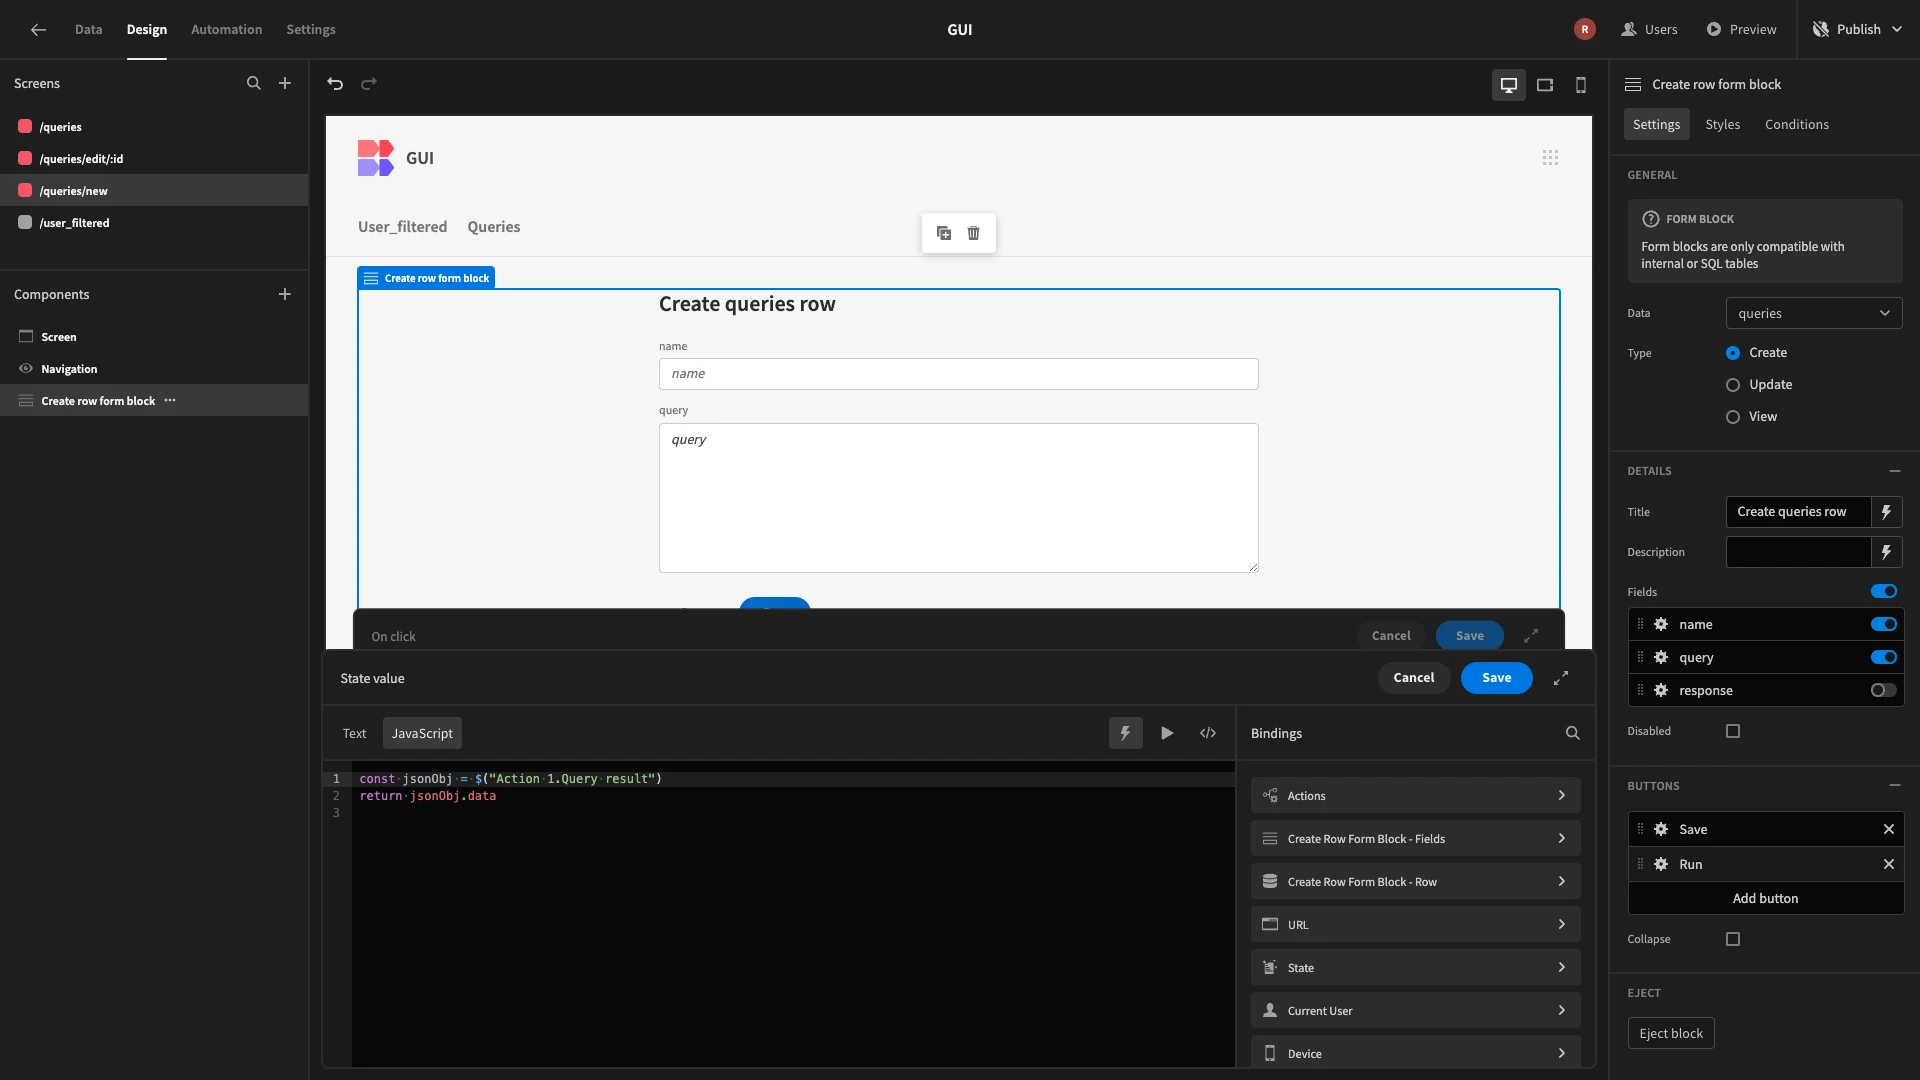
Next, we’re going to add a Table component beneath our existing form UI. We’ve set the Data for this to JSON/CSV.
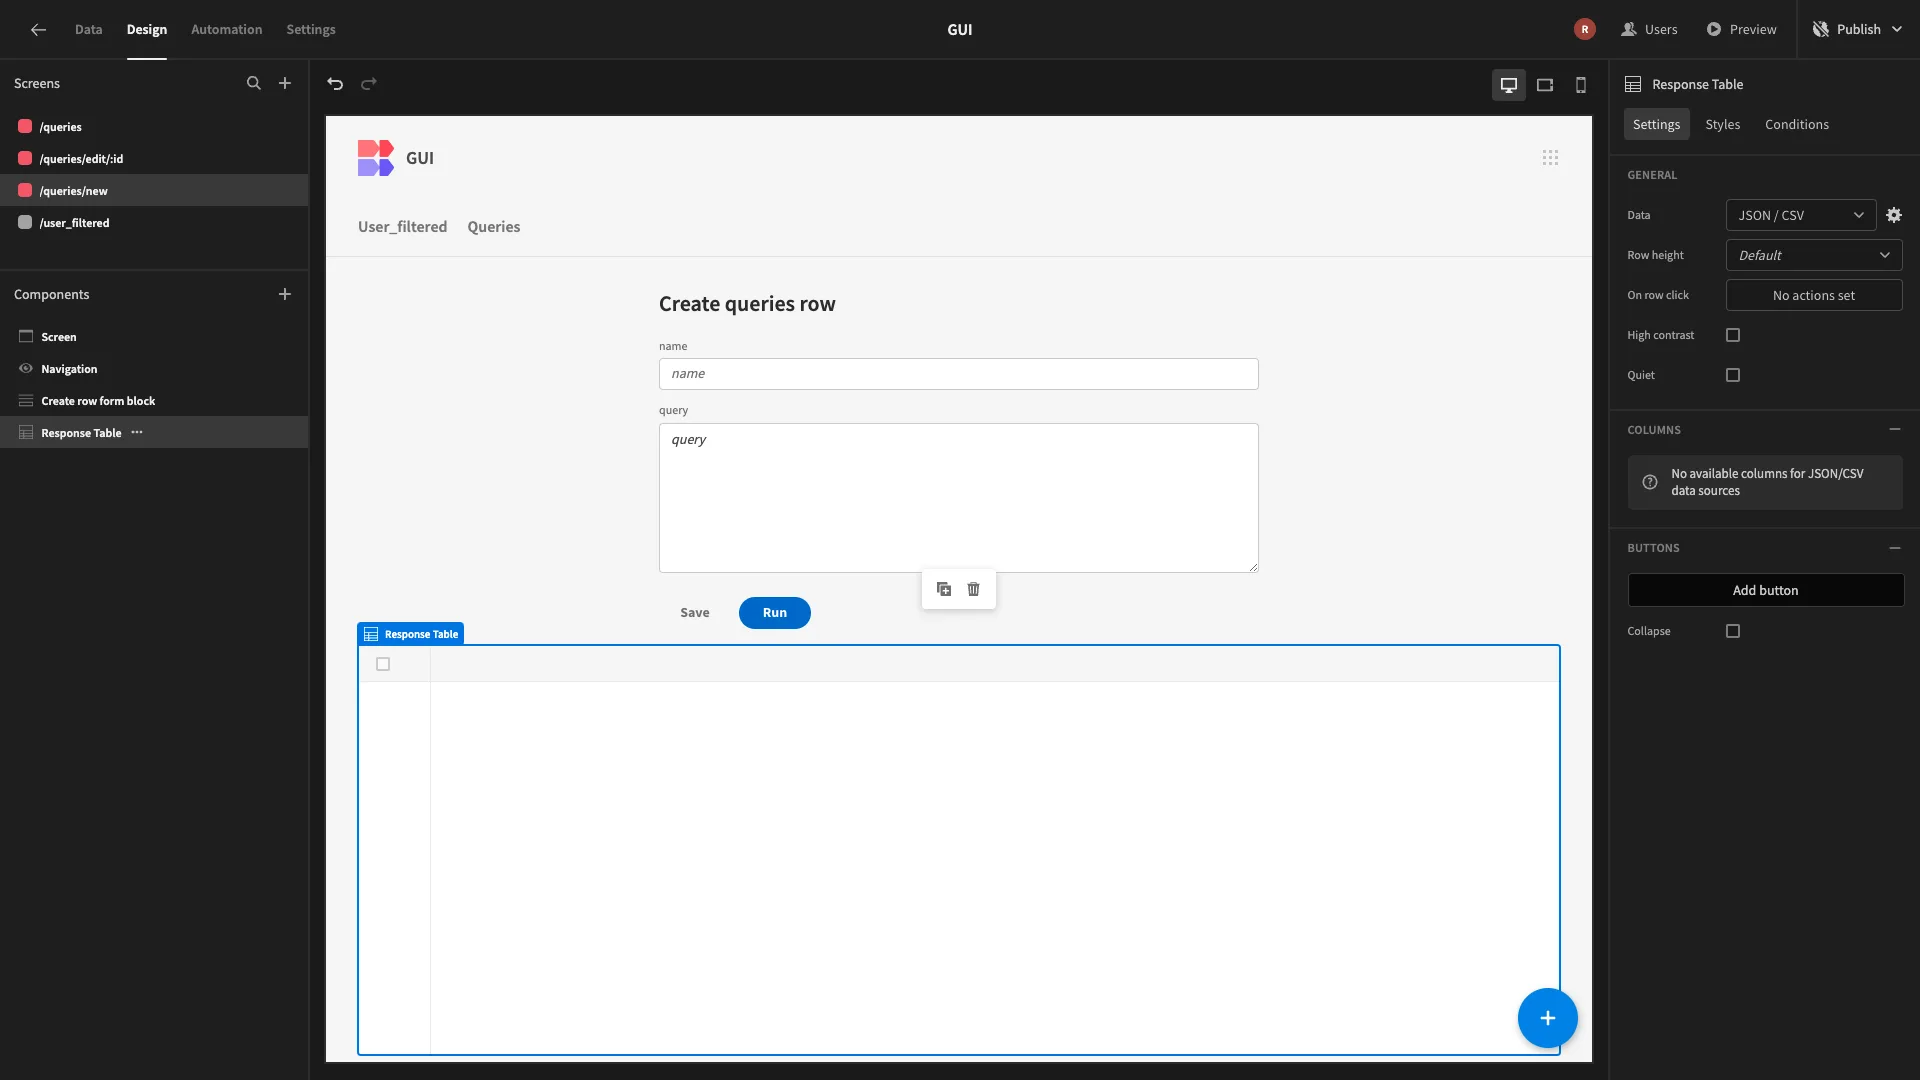
We’ll then use the cog icon to open our bindings menu and set the data source to {{ State.response }}.
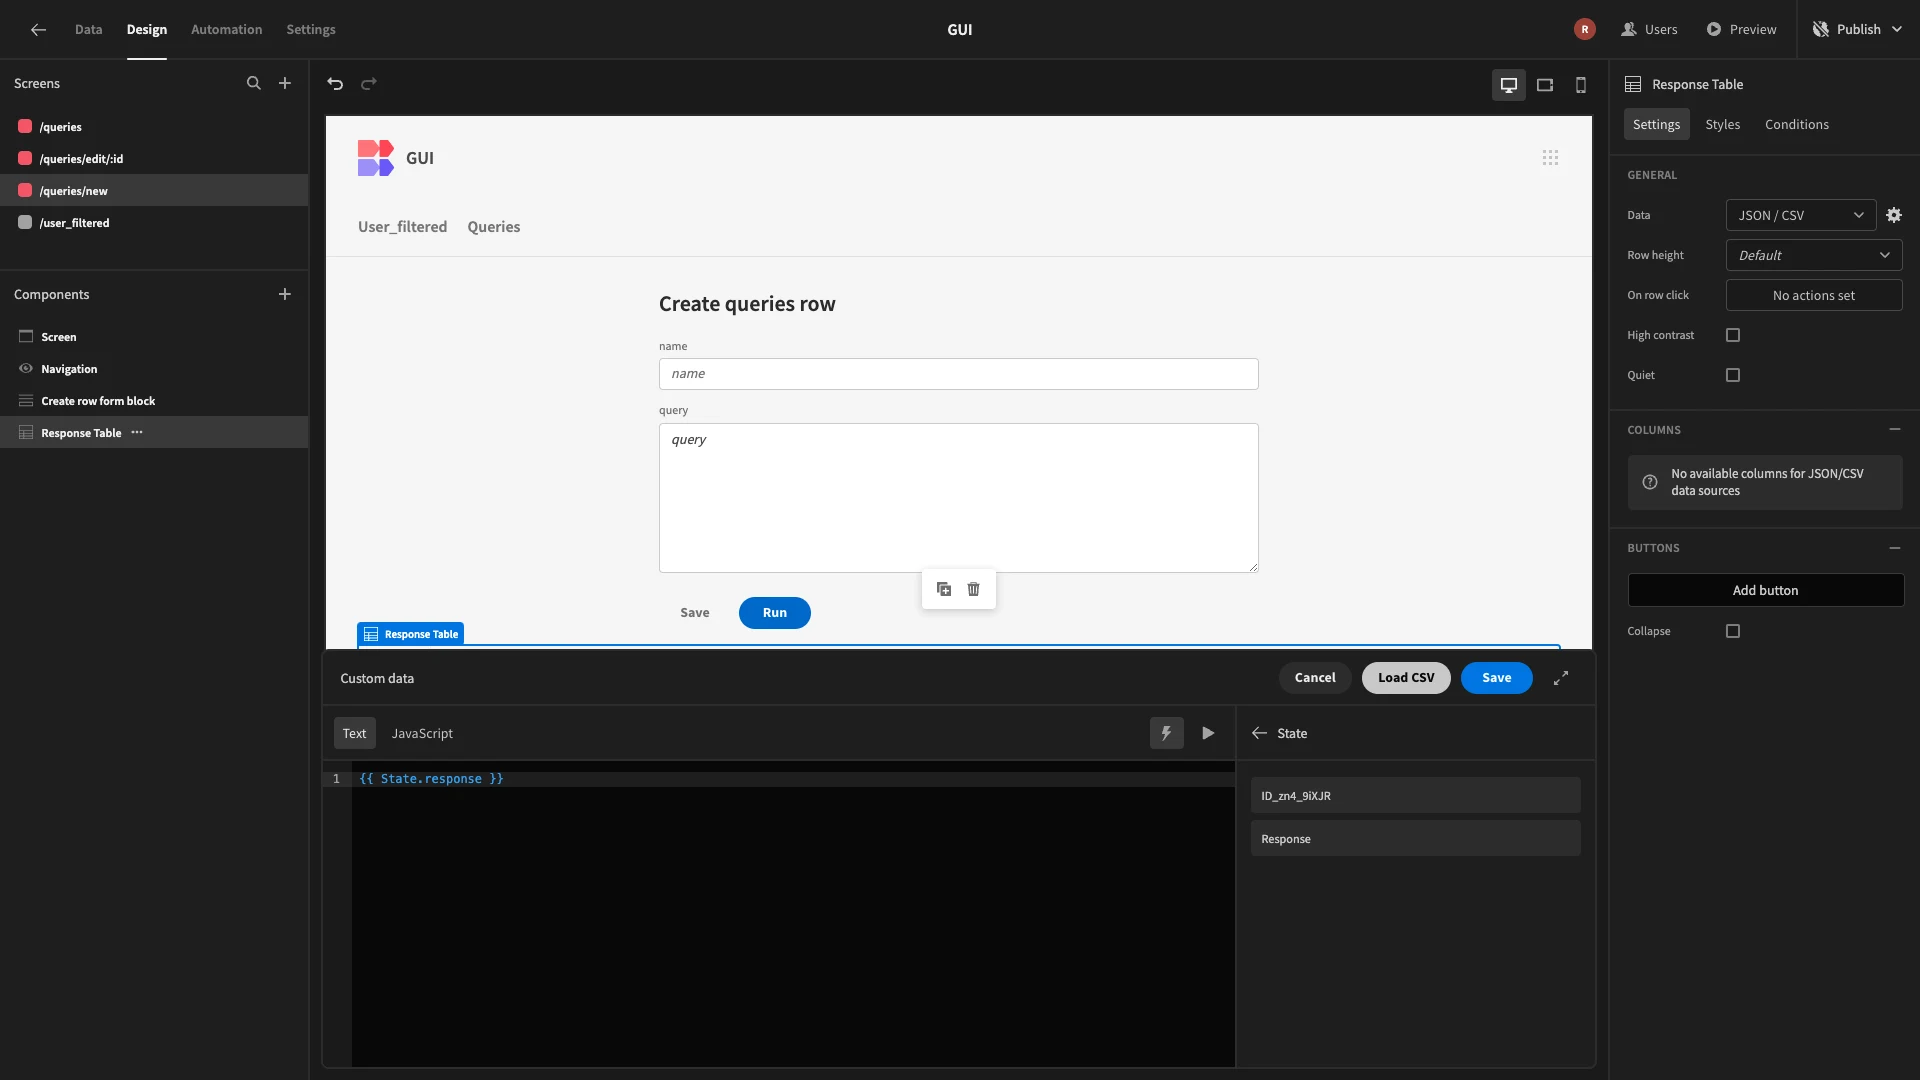
Now, if we preview our app and run a query, the response will be loaded into our table.
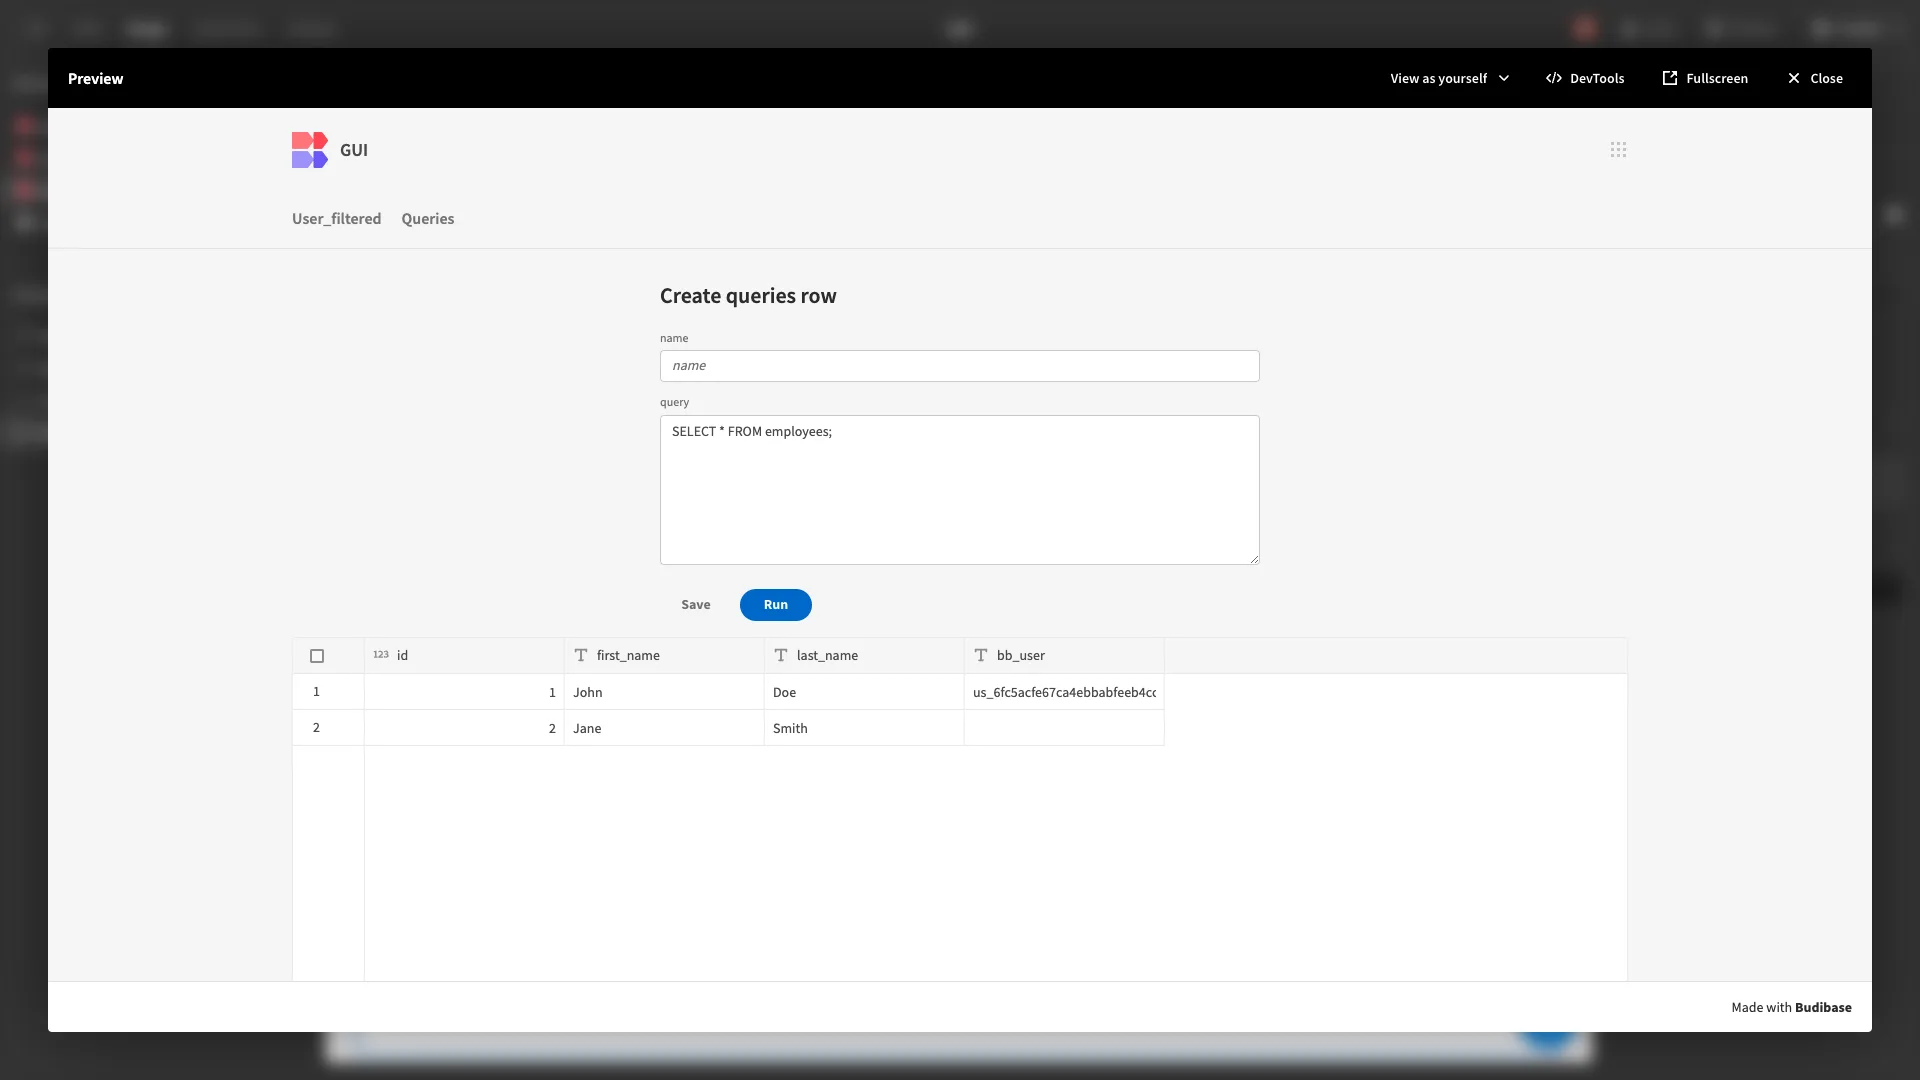
However, we only want our Table to be displayed when there is actually data to populate it.
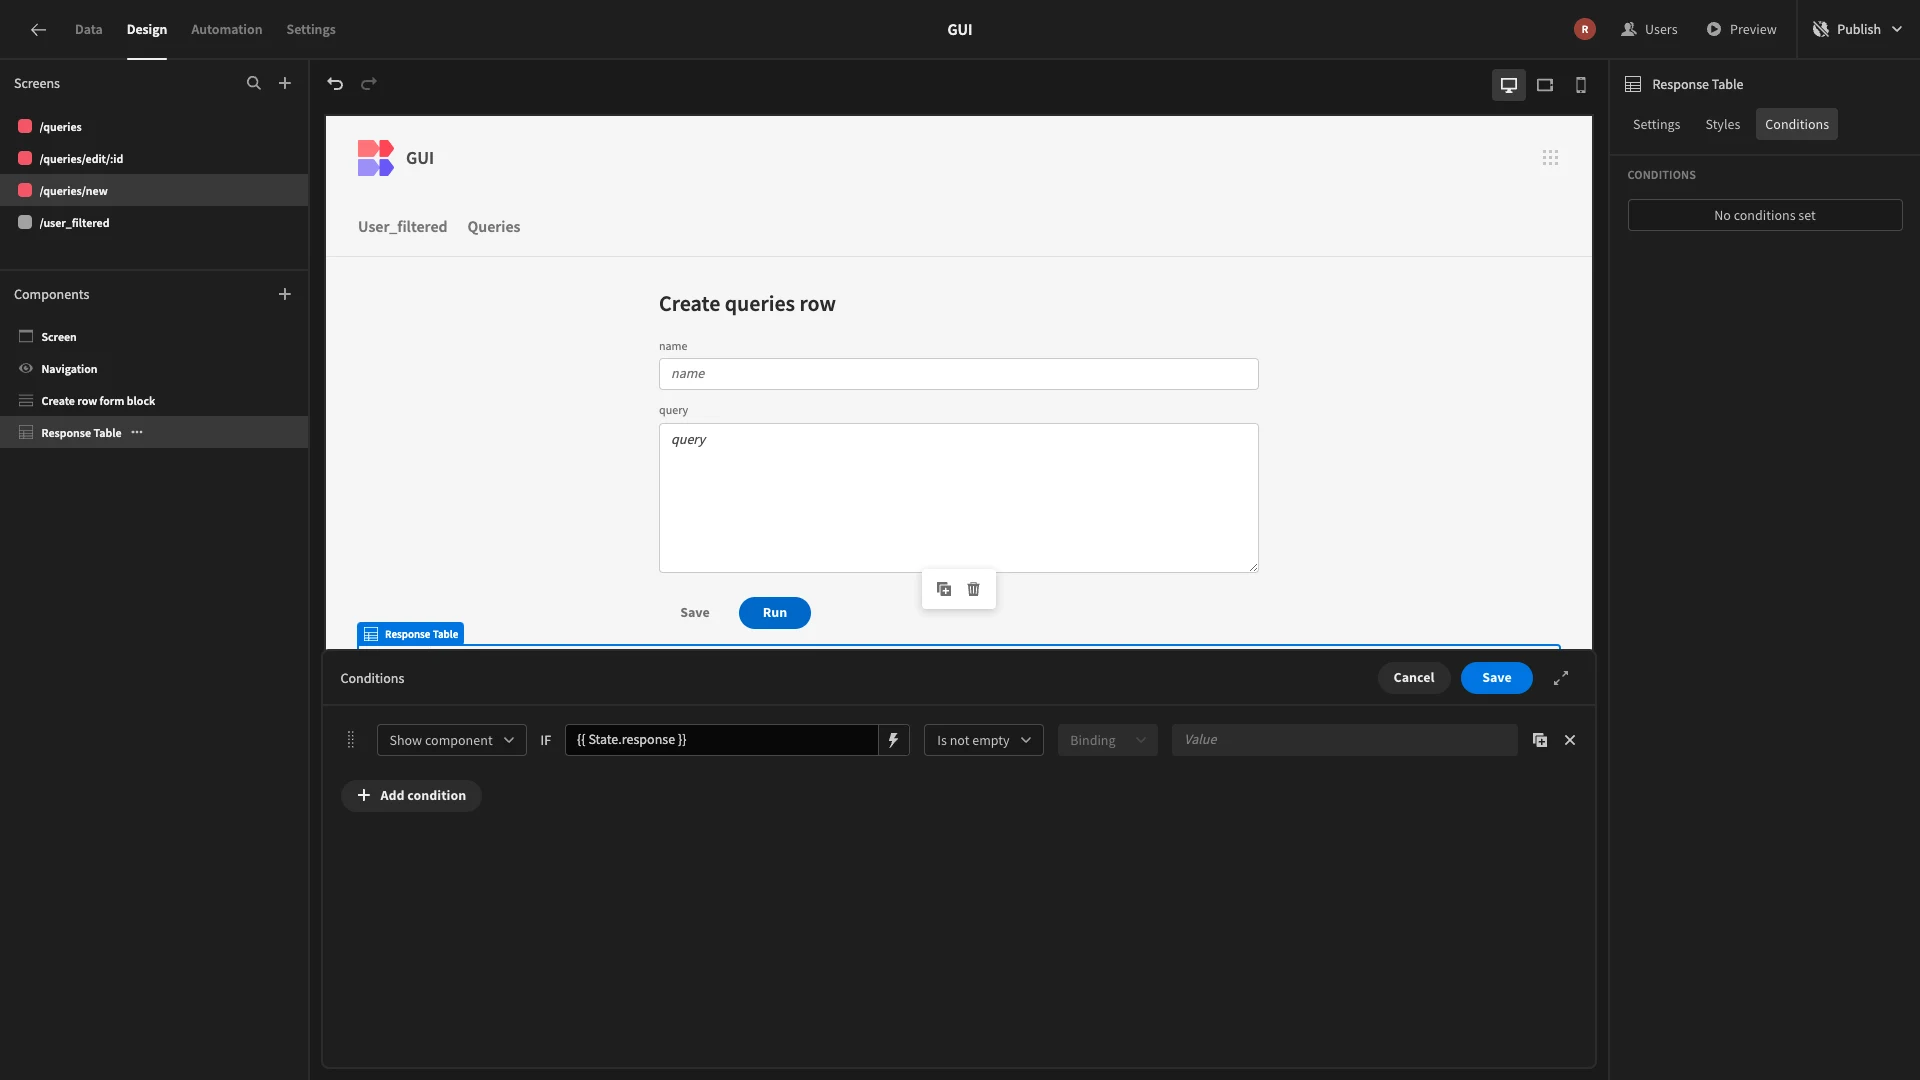
We can achieve this using Conditions. These enable us to define rules to hide, display, or update the native settings of Budibase components.
We’ll start by opening the Conditions drawer for our Table component.
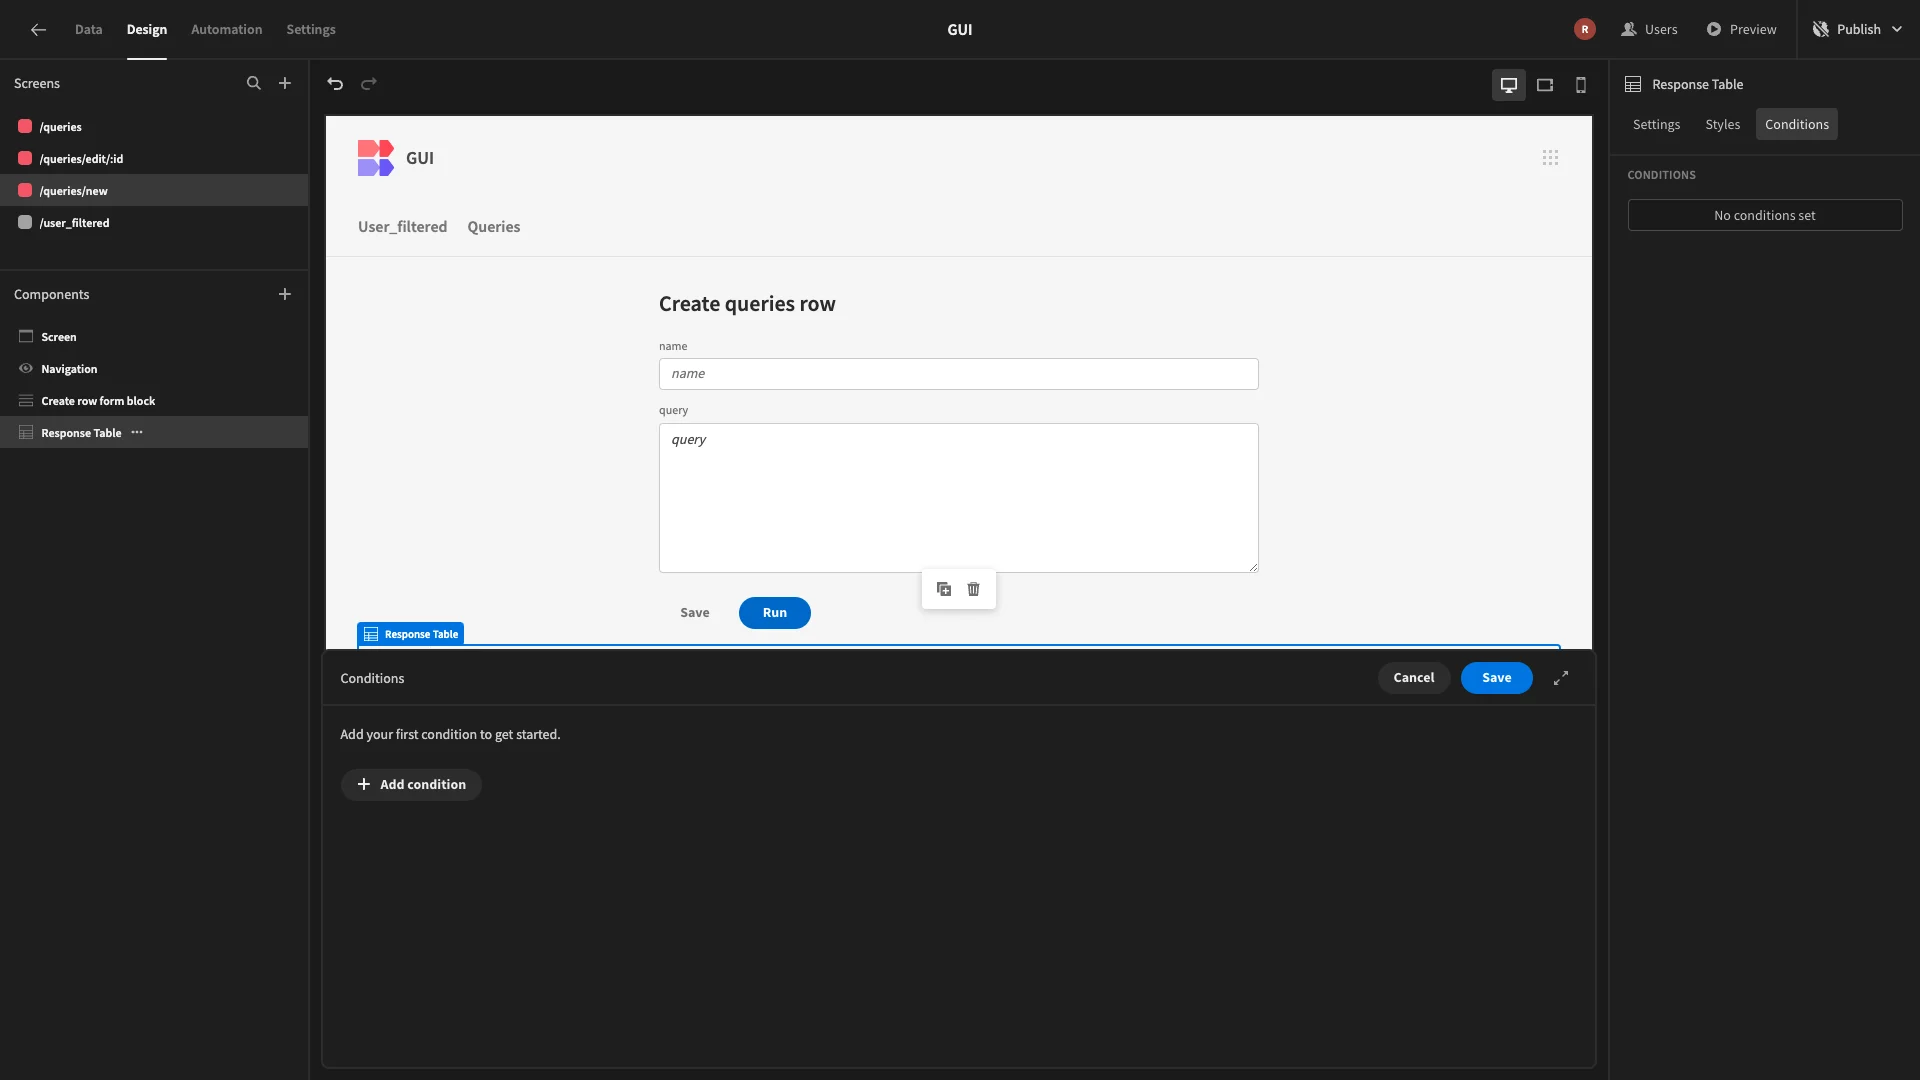
Here, we’ll create a row so that it’s only shown if {{ State.response }} is not empty.
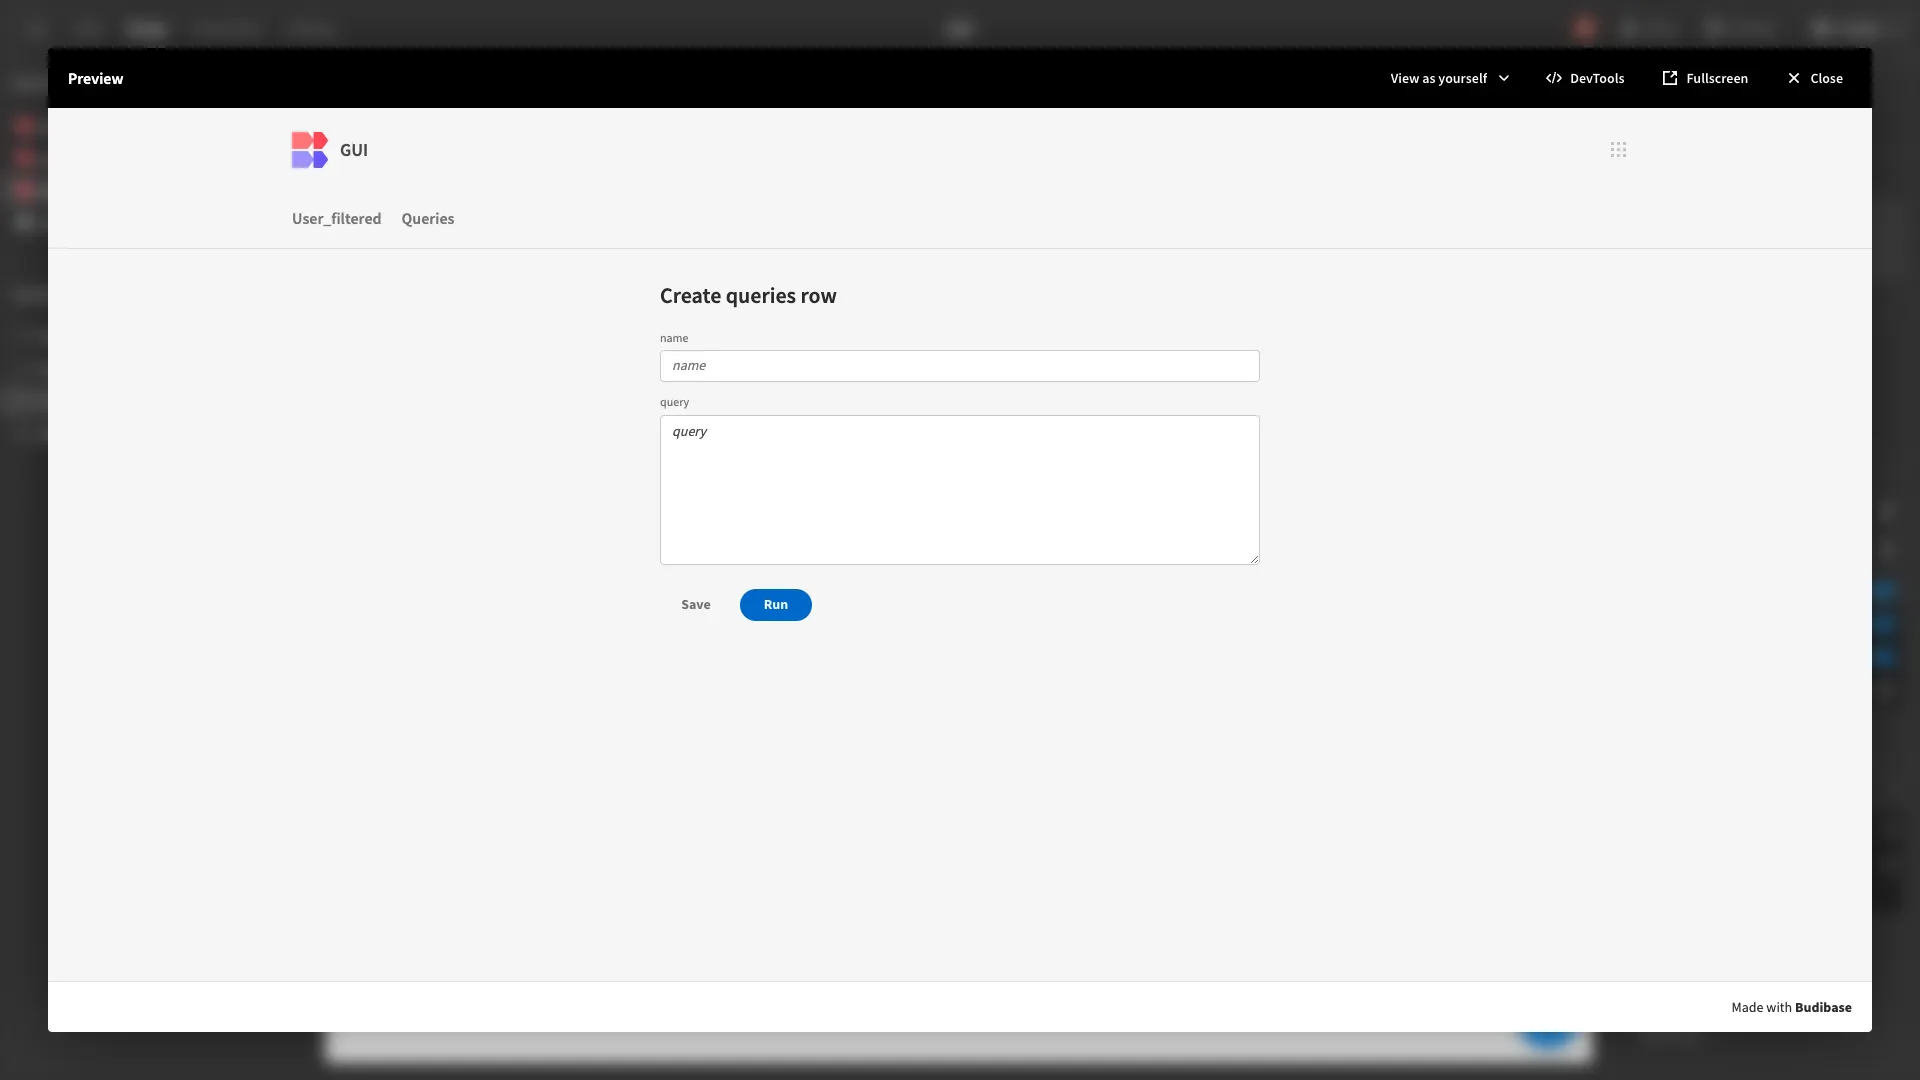
Now, our UI preview will look like this until a query is submitted.
Recording query history
Next, we want to add functionality so that each time a query is run, a record is created in our history table.
We’ll start by adding a Save Row action to our Run button. Here, we can specify the values that we want to save without our users having to specify them.
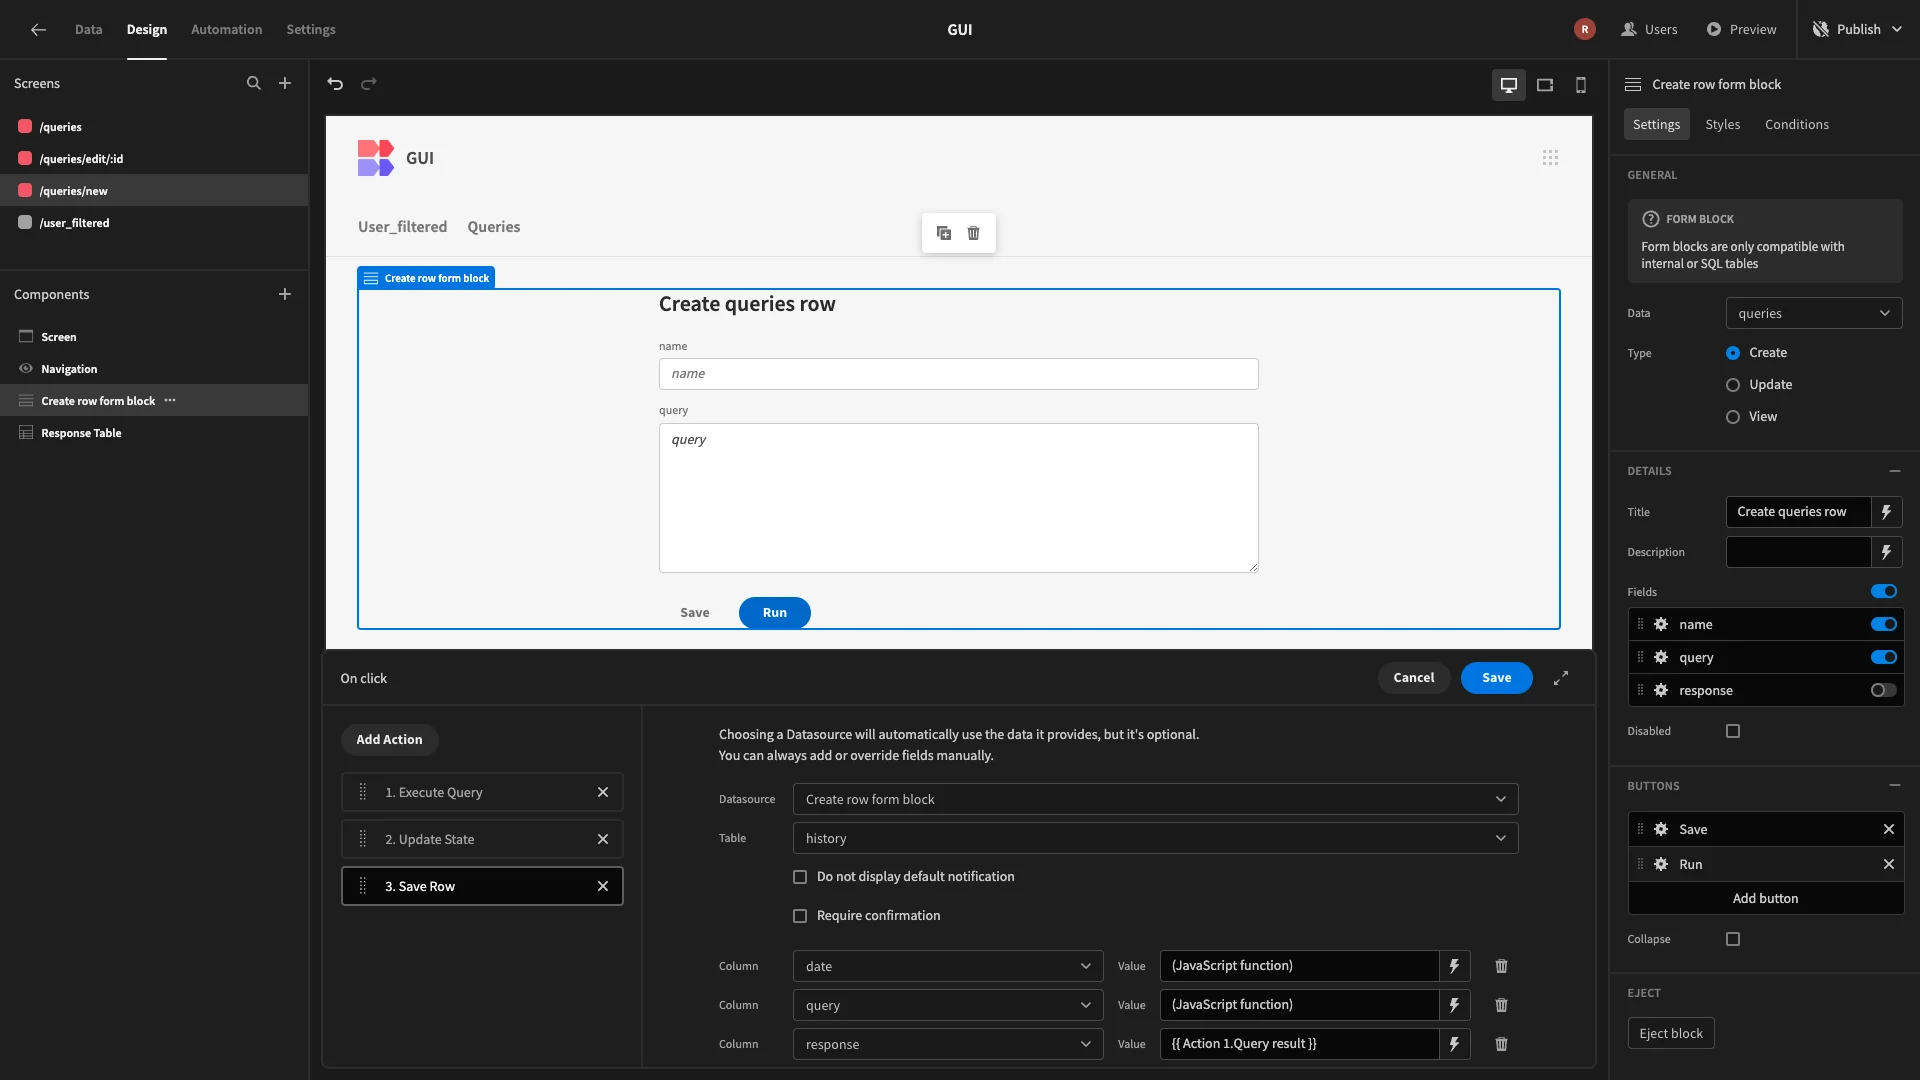
We’ll add all three columns - date, query, and response.
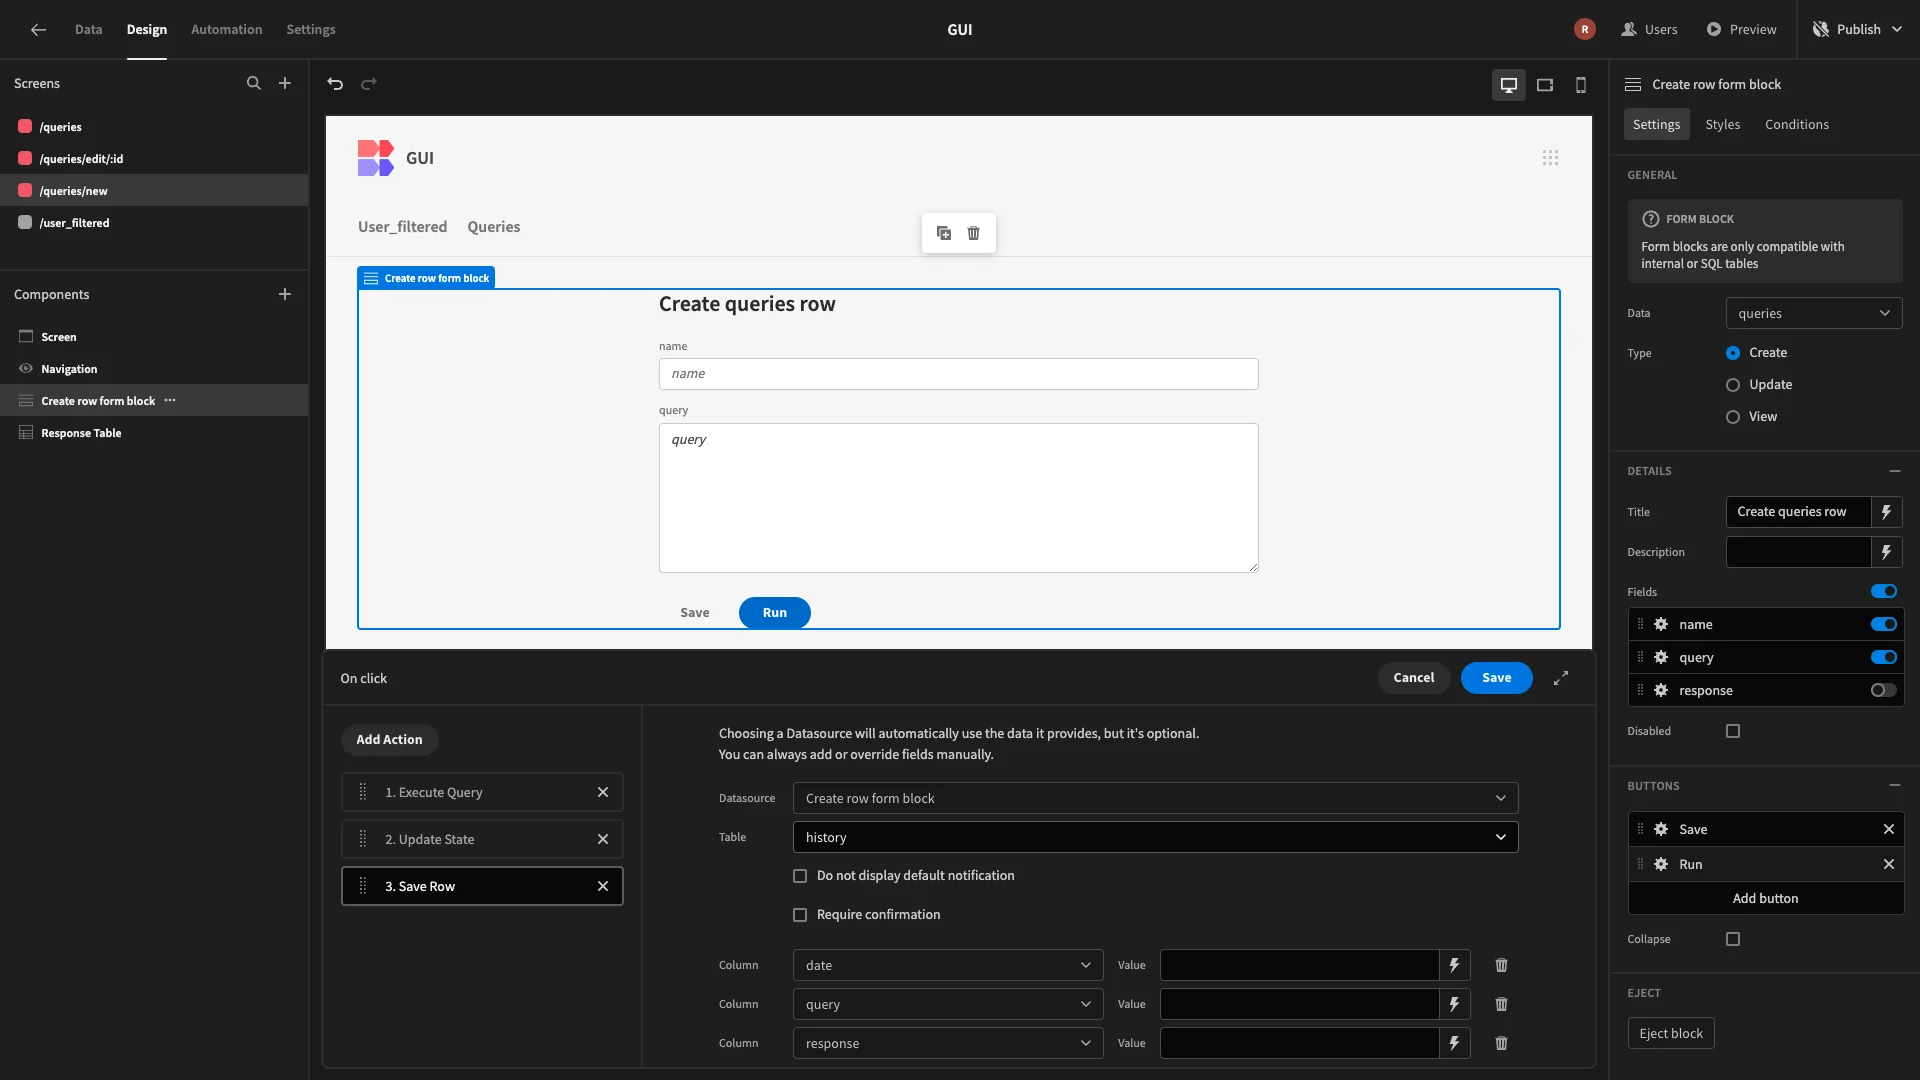
We’re going to set the data column to the current date and time. We can do this using the following JavaScript.
1var date = new Date();
2
3return date;
For our query field, we’re going to use the same JavaScript expression we used earlier.
Lastly, we’ll bind our result field to {{ Action 1.Query result }}.
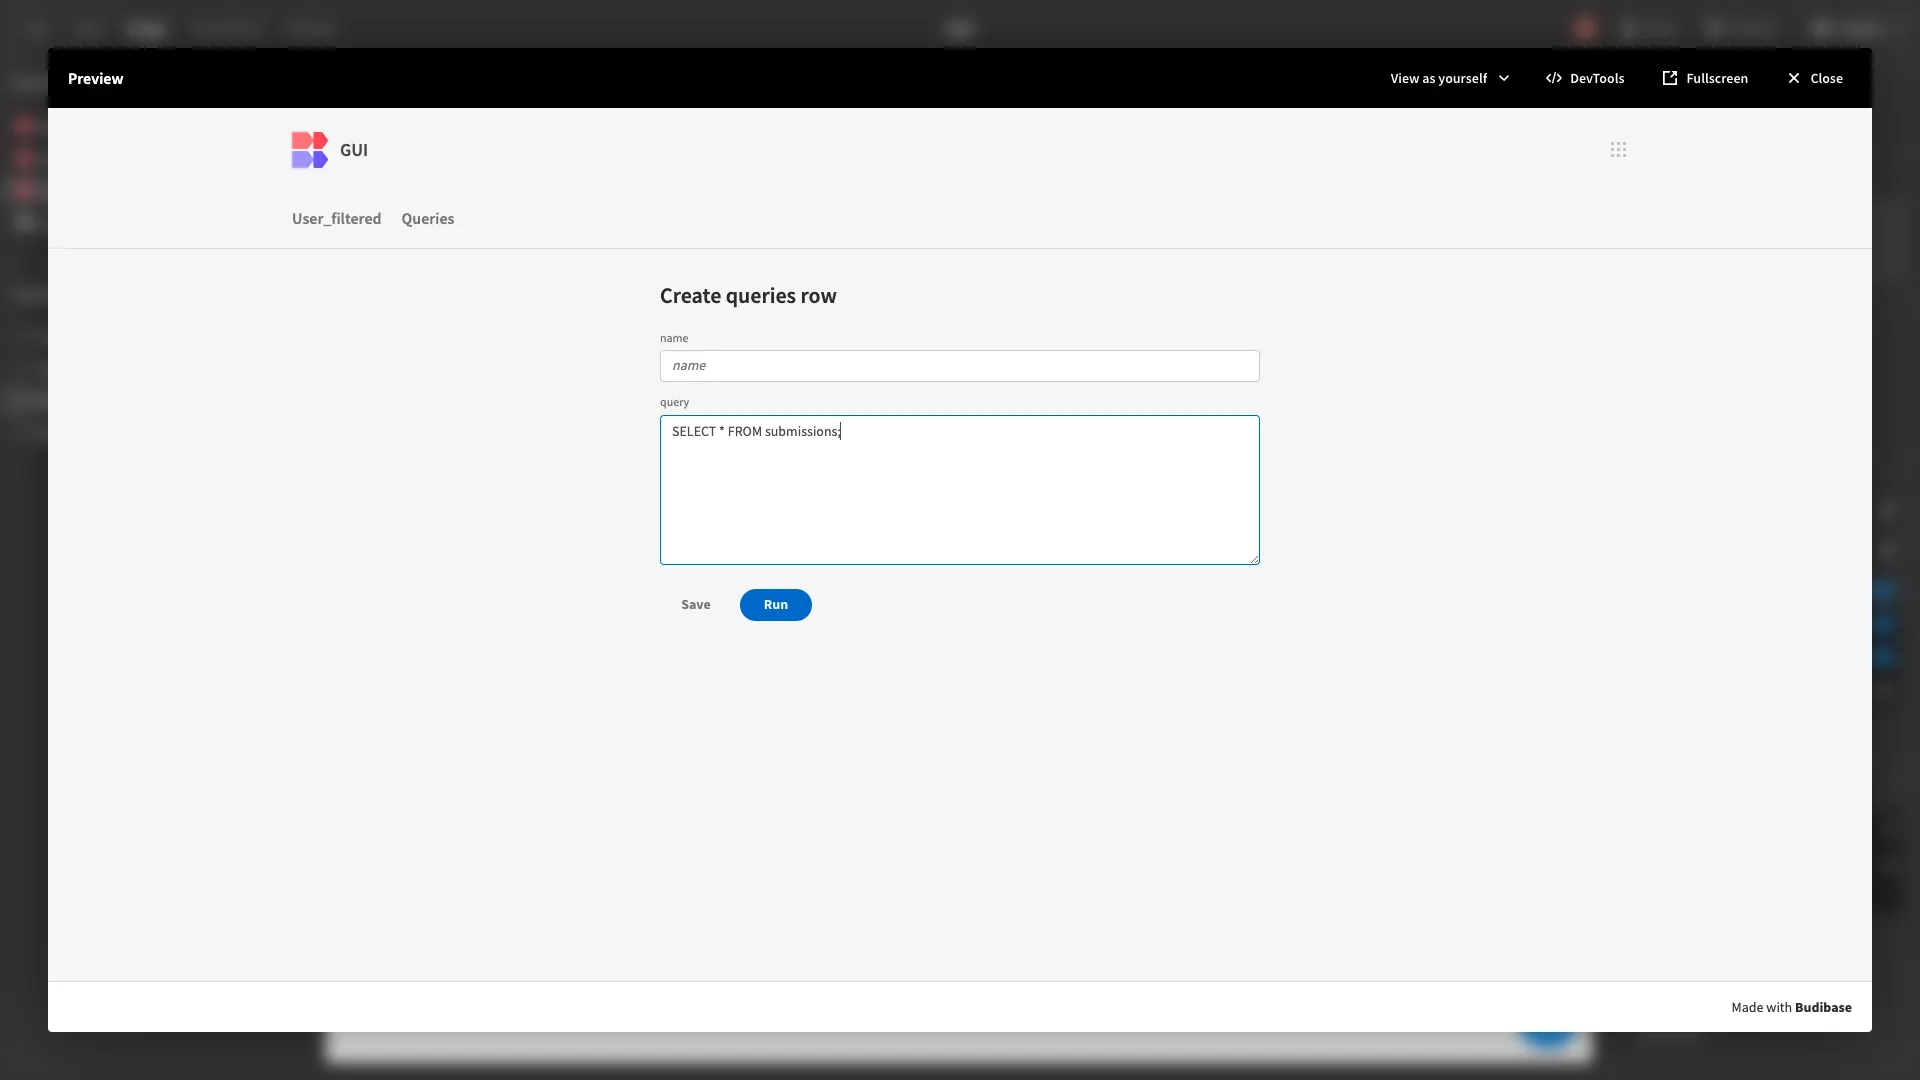
We can then run a test of this in our app preview.
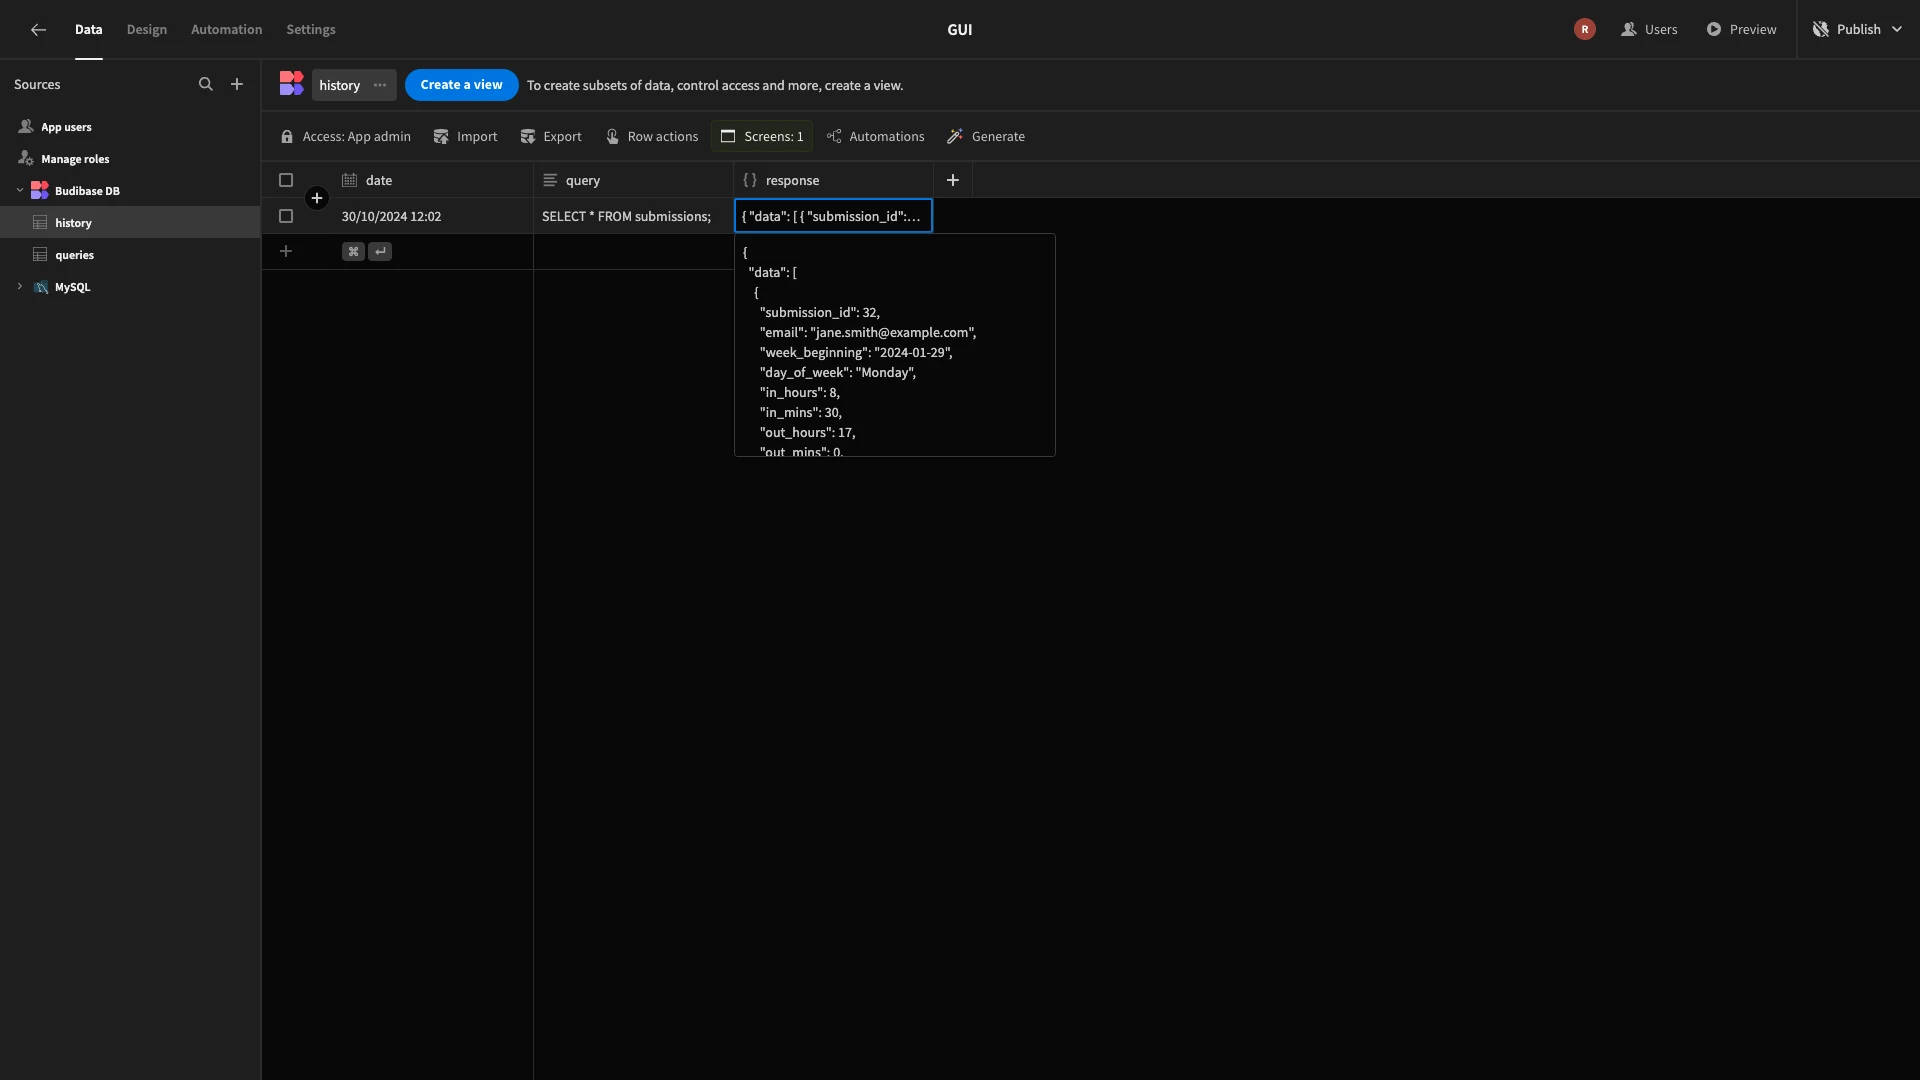
And we can head to the Data section to confirm it’s worked.
Saving queries
The last thing we need to do with our query editor screen is enable users to save queries. Luckily, with our existing Save button, we’re already most of the way there.
Currently, this is set up to save the user-provided name and query values.
We’ll need to add a couple of steps to include the following actions in our flow:
- Run the provided query so that we can populate the result field.
- Save an appropriate row to the history table.
First, though, we’re going to overwrite the user-submitted query value with the JavaScript version, as we have seen a couple of times already.
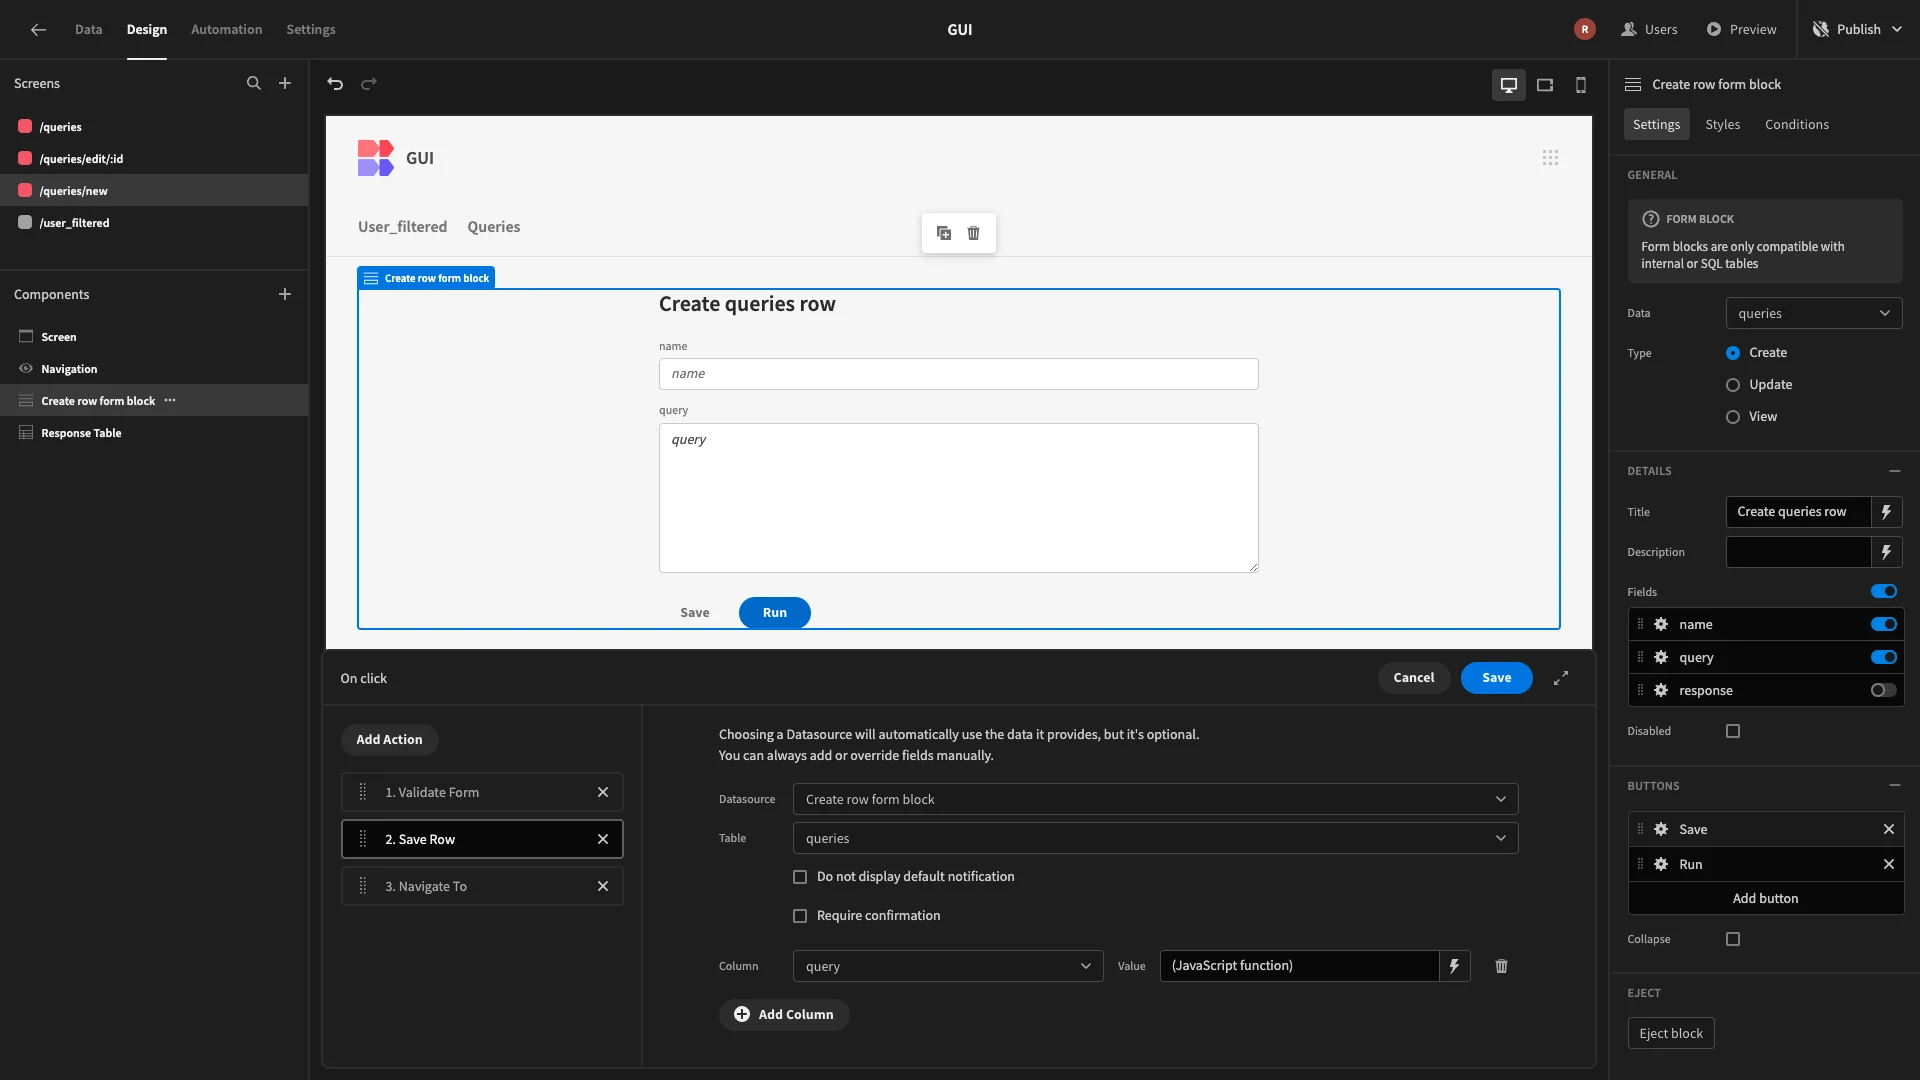
Next, we’ll add an Execute Query action, second in the existing chain, between Validate Form and Save Row. This will match the exact configuration we used for the Execute Query action on our Run button.
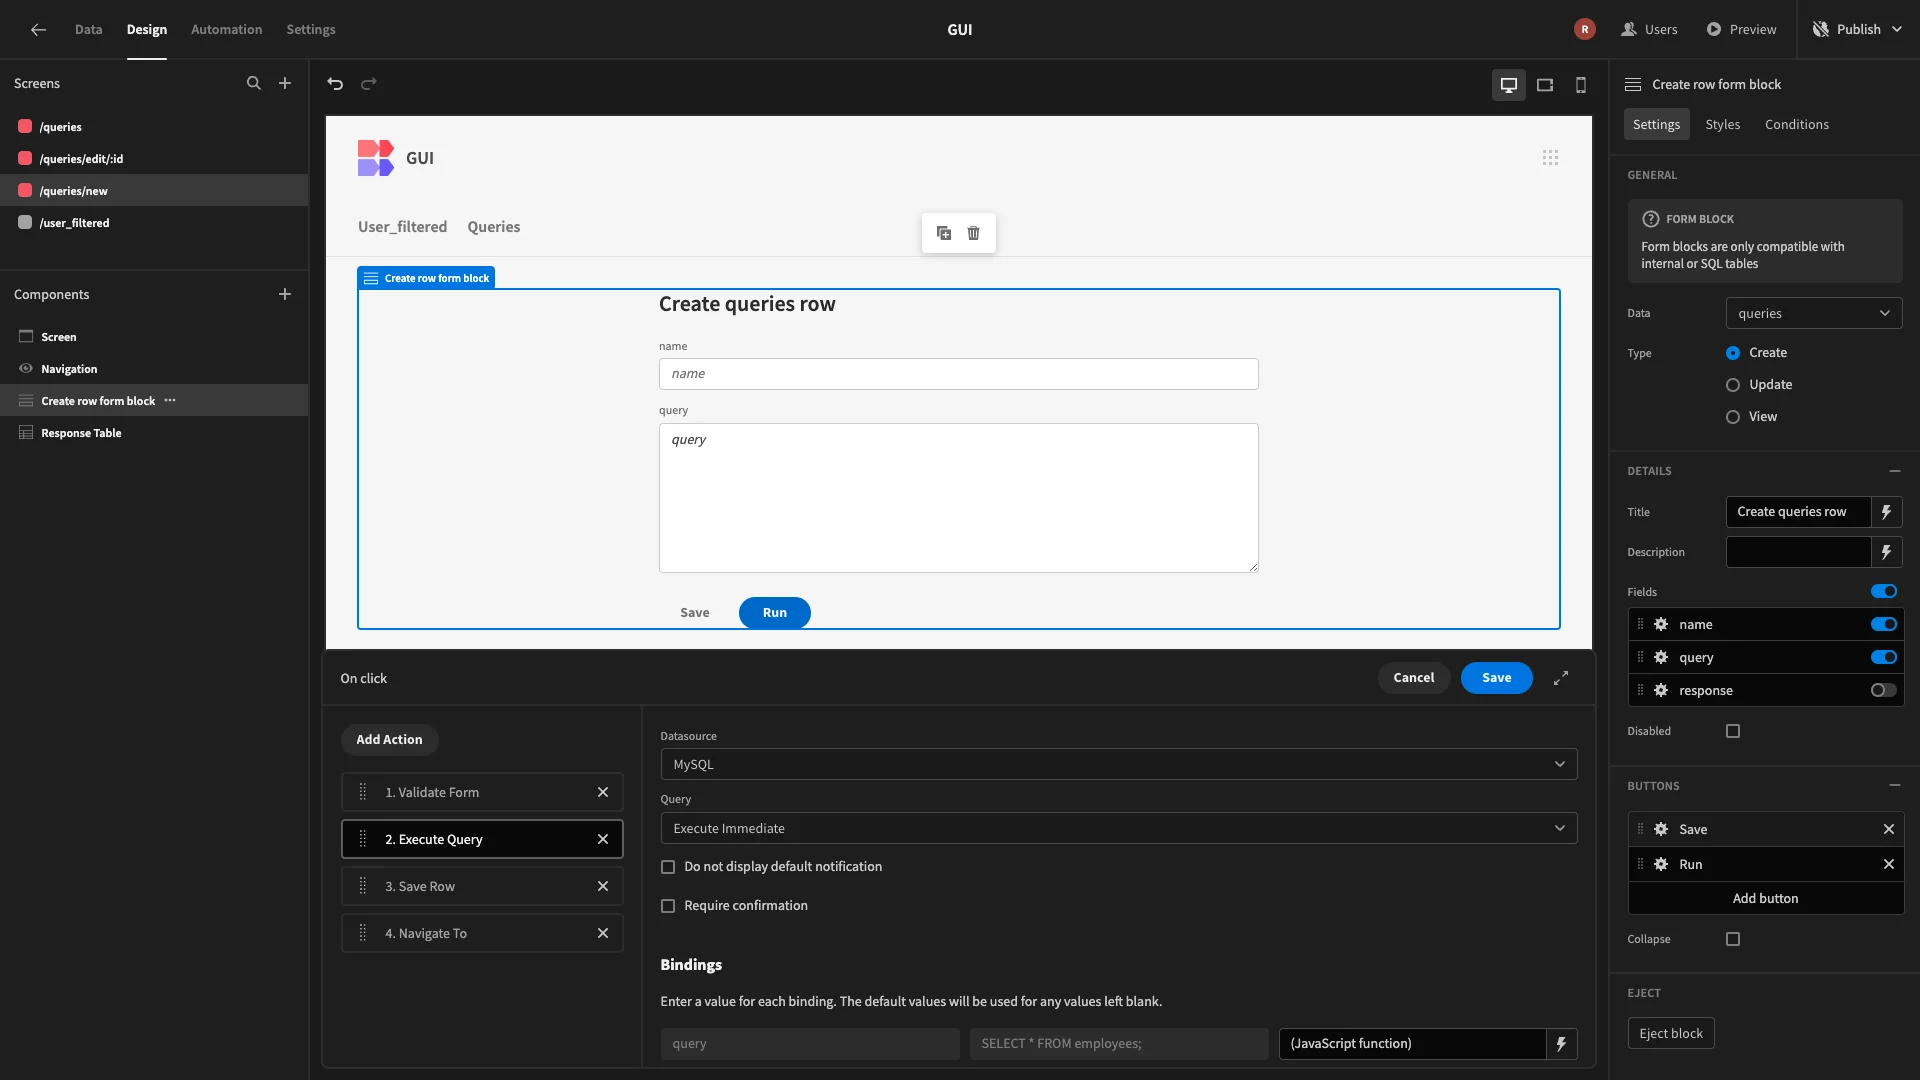
Then, we’ll head to the Save Row action and bind our result value to the output of our Execute Query step, using {{ Action 2.Query result }}.
Here’s what we have so far:
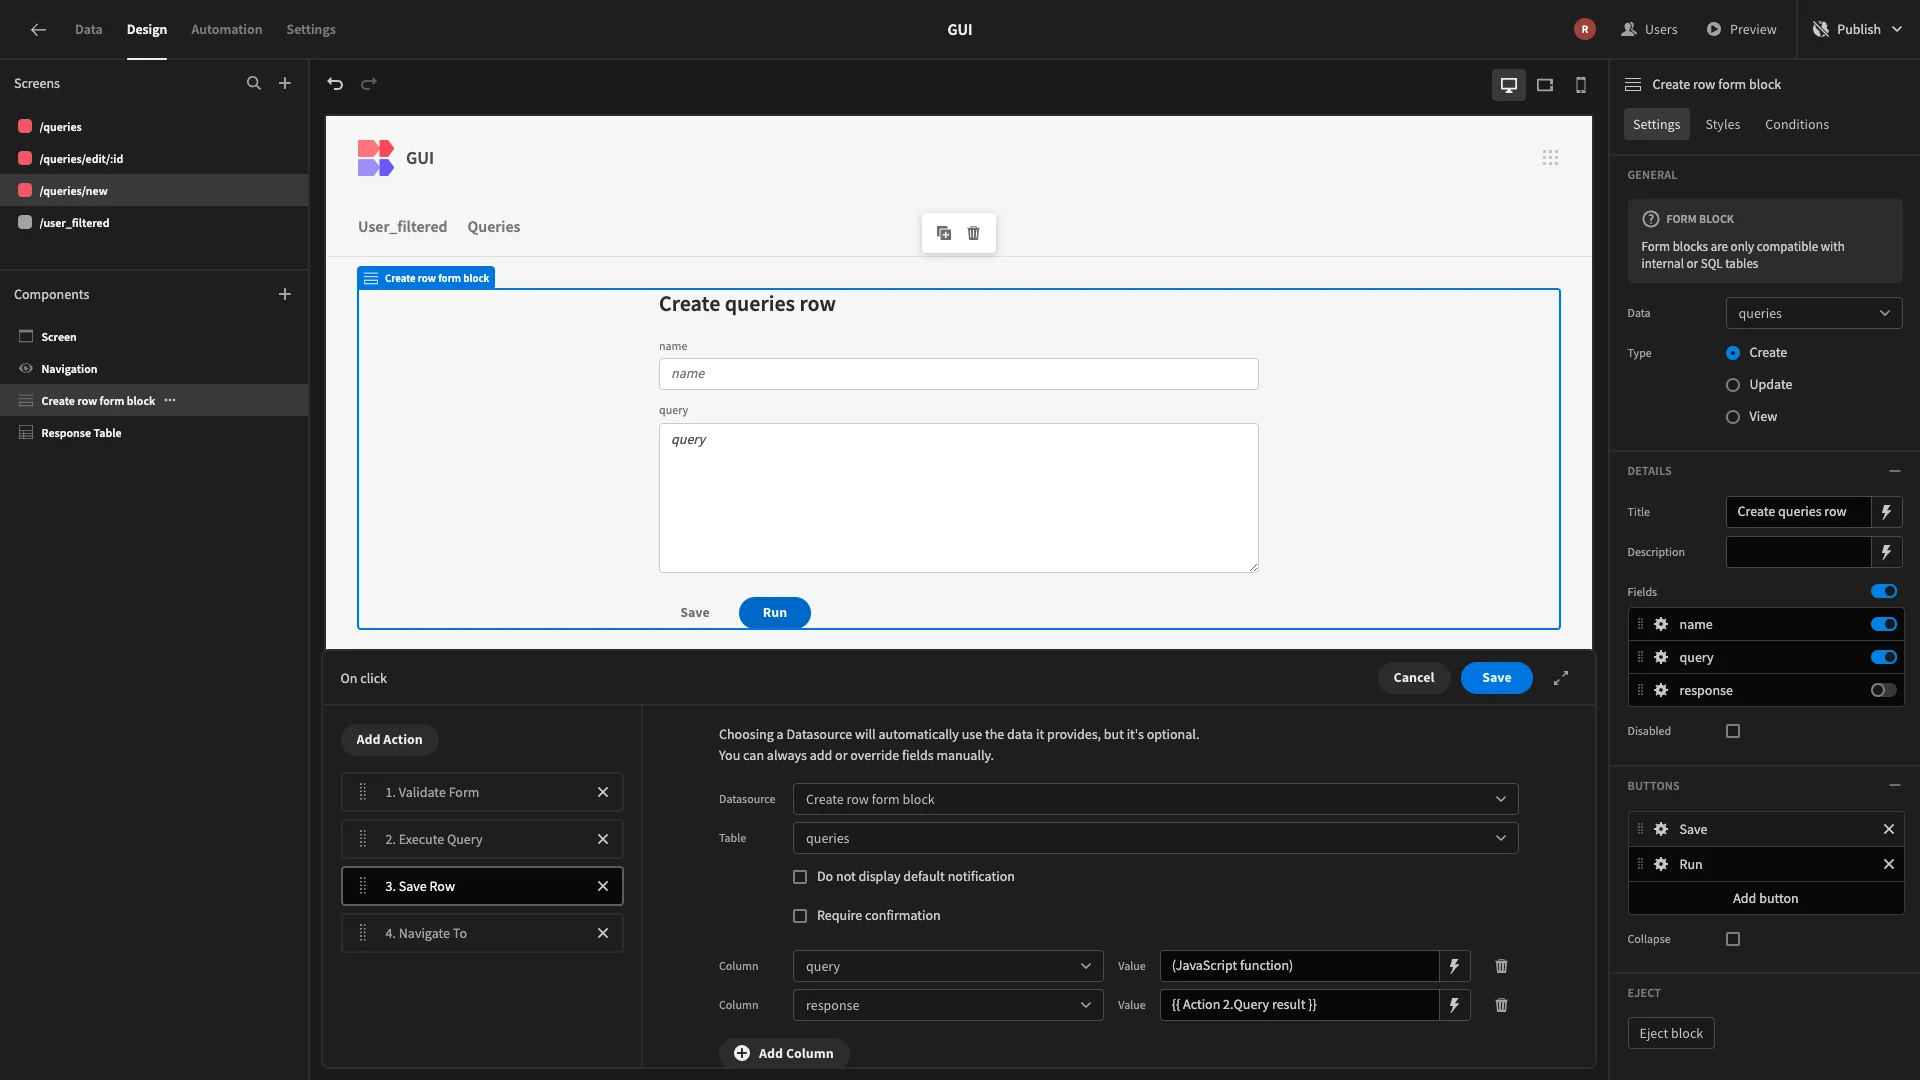
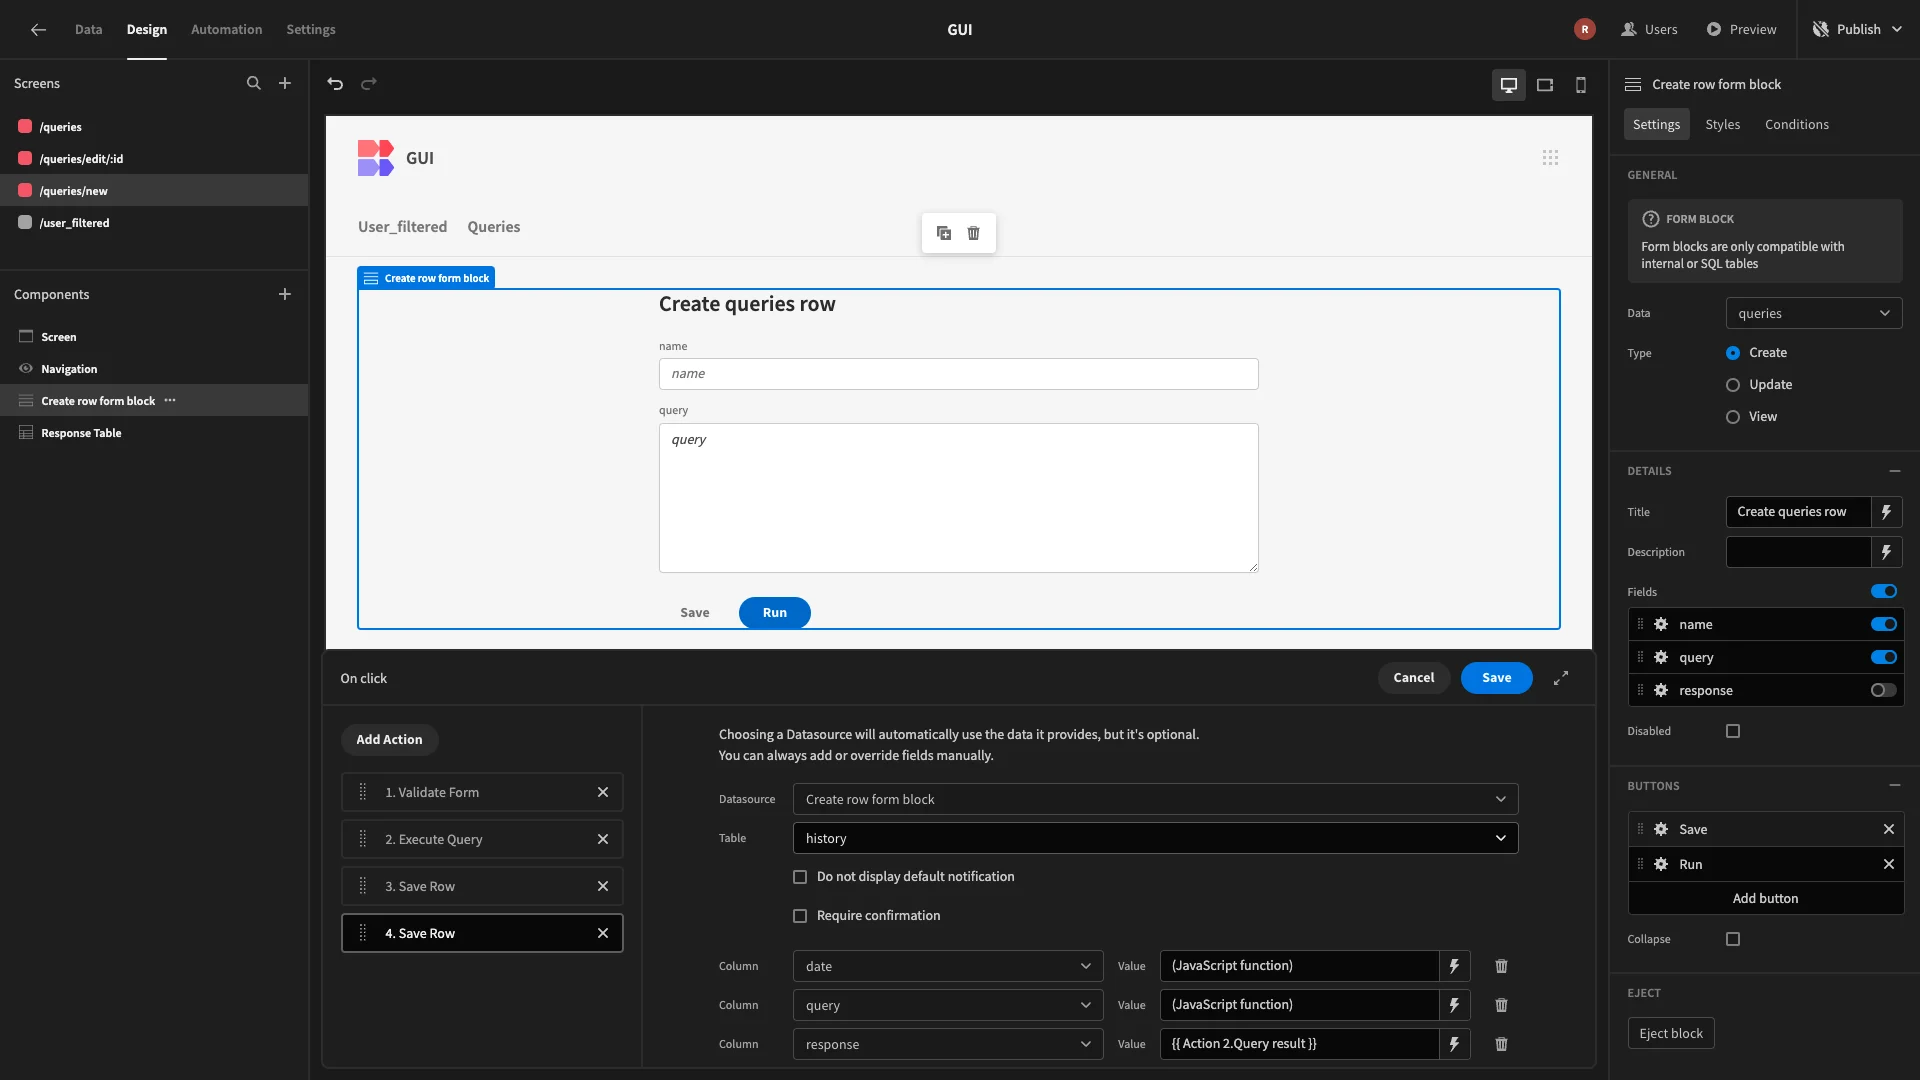
Lastly, we’re going to add a second Save Row action, this time pointing it at our history table.
We’ll use the exact same configuration as we did for our other button, setting values for the date, query, and result columns. We’ll also remove the existing Navigate To action.
Here’s our final chain of action.
Adding a history screens
Finally, we want to add a screen for users to view our query history. We’ll repeat the exact process as before to generate a CRUD UI, pointing it at our history table and choosing the side panels option.
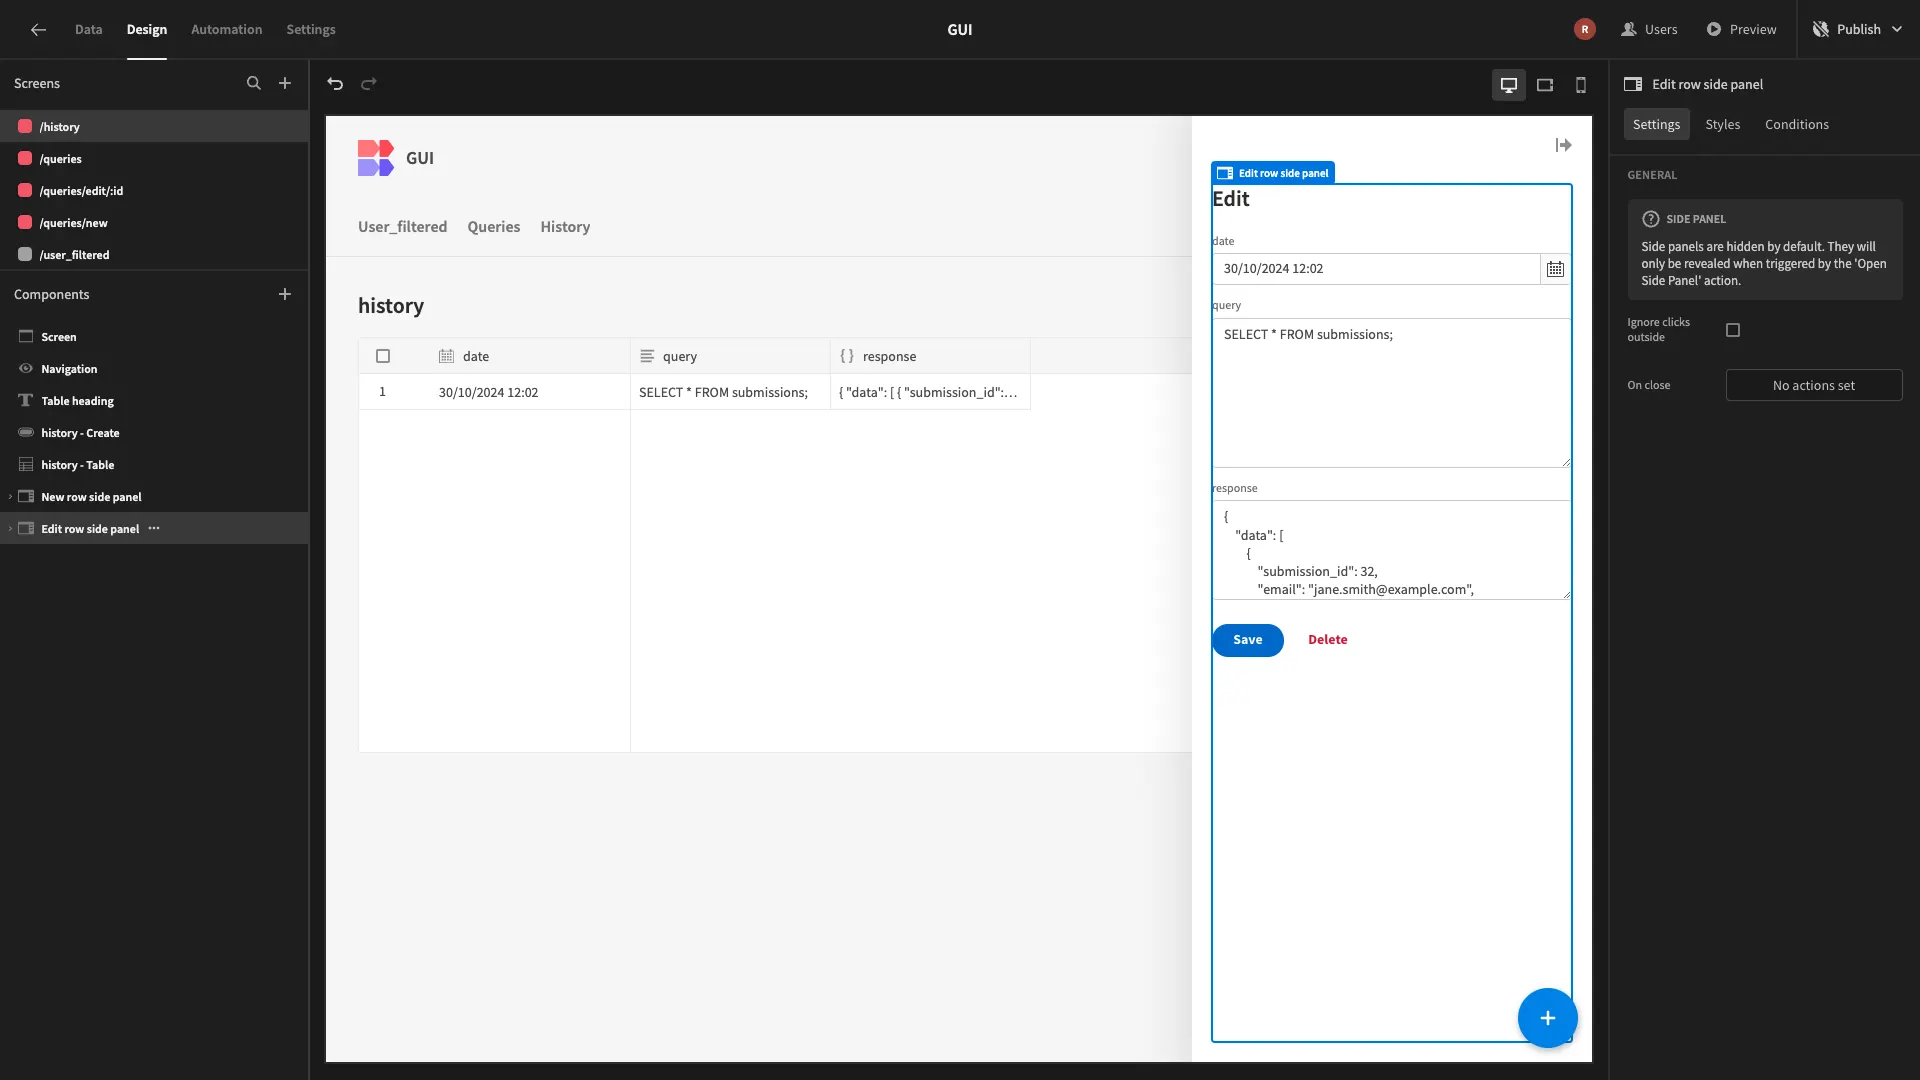
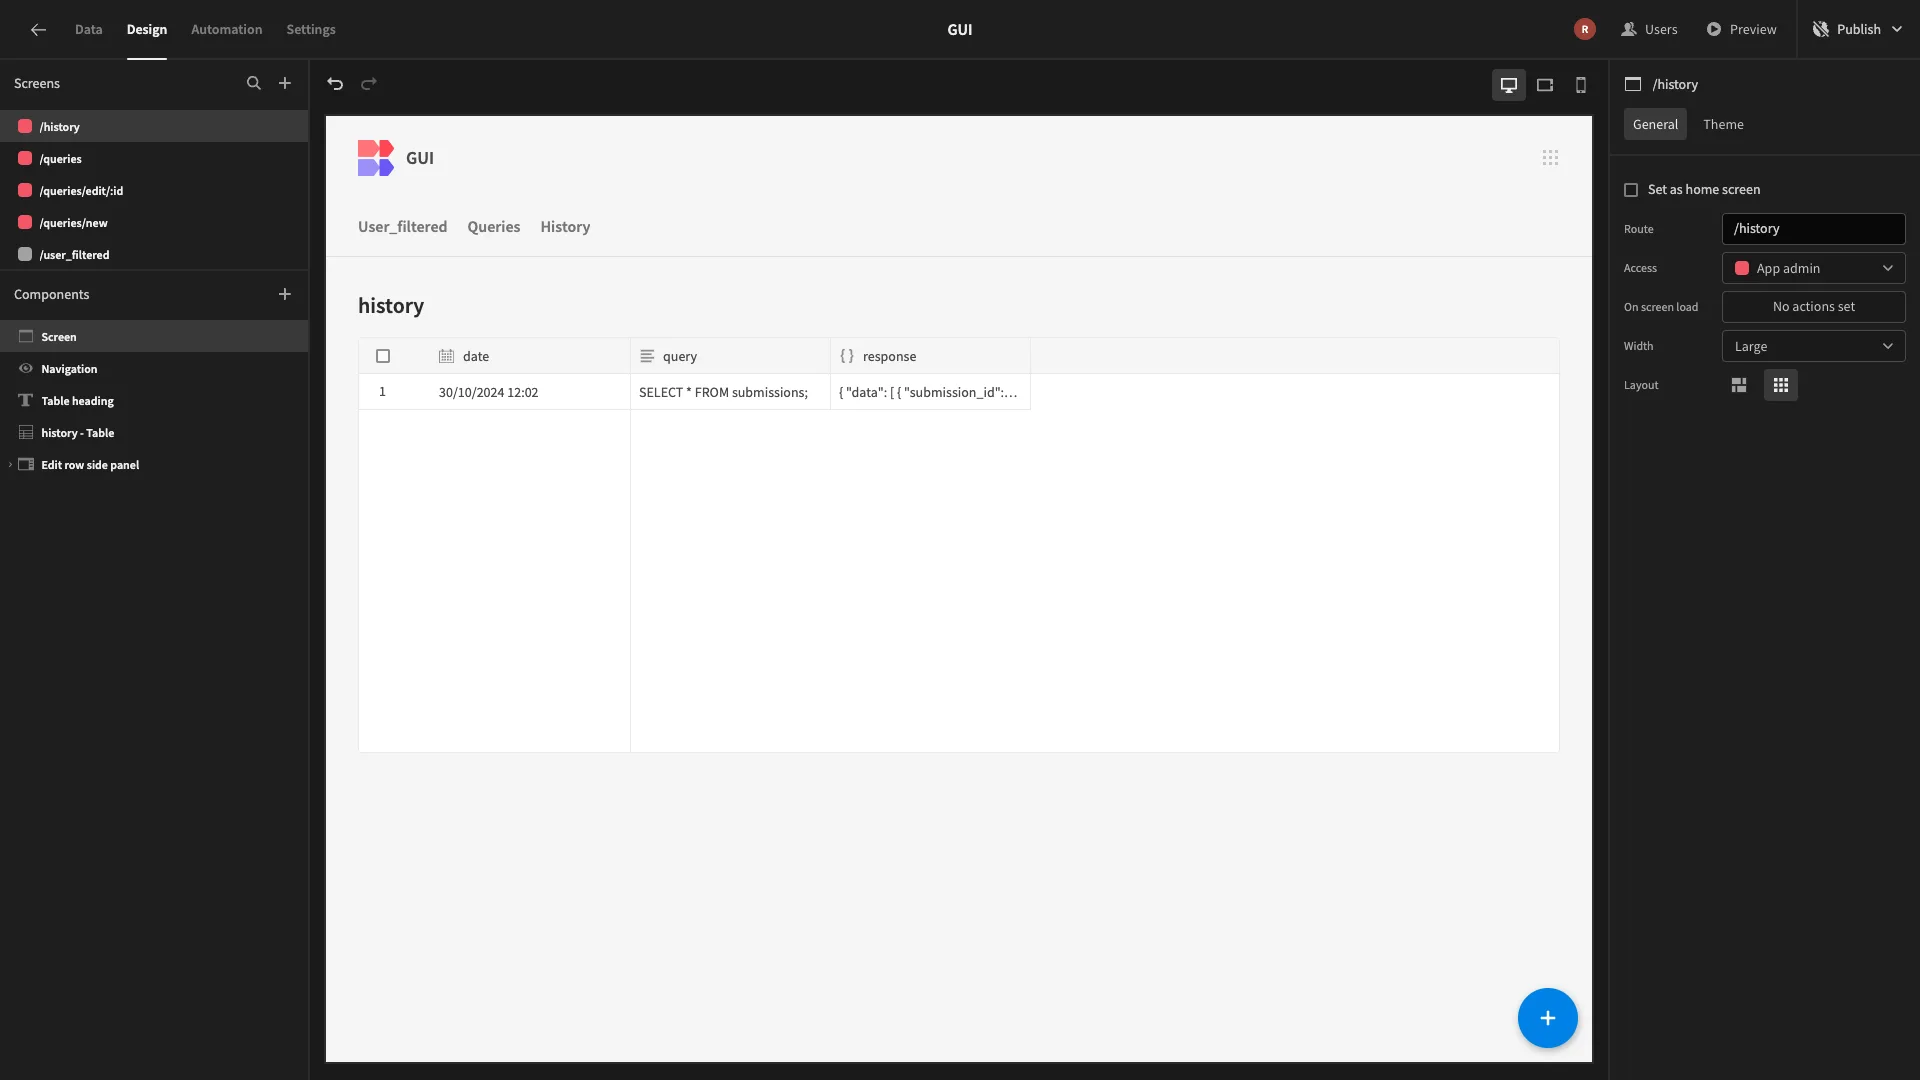
However, we want to make this read-only. We’ll start by deleting the Side-Panel for our Create form, as well as the button that’s used to access this.
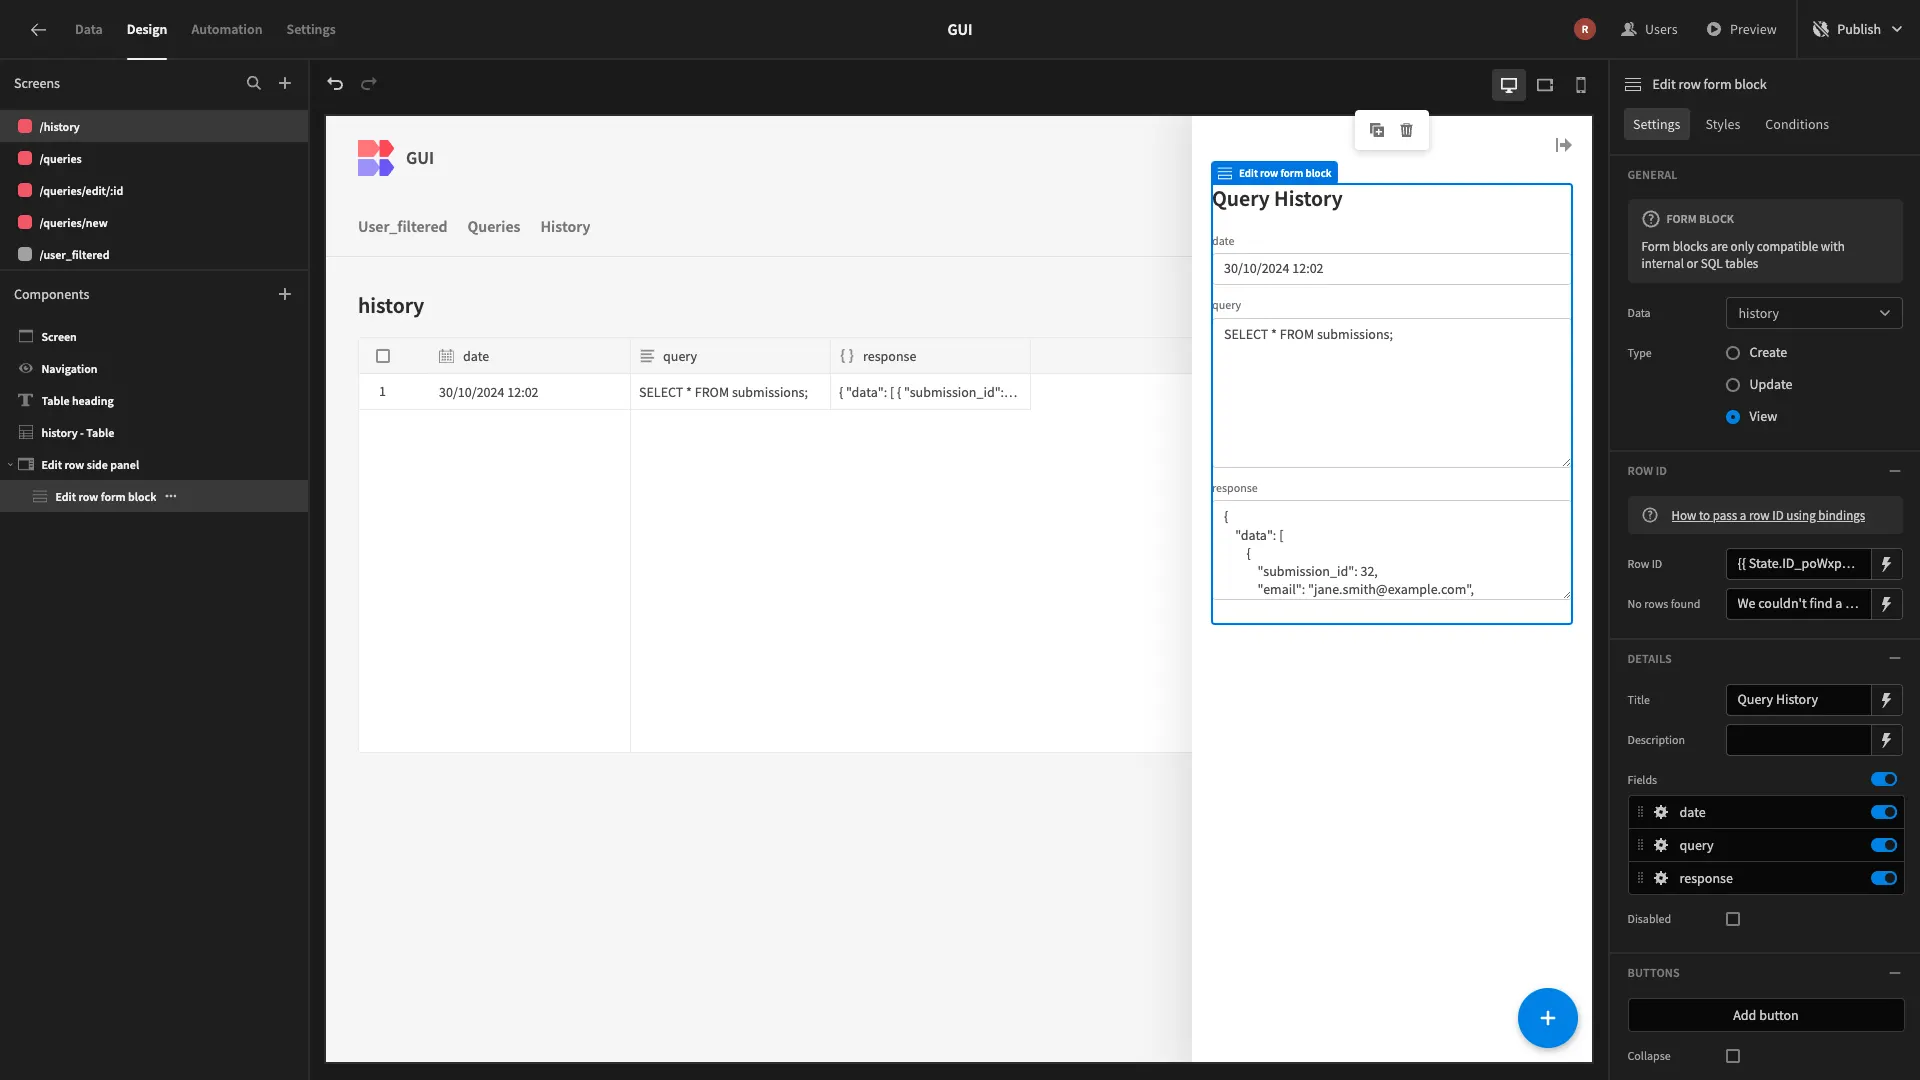
Then, we’re going to select the View option on our remaining form, so users can’t edit saved rows. We’ll also update the Title to reflect this.
4. Adding automations
We want to give our users the ability to re-submit saved queries at the press of a button. The easiest way to do this is using a Row Action. This is an automation relating to a table row that can be trigger by a user-action.
Generate a Row Action
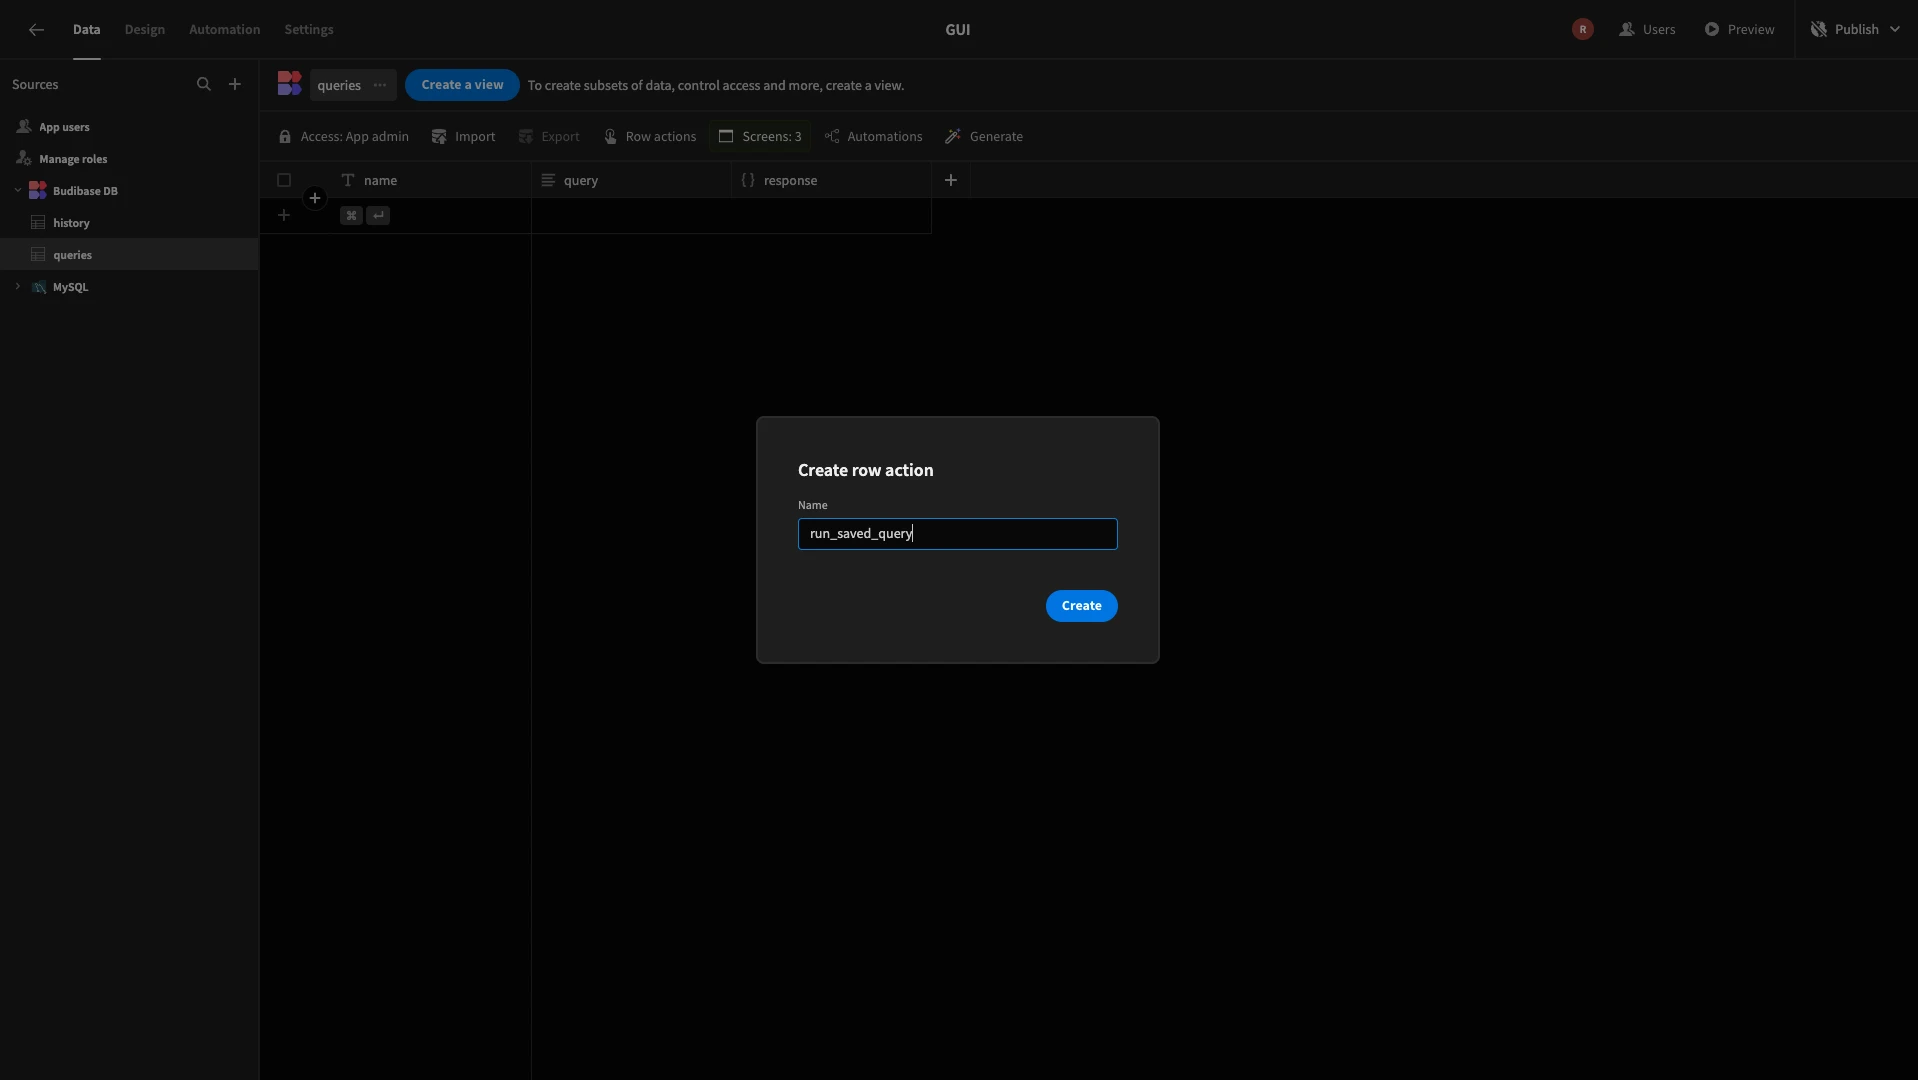
From the Data section, we’ll head to Row Actions for queries and hit Create new row action.
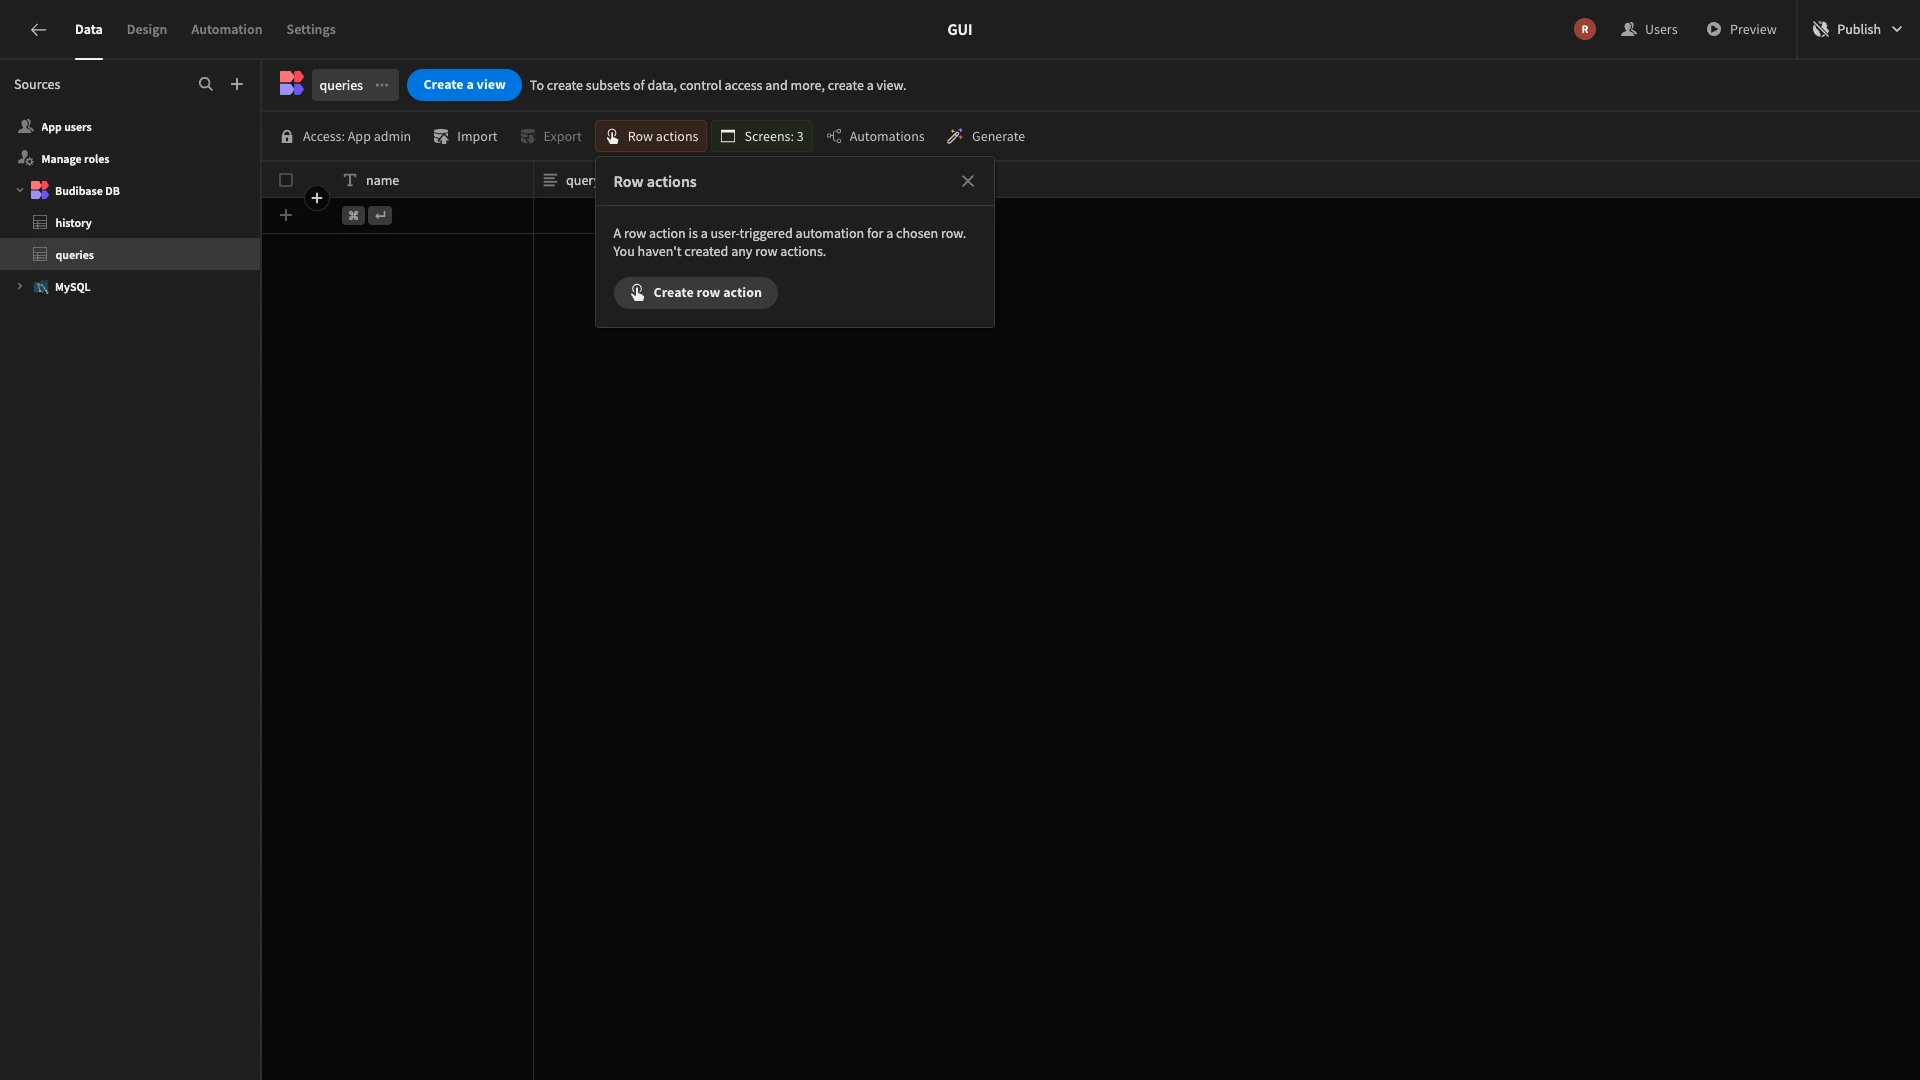
We’re then prompted to give this a name. We’ll call ours run_saved_query.
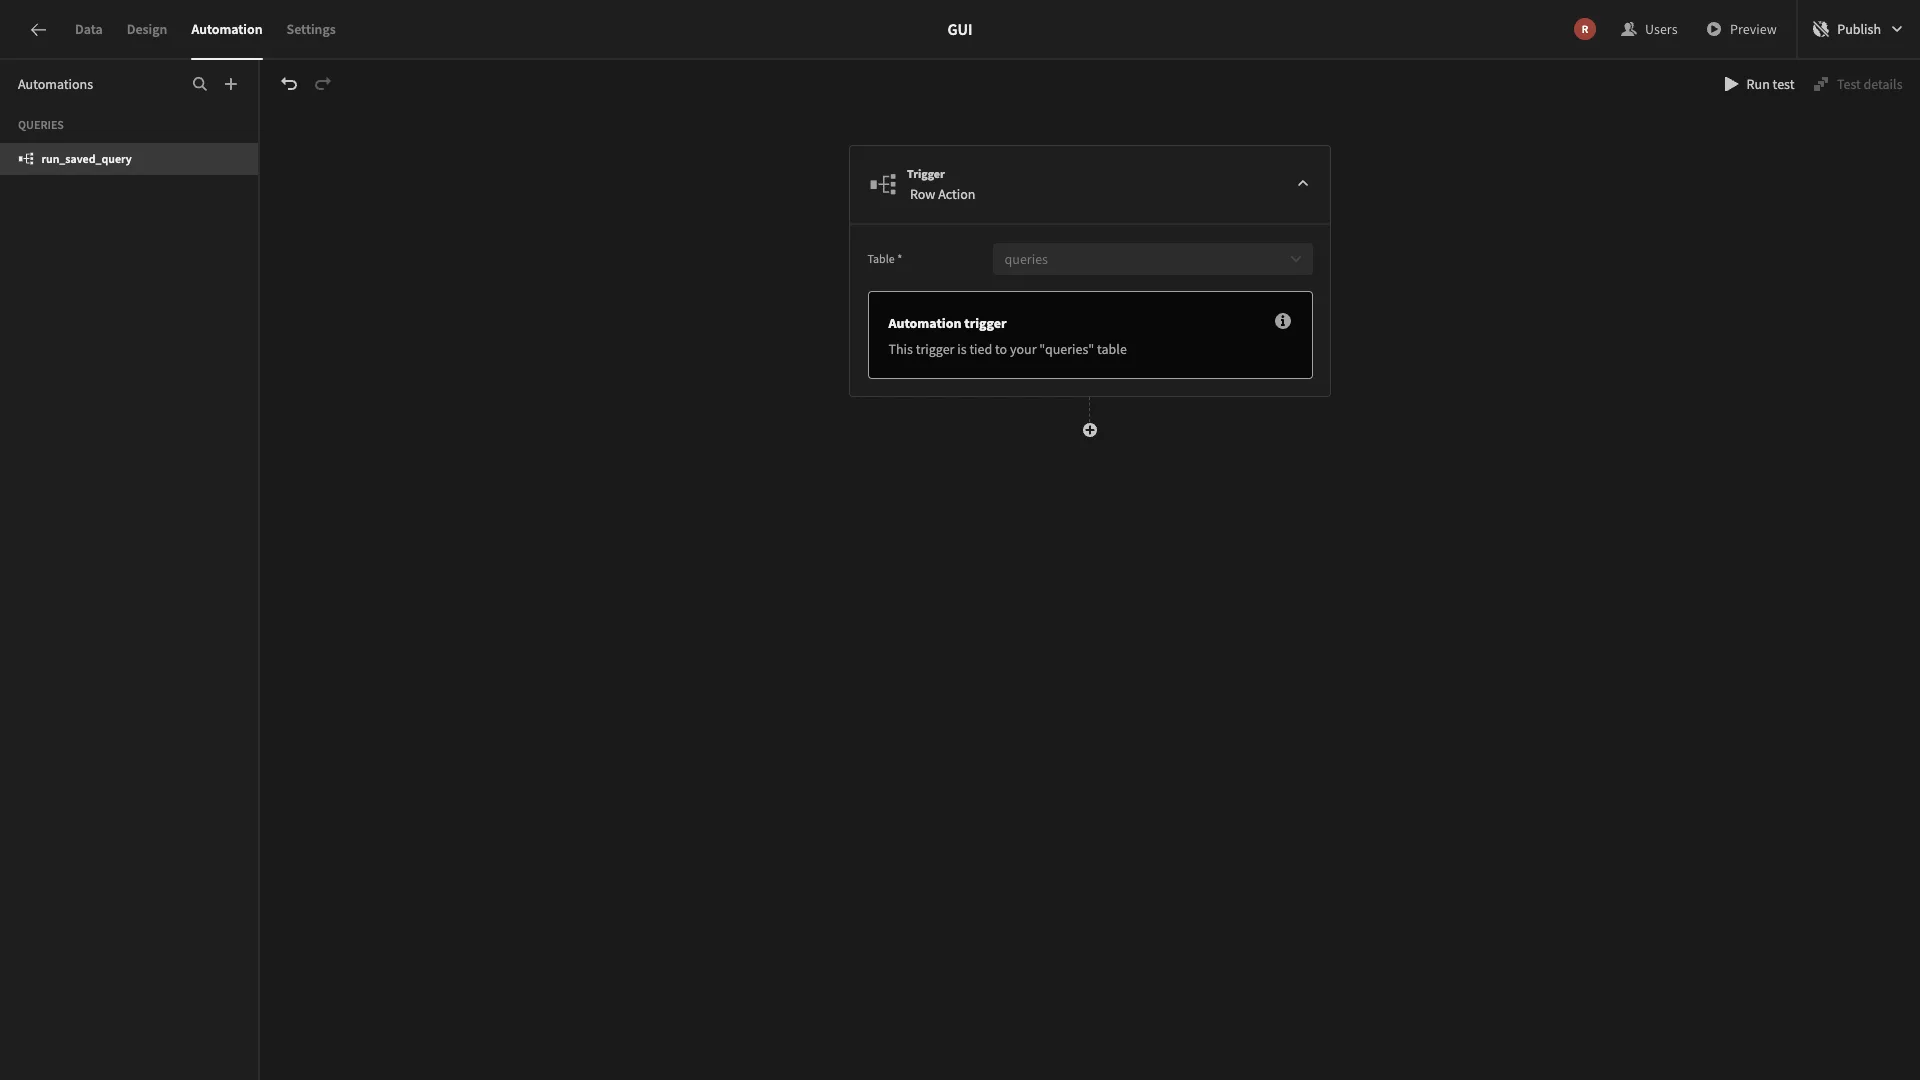
This will then take us to the Automation section, with a trigger set for our new rule.
Building our automation
We want to do the following:
- Send our query.
- Save an appropriate row to the history table.
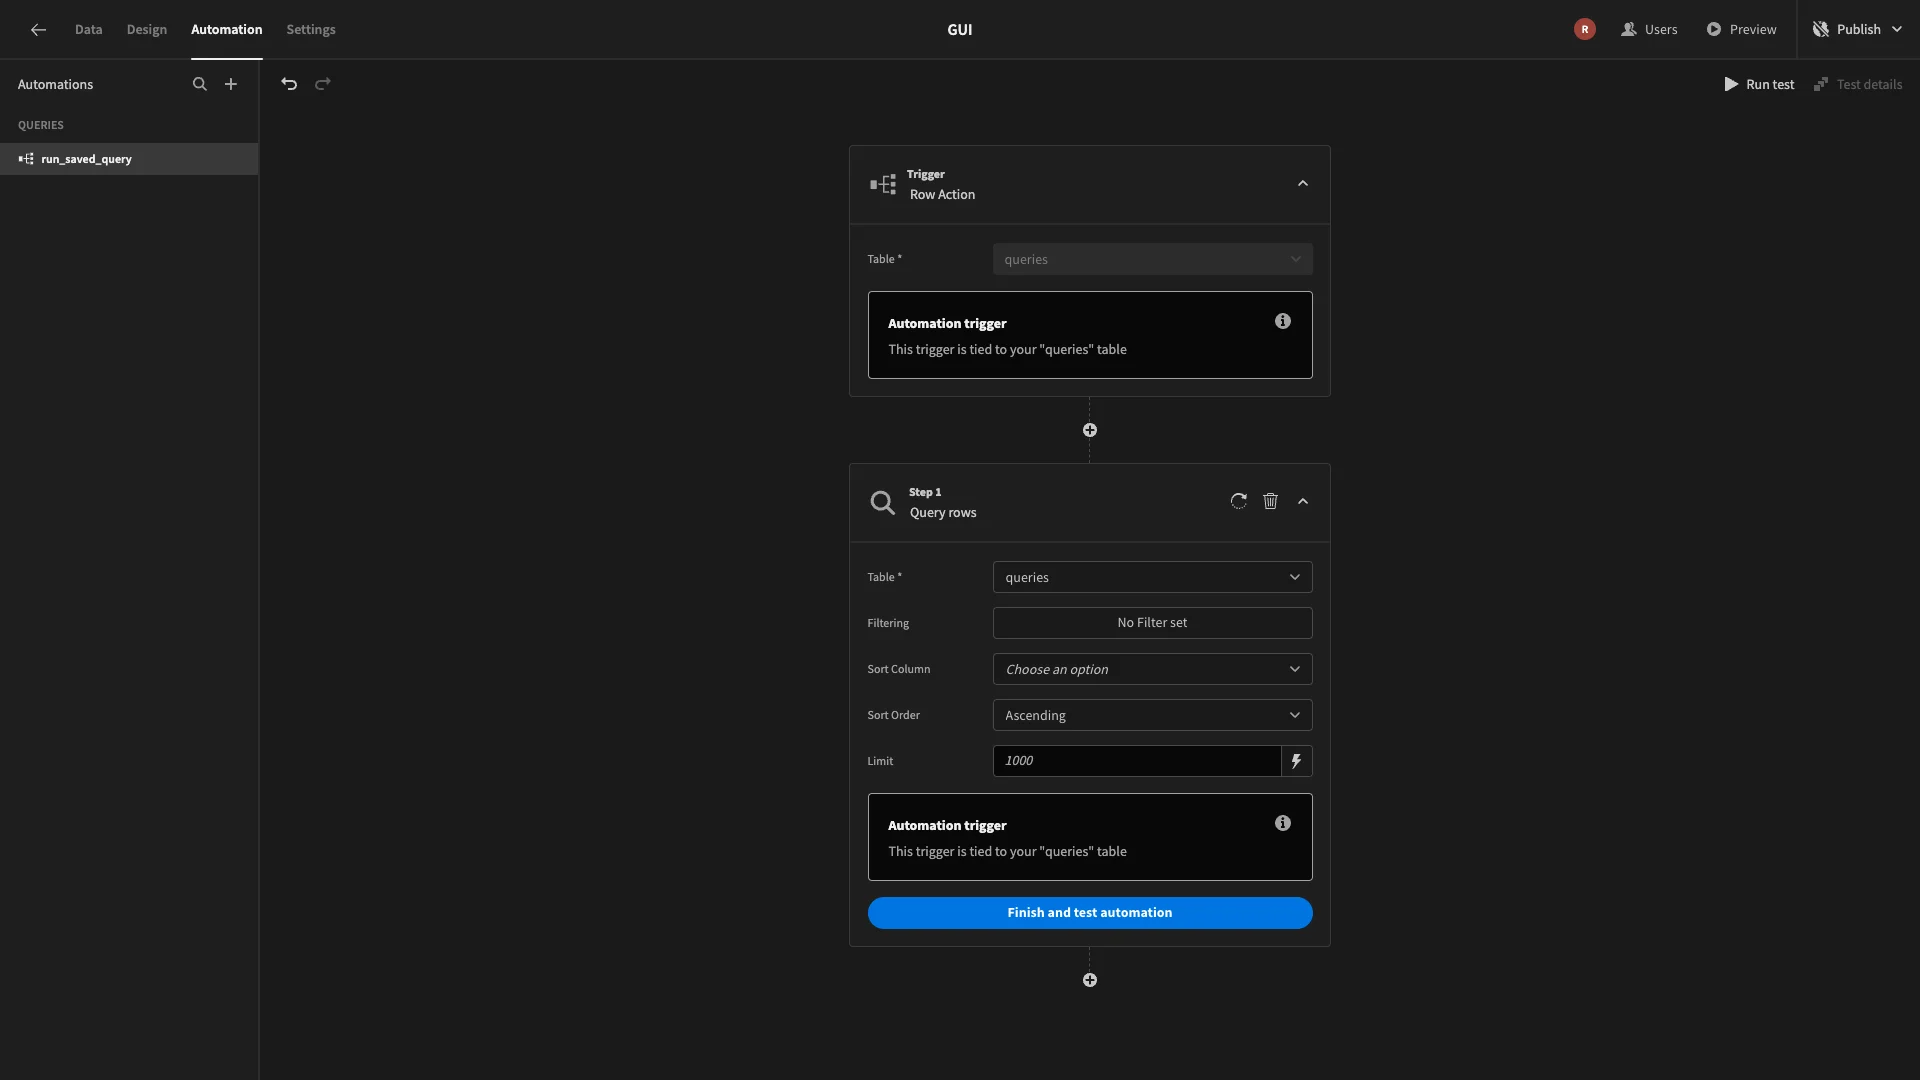
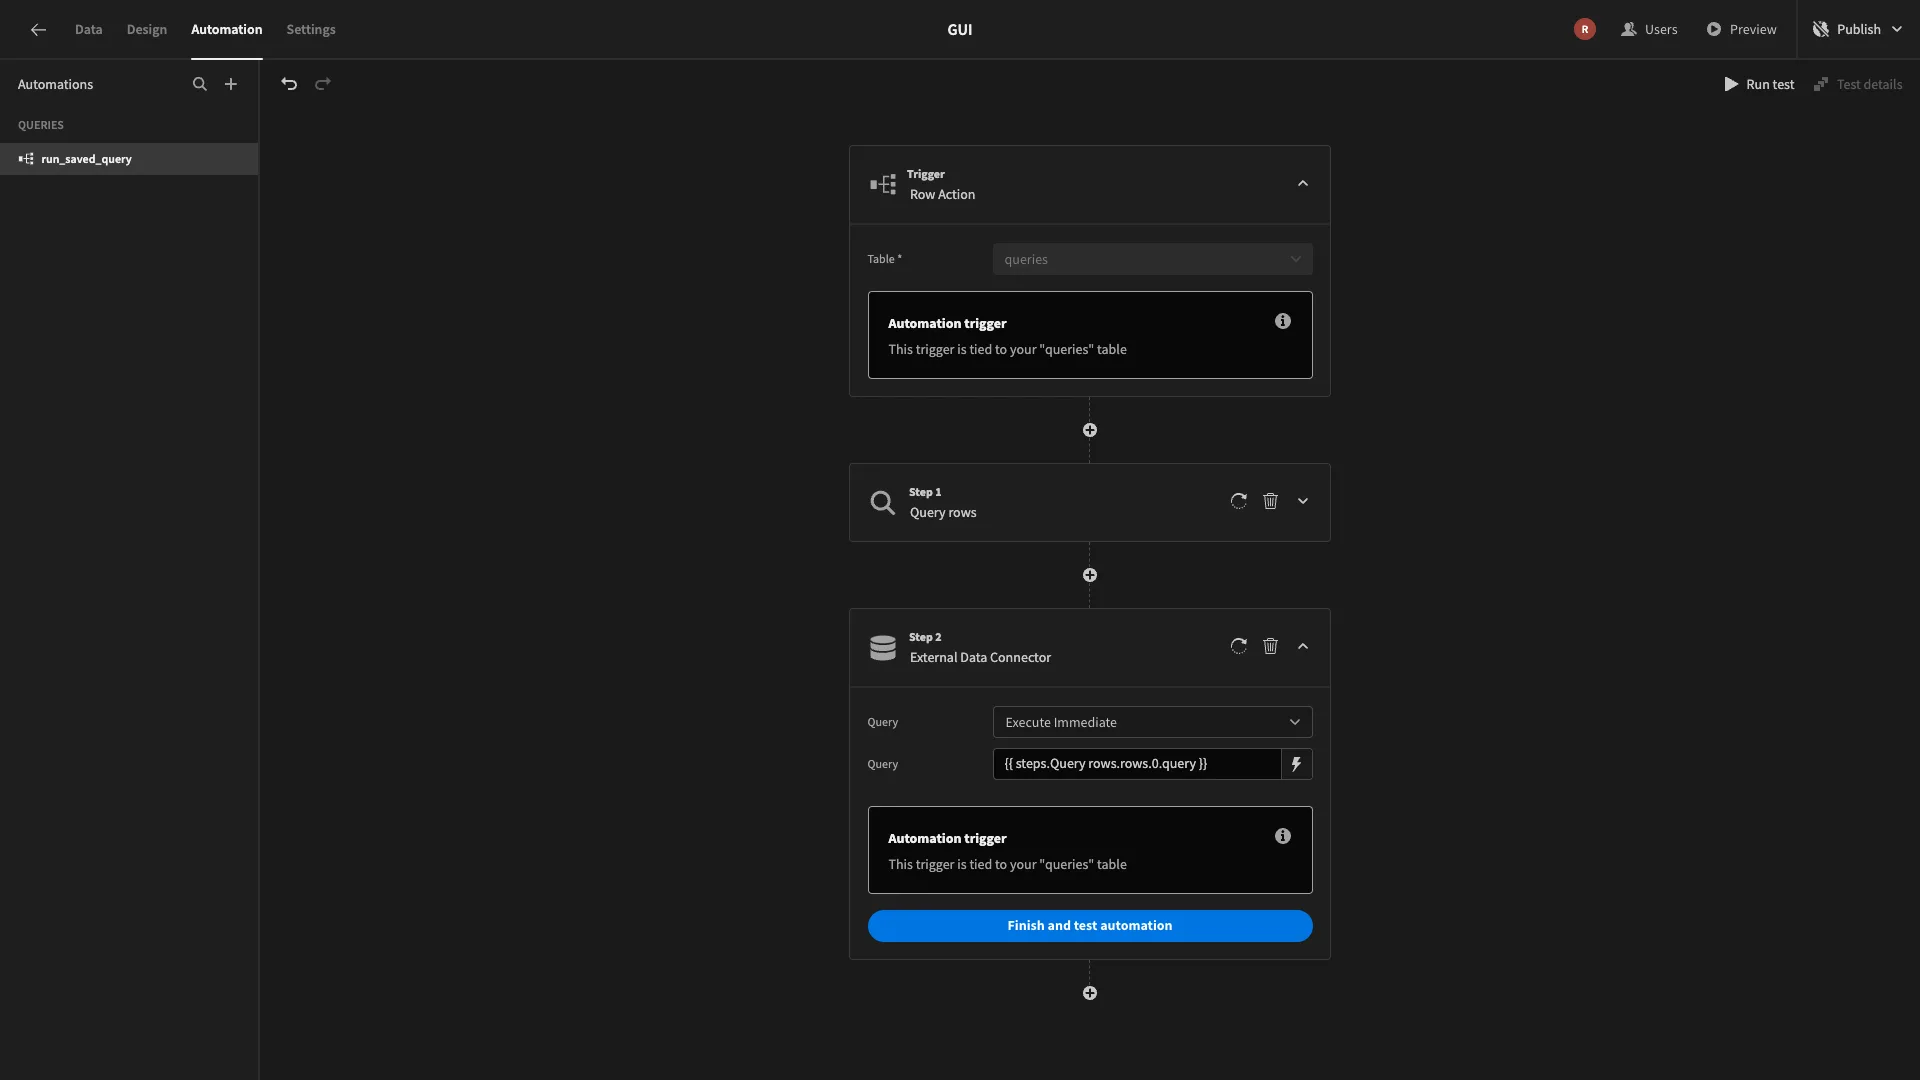
We’ll begin by adding an automation step called query rows, which we’ll point at our queries table.
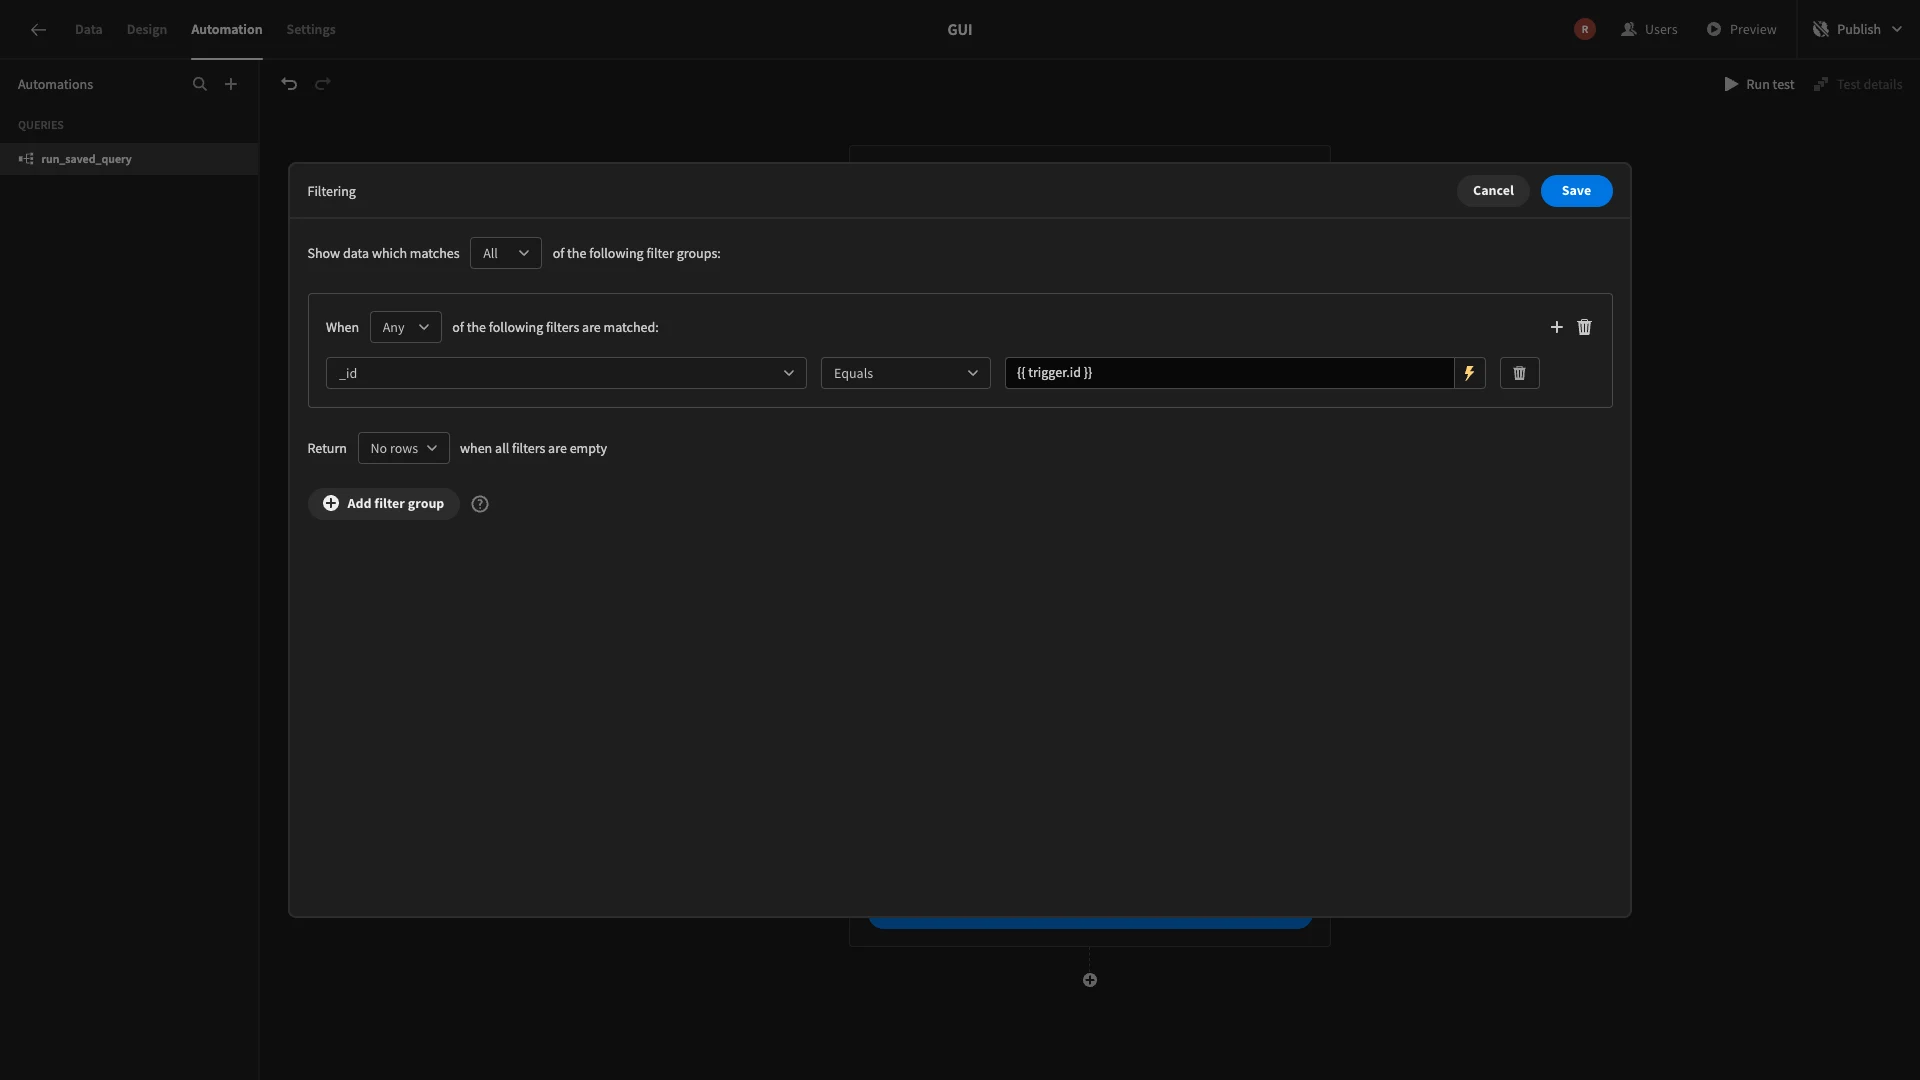
We’ll then add a filter to this so that its _id equals our trigger output, using {{ trigger.id }}.
After this, we’ll add an external data connector action, which will fire our Execute Immediate query. We’re binding the query field to the output of our previous step, using {{ steps.Query rows.rows.0.query }}.
Lastly, we’ll add a create row action, which we’ll point at our history table. We’ll bind the data field to the same JavaScript we used earlier to get the current date:
1var date = new Date();
2
3return date
For the query value, we’ll use {{ steps.Query rows.rows.0.query }}.
And we’ll use the following JavaScript to clean and format our response:
 1// Initialize an empty array inside an object with a "data" key
 2
 3let myObj = {
 4
 5 data: []
 6
 7};
 8
 9// Store the response in a variable (assuming it's an array of objects)
10
11const responseArray = $("steps.External Data Connector.response");
12
13// Iterate over the array and push each object into the "data" array
14
15for (let i = 0; i < responseArray.length; i++) {
16
17 const currentRow = responseArray[i];
18
19 myObj.data.push(currentRow); // Add each object into the "data" array
20
21}
22
23// Return the final object
24
25return myObj;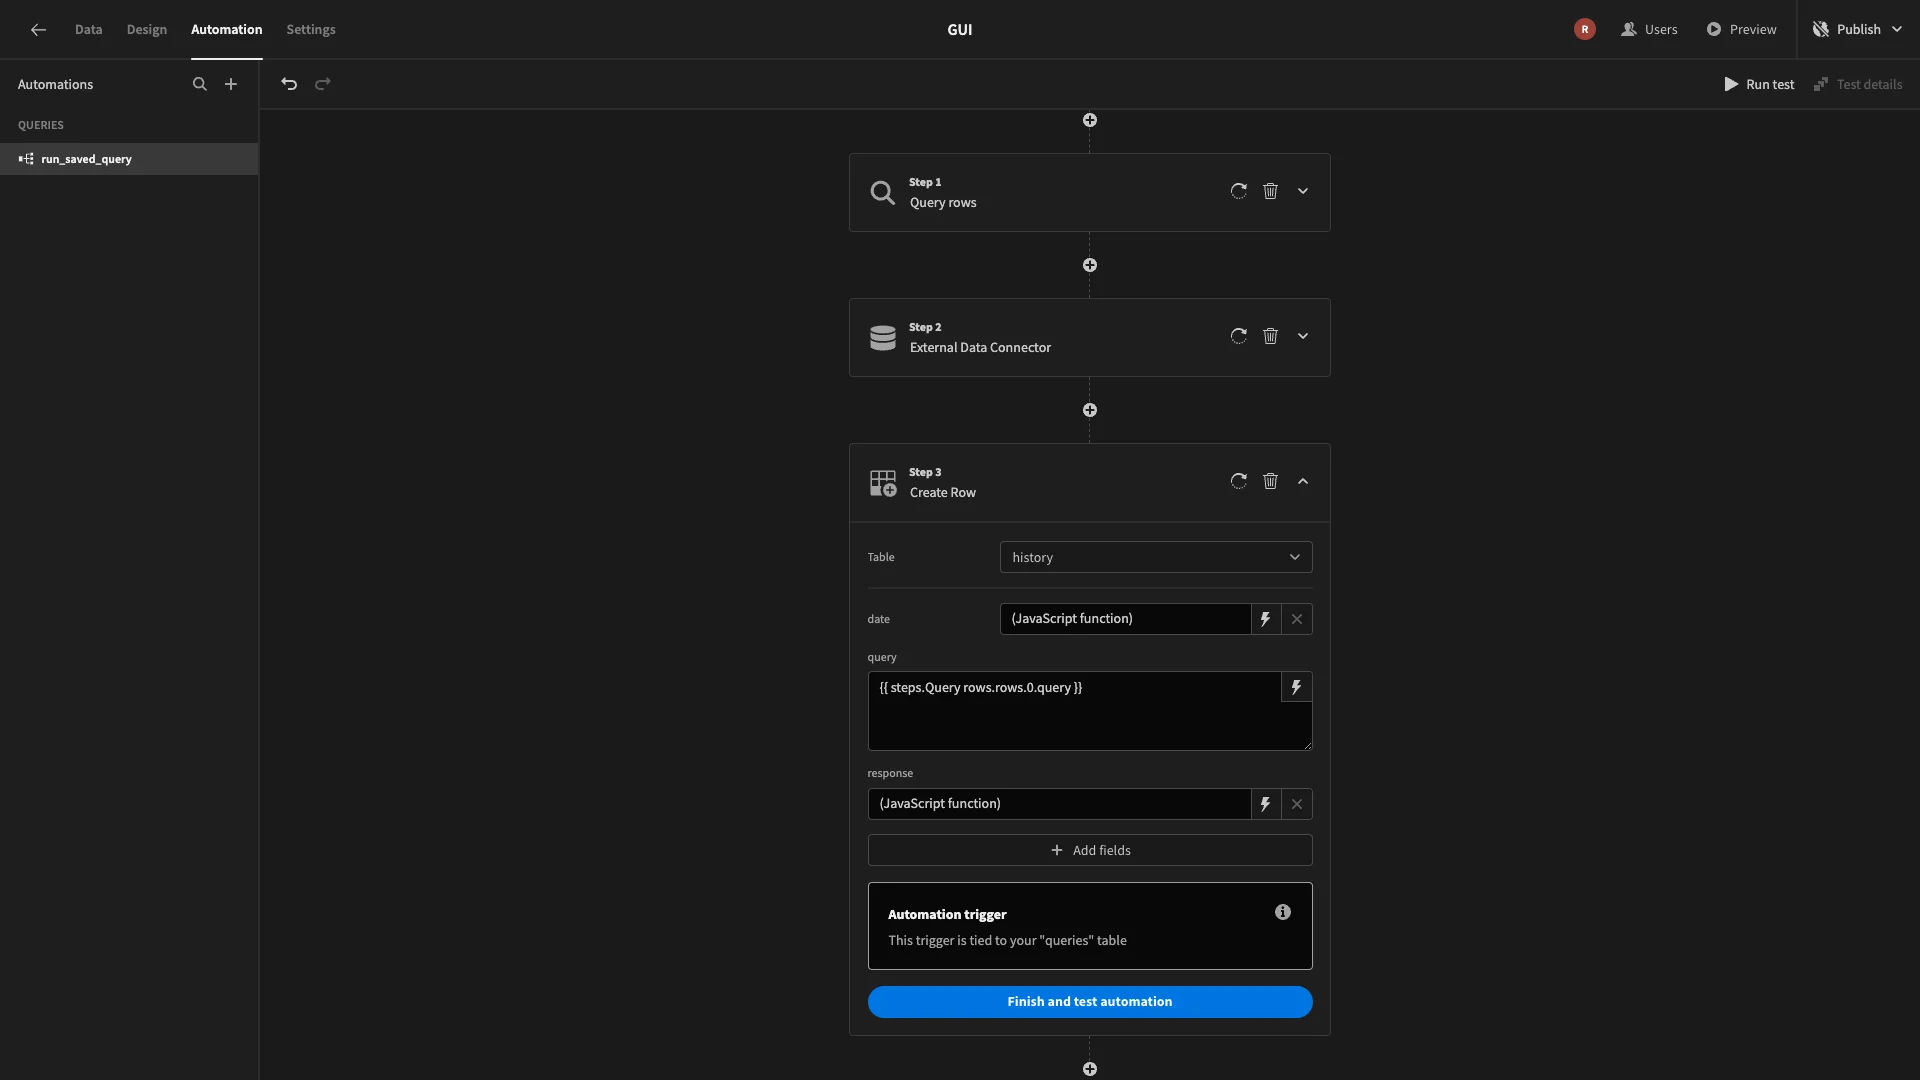
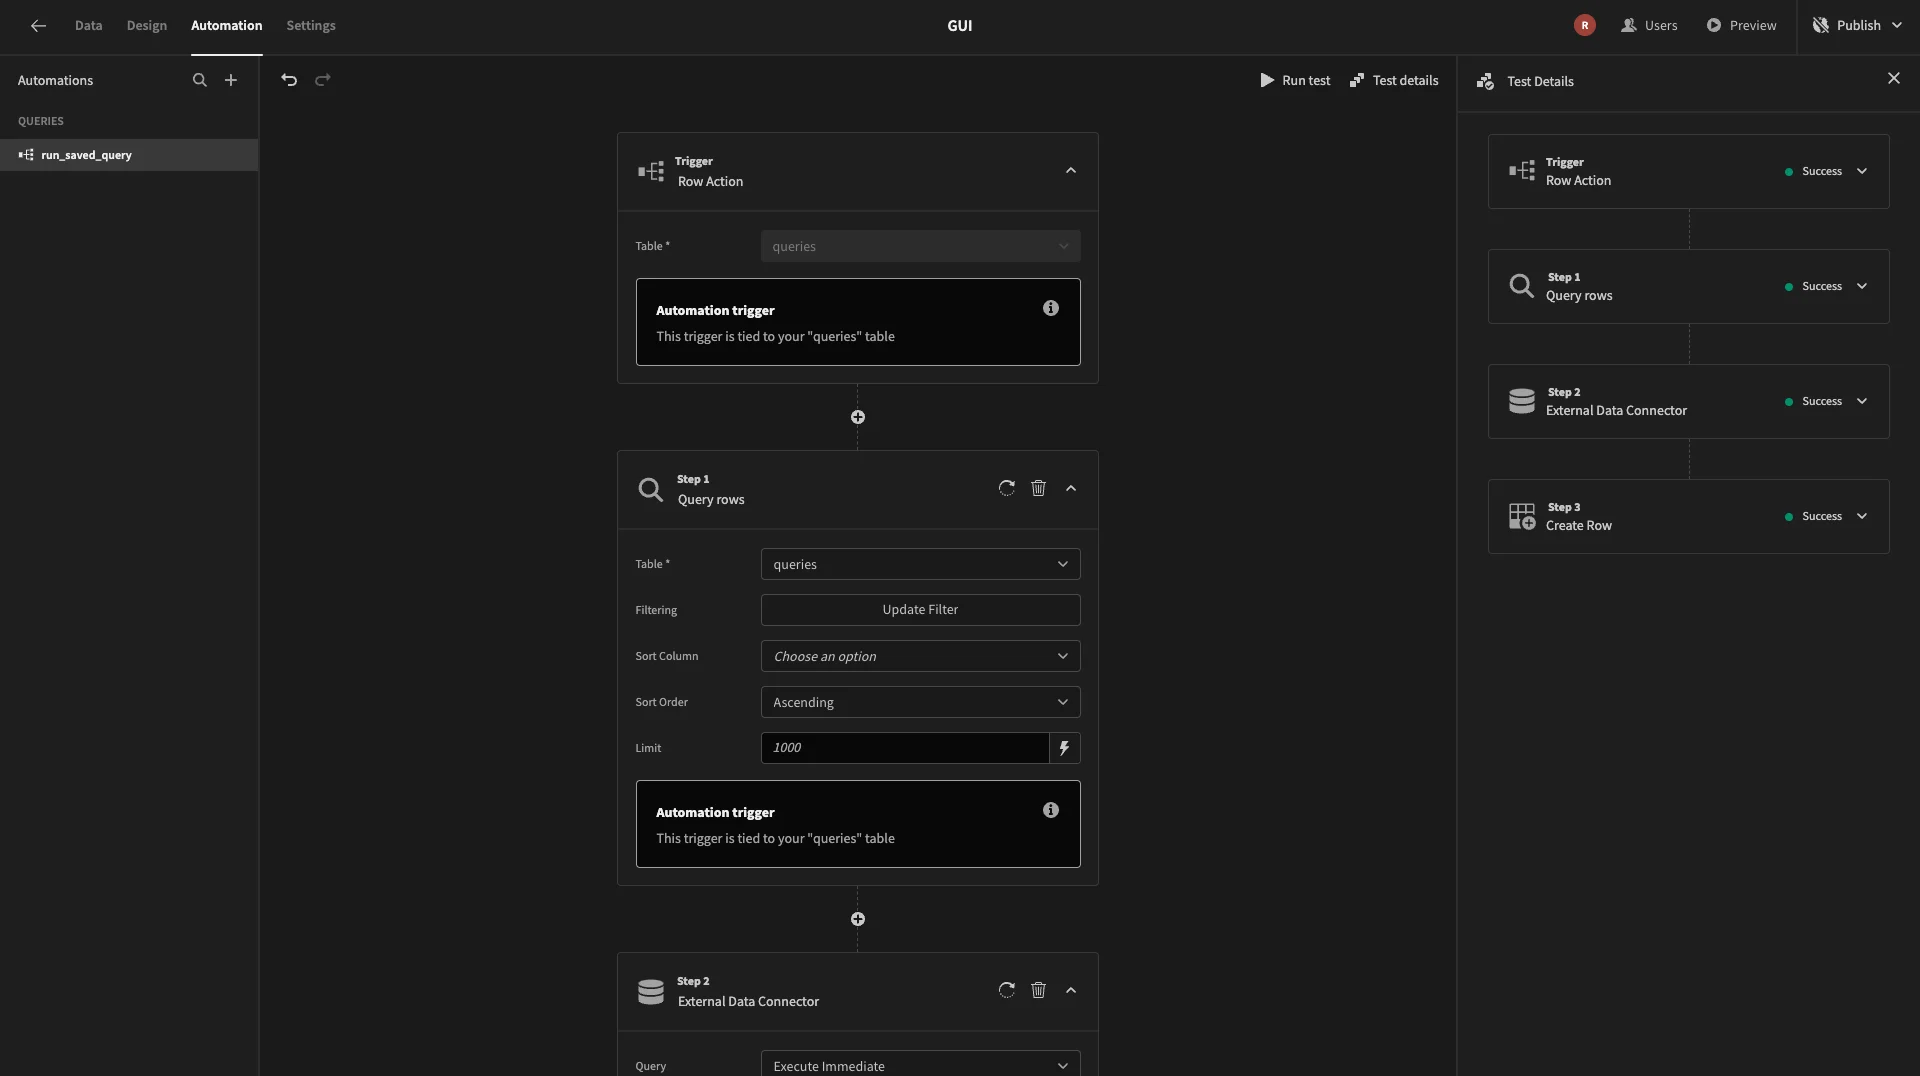
We can then test this to confirm that it works as we expected.
Updating our saved query screens
Next, we’ll make a few updates to our saved query UIs.
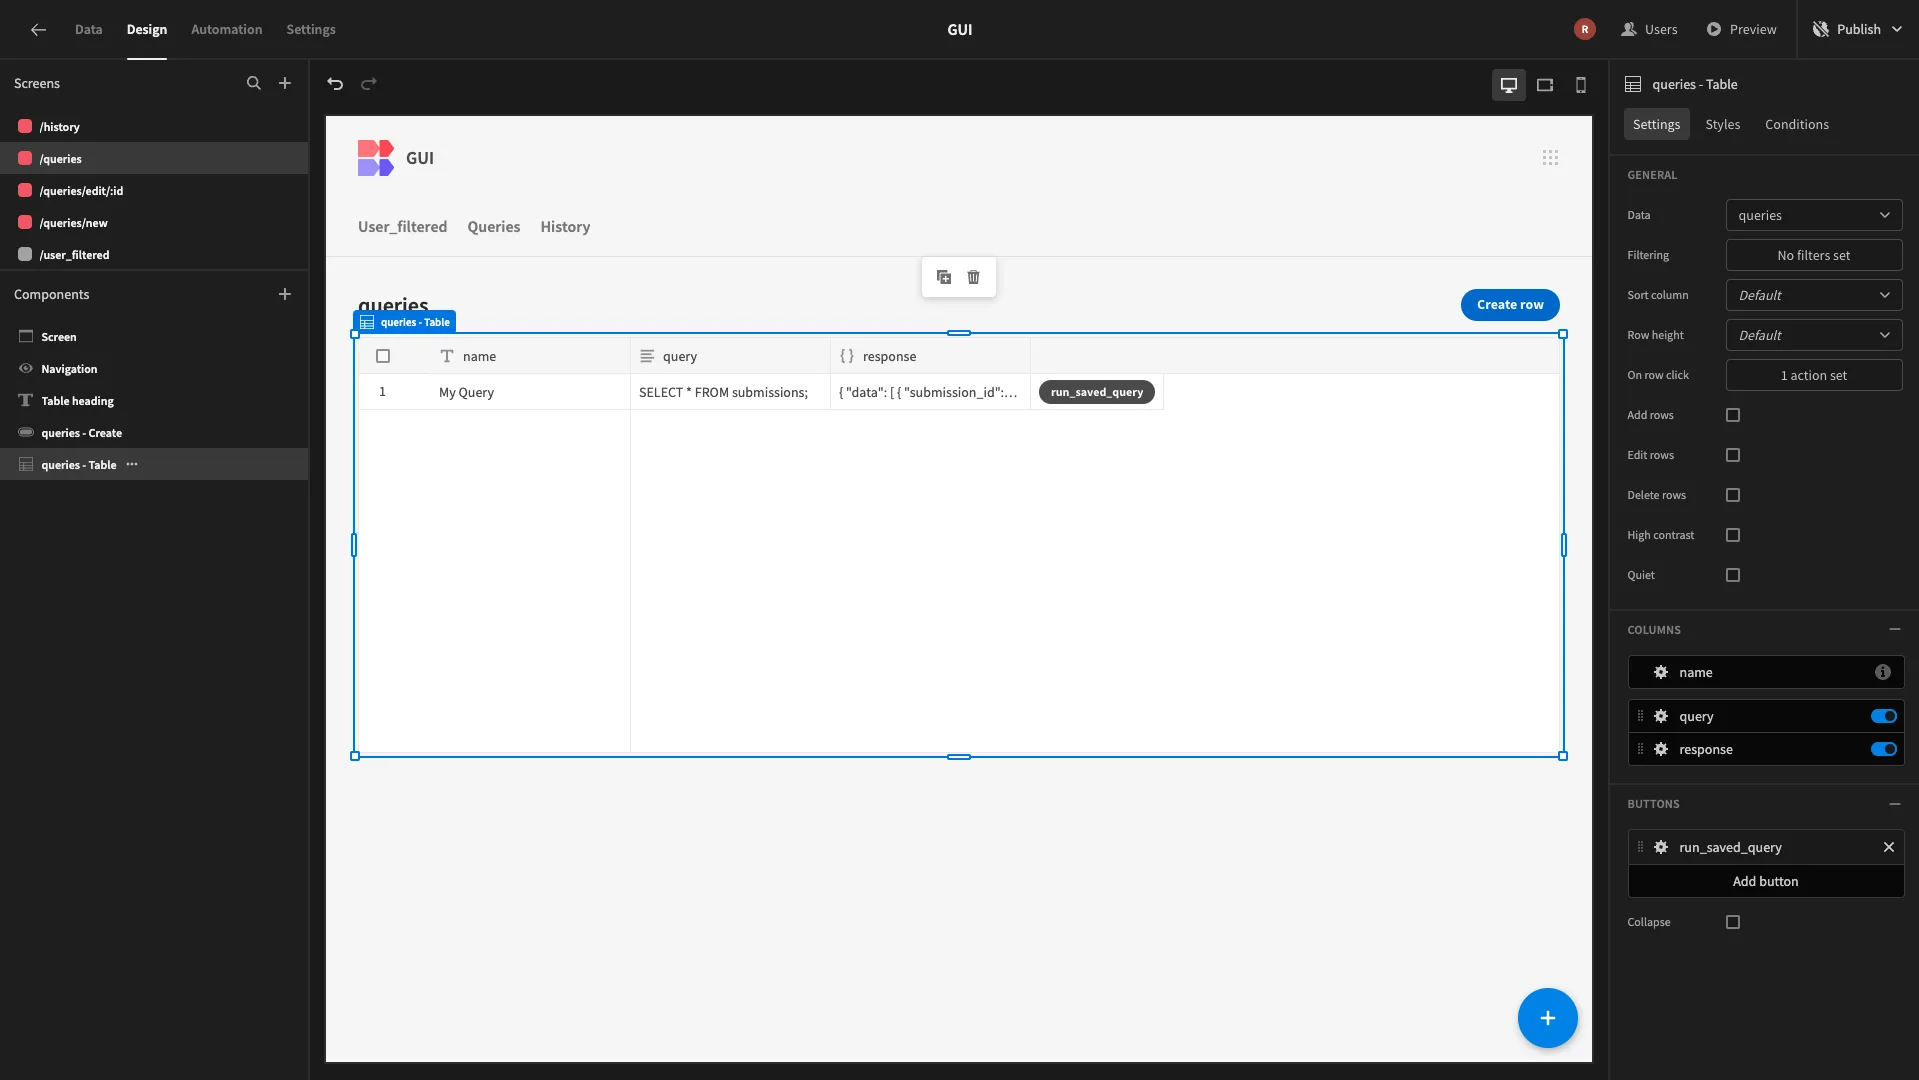
The first thing we’ll do is add a button to trigger our row action.
Next, we want to make a few adjustments to the screen for editing saved queries. We’ll start by deleting the existing form block.
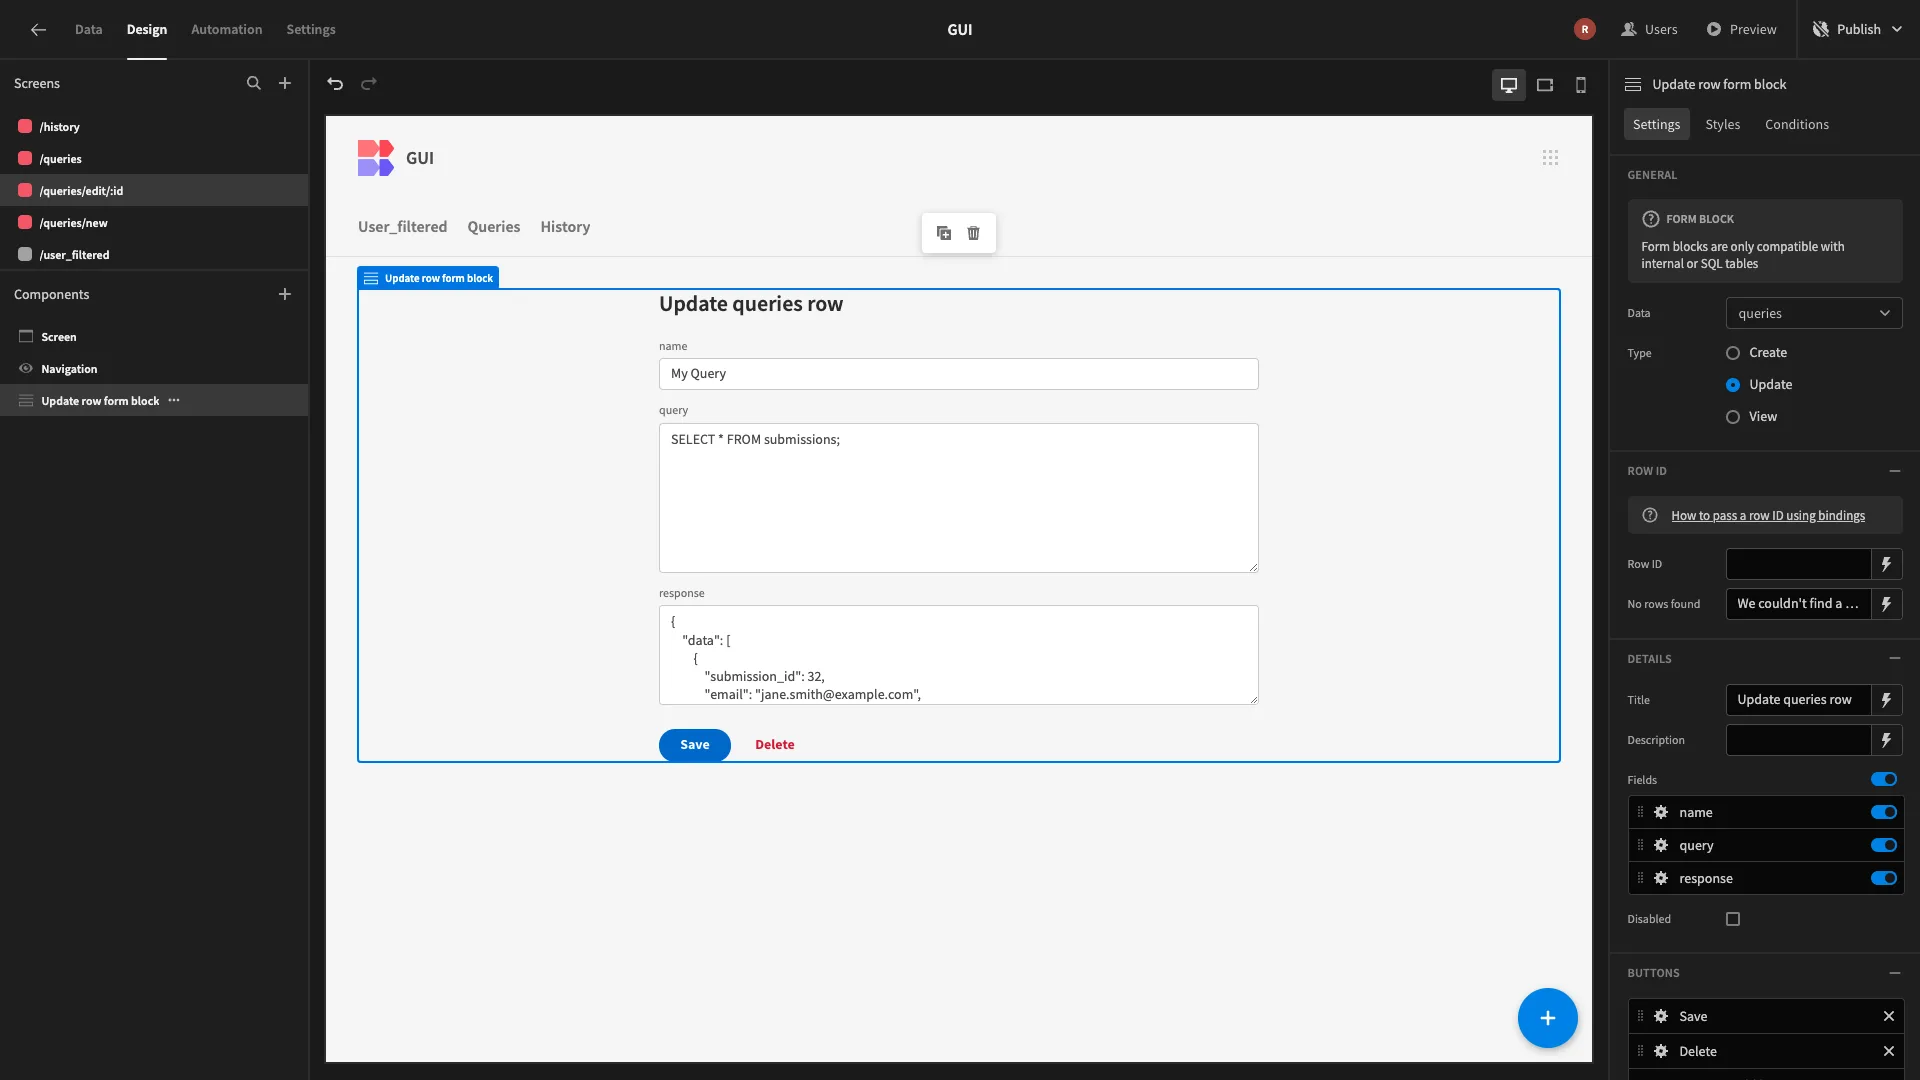
We’ll then copy and paste in the query editor form we built earlier, changing its type to update and setting the Row ID to {{ URL.id }}. All of our button actions will still work correctly.
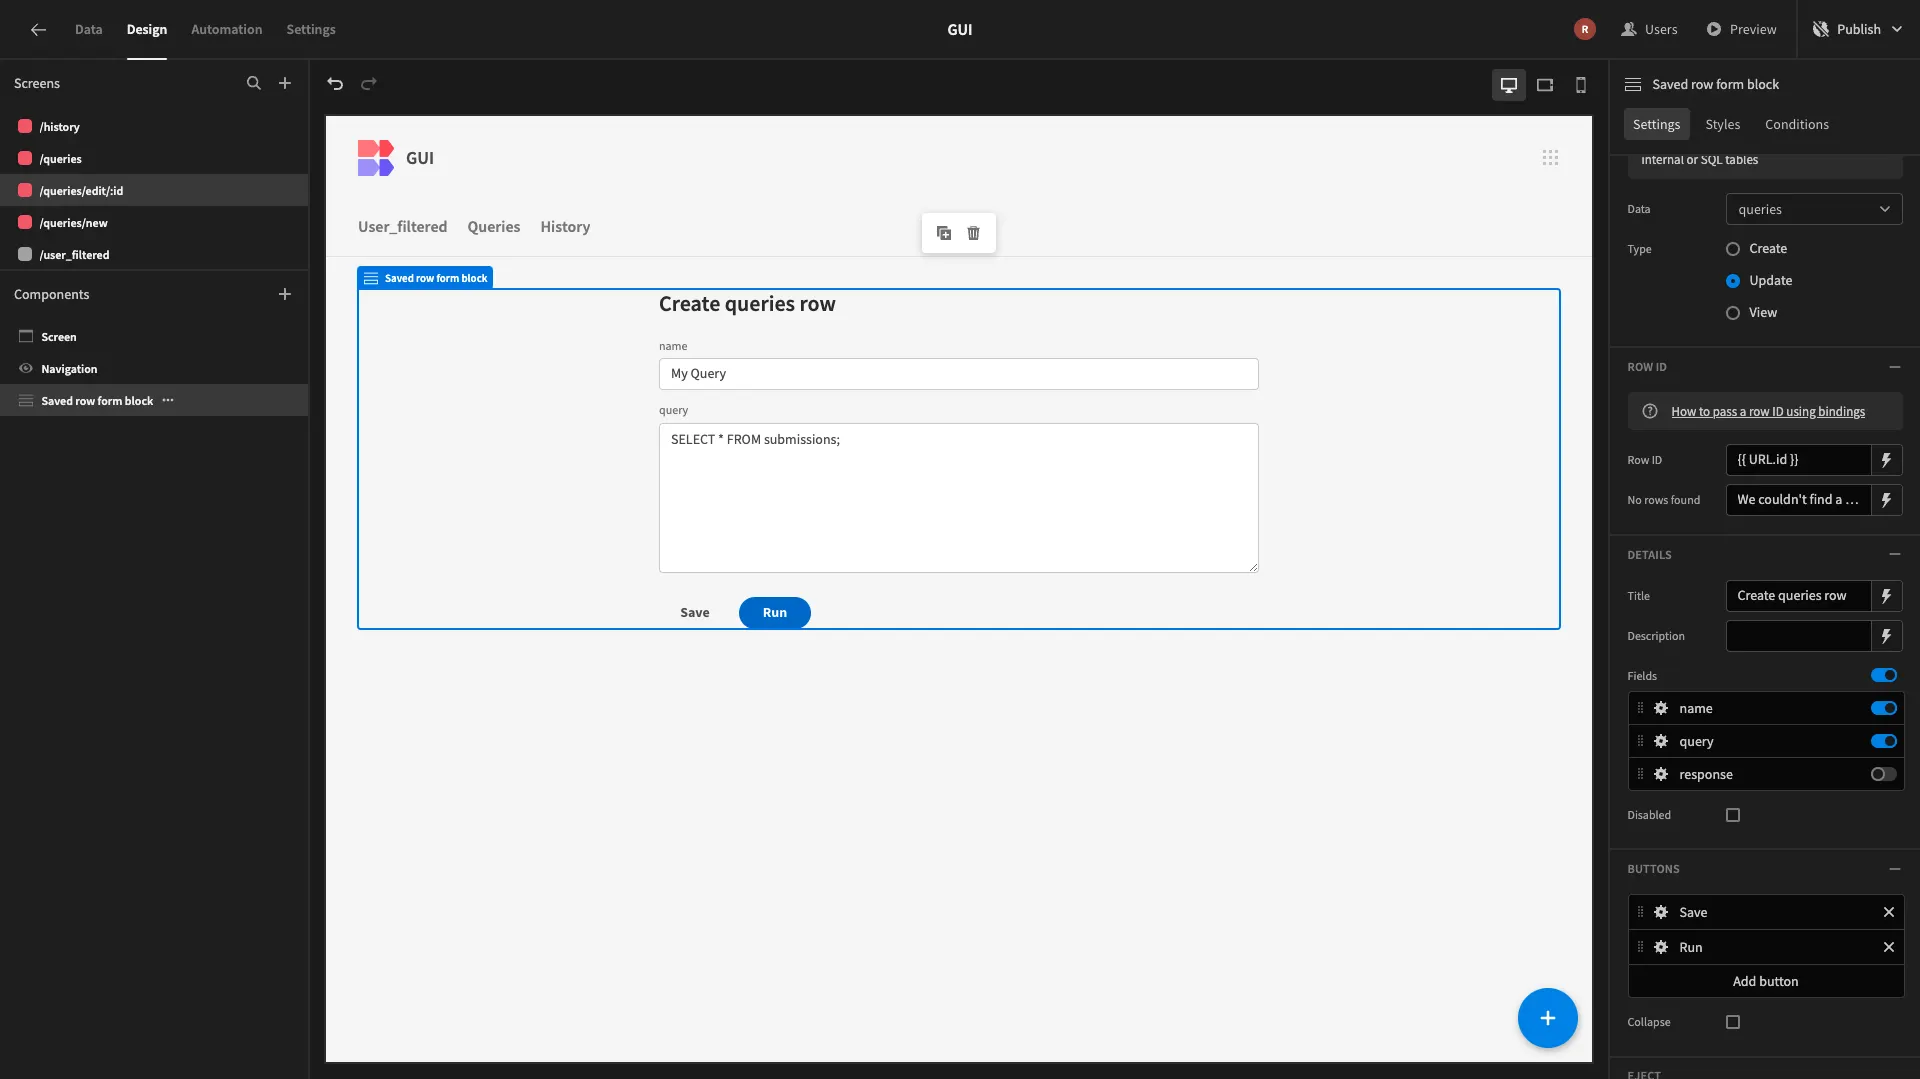
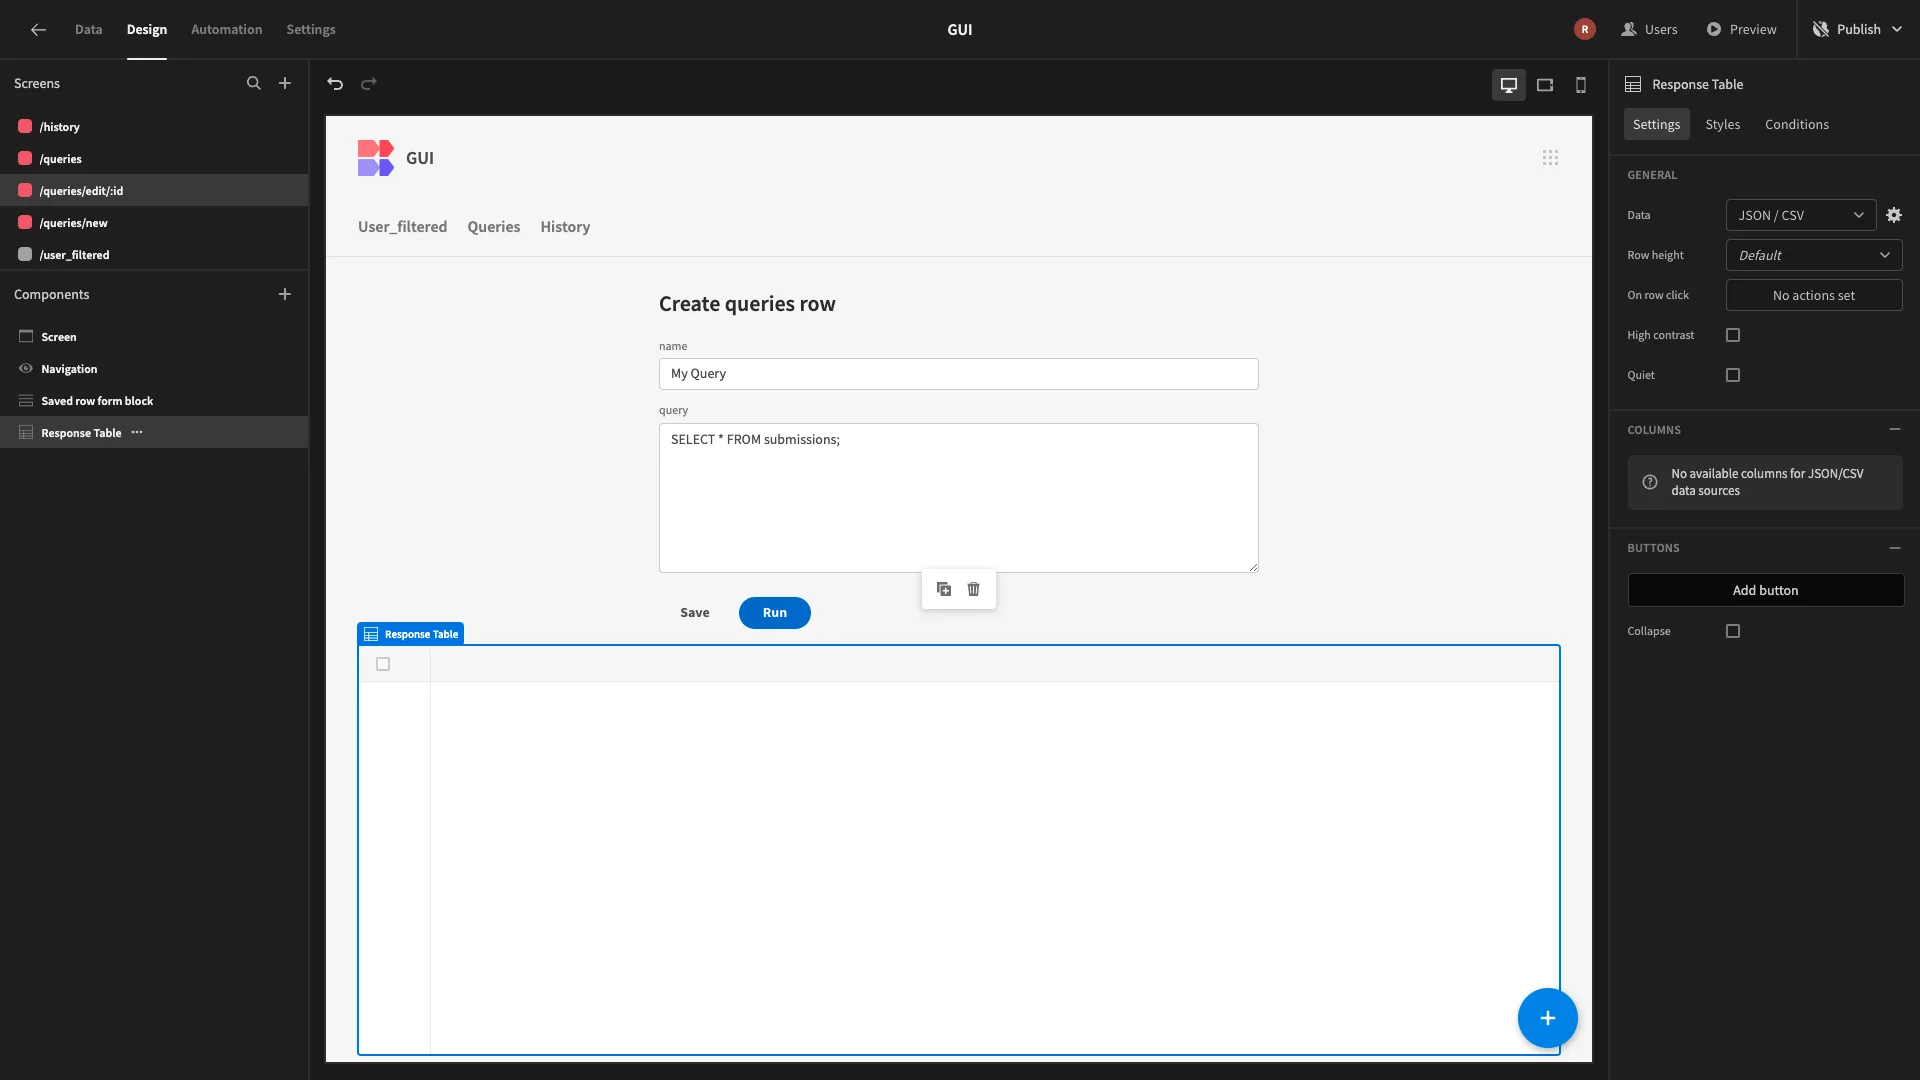
We’ll then paste our results table from the query editor screen beneath this, allowing users to view the responses of queries they’ve resent.
5. Design tweaks and publishing
Functionally, that’s our SQL GUI done. However, we’re going to make a few extra adjustments to the design of our app.
UX changes
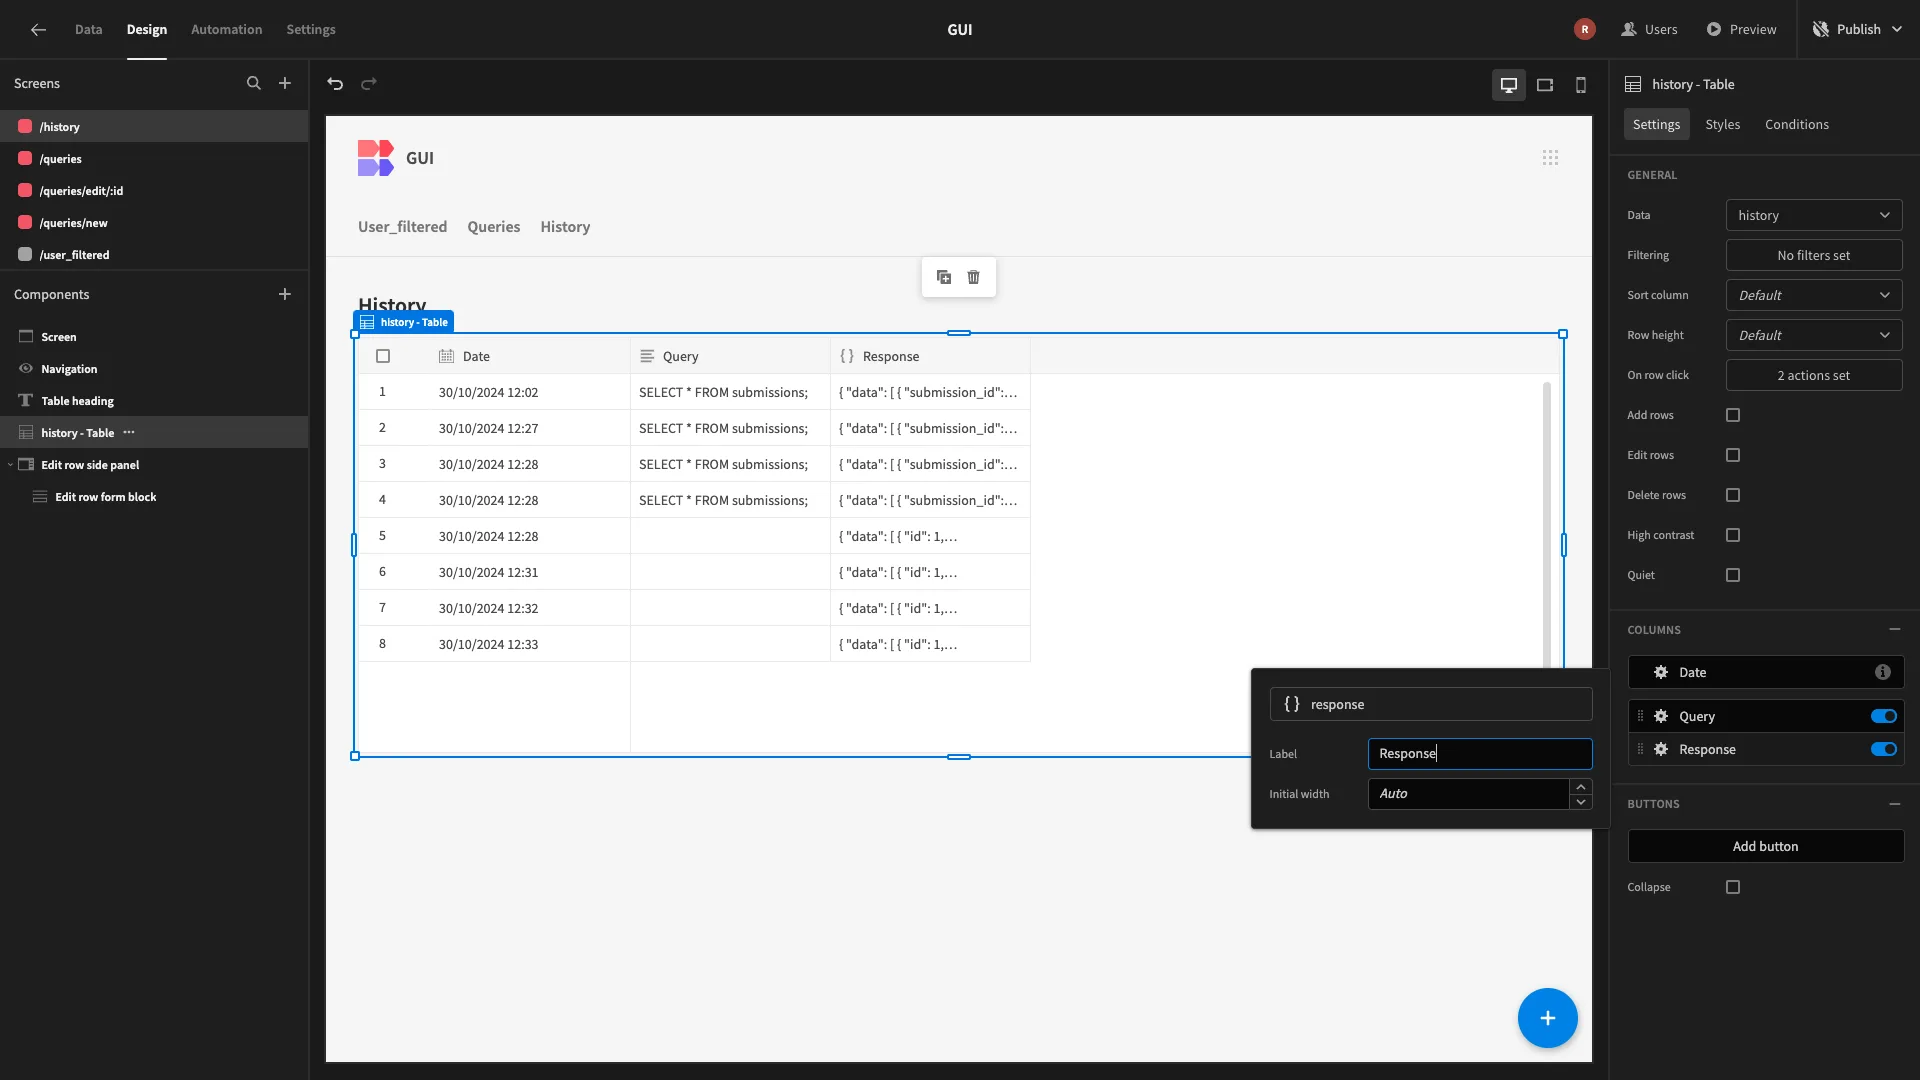
We’ve relied heavily on autogenerated UIs. These are part of what makes Budiabse such a fast, easy option for shipping internal tools on top of your data. However, by default, all UI fields use the column names, as they’re stored in our database.
This isn’t always the best user experience. We’re going to go through all of our tables and forms, updating our display texts with proper capitalization and spacing.
Then, under screen and theme, we’re going to choose Midnight.
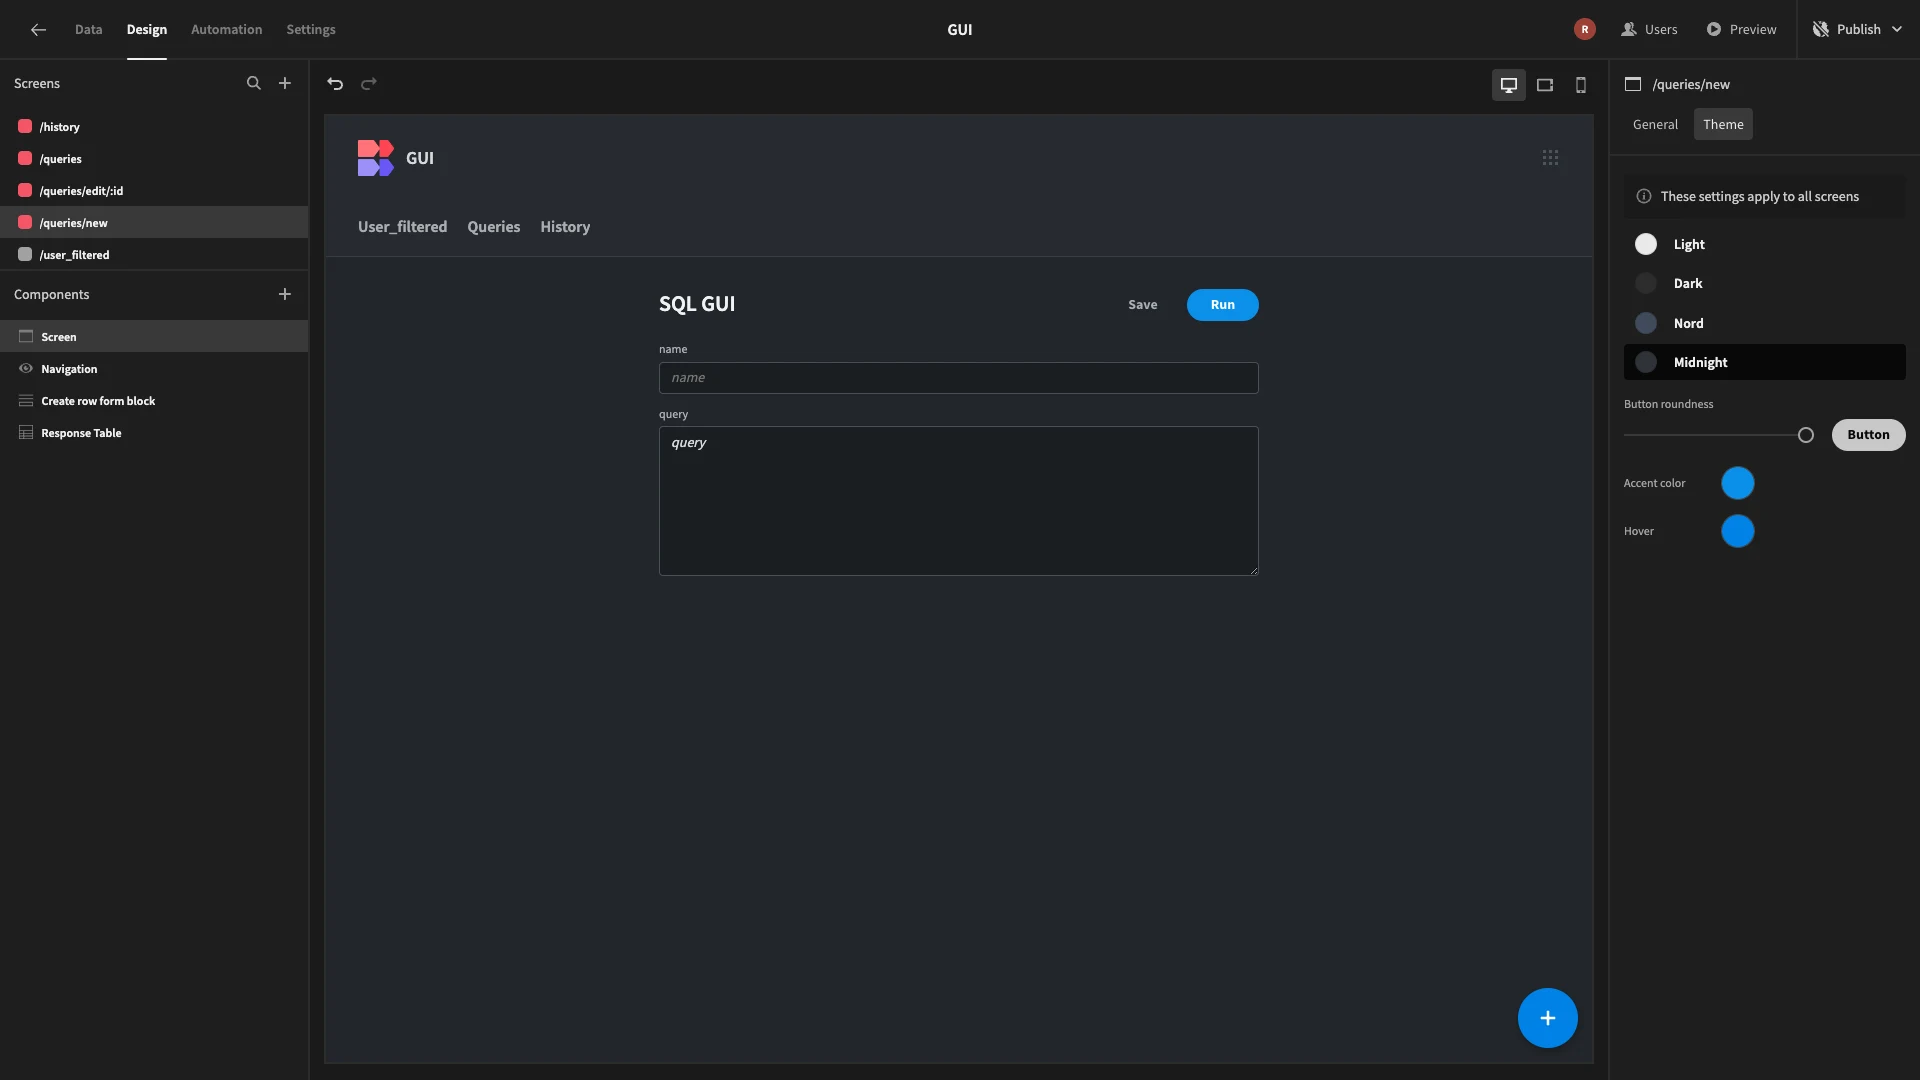
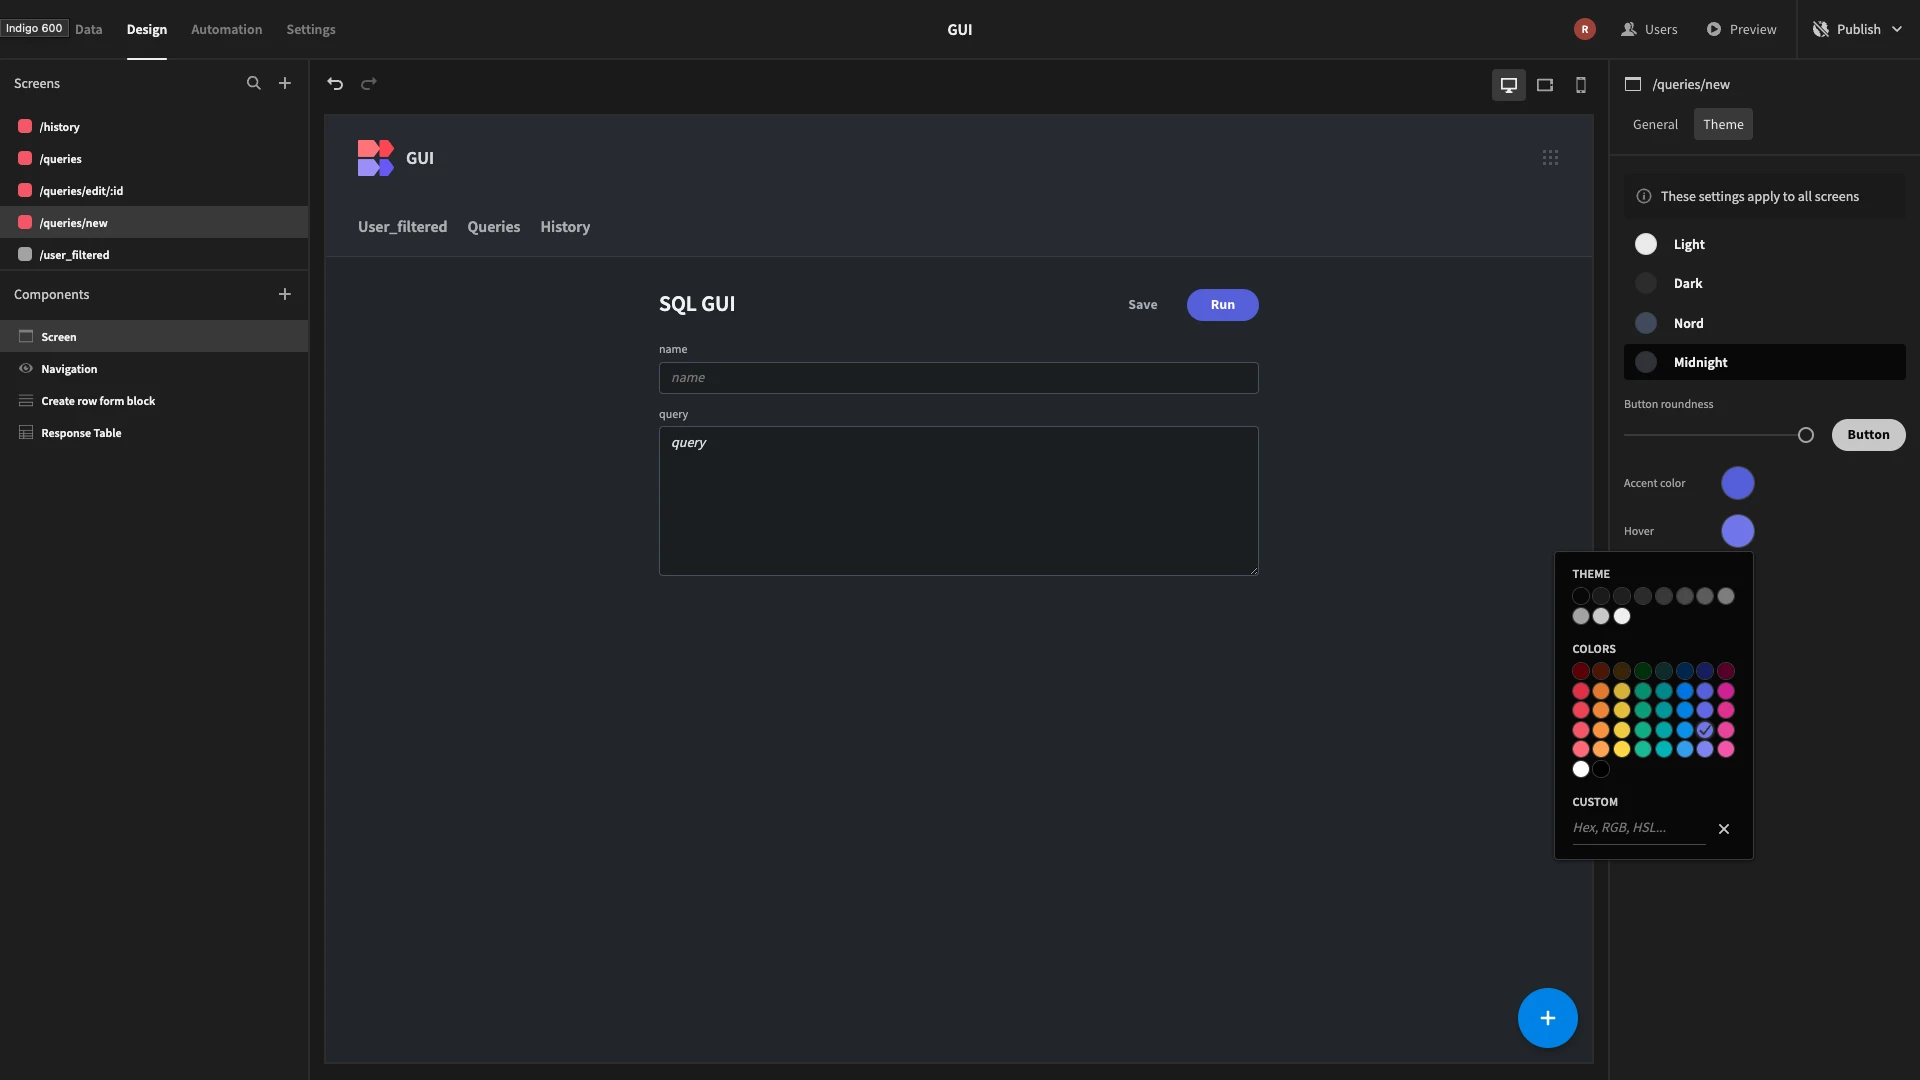
While we’re here, we’ll also update our button colors to better match our internal brand.
Pushing our app live
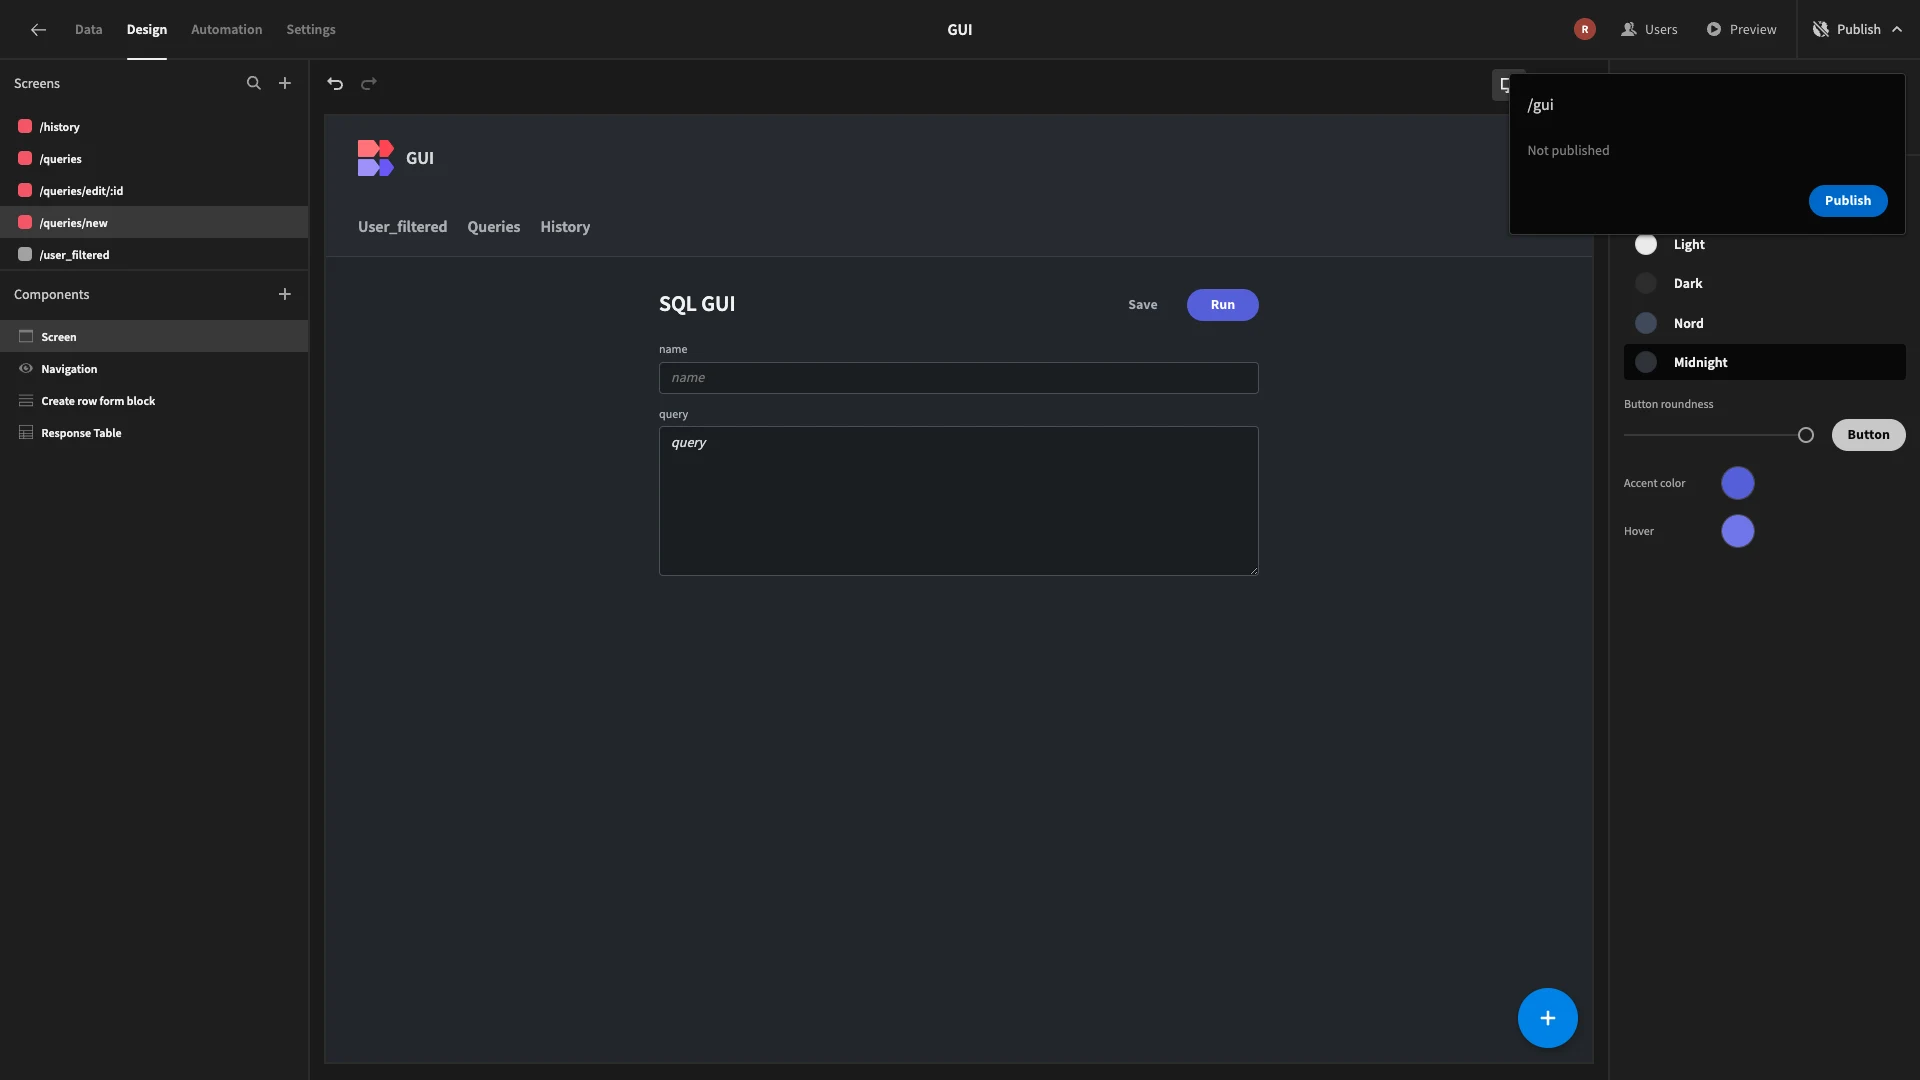
When we’re ready to send our app to end-users, we can hit Publish to push it live.
Here’s a reminder of what our finished SQL GUI looks like.
Turn data into action with Budibase
Budibase is the secure, fast way to build custom tools on top of any data. With dedicated connectors for a huge range of RDBMSs, NoSQL tools, APIs, and spreadsheets, it’s the perfect solution for building SQL GUIs, internal tools, approval workflows, and more.
Once you’ve connected your data you can configure access roles, autogenerate UIs, build powerful automations, all on our cloud-based or self-hostable platform.
Check out our product overview to learn more.