How to Build a Database GUI | In-Depth Guide
Database GUI (Graphical User Interface) are tools that allow you to interact with databases even if you aren’t a programmer. In addition, they are useful for programmers, since they provide quick ways to get data.
When it comes to picking the right database GUI for you, things get tricky. Although there are a lot of options out there, there are many things to take into account. From something as simple as pricing to more complex considerations, like the functionality provided.
For this reason, a lot of developers decide to build their own GUI.
But non-developers can do it too.
No/low-code tools allow you to visually connect to your databases and prepare the functions that you want to use, without needing any advanced coding skills.
With Budibase you can create your own GUIs for databases for free. It’s simple, easy to use and it works everywhere - no matter what operating system or device type you use. Windows, Mac, desktops, mobiles - we’ve got you covered if you need a web-based interface for database management.
Today, we’re going to explore the different components of building your own database GUI. You can use them as a starting point for your own app, or even use these ideas in other apps.
Let’s get started!
What is a Database GUI
A GUI is a visual interface to navigate through your databases, tables, and data. With it, you don’t need to learn commands, SQL, or any languages. But if you know them, you can still use these tools to make your job much easier.
Think of them as productivity tools. They work as a starting point with premade functions and screens to quickly access and manage mission-critical data.
How do you create a database UI?
There are many methods to build UIs for database management. But today, we’re only worried about the easiest one. You’re going to create your database GUI with Budibase - the market-leading open-source, low-code platform.
Budibase is the perfect solution for database UI design, whether you’re a professional developer, database administrator, IT specialist, or even a non-technical colleague.
Here are the main components of your database GUI:

This is the home screen. It loads a dropdown with the tables for you to choose from, and the columns that you want to load. Then it shows the query that is being executed. This is handy in case you want to save it in the Custom Query screen.
We’re using a basic form-based interface to act as a SQL editor. We could also do something similar for non-SQL databases, or even to create a natural language interface.
There’s a button to add new items and the query results cards with the items’ data and edit buttons.
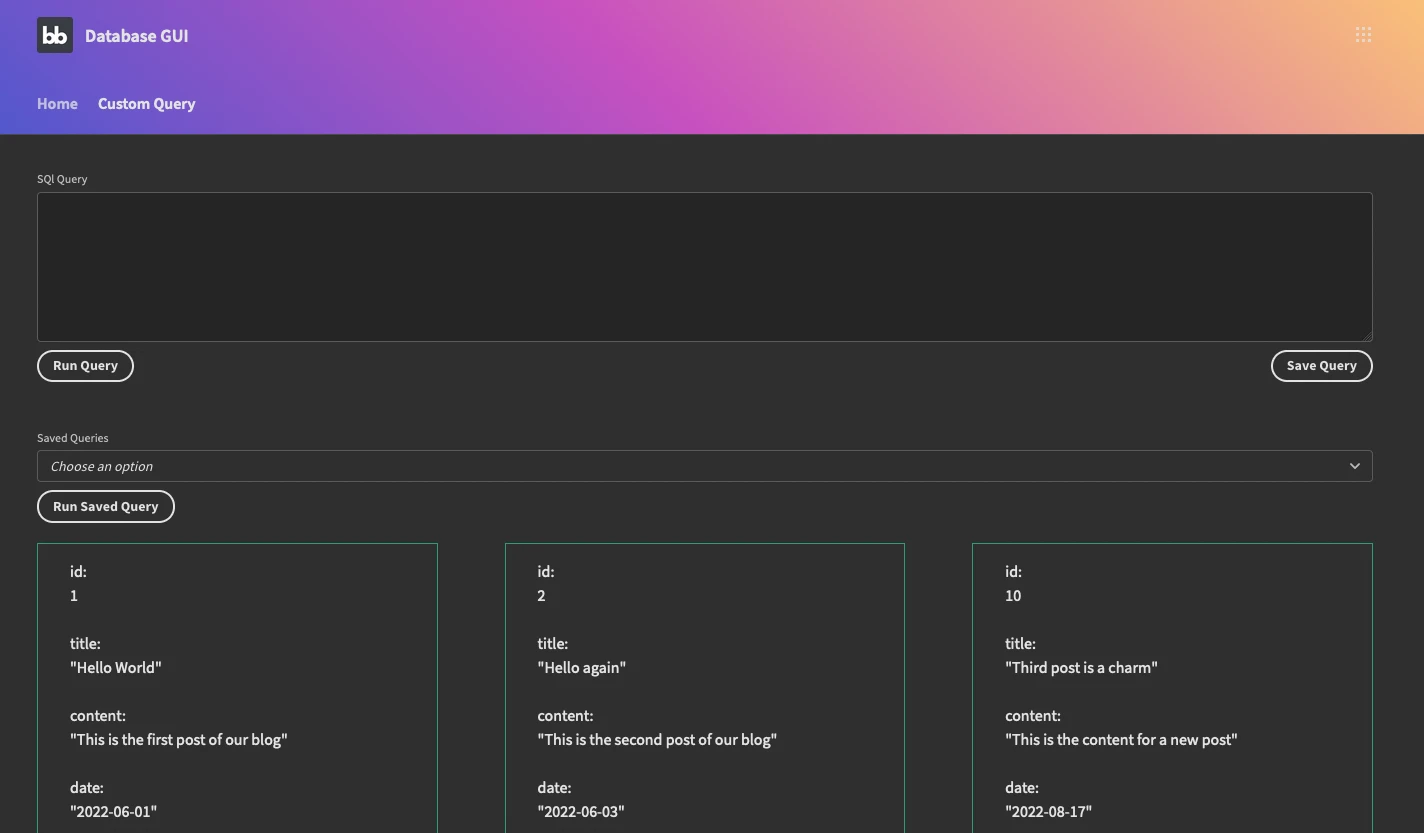
In the custom query screen you can run your own queries if you want. You can also save them for later use or run queries that were saved.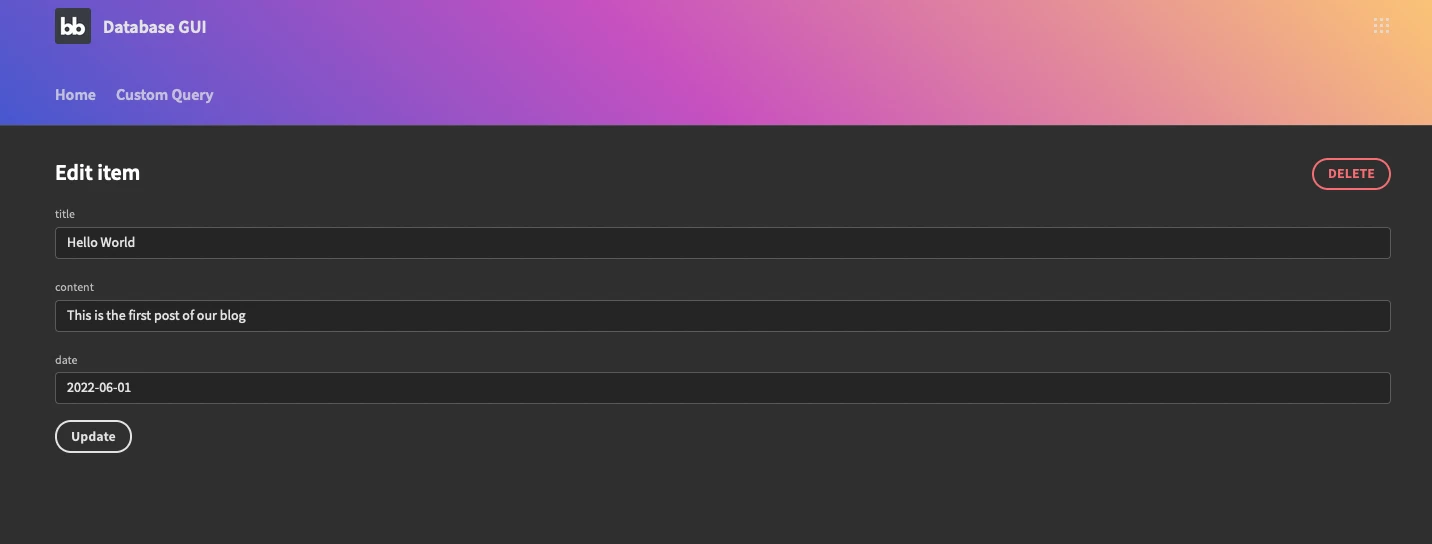
This is the form to edit your rows or add new entries. This form automatically loads the table columns as fields.

This is the saved queries screen. In it you can see the currently saved queries, and you can edit them or delete them if you want. There is a form to edit or add new items that is quite similar to the previous screen.
Create your Database GUI with one click
Designing apps might seem like a very complex task. But, with Budibase, it’s never been easier. Let’s see a way to create a fully functioning UI with just one click.
If you haven’t already, sign up for a Budibase account.
Next, create a new app and select Budibase DB as your data source. You can create a table called saved_queries. This table is there to store your SQL queries for later use.
You just need one column in it, the SQL query.
Now head over to Design > Screens > Add new. Select Autogenerated screens and pick this newly created table:

That’s it. You should see these new screens in your app:
- SQL_Queries.
- Add new.
- Edit.
The first screen is a simple table listing all items. The second is a screen with a form to add new items. And the third is a screen that allows you to edit or delete items.
You can autogenerate screens for other connected databases. For instance, if you connect a MySQL database, then you can auto-generate CRUD screens for each of your tables.
The downside of this approach is that you’ll need to manually create new screens for new tables. But we are going to explore a few strategies to make this more dynamic.
First though, let’s connect to some real-world data.
Connect to a database
Let’s go back to the Data tab and add a new data source . You can add any of your databases here, and each of them has their own capabilities.
In this example, we are using a MySQL database. We could equally create database interfaces for SQL Server, Postgres, Oracle, MongoDB, or a host of other database management systems (DBMSs). We could even create user-friendly interfaces for more complex cross-platform data modeling.
Add the connection details and then you can create your queries.
Remember that we wanted to create dynamic pages to load your data.
Out of the box, you can’t use variables and functions in the query name. Thus, if you try to load something like SELECT * FROM {{ table }} this connection won’t work.
But there’s a way to do it.
Some databases such as MariaDB have a handy function called Execute Immediate. With it, you can run any SQL code you want.
Sadly, MySQL doesn’t have this function.
A good way to work around this is to create a stored procedure in your database. You can use phpMyAdmin or similar and create a procedure named execute_immediate with this code:
1BEGIN
2SET @q = query;
3PREPARE stmt FROM @q;
4EXECUTE stmt;
5DEALLOCATE PREPARE stmt;
6END
Then you can just use this syntax to call your variable query:
CALL execute_immediate( ‘CONCAT ( ‘SELECT * from ‘, {{ table }} ) ’ )
In our demo app we have 2 tables, with this structure:
- Posts:
- Id, title, content, date.
- Settings:
- Id, settngs_key, value.
This dataset is quite small, but you can combine as many databases and as many tables as you want in your Database GUI. This makes it really easy to manage all your database, even if they are from different platforms, in a single place.
In terms of queries, we need just three:
- Execute - our “catch all” query, which allows us to execute any code we want via JS.
- Show tables - a simple query to return all tables from a database.
- Show columns - a query to return all columns from a table.
Execute
This query relies on the procedure you have just created. It allows you to send any SQL code using bindings.
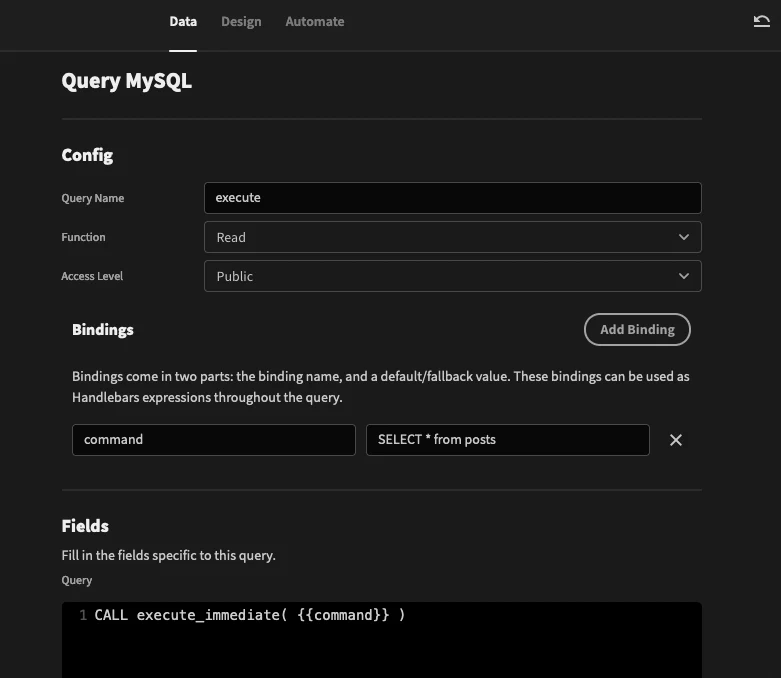
The downside of using just one query for everything - selects, inserts, deletes - is that our schema is not reliable. Therefore, you can auto-generate tables and you can’t use this query in some useful components such as option pickers.
For this reason we have the next two queries.
Show_tables
This query returns all tables for the current database. It is as simple as it gets:
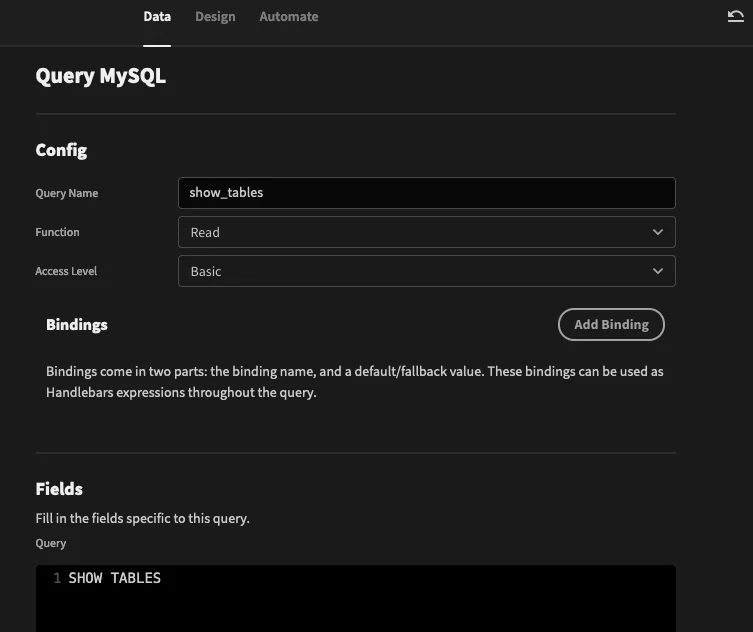
The benefit of using this query by itself is that we can rely on its schema for dropdowns.
Table_columns
This query gets a table binding and returns the columns for this table, like this:
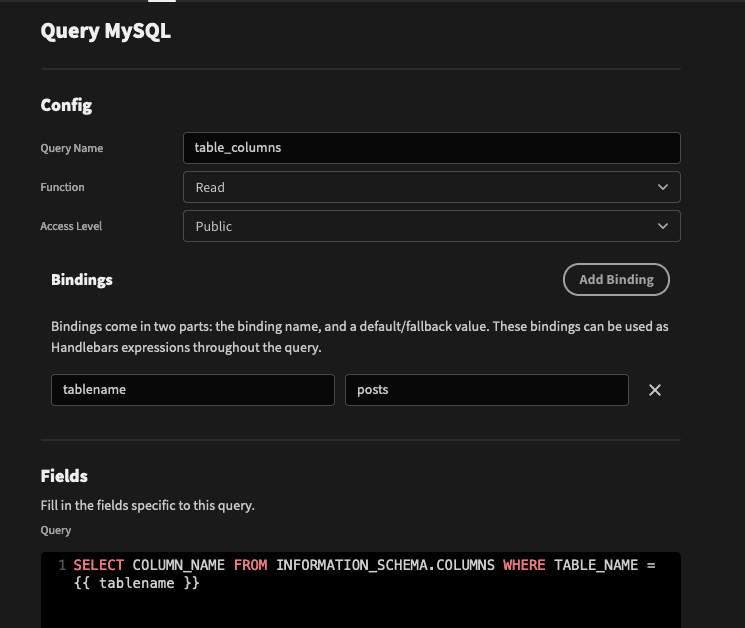
It is quite useful for the options pickers.
Important
Just a quick note, since this is a demo app we aren’t taking measures against SQL injection, or user access control. Please make sure you do so in case you have more users.
Check out our guide on how to implement RBAC for more information.
How to display variable data in a Database GUI
The auto-generated screens show a quick way to read data. Using tables you can list your data coming directly from a data provider.
But the table component needs a fixed schema. Since we have variable calls and we have different tables, we can’t rely on a single schema to load data. We need a more complex database user interface.
There are 3 basic ways to circumvent this:
- Use a “normalization” method, translating your regular column names into specific names. For example, instead of posts.id, posts.title, posts.content, settings.id, settings.key, settings.value, etc, you can translate them all to “id”, “title”, “value” in your queries.
- Loading all possible schemas at once using JS transformers. For example, you could add id, title, content, key, value, etc as possible schema values in your query, even if they are empty.
- Loading your data as it is, then using a repeater and other components to build your own visualization
The third path is the one we are going for on this app.
Go back to the design tab and add a new screen with the “home” route. You can check it as your home screen here:
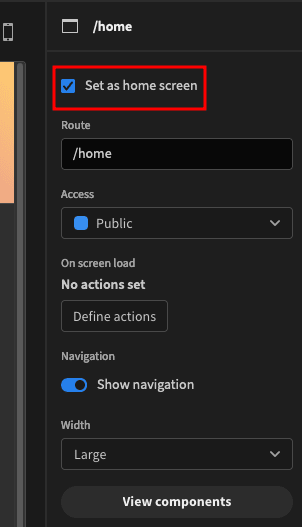
Budibase automatically generates a menu-based interface for navigating between screens.
The logic behind this page is to load items depending on what you have selected before. Here is the element tree for that screen:
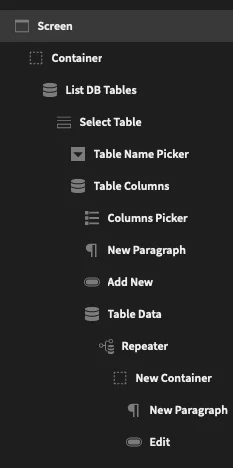
The very first element you have is a data provider to list tables. Click on the blue plus sign or the “add component” button to add a new data provider component to your empty screen.
Now you just need to load the show_tables query in it.
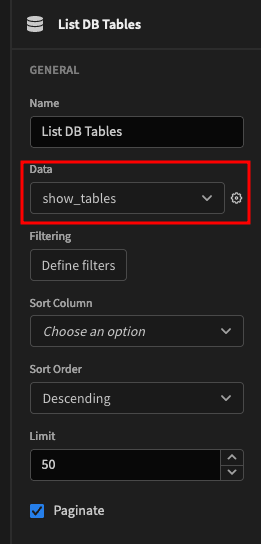
Next, you can add a form component. All form elements have to be inside a form for them to work. Then you can add an options picker for the tables. Use the Options Provider as the data provider for the tables, and the label/values column is the same Tables_in[database name]_.
With this component you already have a way to dynamically load all tables in your database, and then users can pick which one they want to load.
Next, we need to load the columns for that table. You can create a new data provider to load the table_columns query. Then use the {{ Select Table.Value.tablename }} binding so the correct table is sent to your query, like this:
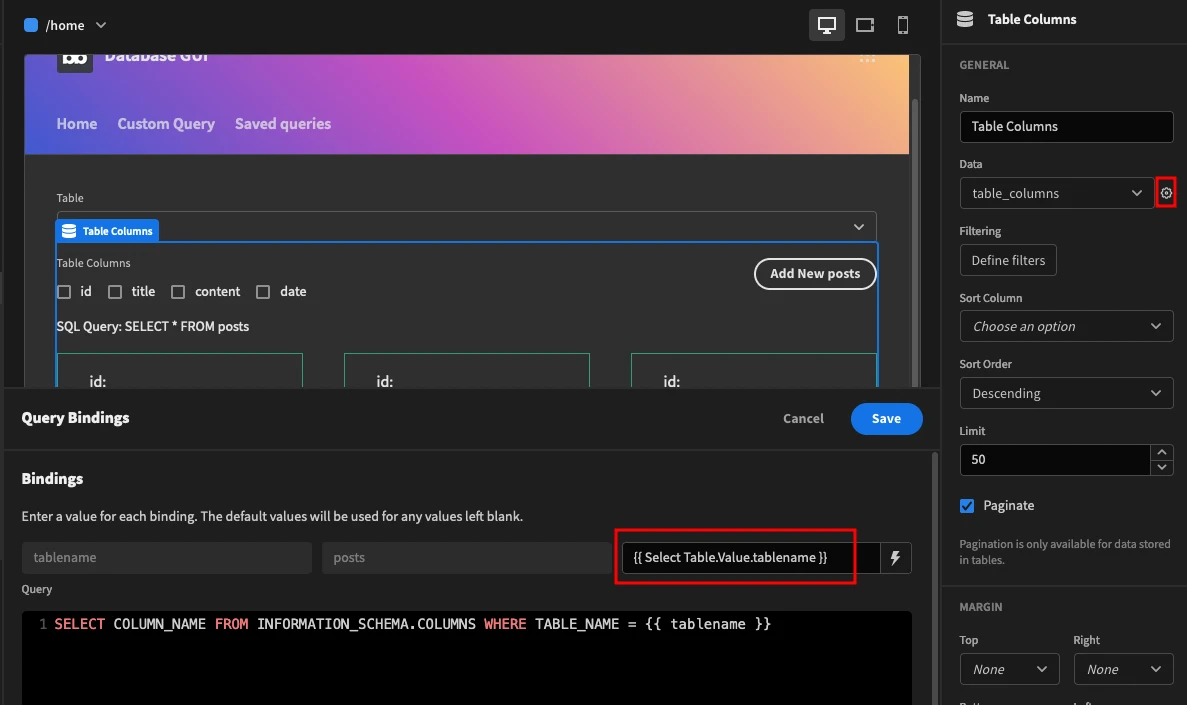
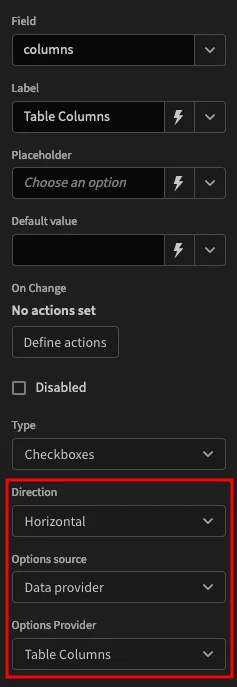
Add an options picker component. In it you’ll use the checkboxes mode, horizontal, and use the data provider to feed the boxes:
Add a new paragraph to display the current SQL Query. Instead of text or bindings use this JS code in it:
1var table = $("Select Table.Value.tablename");
2var columns = $("Select Table.Value.columns");
3if ( columns.length == 0 ) {
4columns = "*";
5}
6var ret = "";
7ret =
8"SQL Query: SELECT " + columns + " FROM " + table;
9return ret;
This allows you to debug if your options are working correctly as well. In the admin screen you won’t see the correct table name, but in the app preview you should see it.
You can add a new button now to add new entries. Add an onclick action to this button to navigate to the edit screen, like this:
/edit/{{ Select Table.Value.tablename }}/0
In Budibase you can use the URL to pass variables to your app. In our case, the path for the edit screen is /edit/:tablename/:itemid
Thus, if you go to /edit/posts/1 you are editing the table posts, at item ID 1.
Finally, it’s time to load your data. Create a new data provider component and use the execute query.
Then, on its bindings (the cog icon next to the query name) you’ll use the same SQL you have in your paragraph, but slightly different:
1var table = $("Select Table.Value.tablename");
2var columns = $("Select Table.Value.columns");
3if ( !columns || columns.length === 0 ) {
4columns = '*';
5}
6var ret = "";
7ret = "SELECT " + columns + " FROM " + table;
8return ret;
The data provider has the entire query as an array of items. To expose these items and work with them you can use a repeater.
Make sure to select the horizontal direction for your repeater if you want items side by side, instead of one per row.
Then add a container inside the repeater, and a paragraph in it. You can use a JS function on this paragraph as well, which loops through each of your variables and displays them:
1var row = $("Repeater.Row Index");
2row = $("Table Data.Rows")[row];
3var ret = "";
4Object.entries(row).forEach(([key, val]) => {
5ret += "" + key + ":\n";
6ret += JSON.stringify(val, null, "\t");
7ret += "\n\n";
8});
9return ret;
The finishing touch is adding an “edit” button to your cards. Just like the “add new” button, the edit button loads the /edit screen with some variables.
This time you can load this screen: /edit/{{ Select Table.Value.tablename }}/{{ Repeater.execute.id }}
Run custom & saved queries
Now your simple view is ready, it’s time to create a screen for your custom queries. Create a new screen and use the custom-query path.
This time the logic is a bit different. Since we need to run update the main query from different buttons, they are both inside the data provider. Here is the components tree for that page:
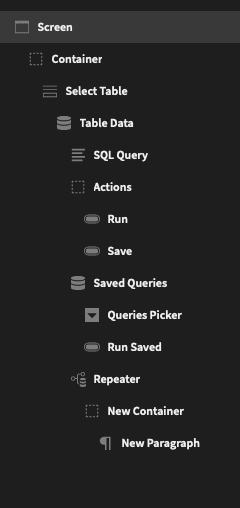
Let’s get started then. Add your form and inside of it add a data provider component. It loads the execute command with the {{ State.query }} binding.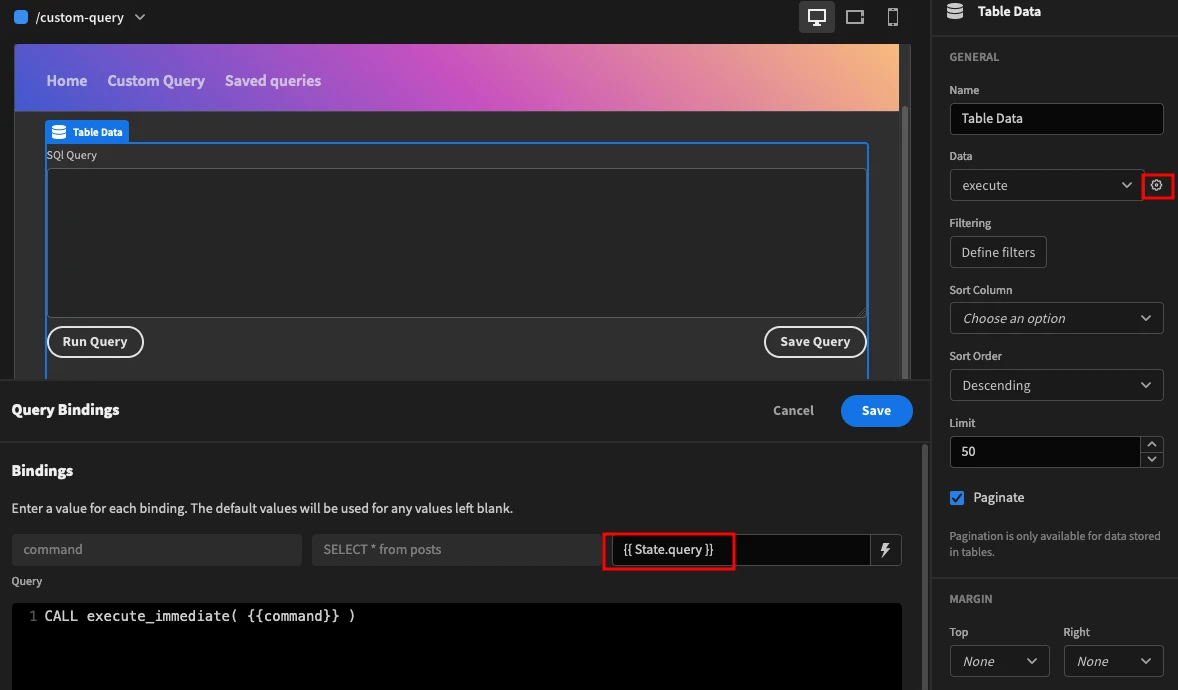
The app states are variables that you can use to store values. Thus you can update the app state from anywhere you want, and just update this query to load it again.
Next, add a multi-line text field to hold your main SQL query. You can add these settings to it:
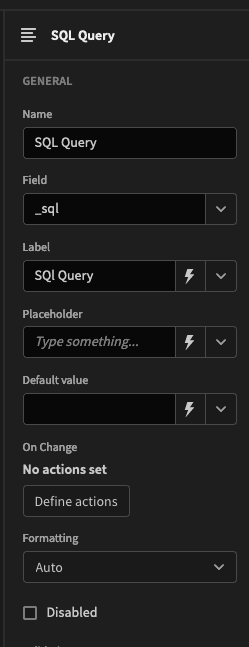
Now add a container with the horizontal orientation. Inside of it add two buttons, one to run the query, and the other to save this query.
The first button has these actions when clicked:

After the app state is saved, it refreshes the table data.
The Save Query button has these actions:

Next, on the same level as the buttons container add a new data provider. This is the data provider for the saved queries selection.
In it, select the saved_queries table and do the same with the options picker inside of the data provider.
You can add a button to run the saved query, and its actions are the same as the previous button, but it saves a different app state:

Now you just need to add a repeater to display your main query data. In it, you can use the same structure as you used for the home screen, with the paragraphs containing this JS code:
1var row = $("Repeater.Row Index");
2row = $("Table Data.Rows")[row];
3var ret = "";
4Object.entries(row).forEach(([key, val]) => {
5ret += "" + key + ":\n";
6ret += JSON.stringify(val, null, "\t");
7ret += "\n\n";
8});
9return ret;
How to add, edit and delete data
Create a new screen with the /edit/:table/:id route. This tells Budibase to treat the first “folder” as the table name, and the second one as the id and it makes this information ready in the {{ URL.table }} and {{ URL.id }} variables.
Usually, screens for adding and editing data are separated. There’s a good reason for this. When you load the default fields for the “edit” action, if there are no results (so it’s a new item) the entire component is hidden.
So even if you have your form under the “edit” mode, you usually need a separate form for the “add new” action. This is done by default in the autogenerated pages as well.
But there’s a way around this.
Since we are building fully custom queries, we can provide default data in case the action is to add new items.
Here’s how.
Add a new data provider with the good old execute query. Then on the query bindings use this function:
 1var ret = ""
 2
 3if ( $("URL.table") && $("URL.id") != 0 ) {
 4
 5ret = "SELECT * FROM " + $("URL.table") + "
 6WHERE id=" + $("URL.id");
 7
 8} else {
 9
10ret = "SELECT 0 as 'id'";
11
12}
13
14return ret;
This function basically says “if the ID isn’t zero, use it in the query, if it’s zero, then return this dummy result of id:0”.
With this approach, you can get a simpler edit screen. This is the elements tree for it:
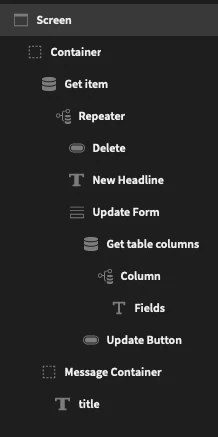
Notice how inside the get item we have the repeater right away. Then there’s the delete button. This button runs the execute query with this binding:
DELETE FROM {{ URL.table }} WHERE id={{ URL.id }}
Make sure to add a confirmation message before running this action. After that, you can navigate to the home screen, since the item doesn’t exist anymore. You can add a display condition to this component to hide it if the {{ URL.id }} is equal to zero.
Next, you can add a headline with this JS code as the text:
1if ( $("URL.id") == 0 ) {
2return "Add new";
3} else {
4return "Edit item";
5}
Again, if the ID is zero, it shows add new, otherwise it shows edit.
Then there’s the update form. You can take a much simpler approach and use the same method provided in the auto-generated pages. But in this screen we are aiming for a fully automated form.
Thus, the form fields will be generated based on the current table fields.
And where do we have these fields?
If you said in the table_columns query, well done!
So now you can add a form, then a data provider inside of it with the table_columns query. Make sure to use the {{ URL.table }} binding in it.
Next add a repeater and add a text field in this repeater.
Here you can use these options for your fields:
Field and label:
{{ Column.table_columns.COLUMN_NAME }}
Placeholder and default value JS code:
return $(“Get item.Rows”)[$(“Repeater.Row Index”)][$(“Column.table_columns.COLUMN_NAME”)]
Since the ID field isn’t editable, you can hide it using the display conditions for the field.
Use “Hide component” if {{ Column.Row Index }} is zero. Meaning that it’s going to hide the first field (ID) at all times.
Then you can add a button in your form to update or add a new item. You can use this JS code for its text:
1if ( $("URL.id") == 0 ) {
2return "Add new";
3} else {
4return "Update";
5}
This button has 3 actions:
Update State updated_rows = 0
Execute the execute query with this JS code as its binding:
var id = $(“URL.id”); var ret = “”; var table = $(“URL.table”); var formData = $(“Update Form.Value”); delete formData.id; if ( id == 0 ) { var keys = Object.getOwnPropertyNames(formData); var values = Object.values(formData); ret = “INSERT INTO " + table + " ( " + keys.join() + ’ ) VALUES ( “’ + values.join(’”,”’) + ‘" )’ ; } else { ret = “UPDATE " + table + " SET “; Object.entries(formData).forEach(([key, val]) => { ret += "
" + key + "=’” + val + “’,”; }); ret = ret.slice(0, -1);ret += " WHERE id=” + id; } return ret;
Update State updated_rows = 1 to display the message for the updated rows.
The JS code itself might seem intimidating, but it is just generating either the insert into query for new rows or the update query for edits.
And a nice finishing touch is to display a message when fields are updated. You can do so with a new container, add your message there and then use the display condition of show component if {{ State.updated_rows }} equals 1.
How to build a database GUI with Budibase.
Today we explored many aspects of building a database GUI. We went from the simple one click screen generation, to complex screens to view, query and update your data.
You can use these tips to build your own database GUI or even any app you want. We hope you’ve enjoyed, and see you again next time!
We’ve also create 50+ free, deployable app templates to help get you started with Budibase.