How to Build a Contractor Portal
Managing projects with external stakeholders can create some unique challenges. This includes monitoring costs, tracking progress, handling approvals, and centralizing information from disparate sources and stakeholders.
Today, we’re exploring one solution to this - by showing off the speed and ease with which we can create a custom contractor portal in Budibase.
See, a huge part of the problem is how we communicate and collaborate with contractors. When we handle this manually using emails, spreadsheets, or even pen and paper - we inevitably create mountains of admin work, along with scope for error.
Let’s jump right in.
What is a contractor portal?
A contractor portal is a centralized platform where internal and external stakeholders can view, share, record, and manipulate information relating to projects.
Crucially, this gives us a single tool where different kinds of users can take distinct actions depending on their roles within a given process.
This requires each type of user to have suitable permissions, data exposure, and UIs for their role.
So, we might empower contractors to edit their own details, set rates, claim jobs, or submit time sheets. Internal users could then view this information for all contractors or projects, as well as process approvals and other admin tasks.
Ultimately, the goal is to provide a more efficient experience for internal and external stakeholders alike.
For instance, cutting the need for meetings, emails, and other communications - along with reducing the risk of human error, data siloes, or poor visibility into projects.
So…
What are we building?
We’re building a simple contractor portal on top of an existing PostgreSQL database. Although, with Budibase, we could use just about any data source. We’ll also provide all the queries necessary to build along with our tutorial.
We’re going to build out two clusters of functionality.
First, contractors will be able to claim jobs, submit timesheets, update their details, or view their current and previous tasks.
Second, our internal users can create jobs, monitor costs, approve timesheets, or view contractors’ details.
Of course, this isn’t the limit of what’s possible. Instead, our goal is to show off just how easily we can craft professional, extensible solutions in Budibase.
By the end, we’ll have a fully functioning contractor portal - that you can deploy in the cloud or on your own infrastructure.
Let’s get started.
How to build a contractor portal in 5 steps
If you haven’t already, sign up for a free Budibase account to start building as many apps as you’d like on top of your existing data assets.
1. Creating our data model
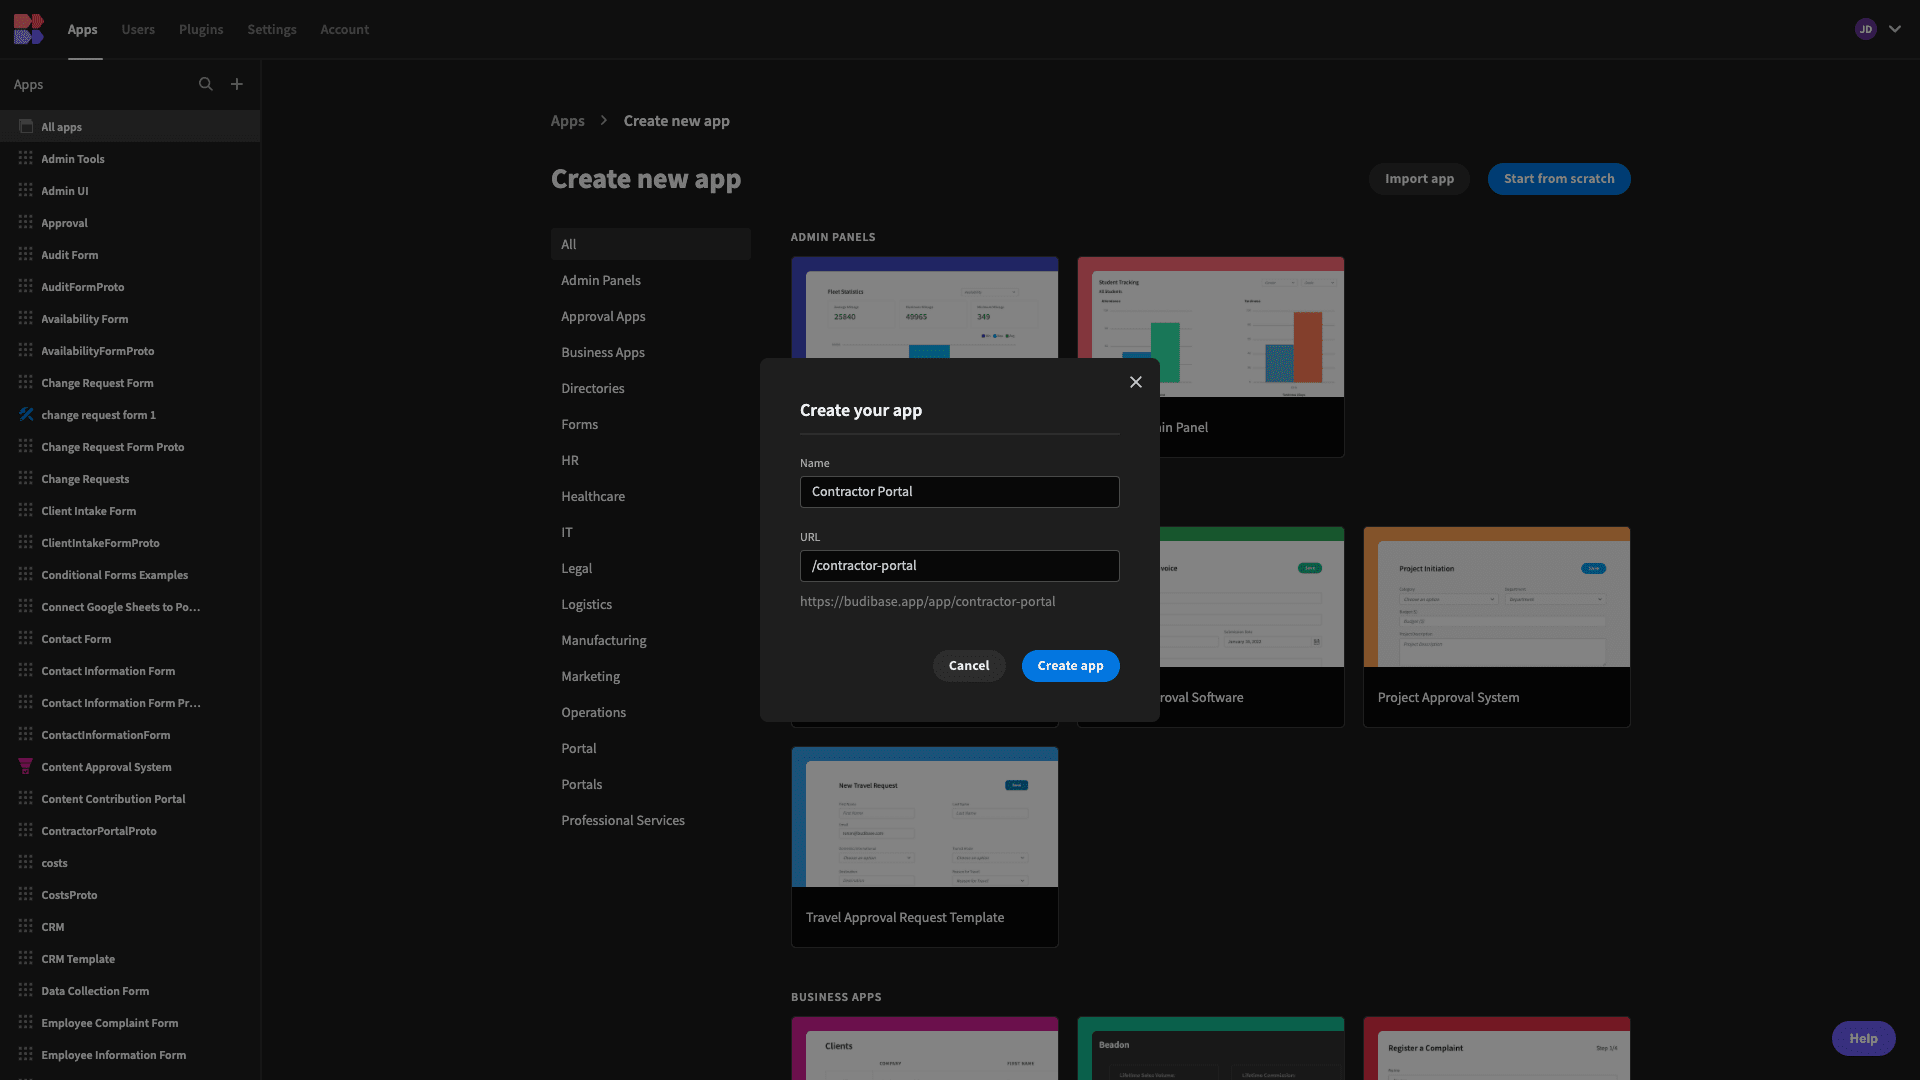
We’ll start by creating a new Budibase application. We can choose a pre-built template or import an existing app dump, but today, we’re starting from scratch.
When we choose this option, we’re prompted to give our new app a name and URL extension. We’re calling ours Contractor Portal.
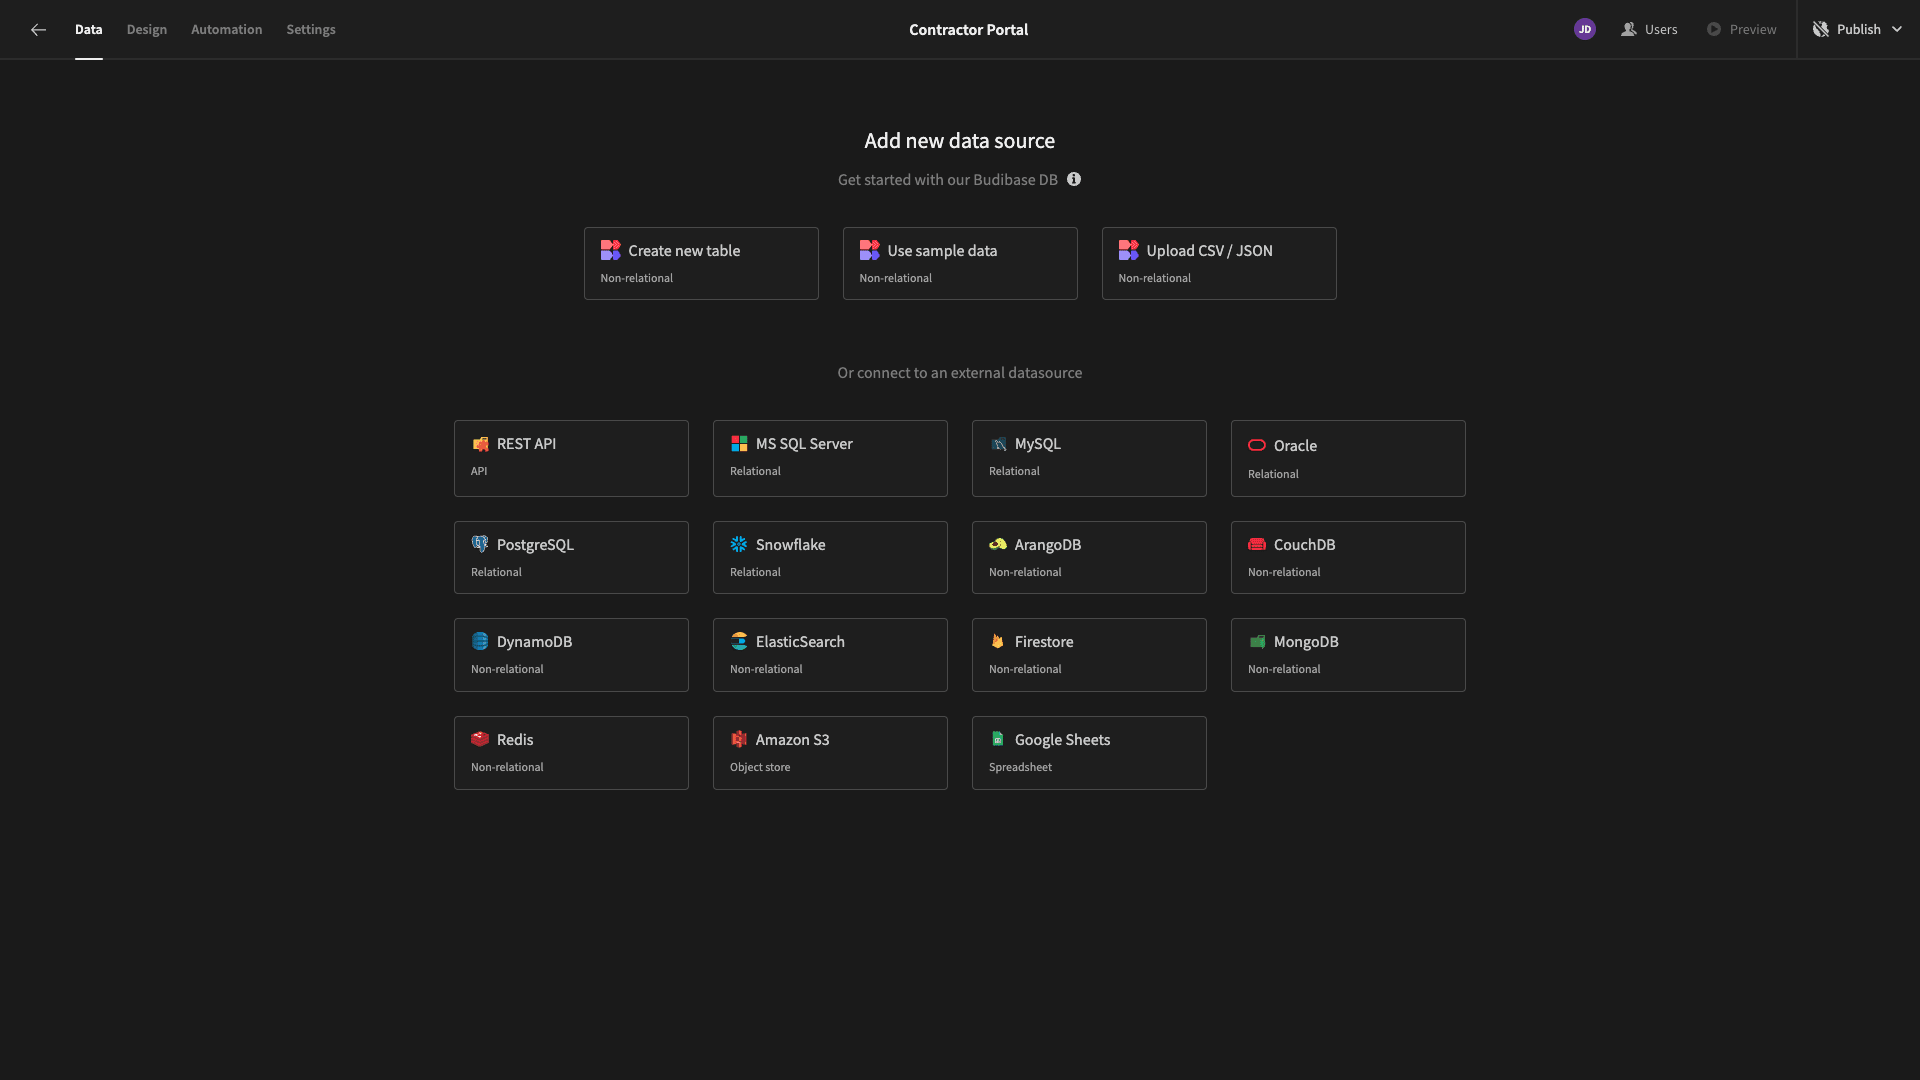
We’re then offered a choice of data sources to connect our app to.
Budibase offers direct connectors for querying relational databases, NoSQL tools, APIs, Google Sheets, and more - alongside our internal low-code database.
Connecting our database
As we said earlier, we’re using an existing Postgres database.
When we select this option, we’re prompted to enter our configuration details. We can do this manually or by using credentials stored in Budibase as secure environment variables.
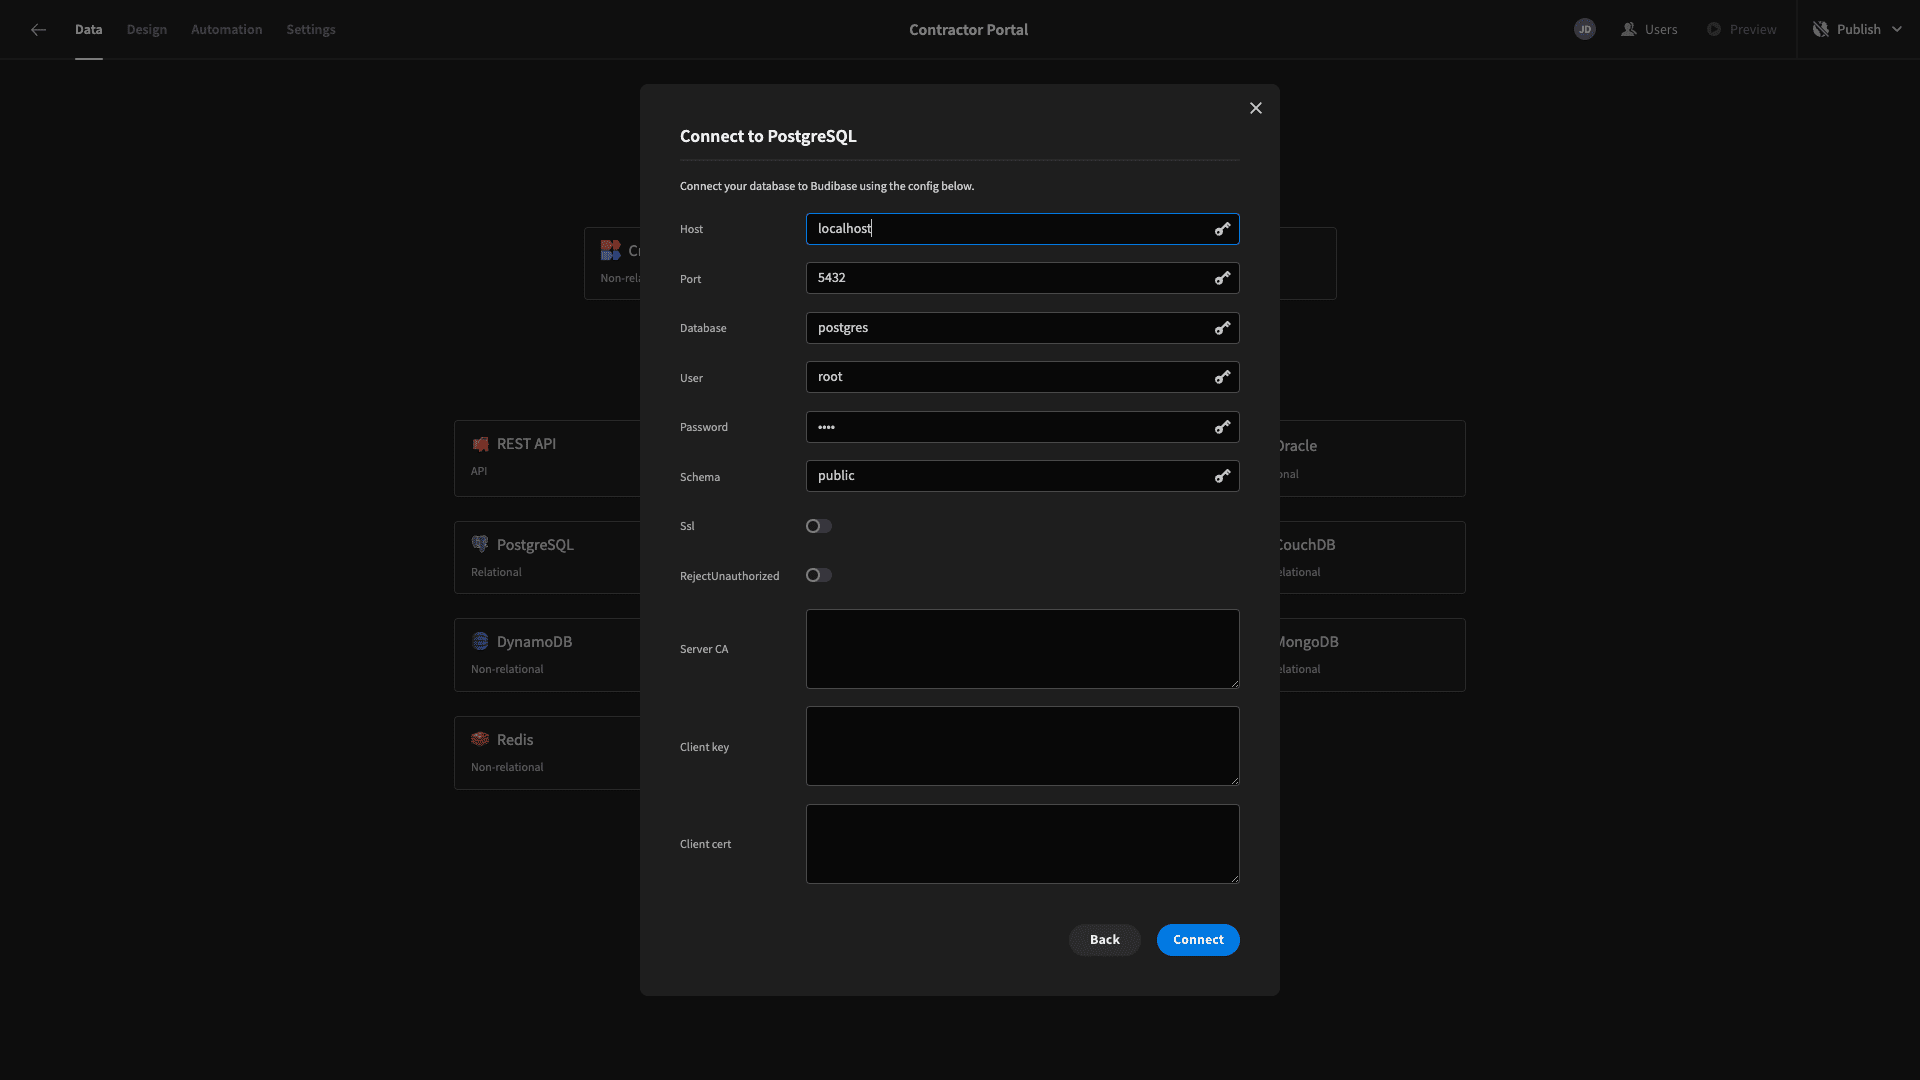
Once we’ve entered these and hit Connect, we’re prompted to choose which of our database’s constituent tables we’d like to fetch, making them queryable within Budibase.
Our database contains three tables called contractors, jobs, and timesheets. We’re fetching all three.

Now, we can view and edit our tables using the spreadsheet-like interface in Budibase’s Data section.
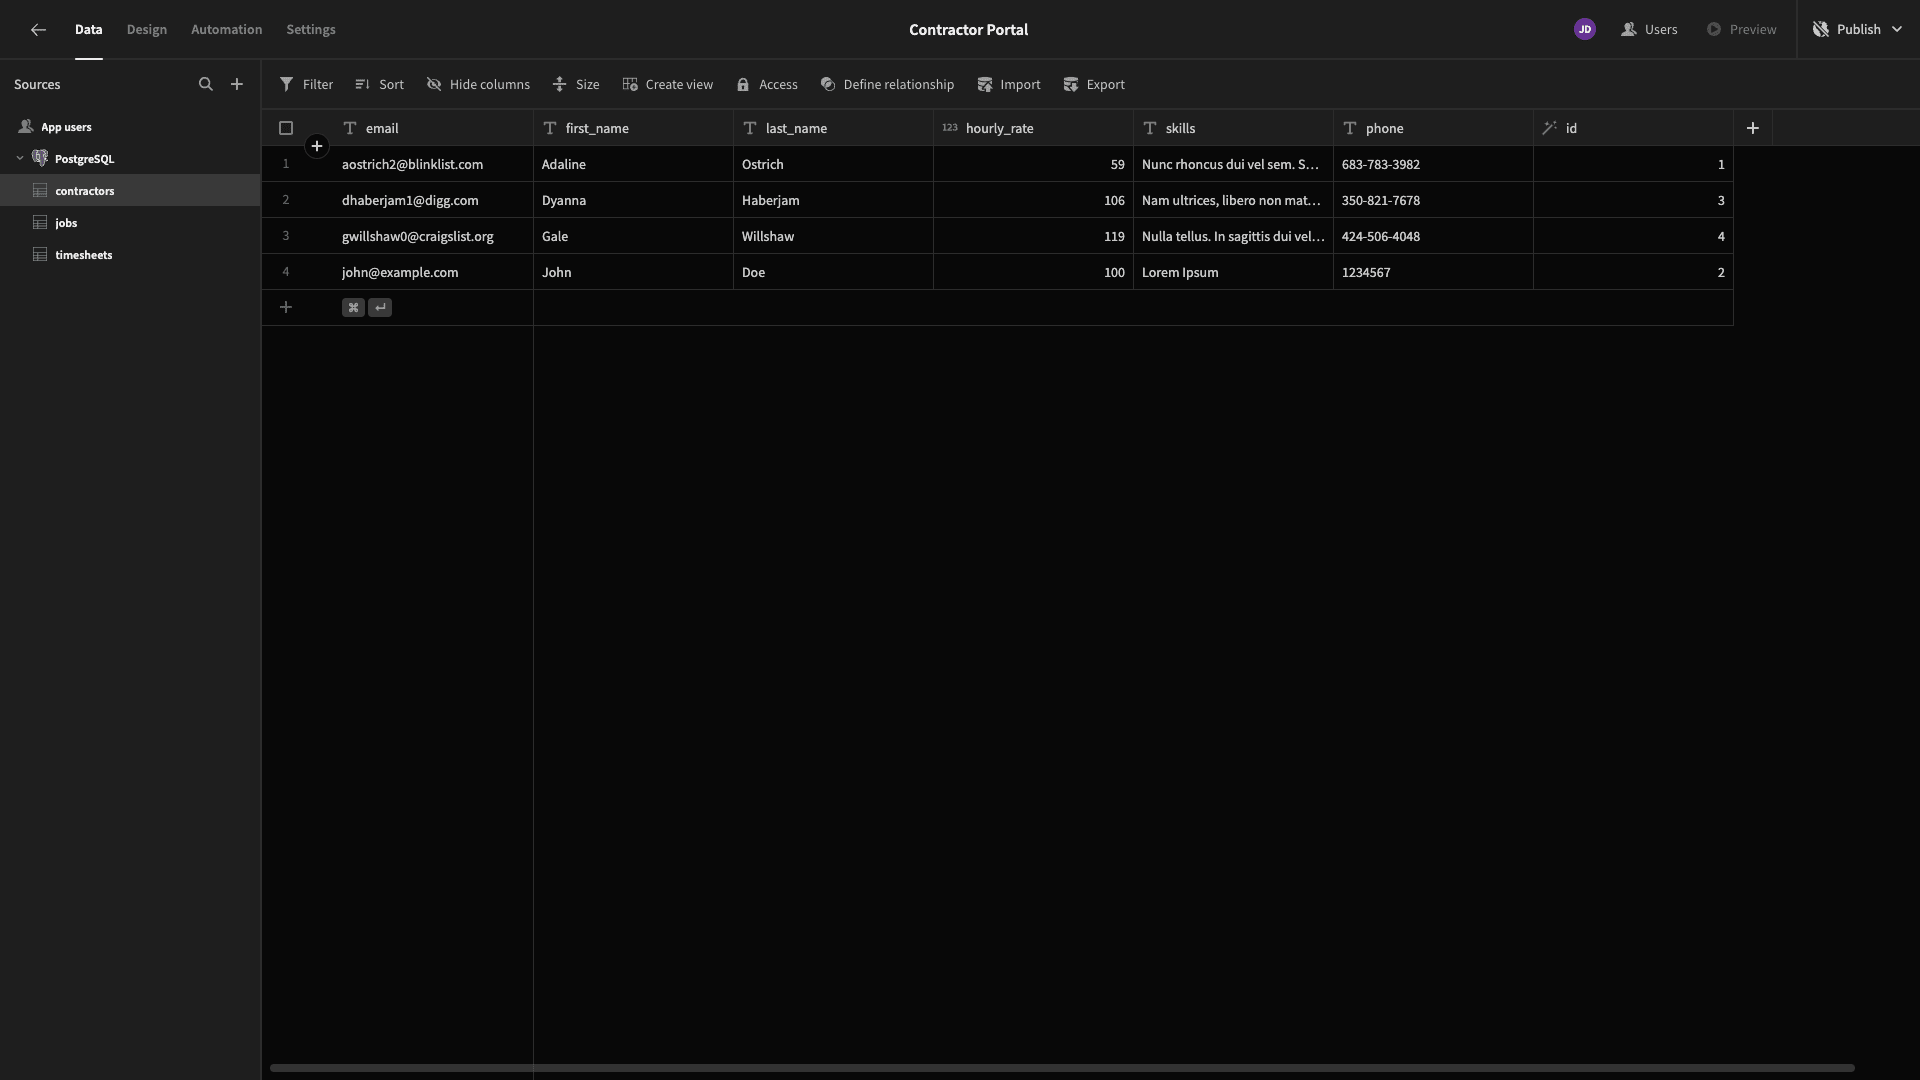
We can make changes to the schema or stored values of any of our tables.
Let’s pause for a second and get familiar with the current schema of our tables.
Our contractors table contains attributes called email, first_name, last_name, hourly_rate, skills, and phone, plus a unique autogenerated ID.
We can create this table using the following query:
 1-- Create the table
 2
 3CREATE TABLE contractors (
 4
 5  email VARCHAR(100),
 6
 7  first_name VARCHAR(50),
 8
 9  last_name VARCHAR(50),
10
11  hourly_rate INTEGER,
12
13  skills TEXT,
14
15  id SERIAL PRIMARY KEY,
16
17  phone VARCHAR(20)
18
19);
20
21-- Insert data into the table
22
23INSERT INTO contractors (email, first_name, last_name, hourly_rate, skills, id, phone) VALUES
24
25  ('aostrich2@blinklist.com', 'Adaline', 'Ostrich', 59, 'Nunc rhoncus dui vel sem. Sed sagittis. Nam congue, risus semper porta volutpat, quam pede lobortis ligula, sit amet eleifend pede libero quis orci. Nullam molestie nibh in lectus. Pellentesque at nulla. Suspendisse potenti. Cras in purus eu magna vulputate luctus. Cum sociis natoque penatibus et magnis dis parturient montes, nascetur ridiculus mus.', 1, '683-783-3982'),
26
27  ('dhaberjam1@digg.com', 'Dyanna', 'Haberjam', 106, 'Nam ultrices, libero non mattis pulvinar, nulla pede ullamcorper augue, a suscipit nulla elit ac nulla. Sed vel enim sit amet nunc viverra dapibus. Nulla suscipit ligula in lacus. Curabitur at ipsum ac tellus semper interdum.', 3, '350-821-7678'),
28
29  ('gwillshaw0@craigslist.org', 'Gale', 'Willshaw', 119, 'Nulla tellus. In sagittis dui vel nisl. Duis ac nibh.', 4, '424-506-4048'),
30
31  ('john@example.com', 'John', 'Doe', 100, 'Lorem Ipsum', 2, '1234567');
Our jobs table stored columns called job_number, status, due_date, and description, along with a unique ID.
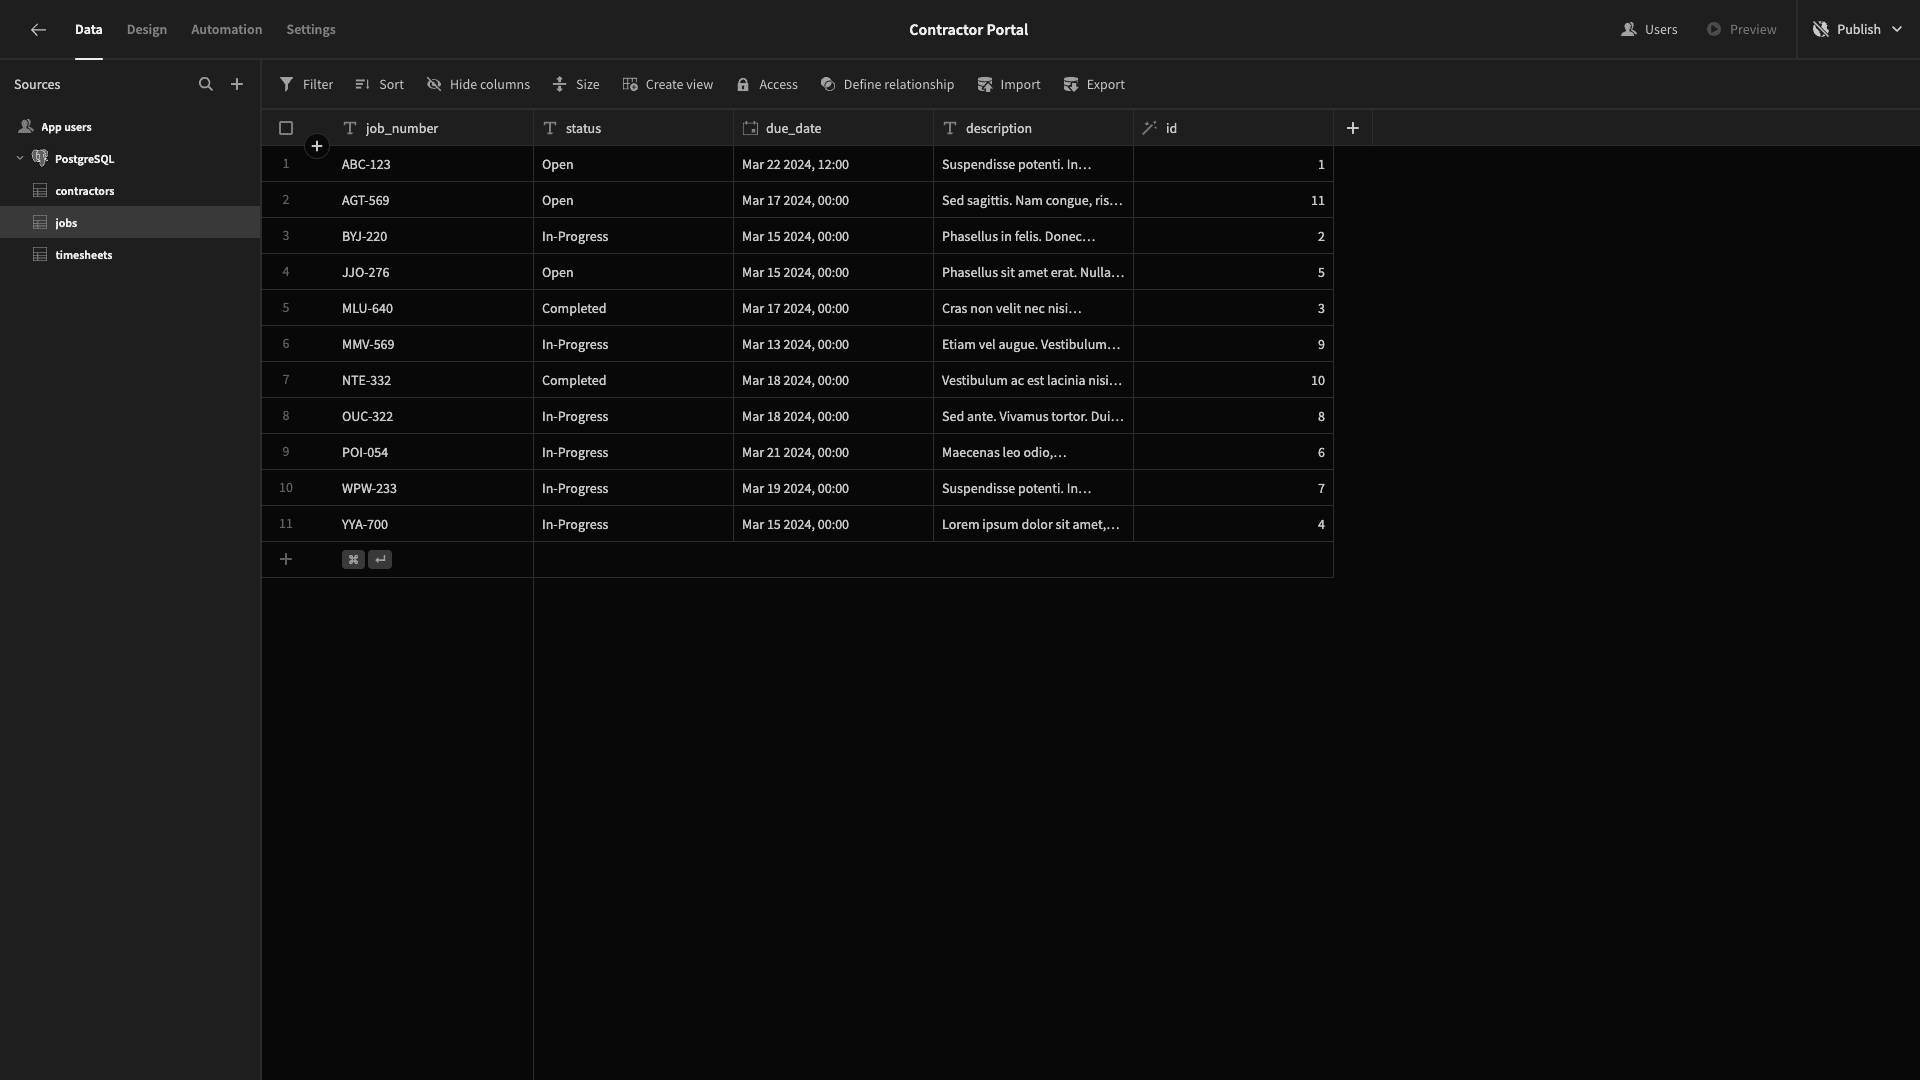
Here’s the query we can create this with.
 1CREATE TABLE jobs (
 2
 3  job_number VARCHAR(20),
 4
 5  status VARCHAR(20),
 6
 7  due_date TIMESTAMP,
 8
 9  id INTEGER,
10
11  description TEXT
12
13);
14
15INSERT INTO jobs (job_number, status, due_date, id, description) VALUES
16
17  ('BYJ-220', 'In-Progress', '2024-03-15 00:00:00', 2, 'Phasellus in felis. Donec semper sapien a libero. Nam dui.
18
19Proin leo odio, porttitor id, consequat in, consequat ut, nulla. Sed accumsan felis. Ut at dolor quis odio consequat varius.'),
20
21  ('MLU-640', 'Completed', '2024-03-17 00:00:00', 3, 'Cras non velit nec nisi vulputate nonummy. Maecenas tincidunt lacus at velit. Vivamus vel nulla eget eros elementum pellentesque.
22
23Quisque porta volutpat erat. Quisque erat eros, viverra eget, congue eget, semper rutrum, nulla. Nunc purus.'),
24
25  ('YYA-700', 'In-Progress', '2024-03-15 00:00:00', 4, 'Lorem ipsum dolor sit amet, consectetuer adipiscing elit. Proin risus. Praesent lectus.
26
27Vestibulum quam sapien, varius ut, blandit non, interdum in, ante. Vestibulum ante ipsum primis in faucibus orci luctus et ultrices posuere cubilia Curae; Duis faucibus accumsan odio. Curabitur convallis.'),
28
29  ('POI-054', 'In-Progress', '2024-03-21 00:00:00', 6, 'Maecenas leo odio, condimentum id, luctus nec, molestie sed, justo. Pellentesque viverra pede ac diam. Cras pellentesque volutpat dui.
30
31Maecenas tristique, est et tempus semper, est quam pharetra magna, ac consequat metus sapien ut nunc. Vestibulum ante ipsum primis in faucibus orci luctus et ultrices posuere cubilia Curae; Mauris viverra diam vitae quam. Suspendisse potenti.'),
32
33  ('WPW-233', 'In-Progress', '2024-03-19 00:00:00', 7, 'Suspendisse potenti. In eleifend quam a odio. In hac habitasse platea dictumst.
34
35Maecenas ut massa quis augue luctus tincidunt. Nulla mollis molestie lorem. Quisque ut erat.
36
37Curabitur gravida nisi at nibh. In hac habitasse platea dictumst. Aliquam augue quam, sollicitudin vitae, consectetuer eget, rutrum at, lorem.'),
38
39  ('JJO-276', 'Open', '2024-03-15 00:00:00', 5, 'Phasellus sit amet erat. Nulla tempus. Vivamus in felis eu sapien cursus vestibulum.
40
41Proin eu mi. Nulla ac enim. In tempor, turpis nec euismod scelerisque, quam turpis adipiscing lorem, vitae mattis nibh ligula nec sem.
42
43Duis aliquam convallis nunc. Proin at turpis a pede posuere nonummy. Integer non velit.'),
44
45  ('NTE-332', 'Completed', '2024-03-18 00:00:00', 10, 'Vestibulum ac est lacinia nisi venenatis tristique. Fusce congue, diam id ornare imperdiet, sapien urna pretium nisl, ut volutpat sapien arcu sed augue. Aliquam erat volutpat.
46
47In congue. Etiam justo. Etiam pretium iaculis justo.
48
49In hac habitasse platea dictumst. Etiam faucibus cursus urna. Ut tellus.'),
50
51  ('AGT-569', 'Open', '2024-03-17 00:00:00', 11, 'Sed sagittis. Nam congue, risus semper porta volutpat, quam pede lobortis ligula, sit amet eleifend pede libero quis orci. Nullam molestie nibh in lectus.
52
53Pellentesque at nulla. Suspendisse potenti. Cras in purus eu magna vulputate luctus.'),
54
55  ('OUC-322', 'In-Progress', '2024-03-18 00:00:00', 8, 'Sed ante. Vivamus tortor. Duis mattis egestas metus.'),
56
57  ('MMV-569', 'In-Progress', '2024-03-13 00:00:00', 9, 'Etiam vel augue. Vestibulum rutrum rutrum neque. Aenean auctor gravida sem.
58
59Praesent id massa id nisl venenatis lacinia. Aenean sit amet justo. Morbi ut odio.'),
60
61  ('ABC-123', 'Open', '2024-03-22 12:00:00', 1, 'Suspendisse potenti. In eleifend quam a odio. In hac habitasse platea dictumst.
62
63Maecenas ut massa quis augue luctus tincidunt. Nulla mollis molestie lorem. Quisque ut erat.
64
65Curabitur gravida nisi at nibh. In hac habitasse platea dictumst. Aliquam augue quam, sollicitudin vitae, consectetuer eget, rutrum at, lorem.');
Lastly, our timesheets table stores attributes called date_submitted, comments, hours, job_id, and status, plus a unique ID.
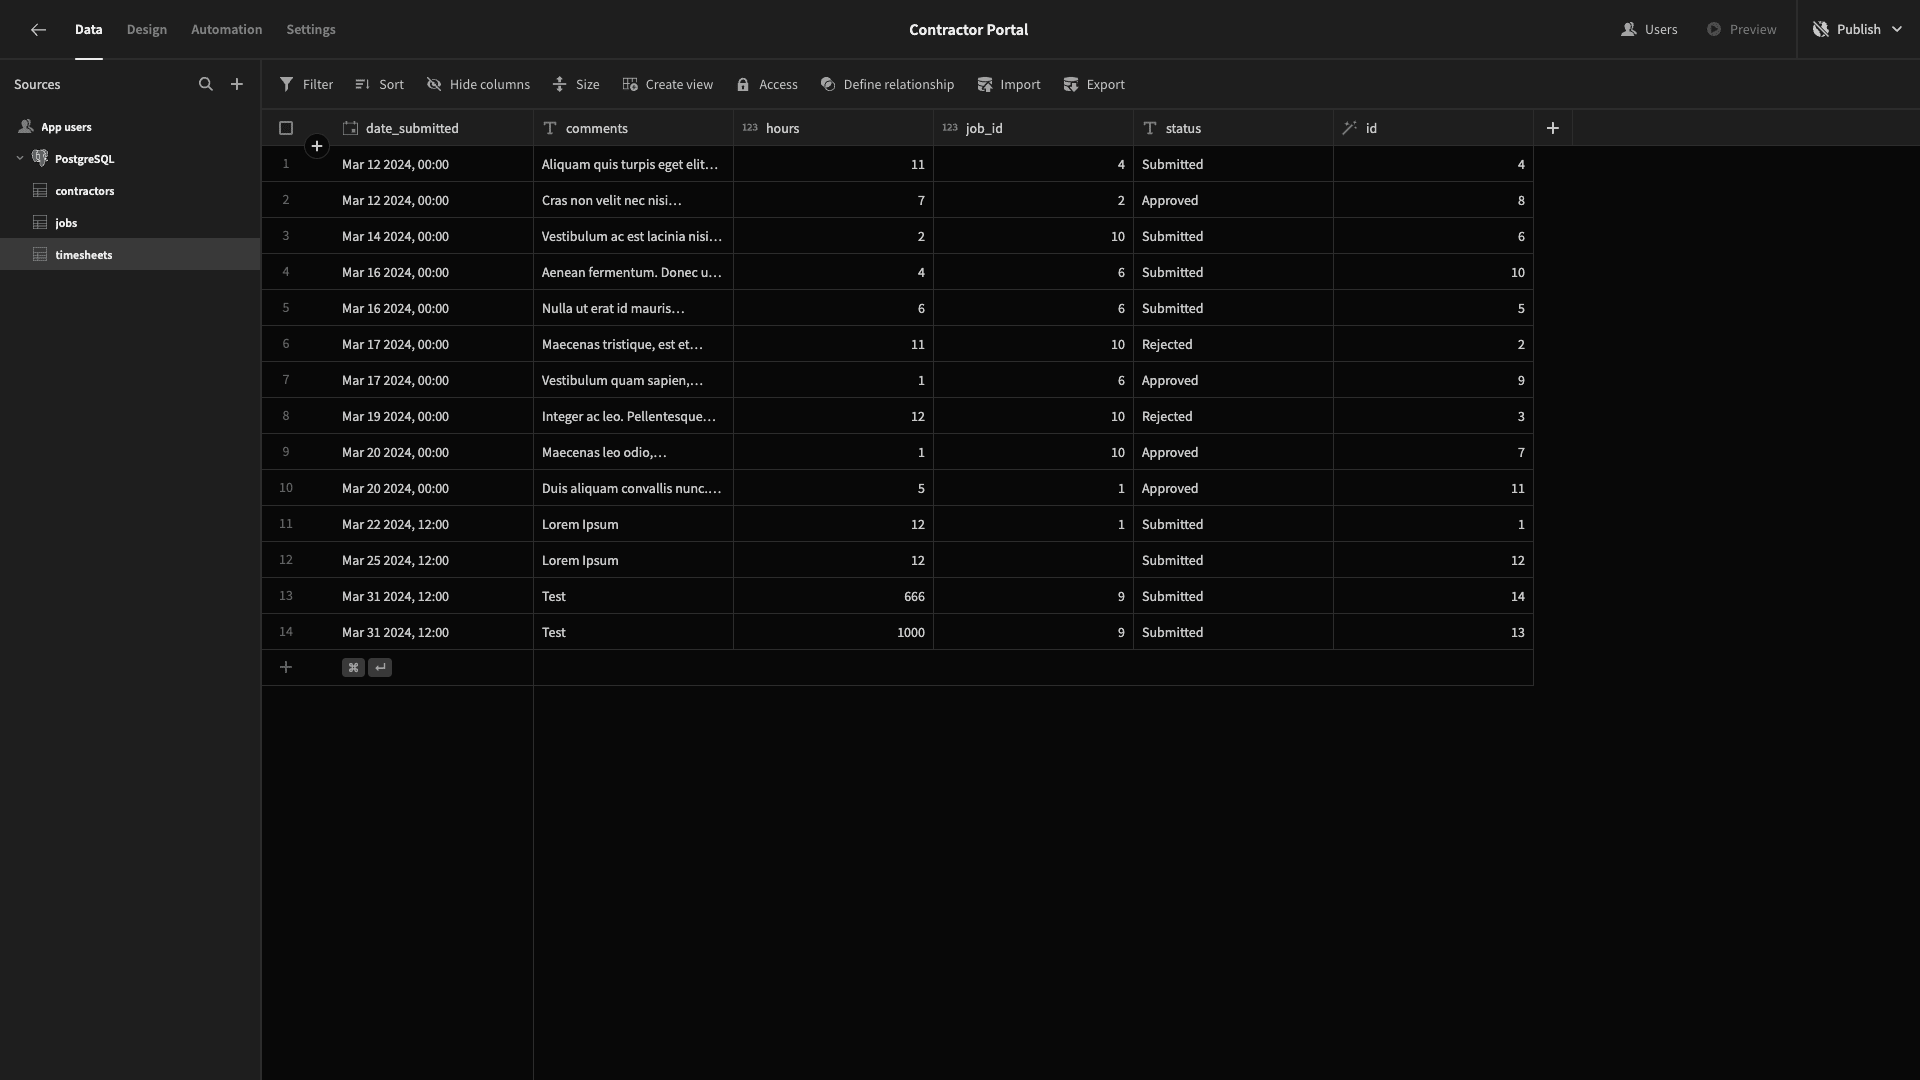
Here’s the query.
 1CREATE TABLE timesheets (
 2
 3  comments TEXT,
 4
 5  id SERIAL PRIMARY KEY,
 6
 7  hours INTEGER,
 8
 9  job_id INTEGER,
10
11  date_submitted TIMESTAMP,
12
13  status VARCHAR(20)
14
15);
16
17INSERT INTO timesheets (comments, id, hours, job_id, date_submitted, status) VALUES
18
19  ('Lorem Ipsum', 1, 12, 1, '2024-03-22T12:00:00.000Z', 'Submitted'),
20
21  ('"Maecenas tristique, est et tempus semper, est quam pharetra magna, ac consequat metus sapien ut nunc. Vestibulum ante ipsum primis in faucibus orci luctus et ultrices posuere cubilia Curae; Mauris viverra diam vitae quam. Suspendisse potenti. Nullam porttitor lacus at turpis. Donec posuere metus vitae ipsum. Aliquam non mauris."', 2, 11, 10, '2024-03-17T00:00:00.000Z', 'Rejected'),
22
23  ('"Integer ac leo. Pellentesque ultrices mattis odio. Donec vitae nisi. Nam ultrices, libero non mattis pulvinar, nulla pede ullamcorper augue, a suscipit nulla elit ac nulla. Sed vel enim sit amet nunc viverra dapibus. Nulla suscipit ligula in lacus. Curabitur at ipsum ac tellus semper interdum. Mauris ullamcorper purus sit amet nulla. Quisque arcu libero, rutrum ac, lobortis vel, dapibus at, diam."', 3, 12, 10, '2024-03-19T00:00:00.000Z', 'Rejected'),
24
25  ('Aliquam quis turpis eget elit sodales scelerisque. Mauris sit amet eros. Suspendisse accumsan tortor quis turpis.', 4, 11, 4, '2024-03-12T00:00:00.000Z', 'Submitted'),
26
27  ('"Nulla ut erat id mauris vulputate elementum. Nullam varius. Nulla facilisi. Cras non velit nec nisi vulputate nonummy. Maecenas tincidunt lacus at velit. Vivamus vel nulla eget eros elementum pellentesque."', 5, 6, 6, '2024-03-16T00:00:00.000Z', 'Submitted'),
28
29  ('Vestibulum ac est lacinia nisi venenatis tristique. Fusce congue, diam id ornare imperdiet, sapien urna pretium nisl, ut volutpat sapien arcu sed augue. Aliquam erat volutpat.', 6, 2, 10, '2024-03-14T00:00:00.000Z', 'Submitted'),
30
31  ('Maecenas leo odio, condimentum id, luctus nec, molestie sed, justo. Pellentesque viverra pede ac diam. Cras pellentesque volutpat dui.', 7, 1, 10, '2024-03-20T00:00:00.000Z', 'Approved'),
32
33  ('"Vestibulum quam sapien, varius ut, blandit non, interdum in, ante. Vestibulum ante ipsum primis in faucibus orci luctus et ultrices posuere cubilia Curae; Duis faucibus accumsan odio. Curabitur convallis. Duis consequat dui nec nisi volutpat eleifend. Donec ut dolor. Morbi vel lectus in quam fringilla rhoncus."', 9, 1, 6, '2024-03-17T00:00:00.000Z', 'Approved'),
34
35  ('Aenean fermentum. Donec ut mauris eget massa tempor convallis. Nulla neque libero, convallis eget, eleifend luctus, ultricies eu, nibh.', 10, 4, 6, '2024-03-16T00:00:00.000Z', 'Submitted'),
36
37  ('"Duis aliquam convallis nunc. Proin at turpis a pede posuere nonummy. Integer non velit. Donec diam neque, vestibulum eget, vulputate ut, ultrices vel, augue. Vestibulum ante ipsum primis in faucibus orci luctus et ultrices posuere cubilia Curae; Donec pharetra, magna vestibulum aliquet ultrices, erat tortor sollicitudin mi, sit amet lobortis sapien sapien non mi. Integer ac neque. Duis bibendum. Morbi non quam nec dui luctus rutrum. Nulla tellus."', 11, 5, 1, '2024-03-20T00:00:00.000Z', 'Approved'),
38
39  ('Cras non velit nec nisi vulputate nonummy. Maecenas tincidunt lacus at velit. Vivamus vel nulla eget eros elementum pellentesque.', 8, 7, 2, '2024-03-12T00:00:00.000Z', 'Approved');
Adding user columns and other schema changes
Next, we’re going to make a few changes to each of our tables’ schemas.
First of all, we want to link each one to Budibase’s internal Users table. The user data type allows us to create a relationship between rows in SQL or internal data tables and individual users’ accounts.
We can use the plus icon to add this as a column. We’ll call ours bb_user.
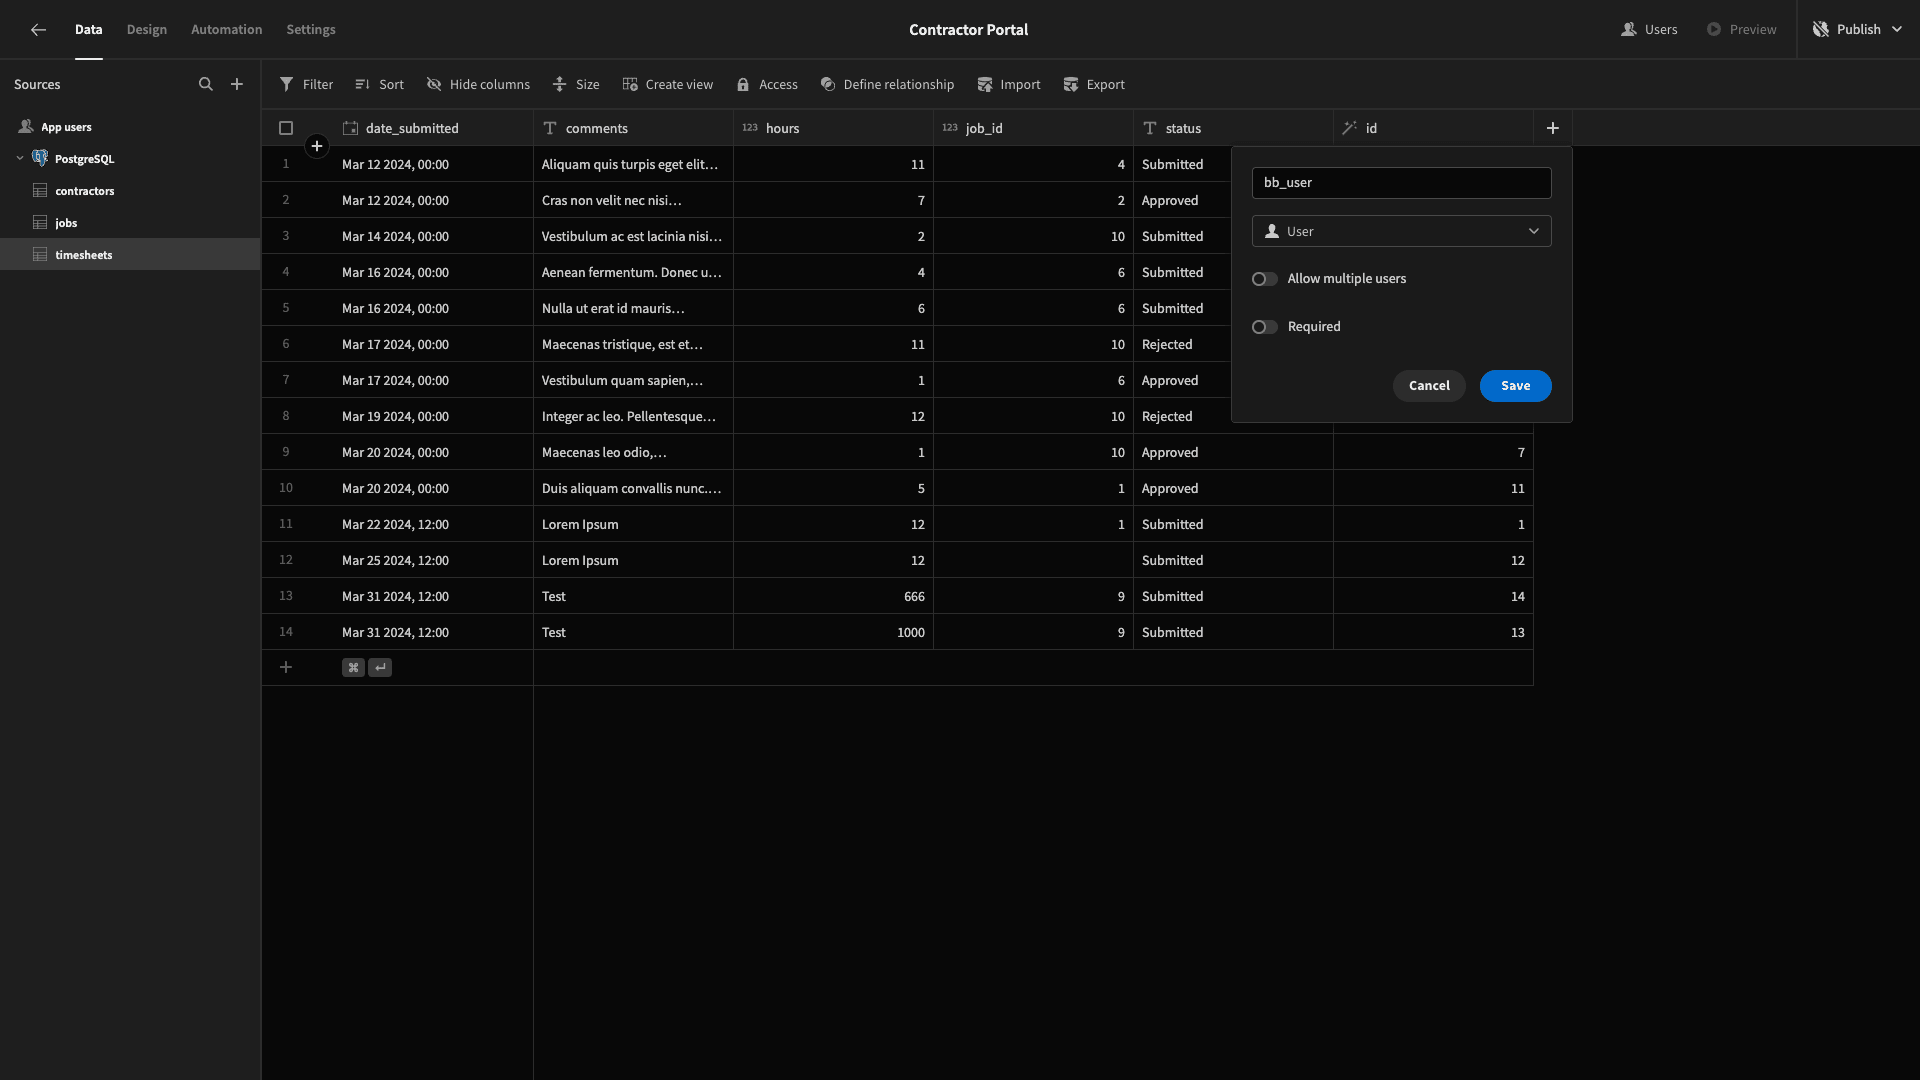
We’ll repeat this step for all three tables in our database. We can also assign ourselves as the user for a row in our contractors table - and a handful of rows in our other two tables.
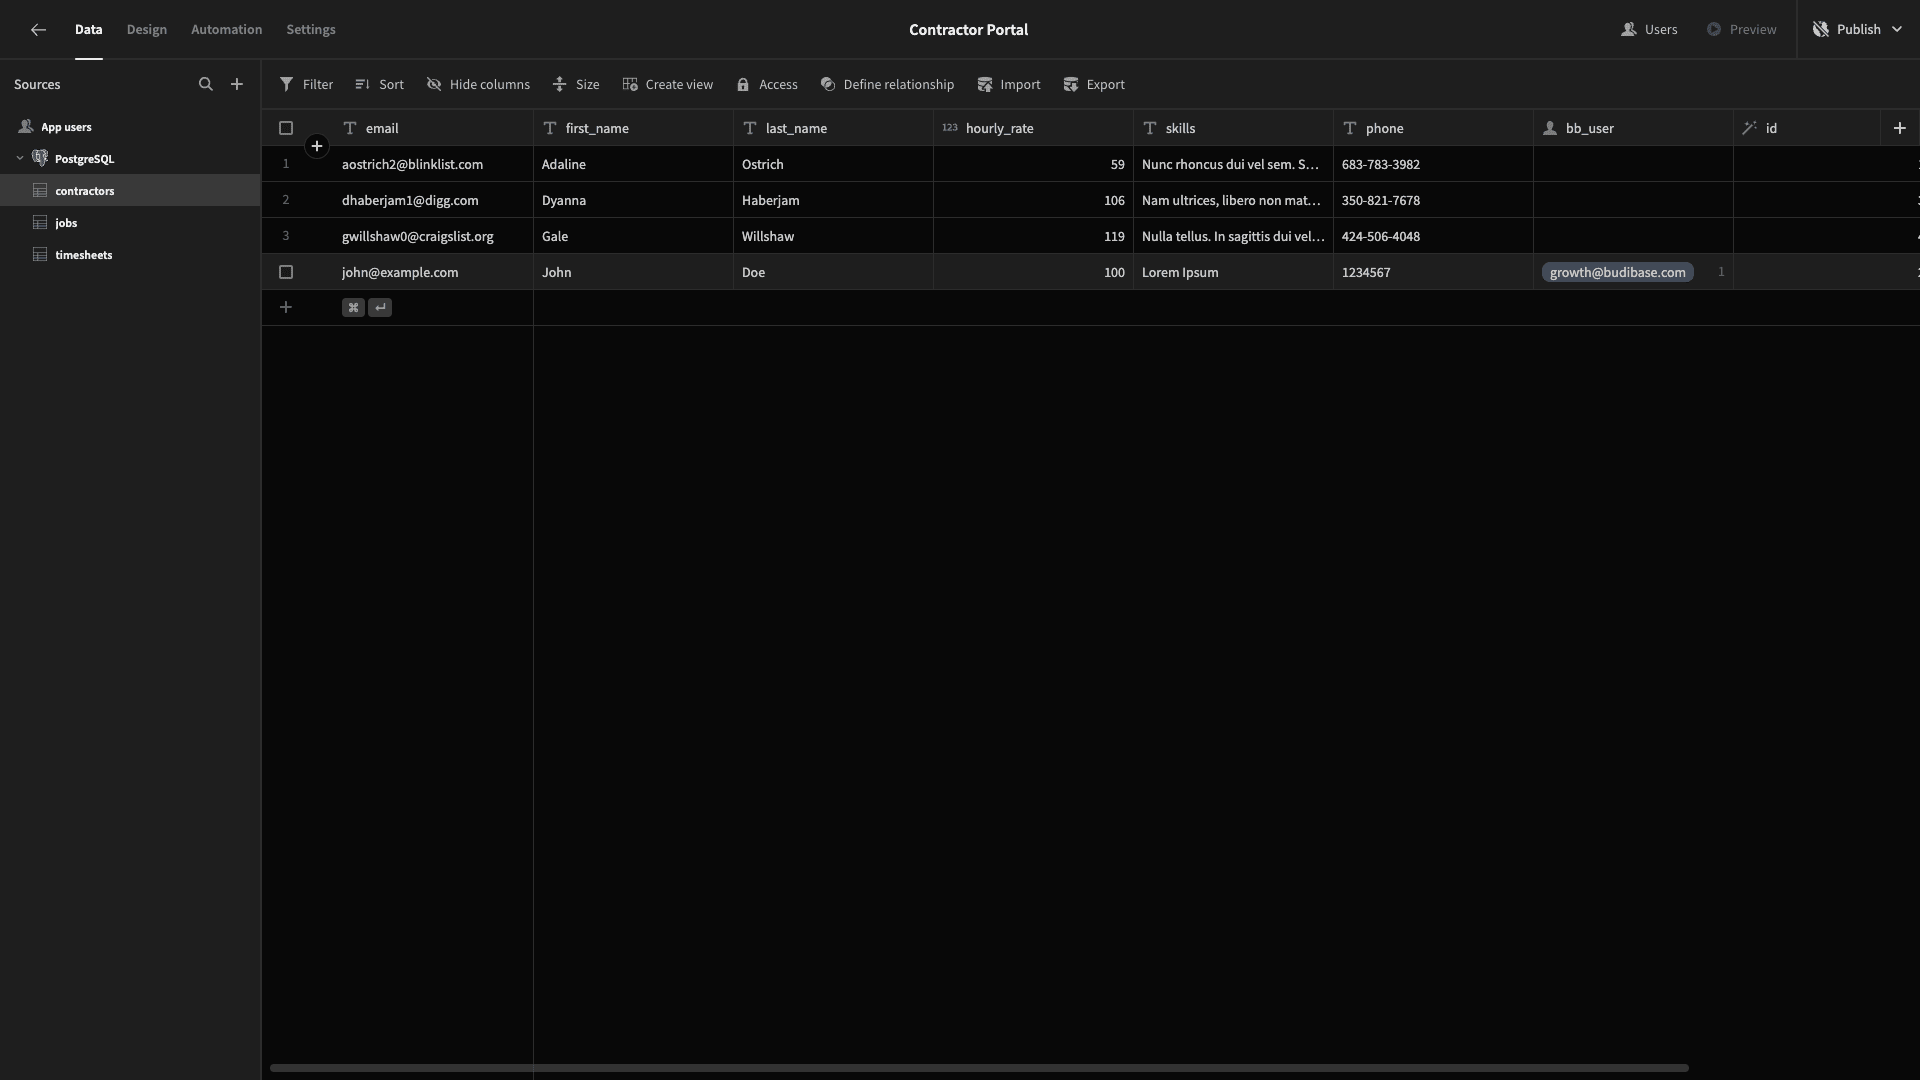
We’ll use this extensively as we build our contractor portal.
We’re also going to make a few additional tweaks to our schema that will make life easier when we start building our UIs.
First, there are attributes in our jobs and timesheets tables called status. These are stored in our database as VARCHARs, but we want to limit the possible values to a defined set of options.
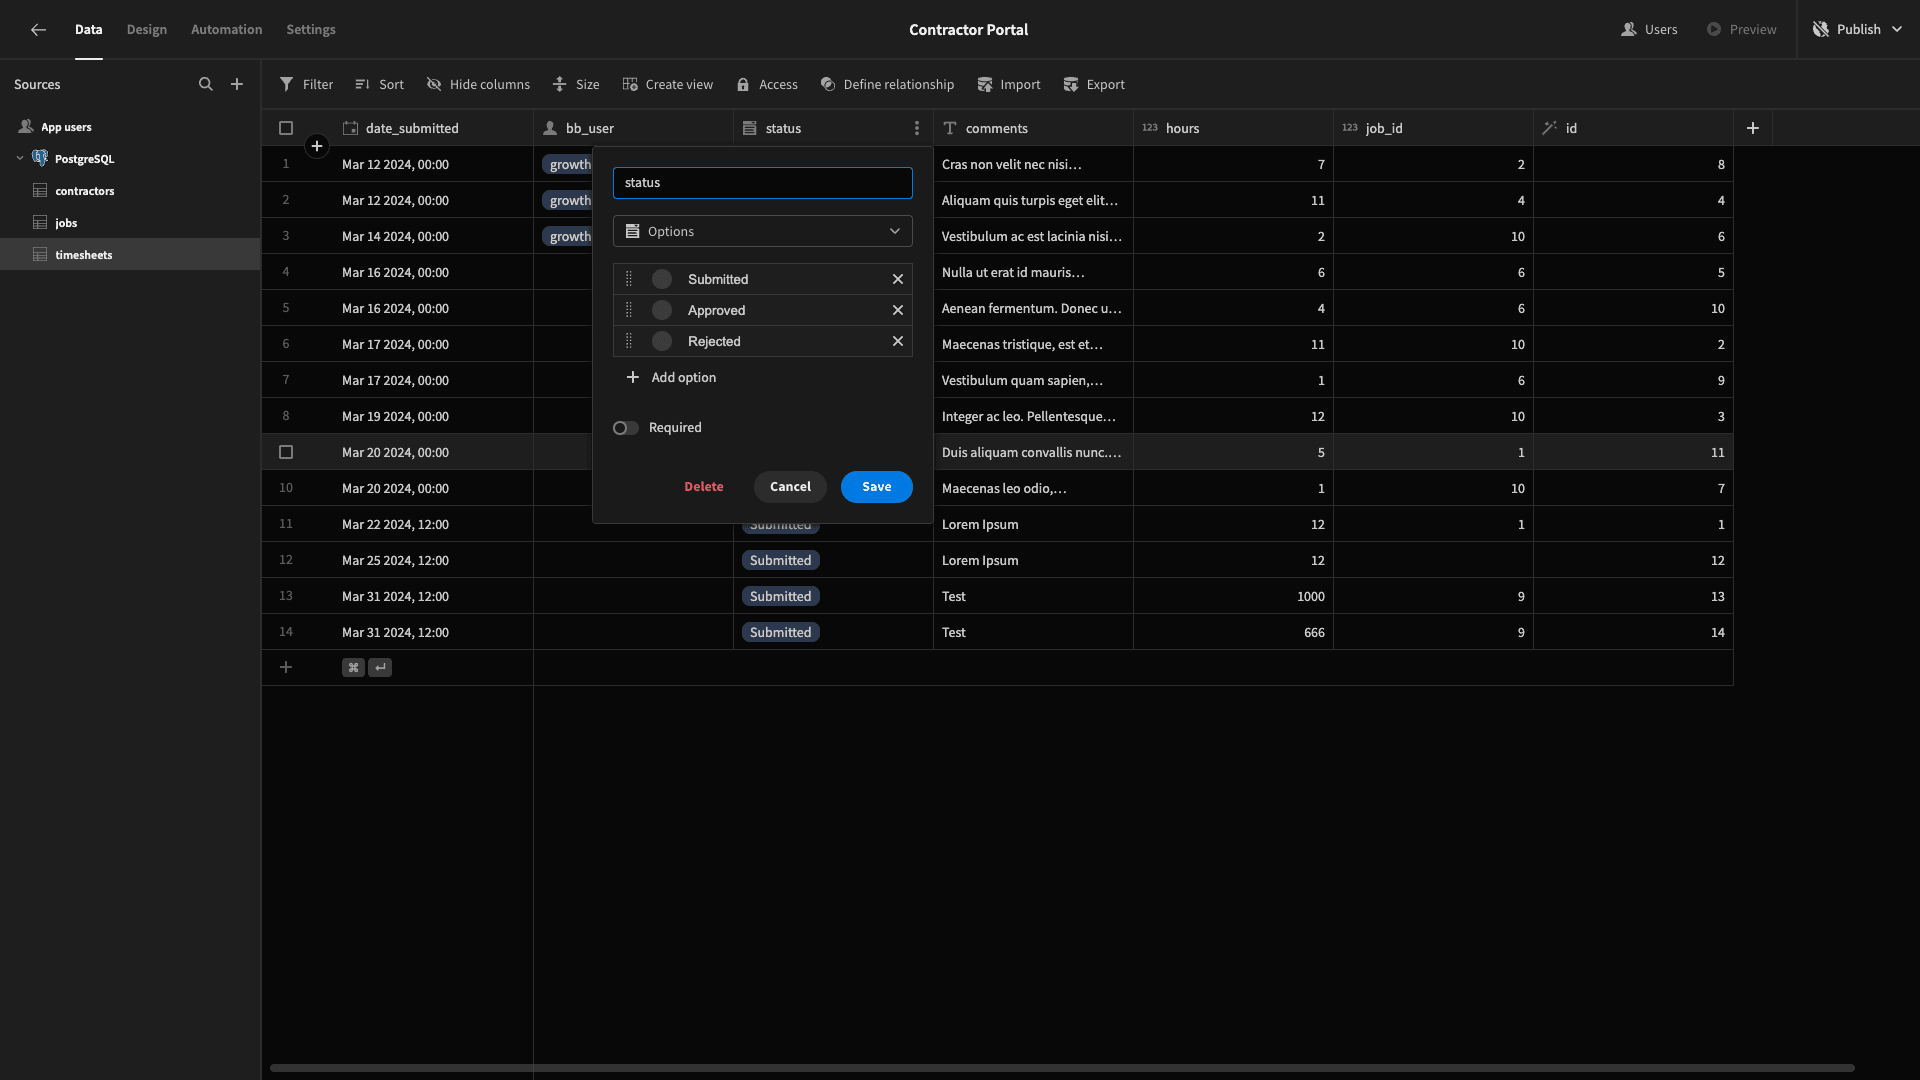
So, under each, we’ll hit Edit Column and change the type to options. We can then input the possible values. For the timesheets status, these will be Submitted, Approved, and Rejected.
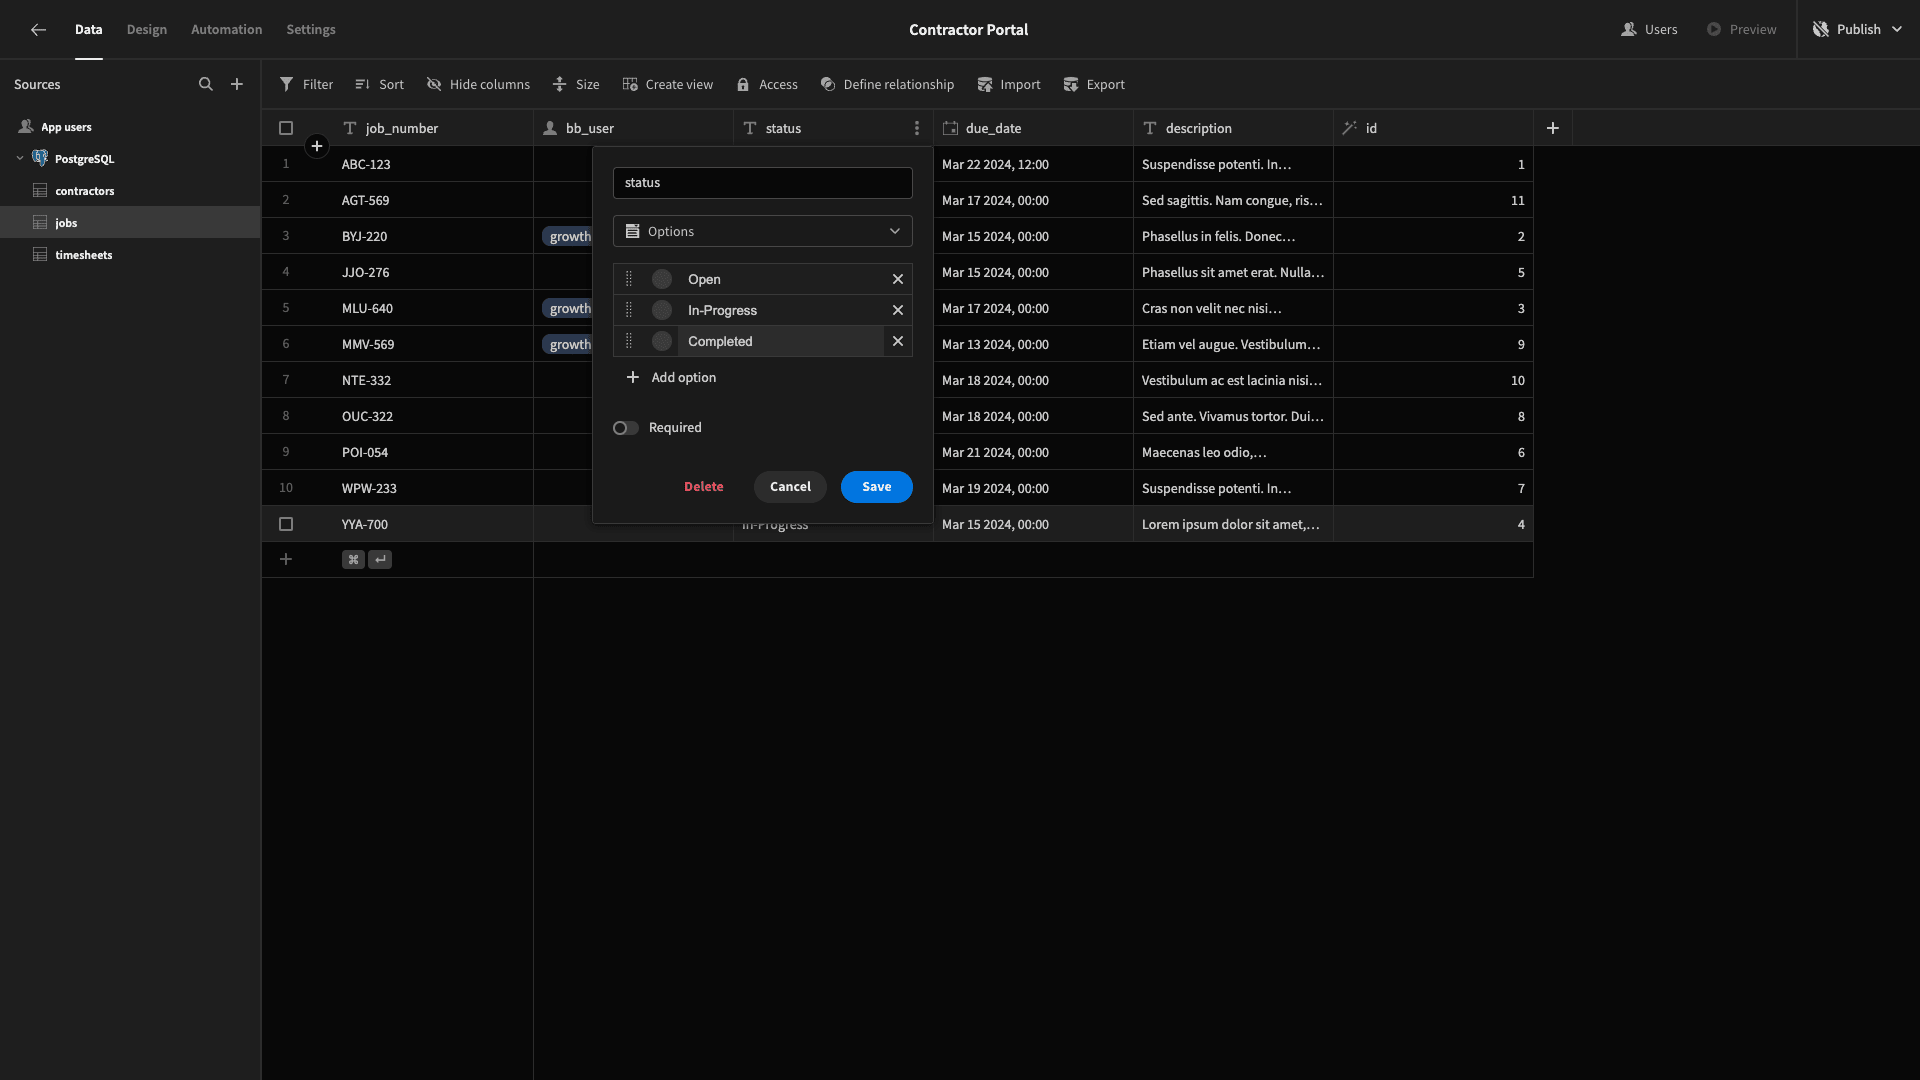
For the status attribute in the jobs table, the options will be Open, In-Progress, and Completed.
There are also columns in each of our tables where we’re storing longer text. These are description in the jobs table, comments in timesheets, and skills in contractors.
To ensure appropriate fields are provided when we autogenerate UIs for our tables, we’re changing the Type for each of these columns to Long-Form Text.

Defining relationships
Next, we can configure the relationships between each of our tables by hitting Define Relationships.
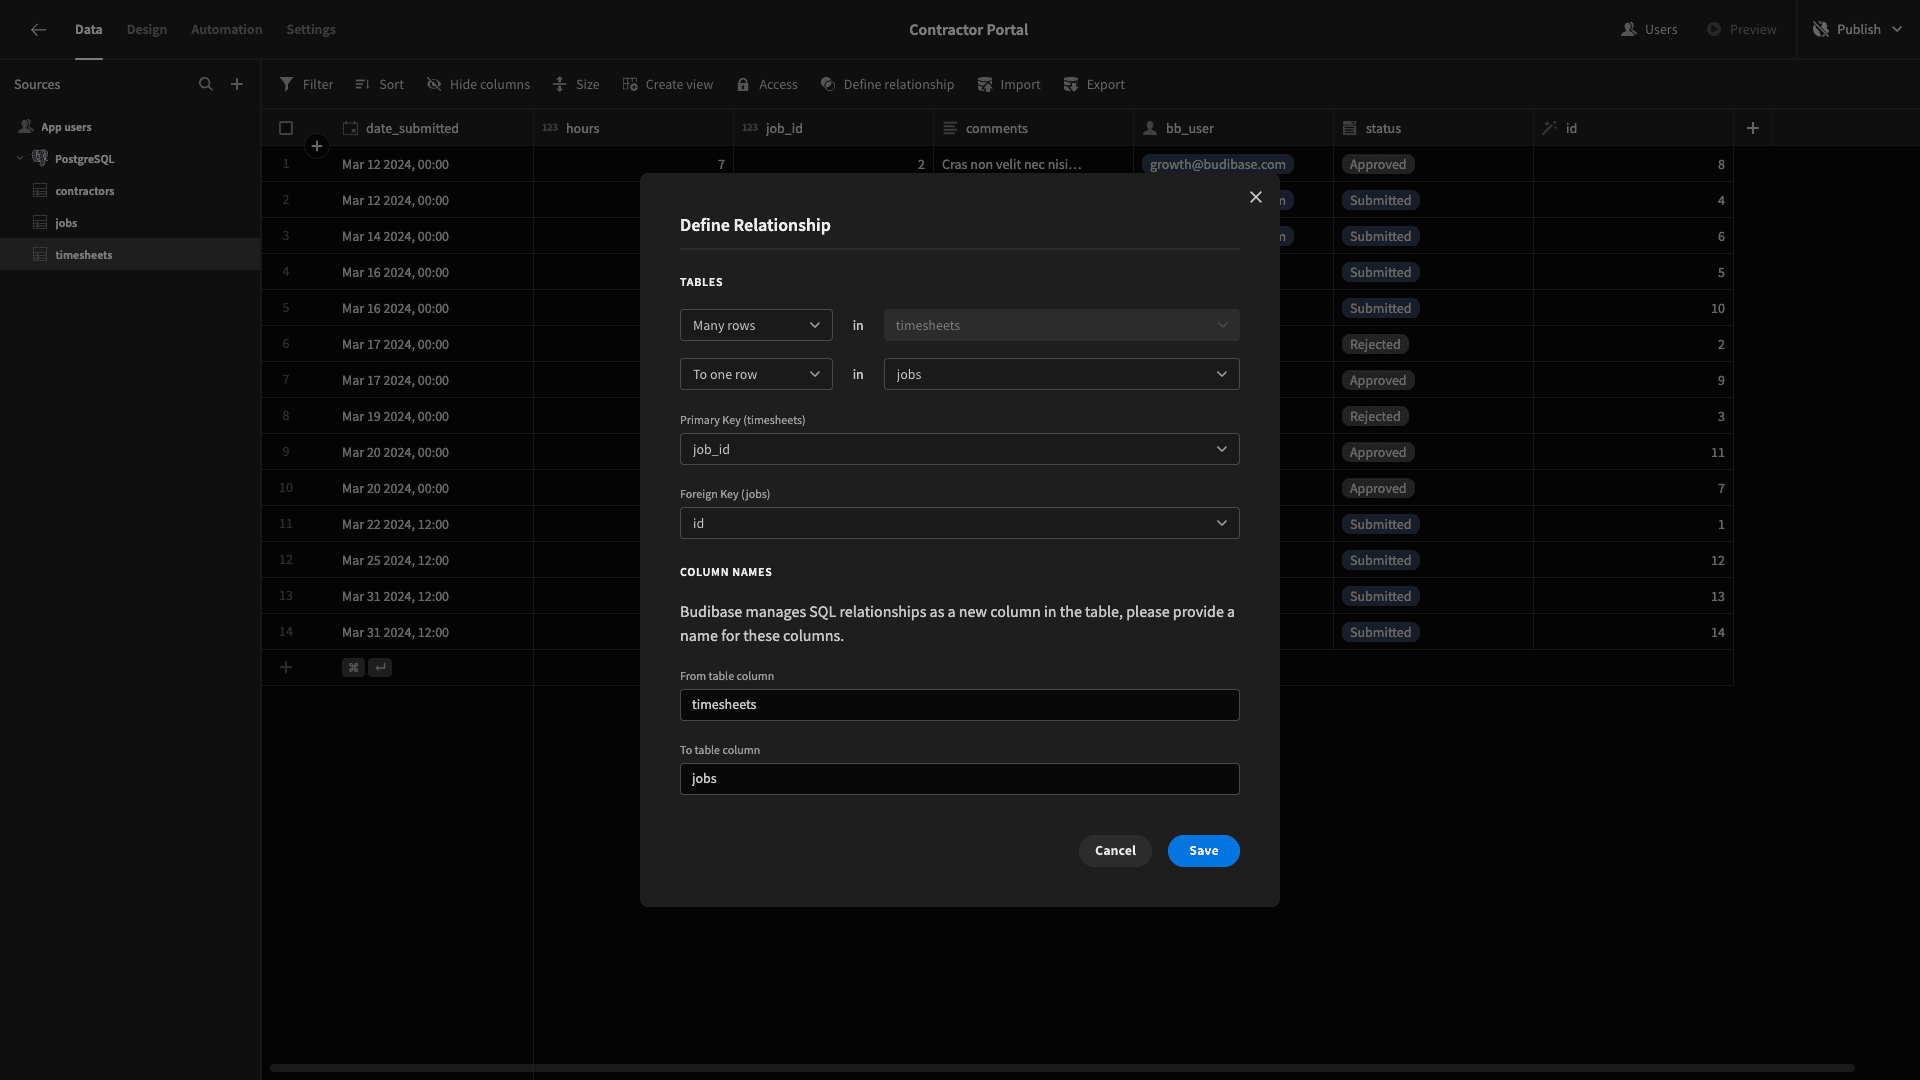
First, we’ll add a many-to-one relationship between our timesheets and jobs tables, using the job_id attribute in timesheets as our primary key and the id attribute in jobs as our foreign key.
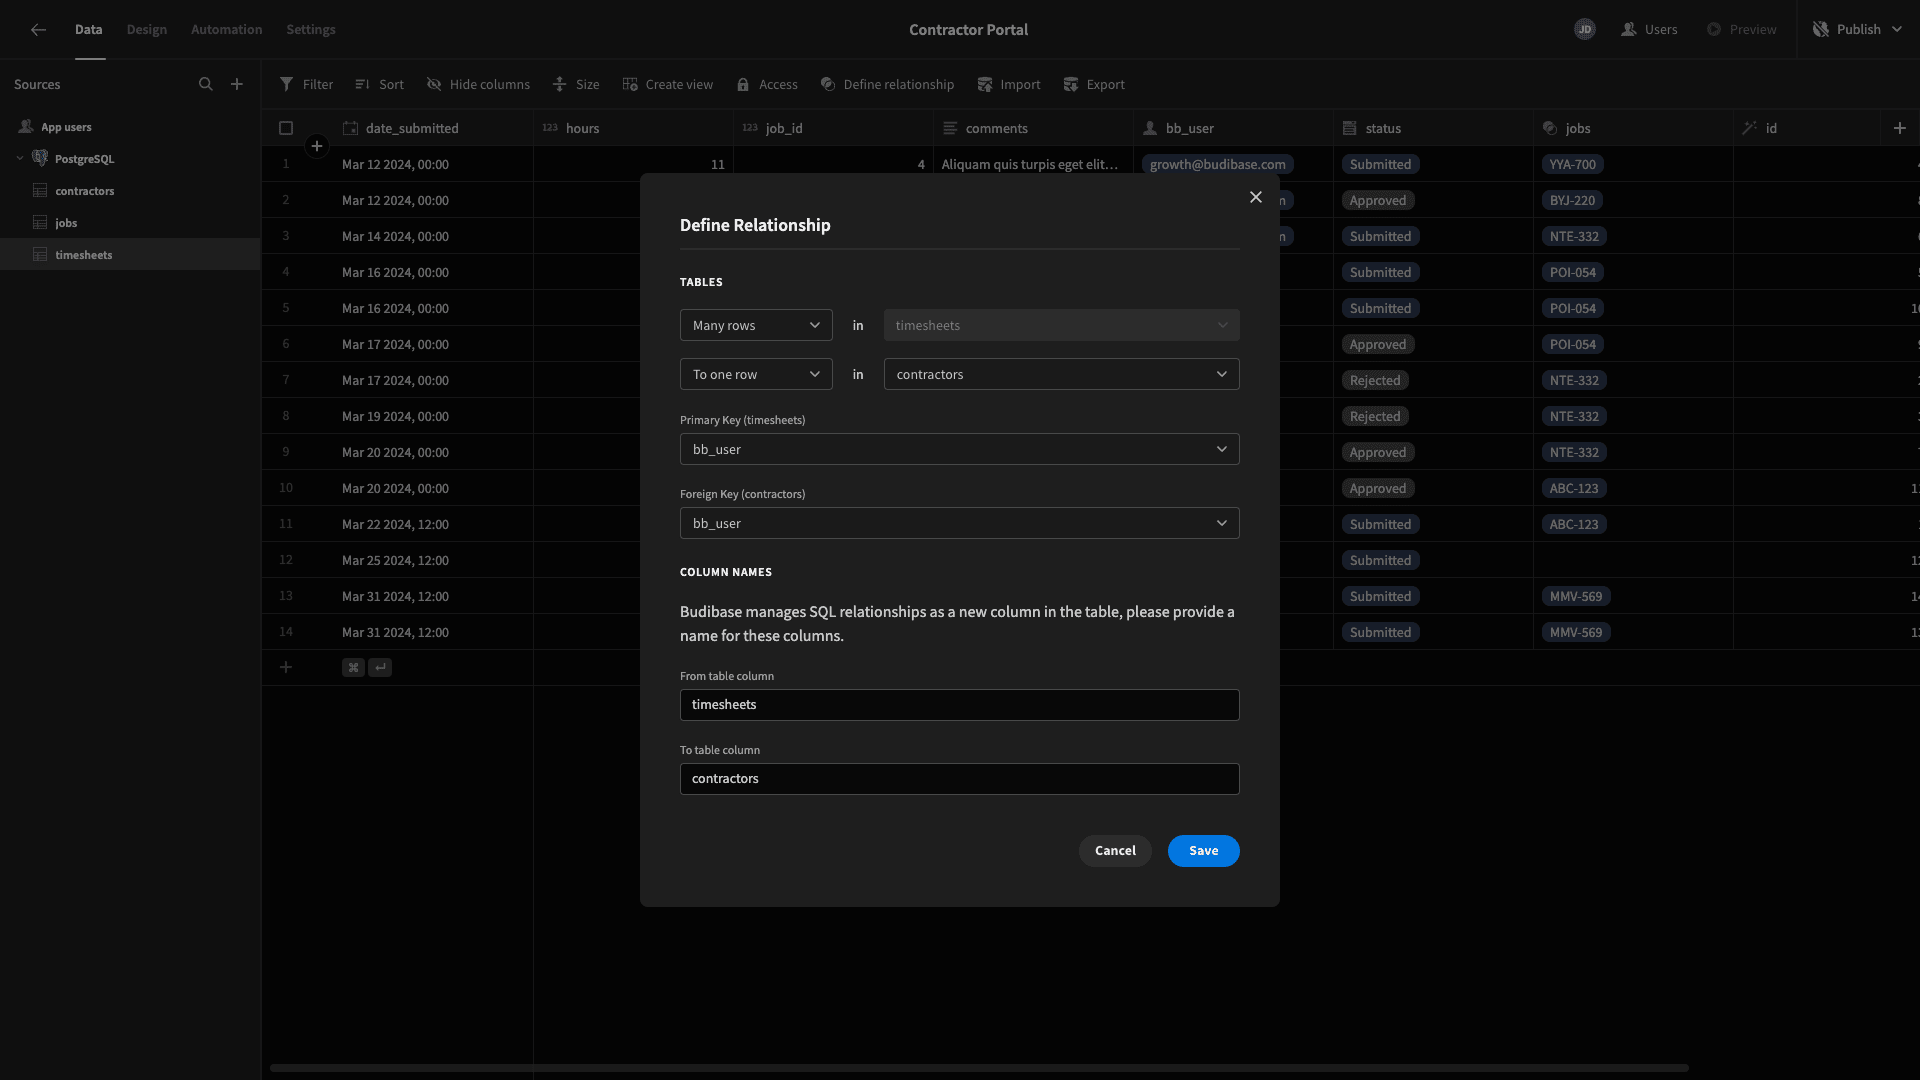
We’ll also add a many-to-one relationship from timesheets to contractors, using the bb_user column in both tables as our keys.
Lastly, we’ll repeat this process to create a many-to-one relationship between jobs and contractors using the bb_user column.

Now, we’re ready to start building our UIs.
2. Building our contractor home screen
First up, we’re going to build a home screen for our contractors. This will enable users to carry out a few distinct actions.
First, they’ll be able to view their own jobs and submit timesheets relating to these. Besides this, they’ll be able to view and claim open jobs or update their personal details.
We’ll start by adding a new screen. Head to the design tab, and we’re prompted with several options for how we’d like to create our first screen, including several autogenerated layouts.

For this screen, we’re choosing Table with Details Panel.
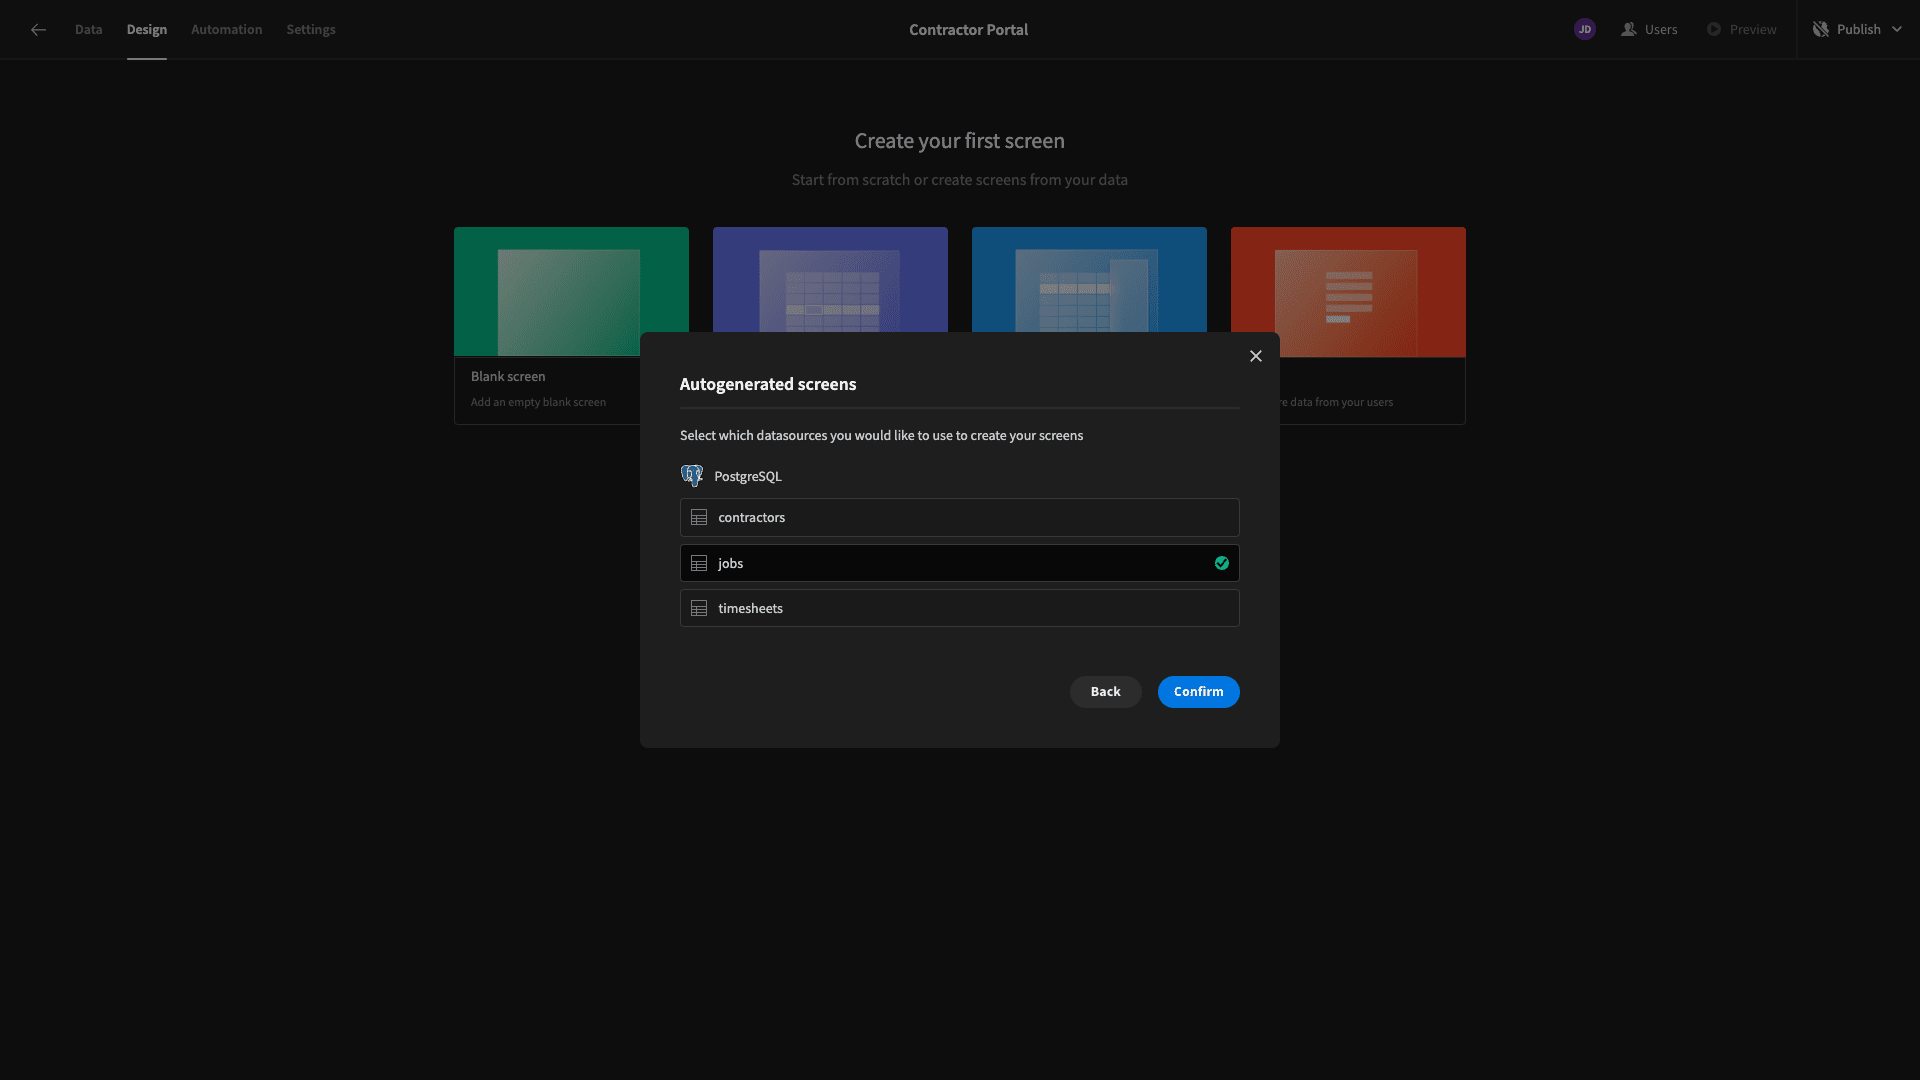
When we select this option, we’re prompted to choose which of our connected data tables we want to generate a UI for.
We’re selecting jobs.
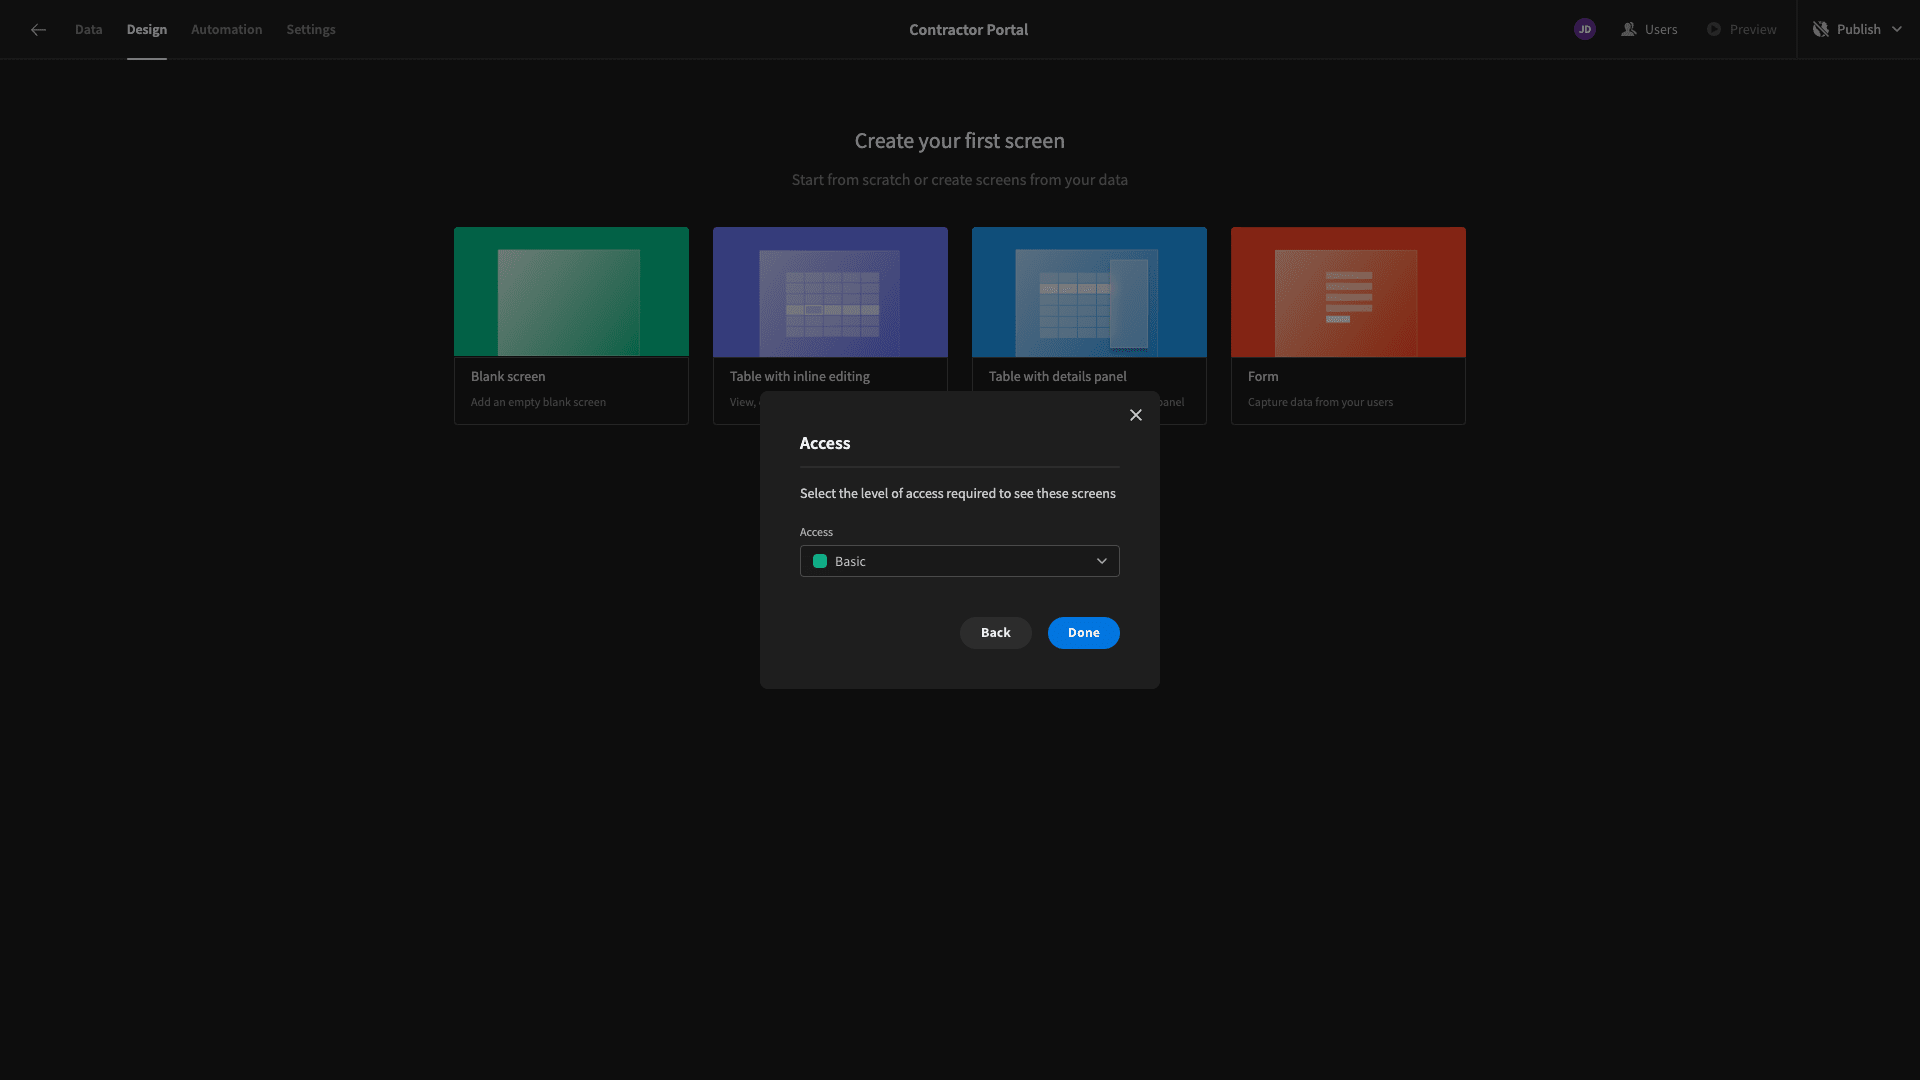
Then, we can choose which role within Budibase’s RBAC framework we’d like to set as the minimum for accessing this screen.
We’re leaving this set to the default option of Basic.
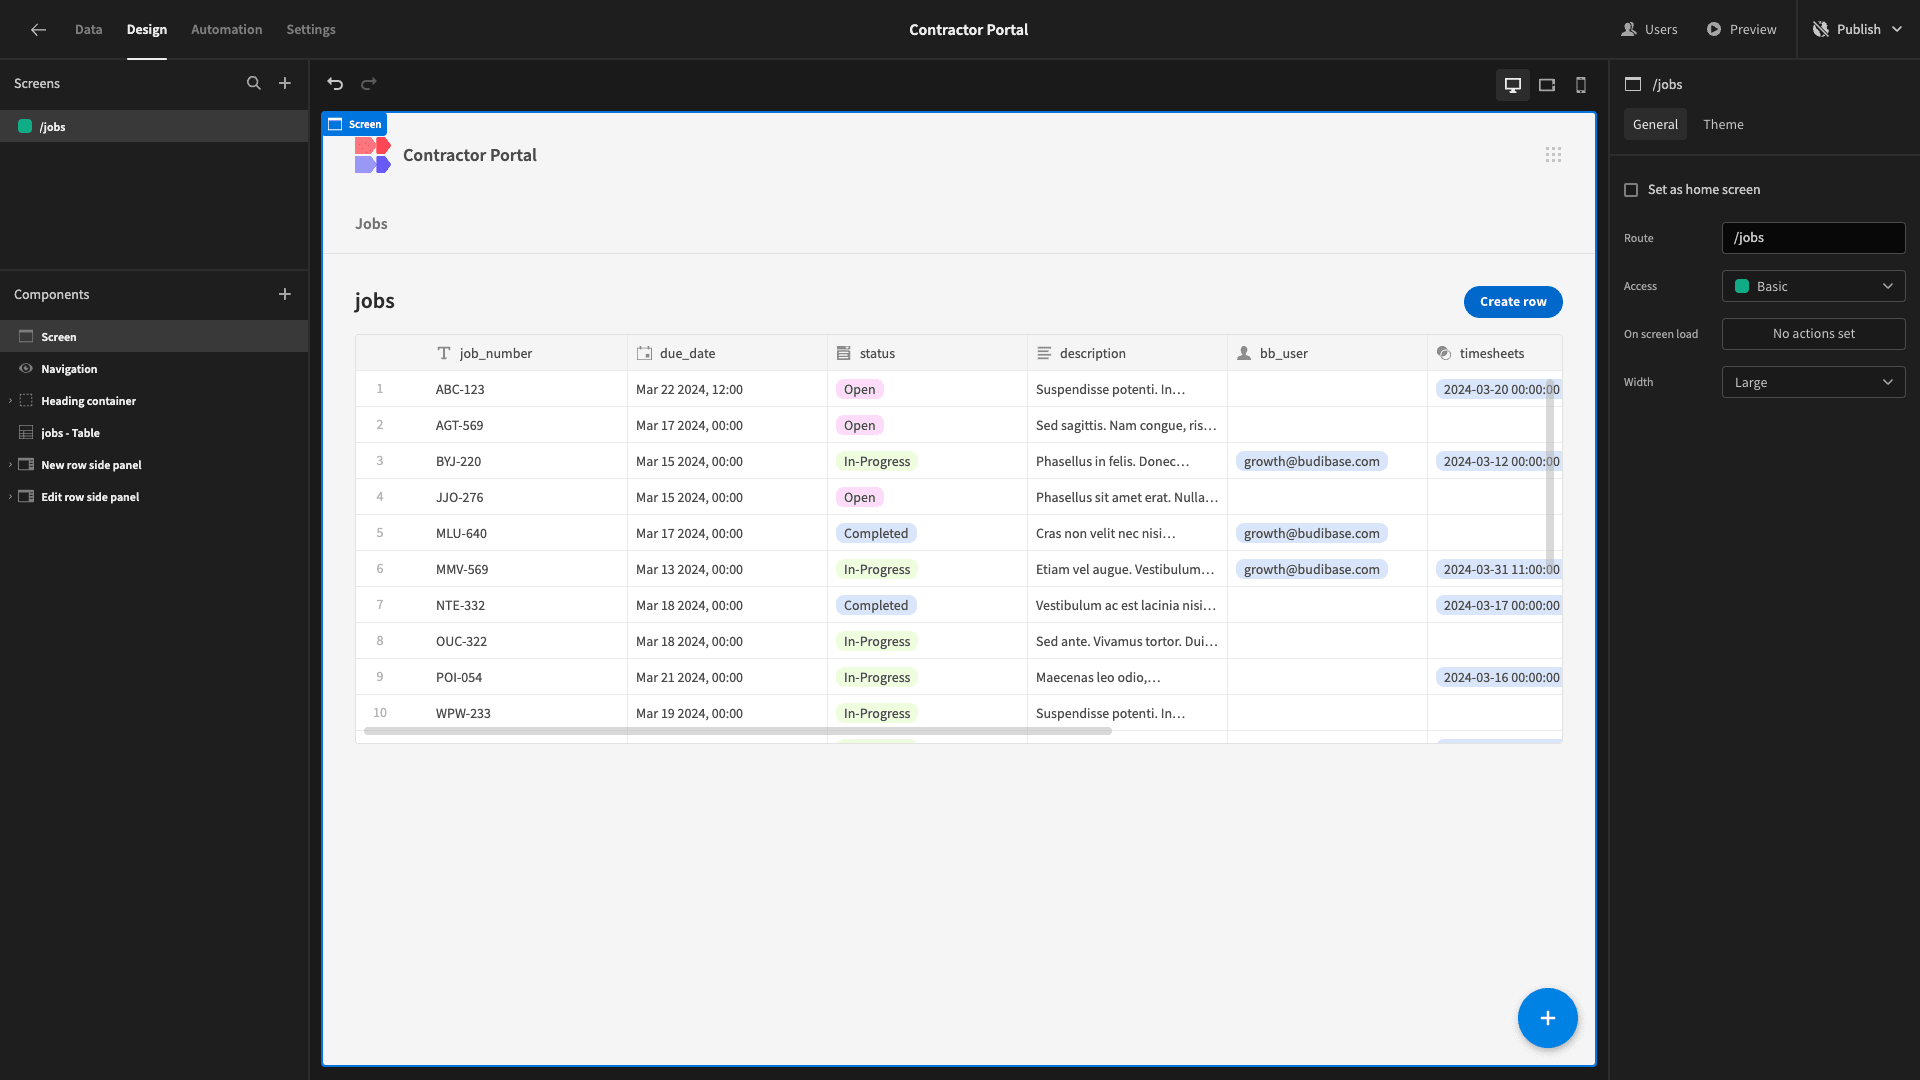
Here’s what our screen looks like.
Users can edit existing rows or add new ones using side-panel forms.
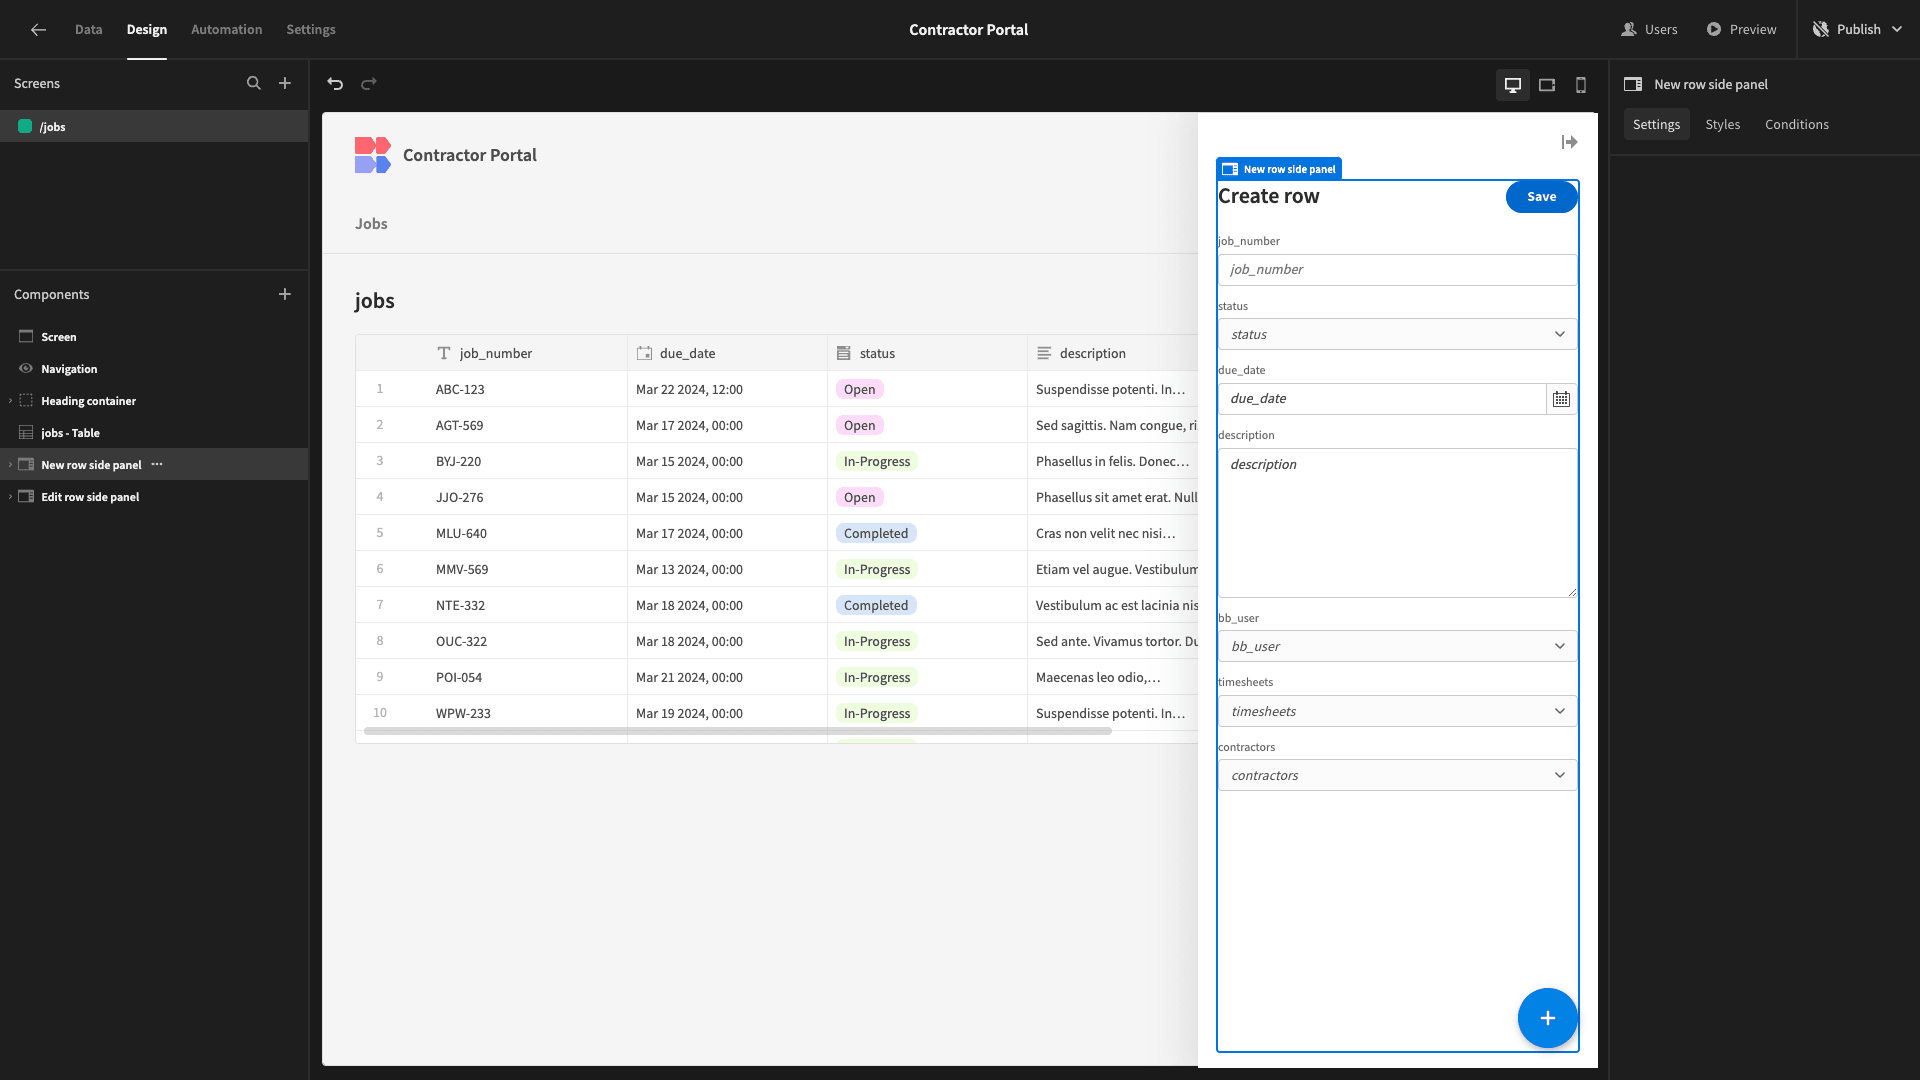
Essentially, this is a fully working CRUD UI for our jobs table. However, we’re going to make some pretty important changes so that it better suits our purposes.
Contractor jobs view
First of all, we don’t want individual contractors to be exposed to all of our jobs data. Rather, on this table, we only want them to be able to view their own jobs.
So, we’re going to add a filter.
We only want to display the jobs roles that relate to the user who’s viewing this screen at any given moment.
We’ll start by opening the Filters drawer and adding a rule based on our bb_user attribute.
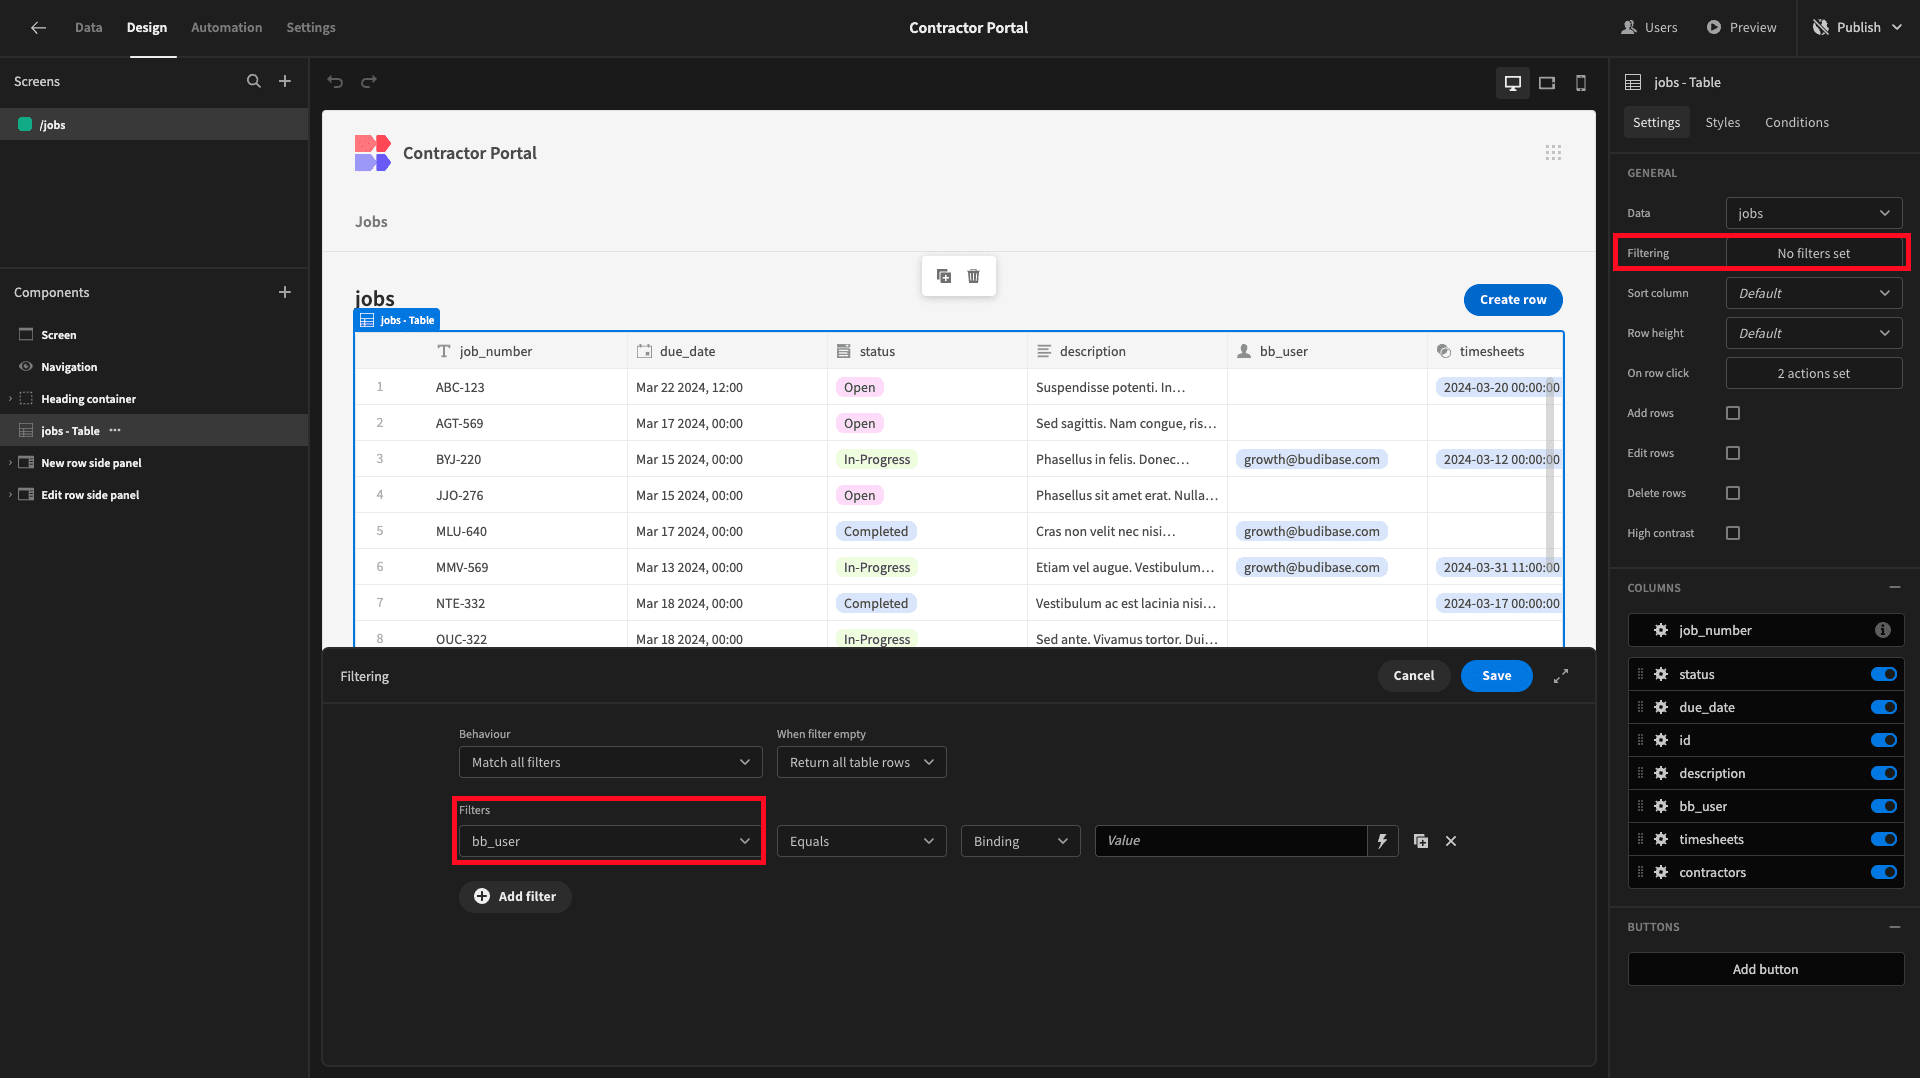
Then, we’ll use the lightning bolt icon beside the value to open up our bindings menu. Here, we can see all of the data that our table is exposed to, sorted by its source. We’re going to choose Current User.

And we’re binding our value to the _id attribute in here.

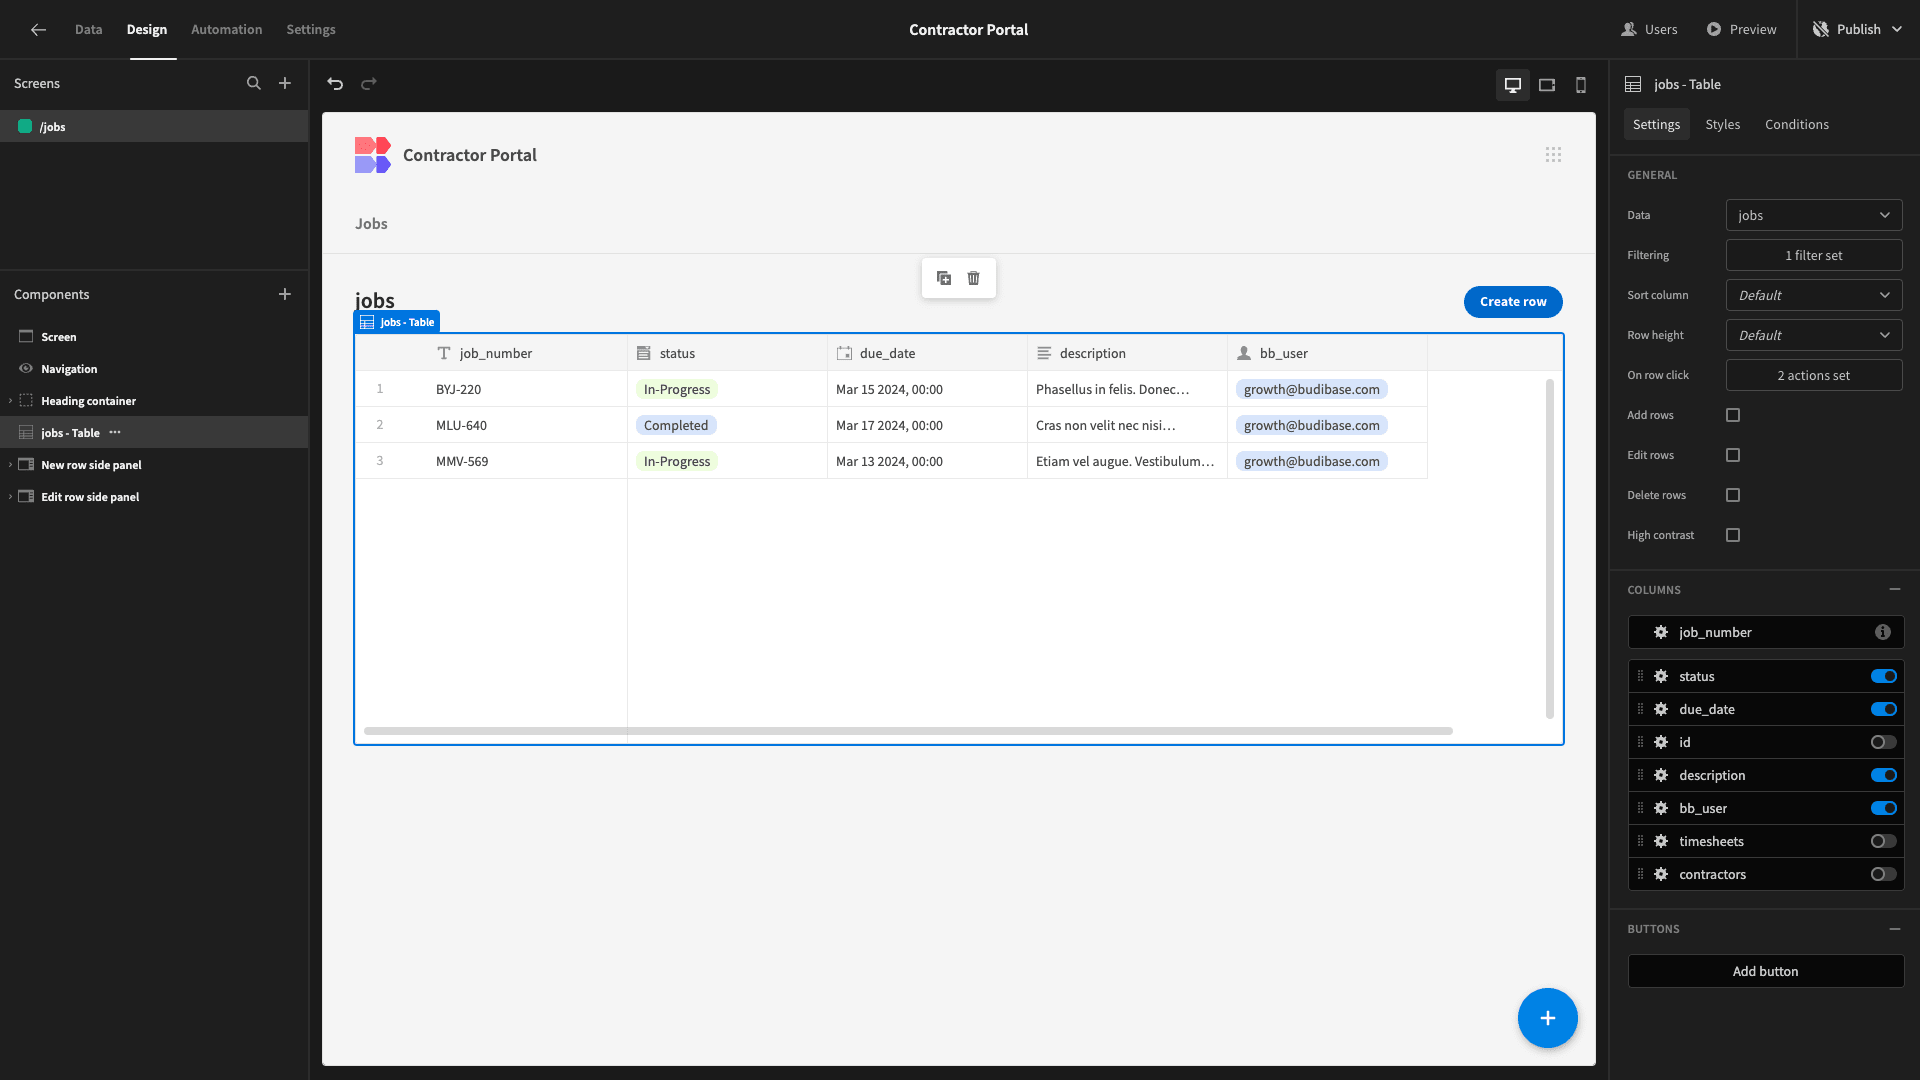
Now, our table only displays the jobs that relate to our current user - i.e., the ones we assigned to ourselves earlier.

Before we go any further, we’re going to tidy up our table UI a little bit.
We can use the sliders on the right-hand side to configure which columns we want to display. We’ll simply disable bb_user and contractors, since these are now redundant, as well as the id attribute.
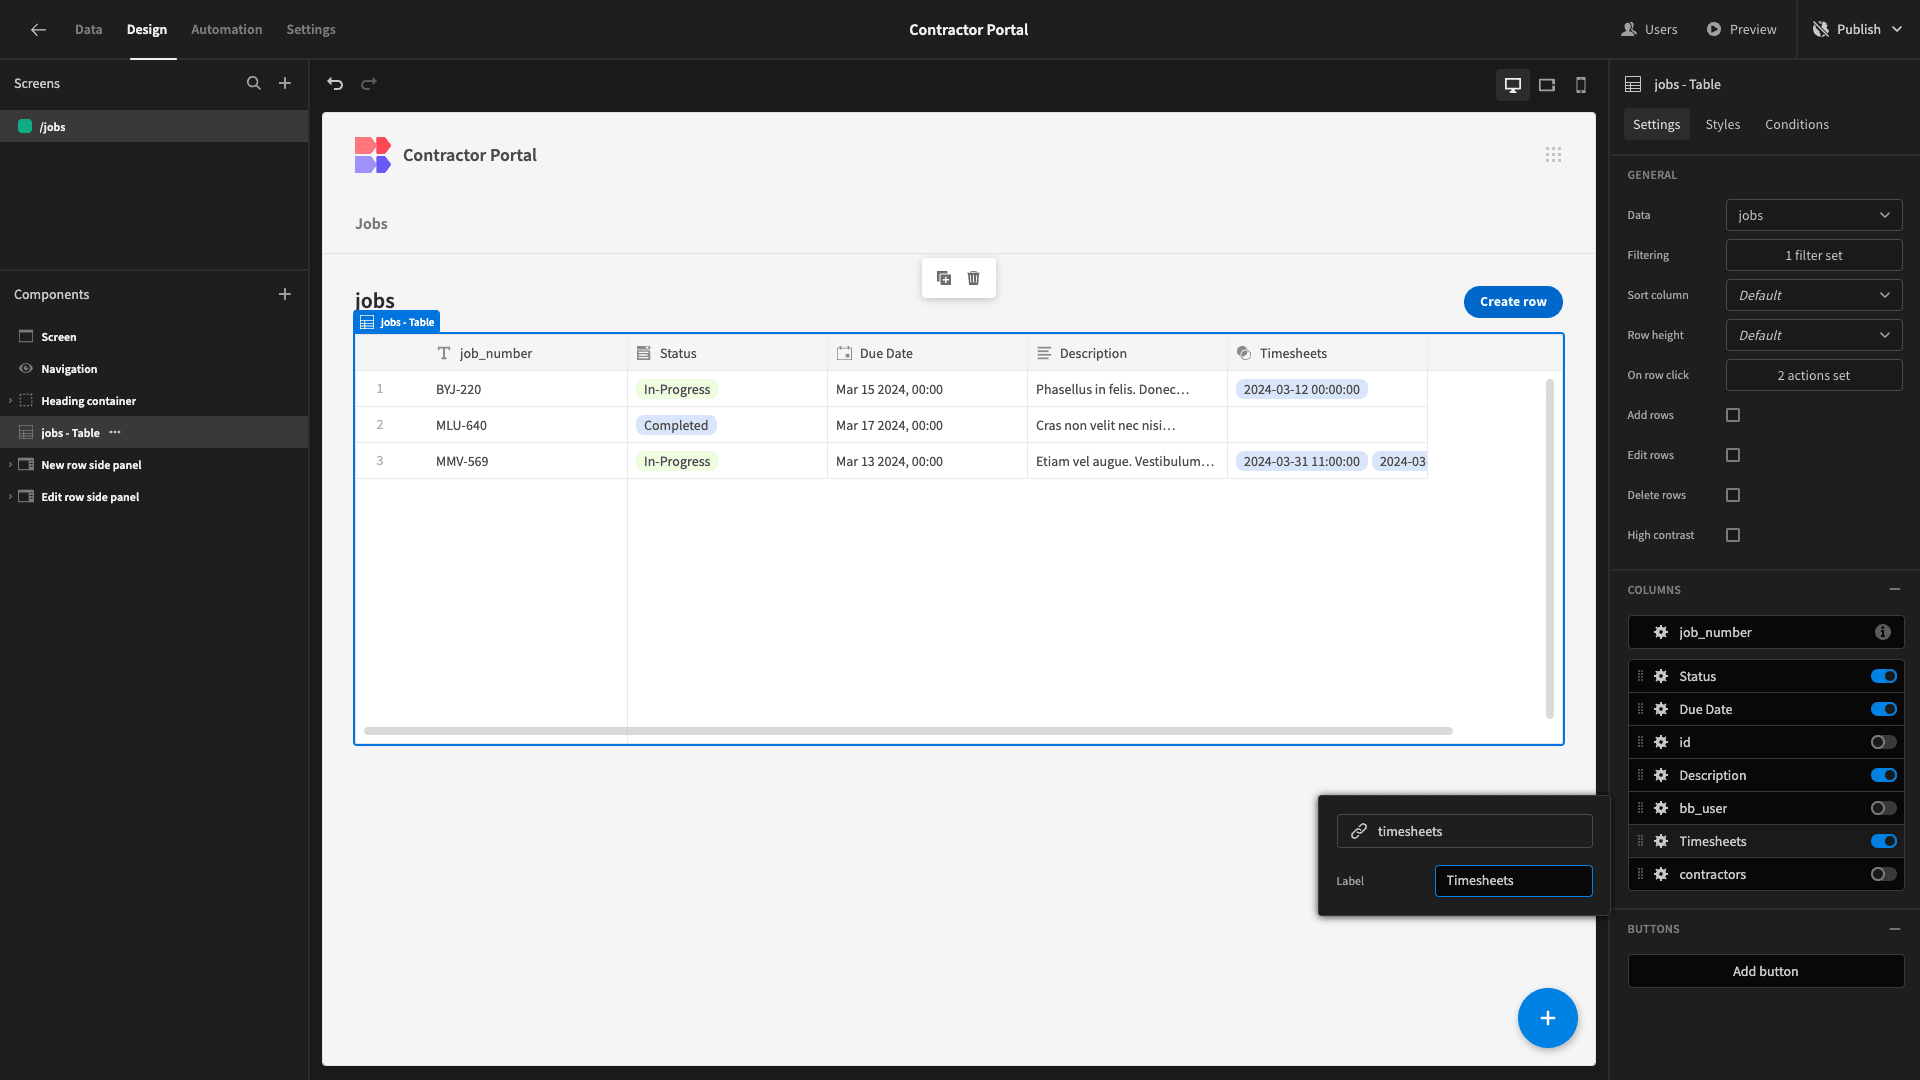
Then, we’ll update the Label setting under each of our remaining columns to show more human-readable display text.
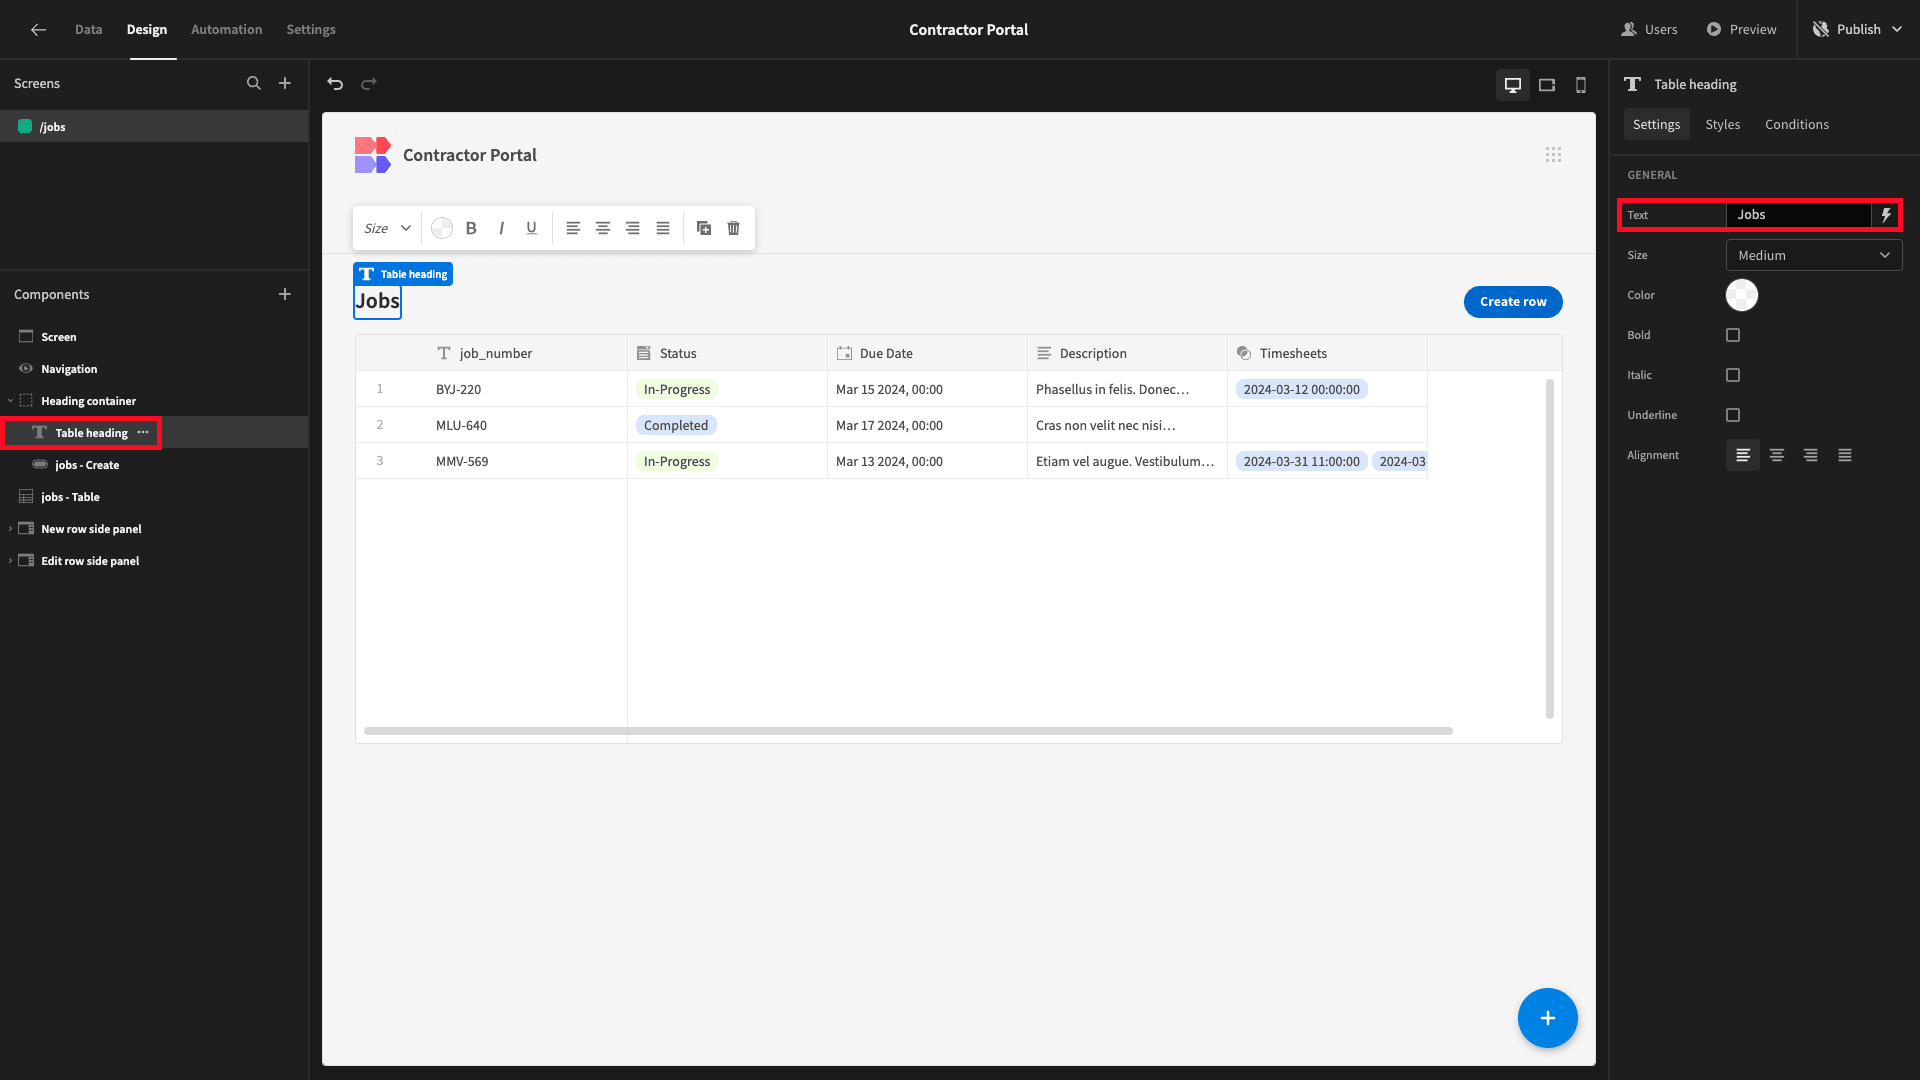
We’ll also capitalize our screen’s title.
Setting up our side panels
Next, we’re going to set up some UIs for our contractors to take actions. Specifically, we want to enable them to:
- View the details of their jobs.
- Add timesheets relating to each one.
- Update their own personal details.
We’re going to achieve this using side panel components. These are UI sections in Budibase, which we can nest other components inside - and open based on in-app user actions.
We’ll start with viewing the details of existing jobs. Our table layout comes along with a side panel containing an edit form, which is opened when a user clicks on any row.
We’re simply going to modify this to make it read-only - and then tidy up its design a little.
Here’s what our Edit Row side panel looks like at present. It contains a single component called a Form Block.
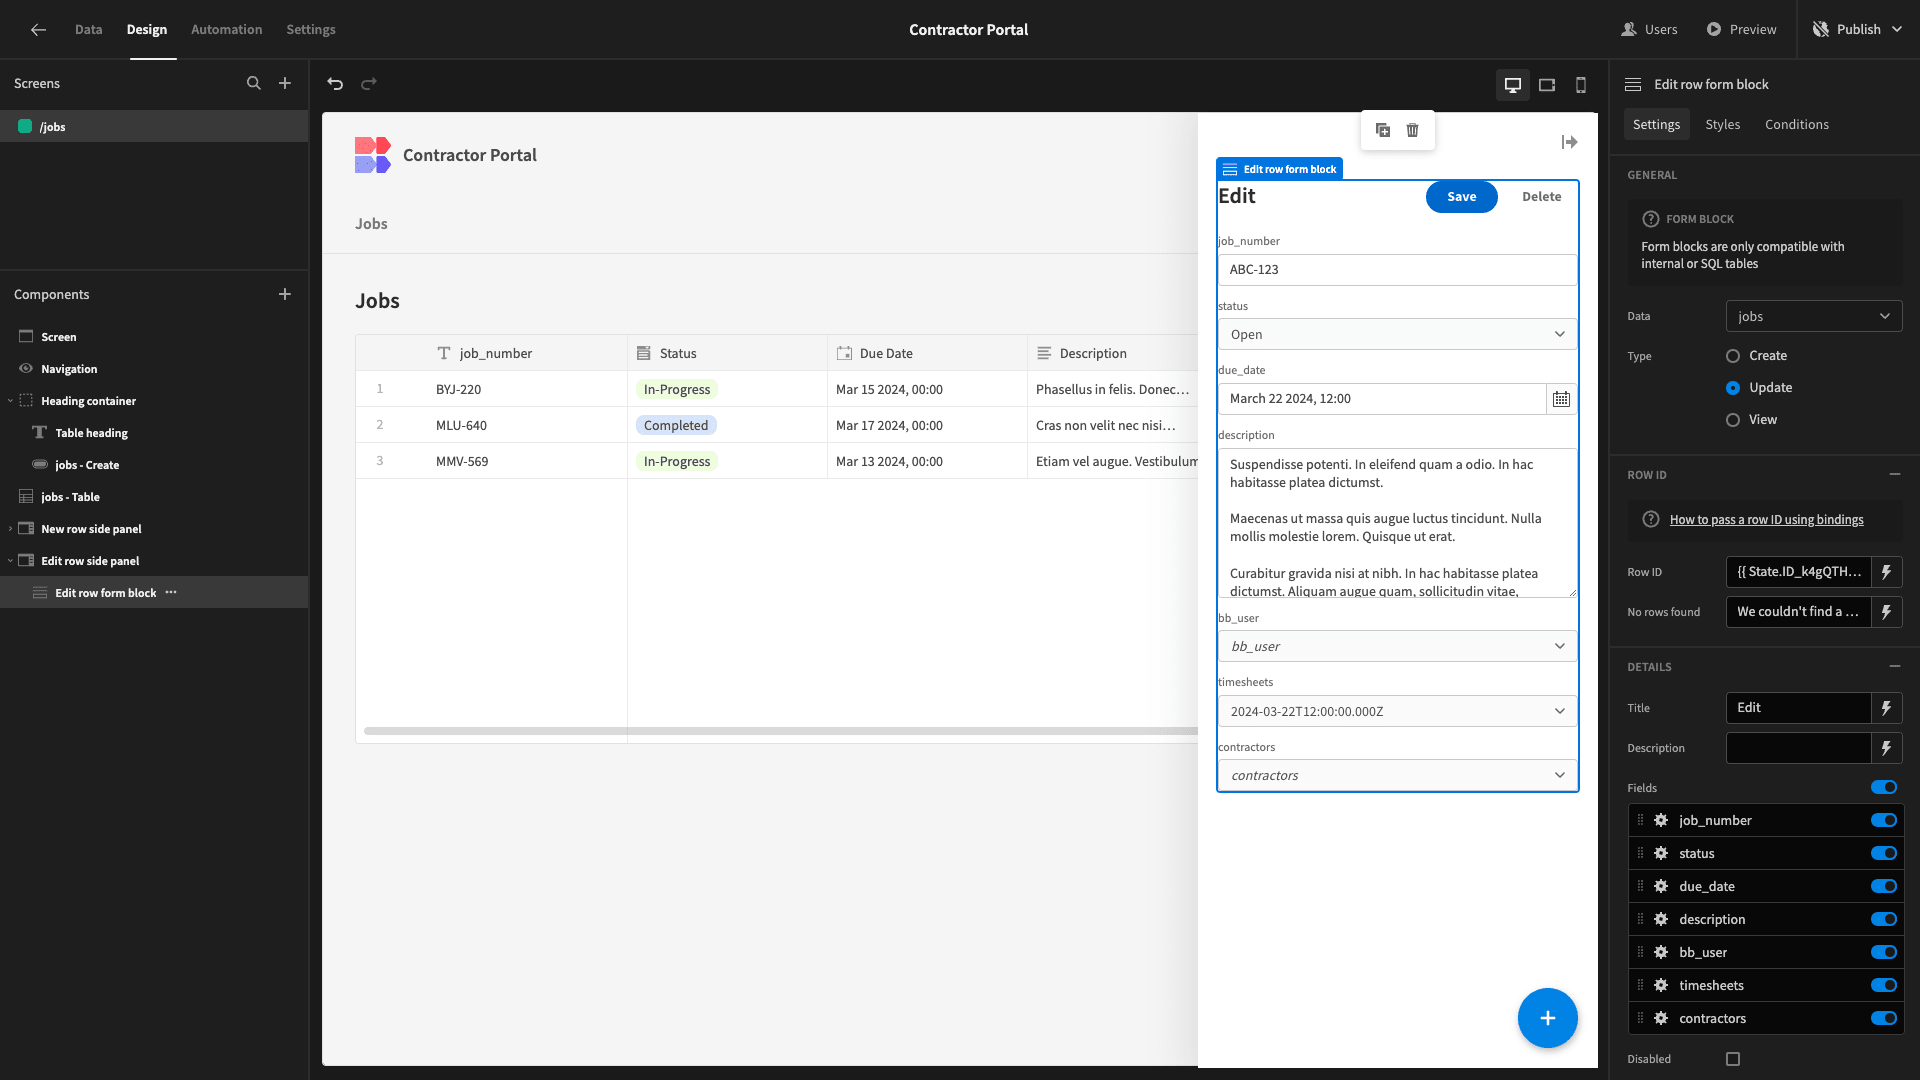
We’re going to start by using the lightning bolt beside the Title setting to open up the bindings drawer. We want this to display the relevant job_number attribute for the row we’re viewing.
So, we’ll choose Edit Row Form Block - Fields.
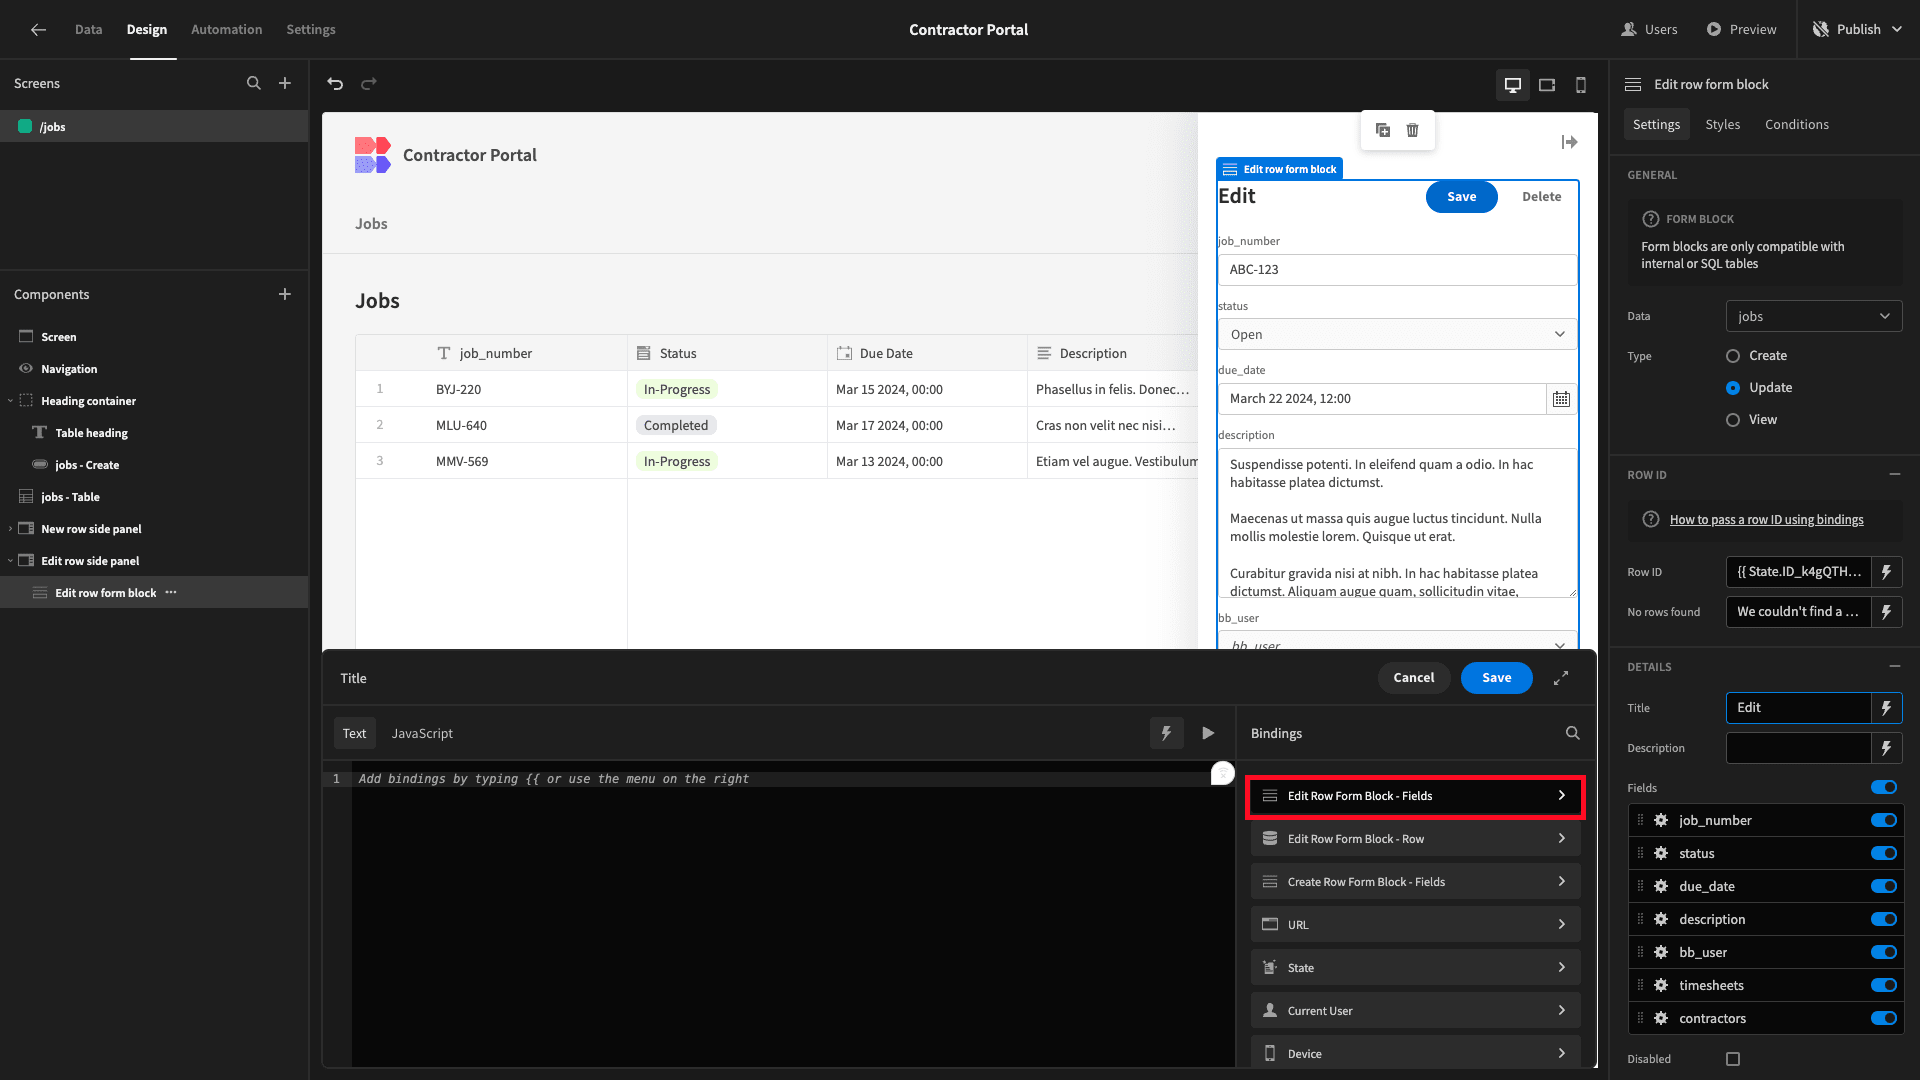
Then job_number.

Then, we’ll deselect all of our form fields except status, due_date, and description. Just like before, we’ll also update their Label settings for something more human-readable.
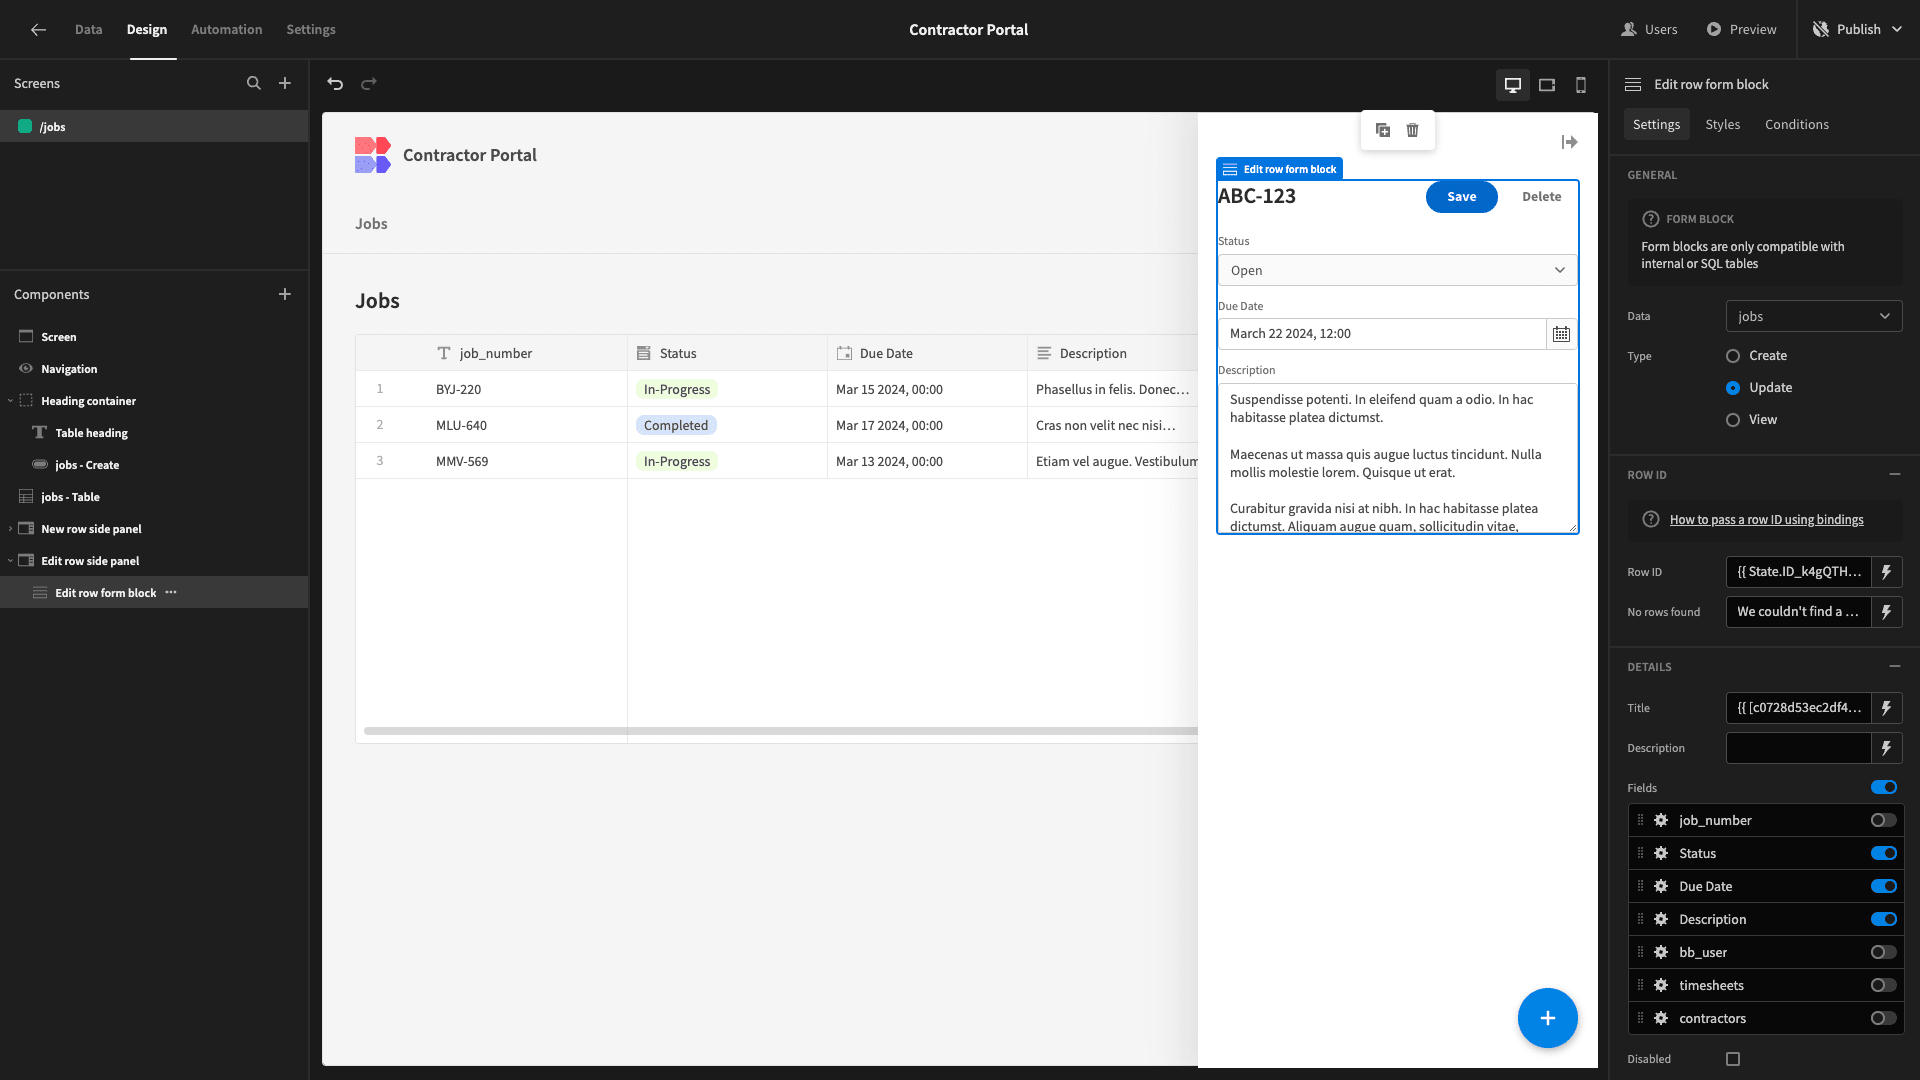
Then, we’ll select the Disabled option and use the X icons to remove each of our buttons.
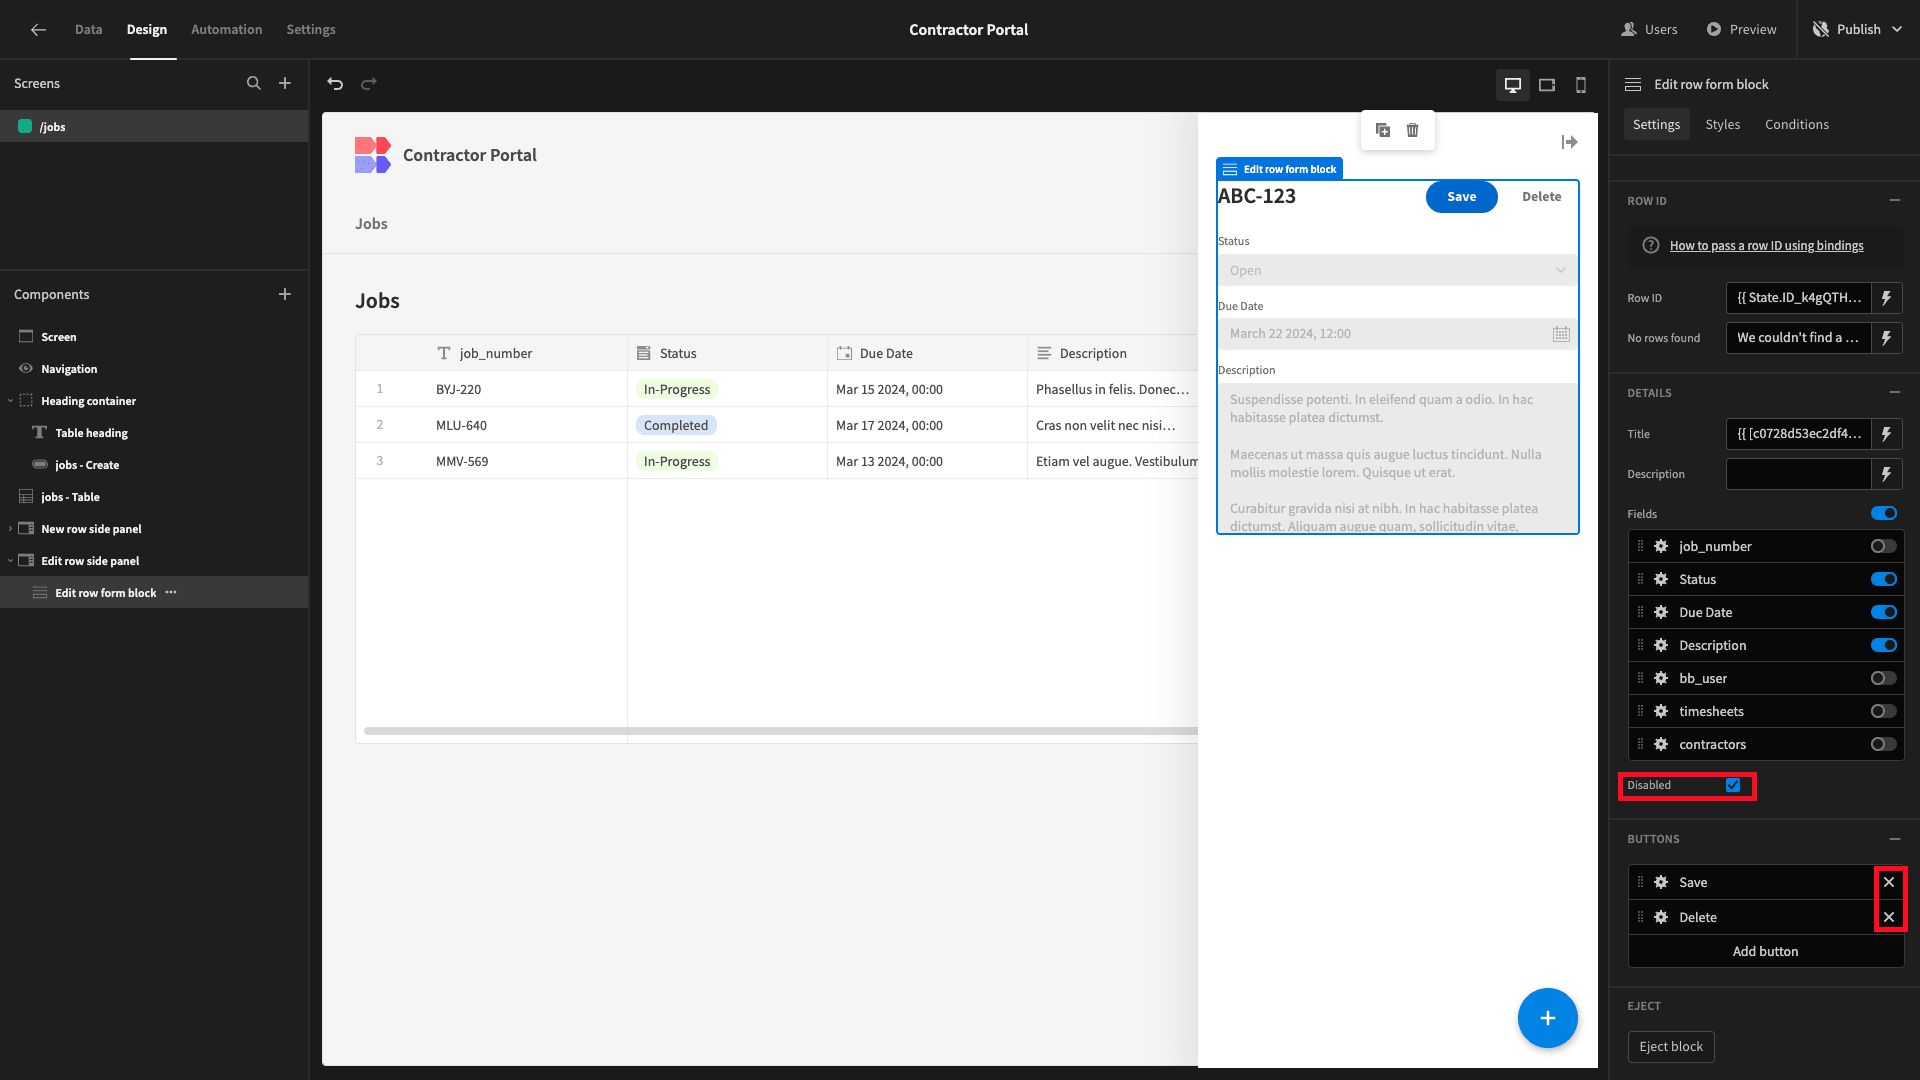
Here’s how this should look.
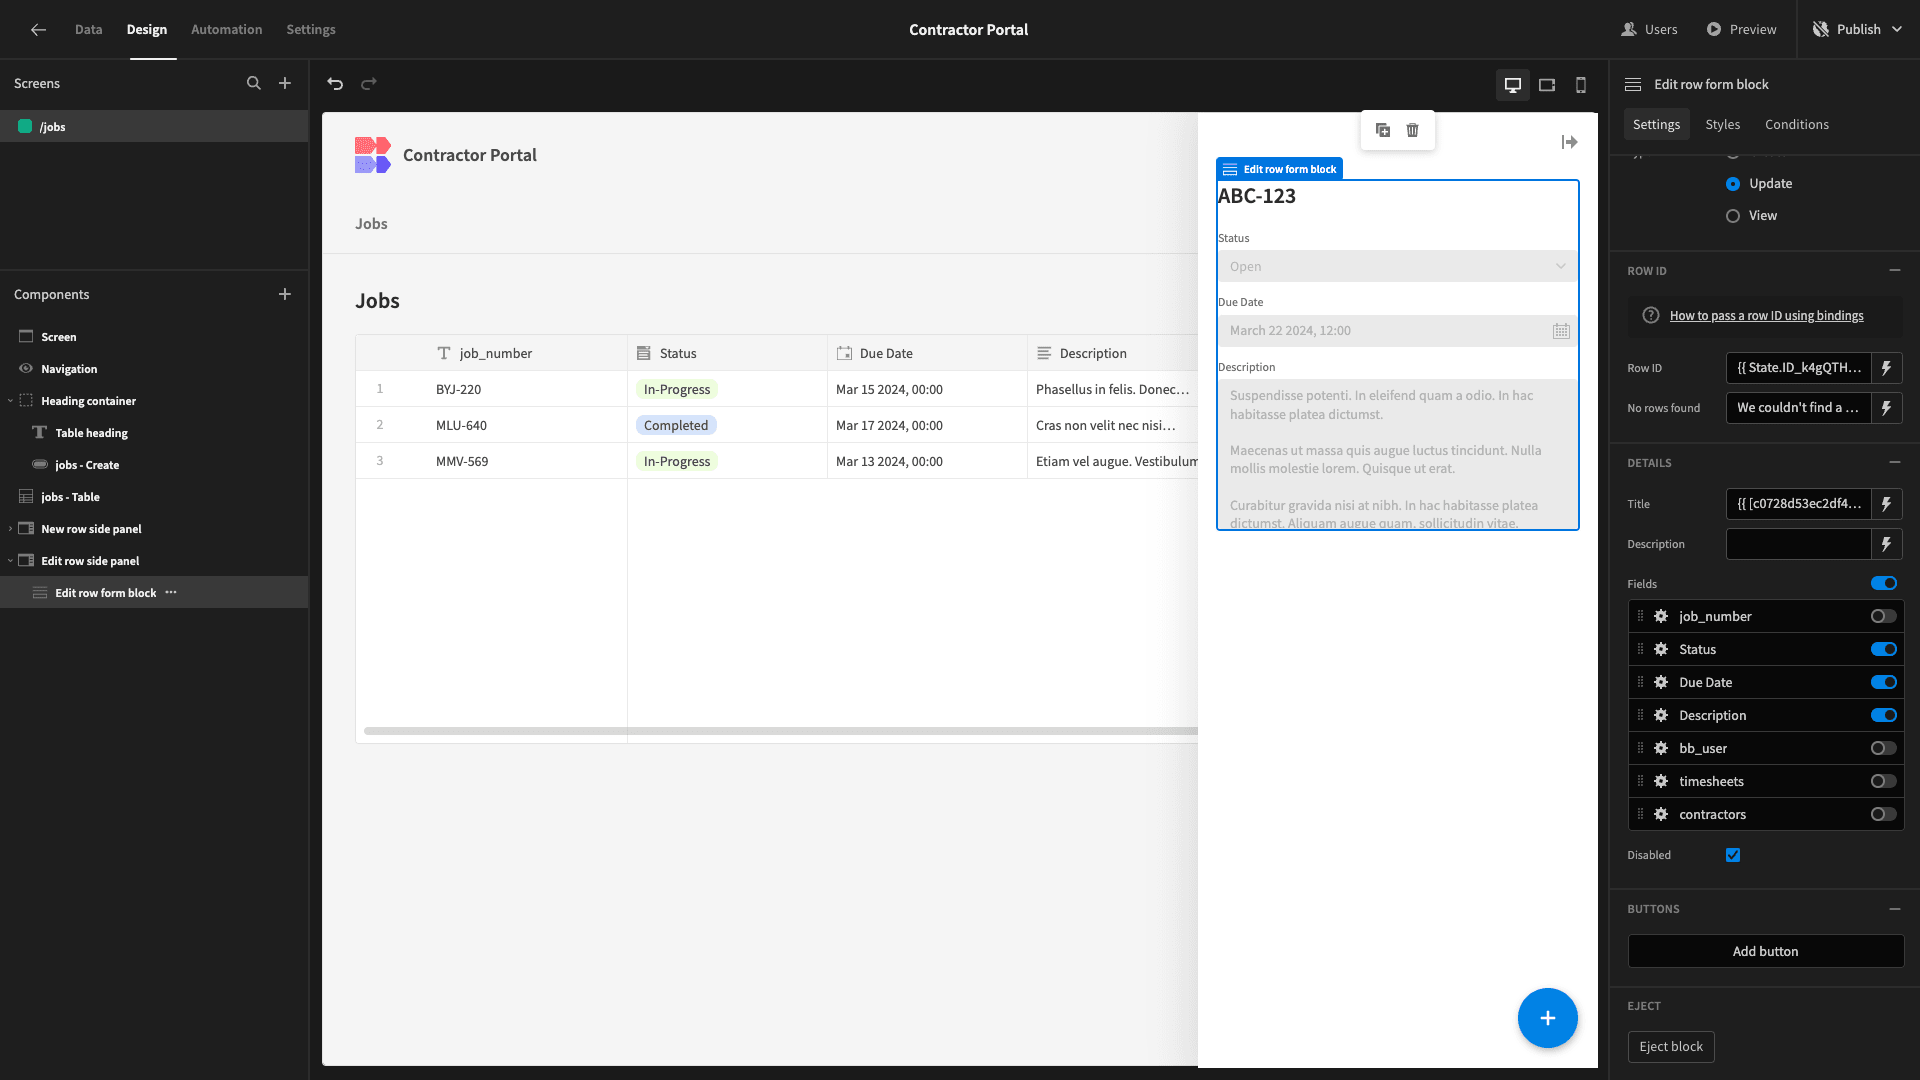
Next, we want to create a similar UI where our contractors can update their personal details.
We currently have a side panel for creating a new row in the jobs title that’s triggered when users hit the Create Row button above our table. Rather than delete this and start from scratch, we’ll modify it to suit our purposes.
Here’s how this looks at present.

Our Form Block has settings called Data and Type. As the names suggest, these are the data table it’s pointed at and the type of action we can take by filling out our form, respectively.
We’re going to start by changing the Data to our contractors table, and the Type to Update. We’ll also update the component names for our Form Block and Side Panel components to reflect this.
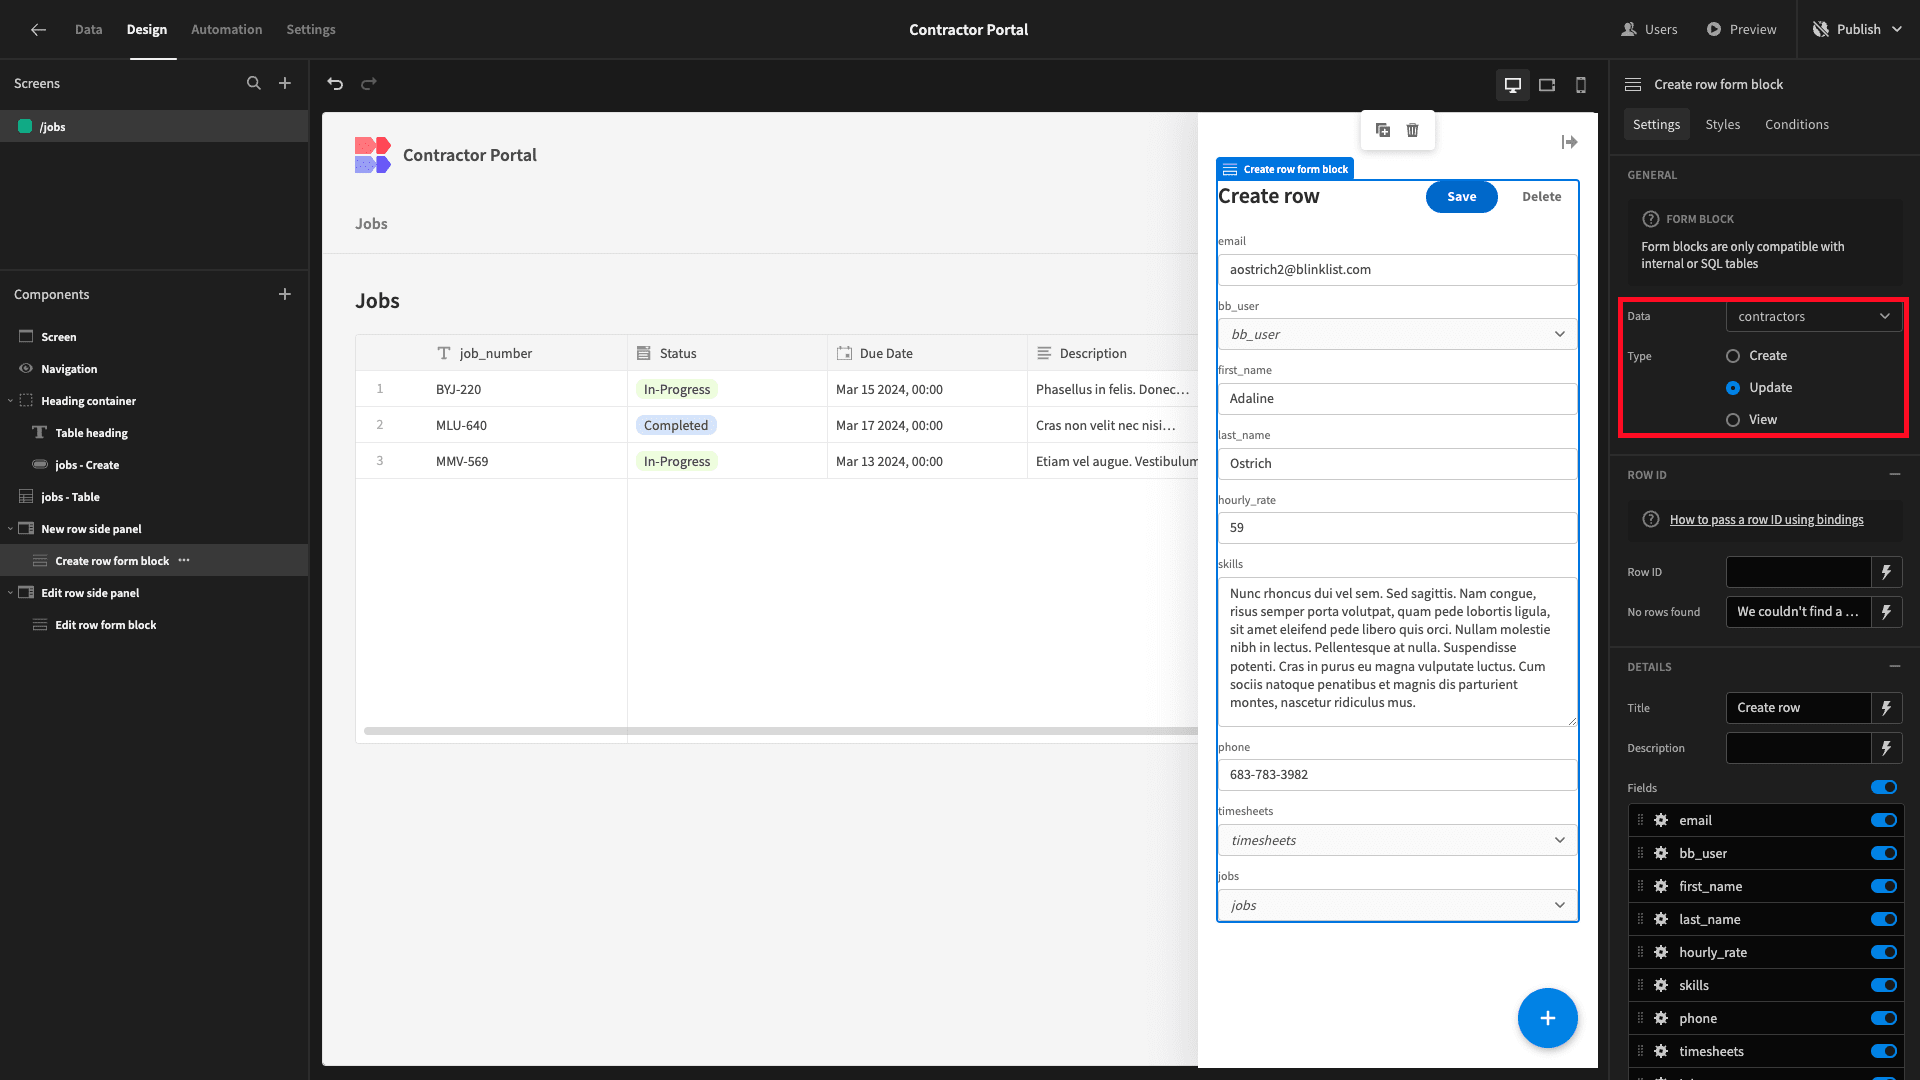
Changing the Type to Update exposes a new setting on our form block called Row ID. This lets us configure which row we want our form to update.
In our cases, this is the entry in our contractors table that has the current user assigned to it as its bb_user attribute. However, our Form Block isn’t exposed to the right data to achieve this using bindings.
We’re going to add a component at the bottom of our screen called a Data Provider and point it at the contractors table.
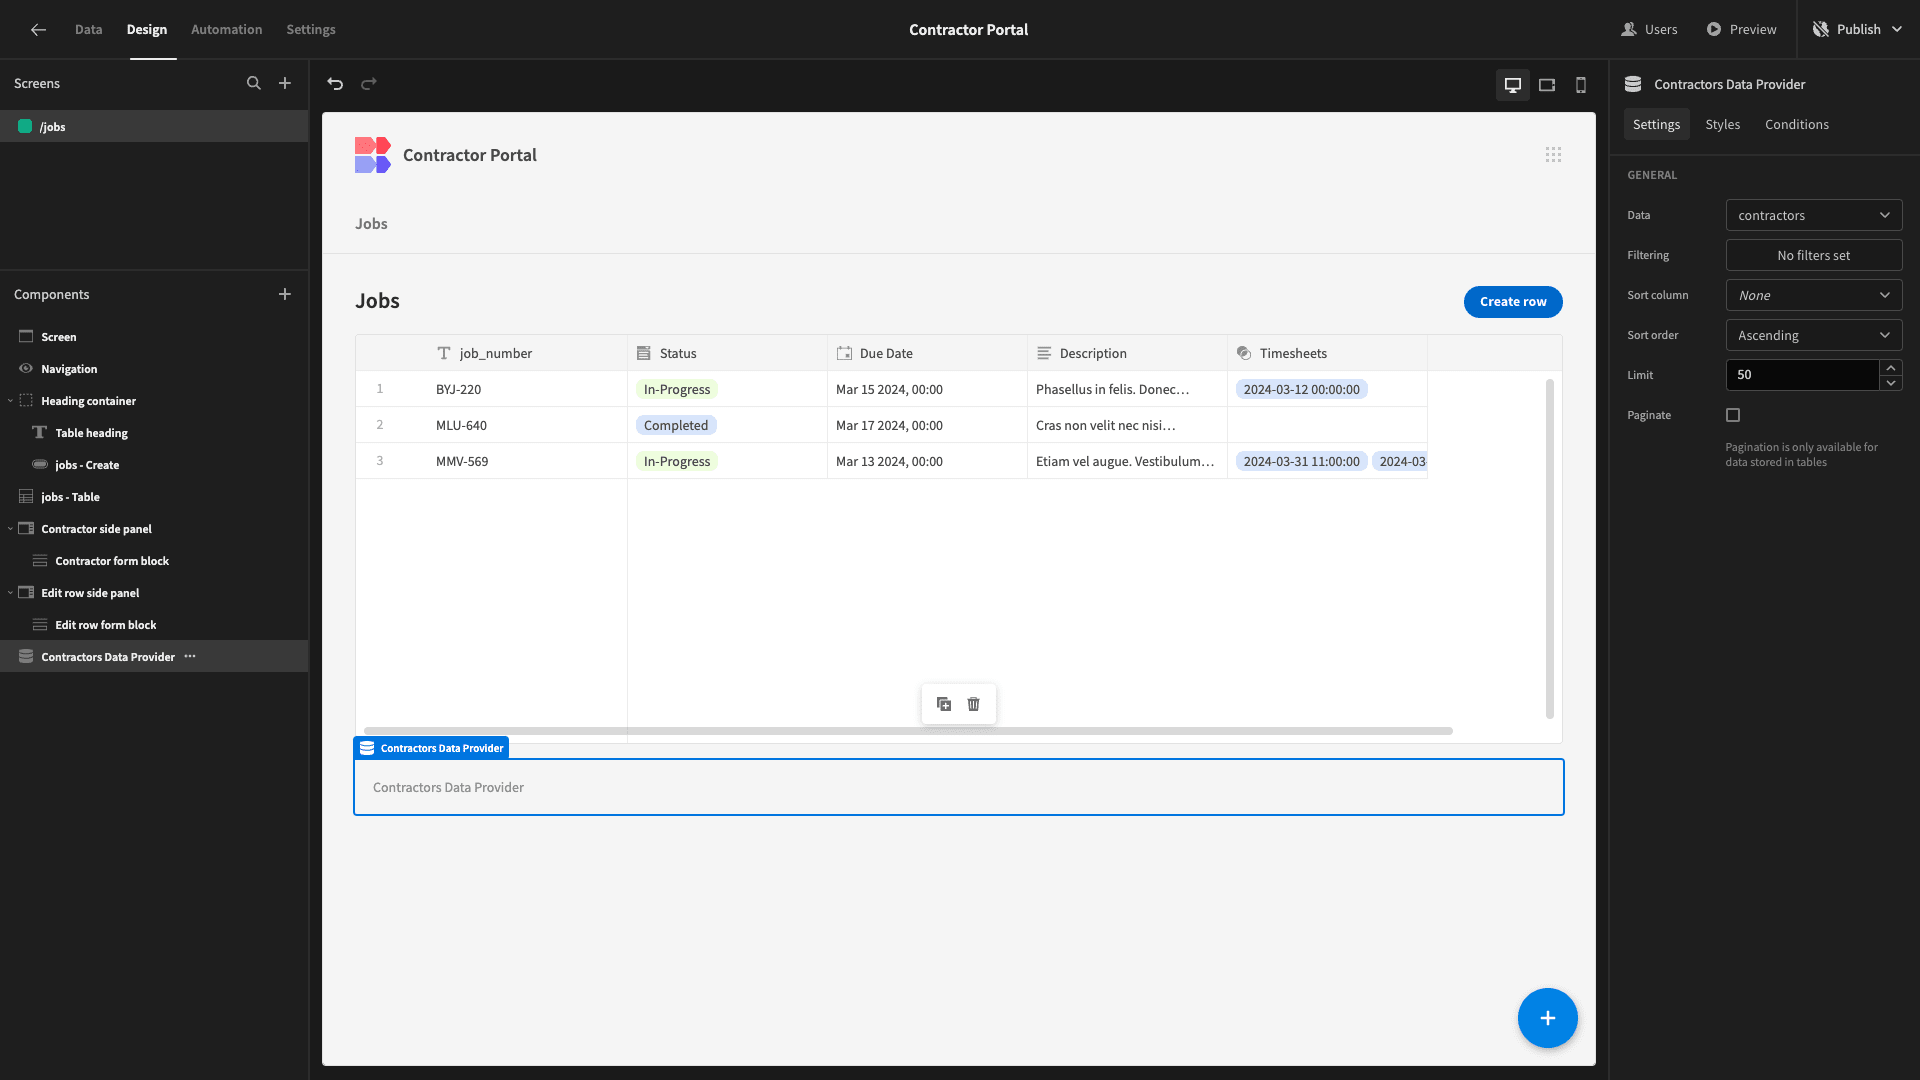
As the name suggests, a Data Provider accepts a data source and enables other components to use its stored values as bindings elsewhere on our screen. With Global Bindings in Budibase, this can be placed anywhere on our UI.
We’re then going to add a filter so it only returns the row where our bb_user attribute matches the _id of the current user.

Back on our contractor Form Block, we can set the Row ID to the _id of the single row our data provider outputs using {{ Contractors Data Provider.Rows.0._id }}.
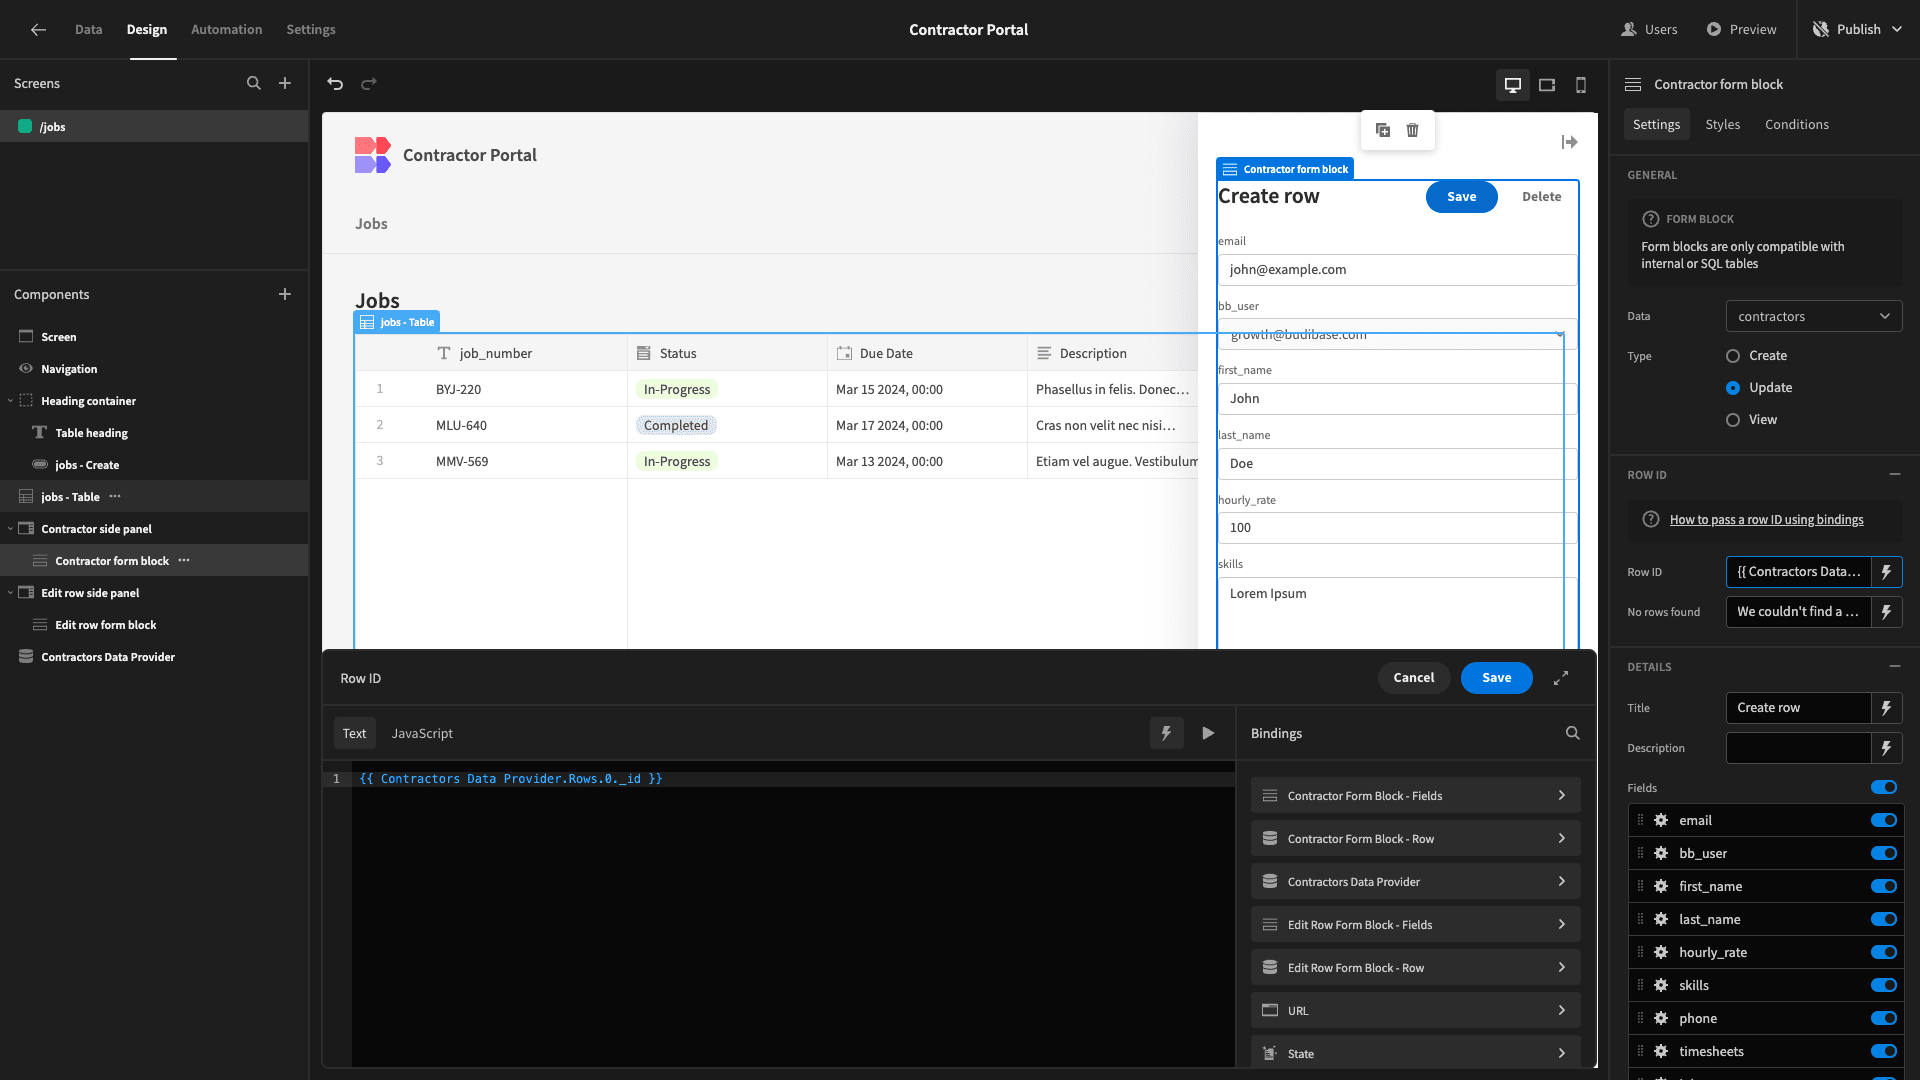
Once again, we can remove any form fields we don’t want to display. In our case, these are bb_user, timesheets, and jobs. We’ll also update our display text just like before and remove the Delete button.

Lastly, we’ll add a third Side Panel component and call it Timesheets side panel. This will enable contractors to add a new row to our timesheets table that will be related to the relevant row in the jobs table.
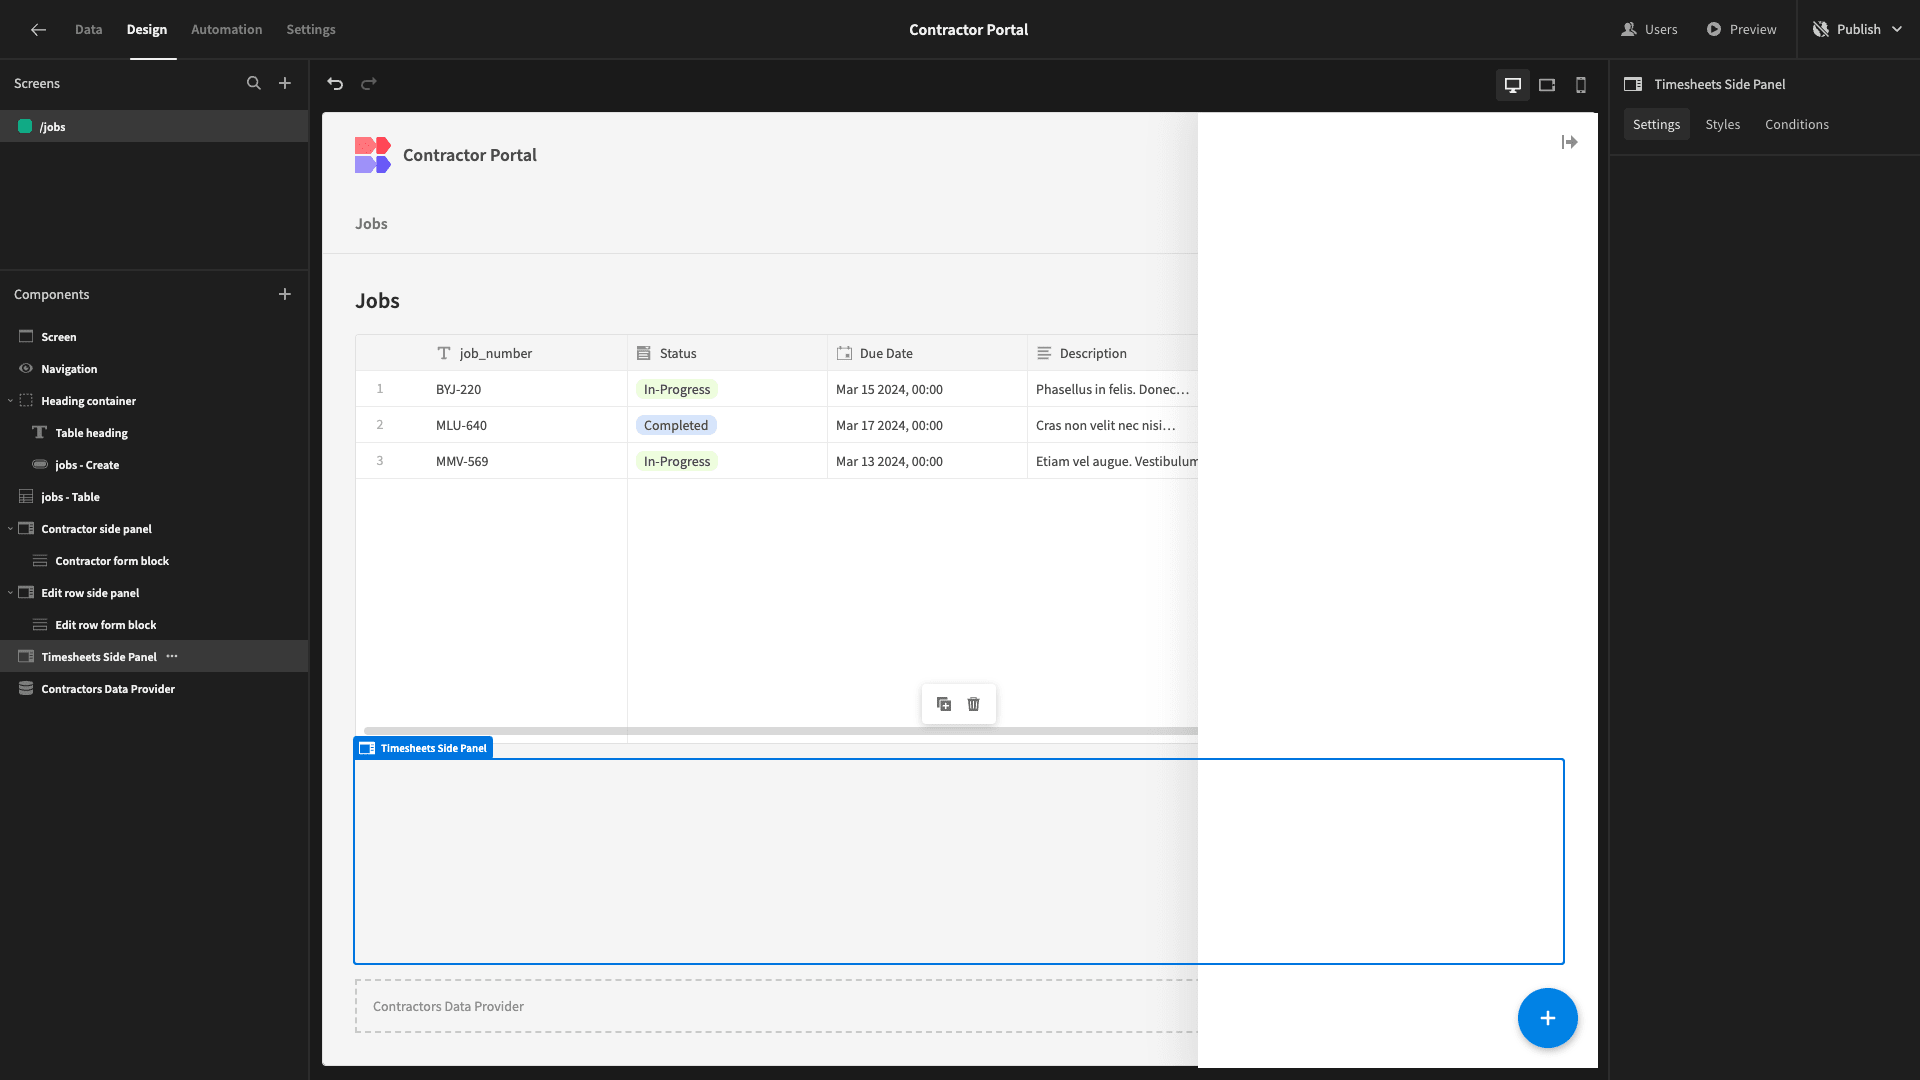
Inside this, we’ll add a Form Block, with its Data set to timesheets and its Type set to Create.
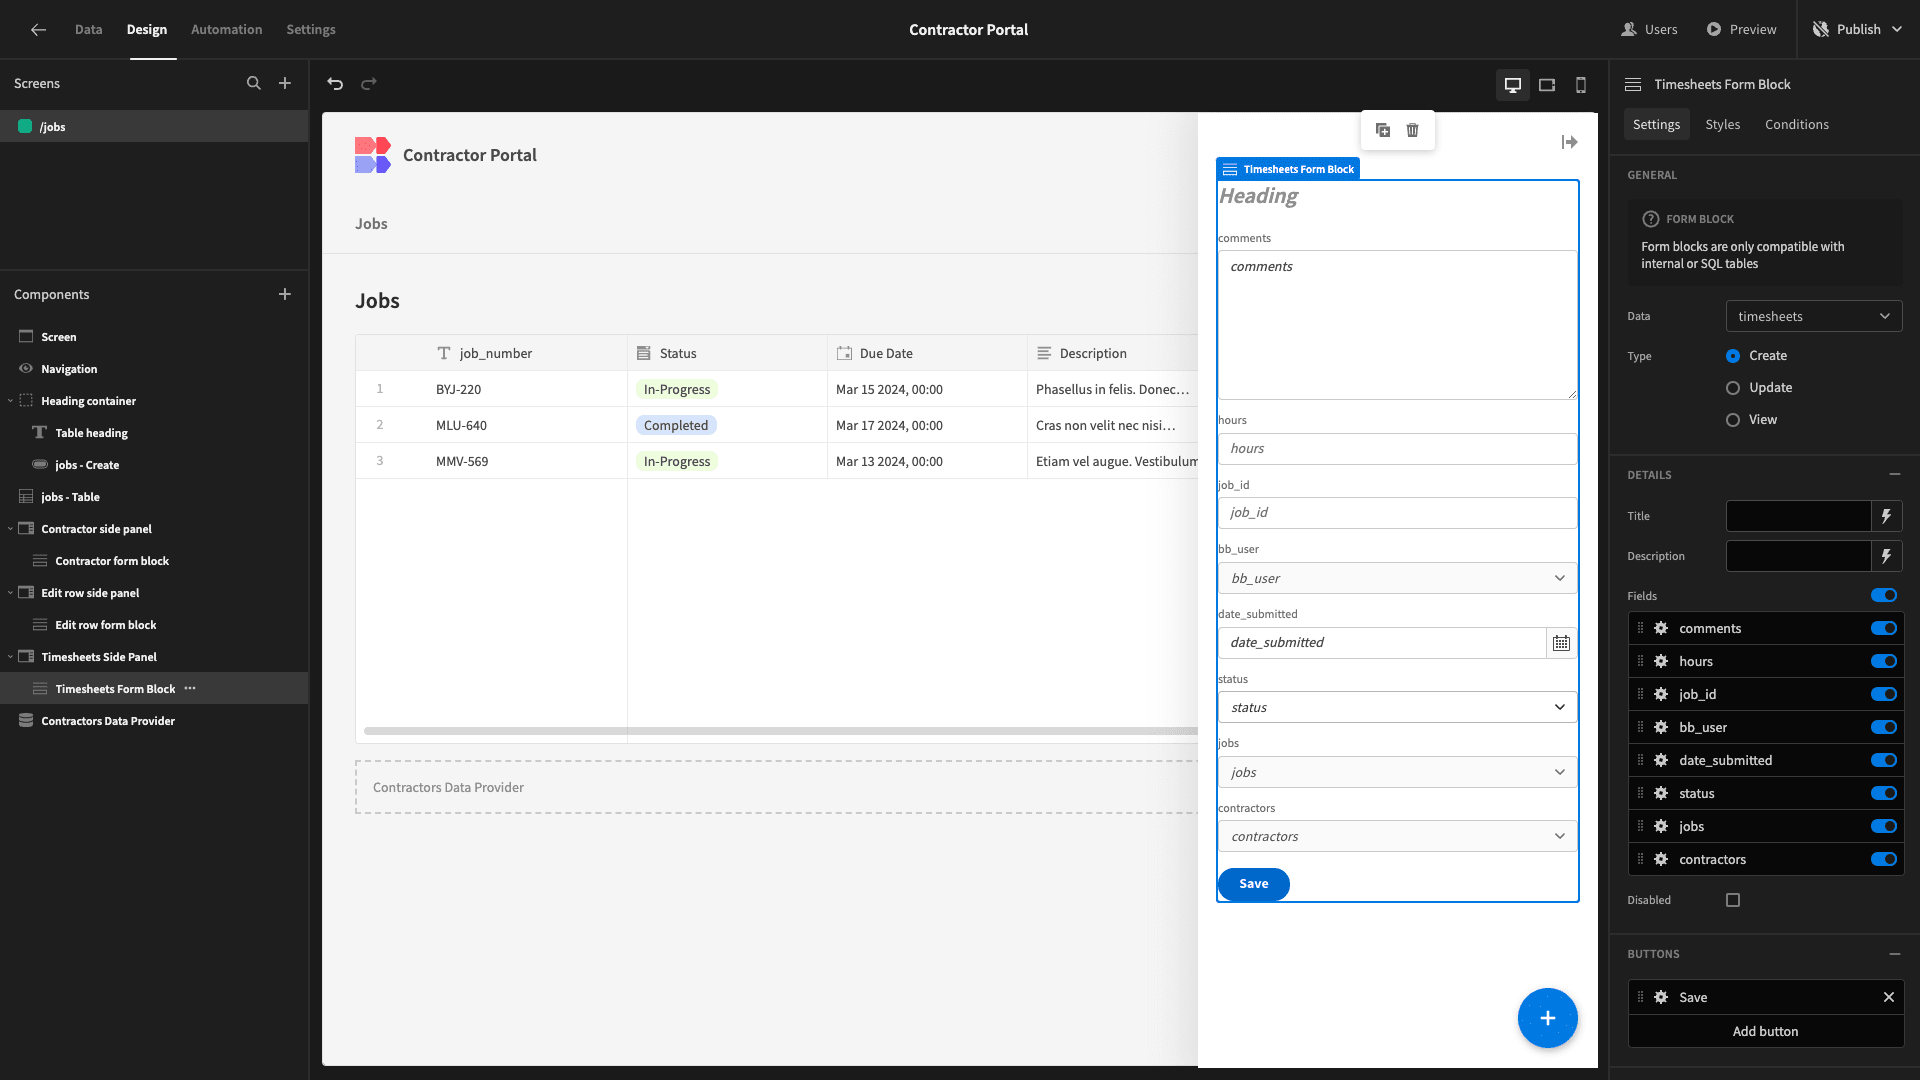
This form will be a little bit different from the others because we’re going to accept user inputs for some fields, but we’ll assign values to others automatically.
We’ll start by deselecting all of our fields except date_submitted, hours, and comments - as well as tidying up our display text again.
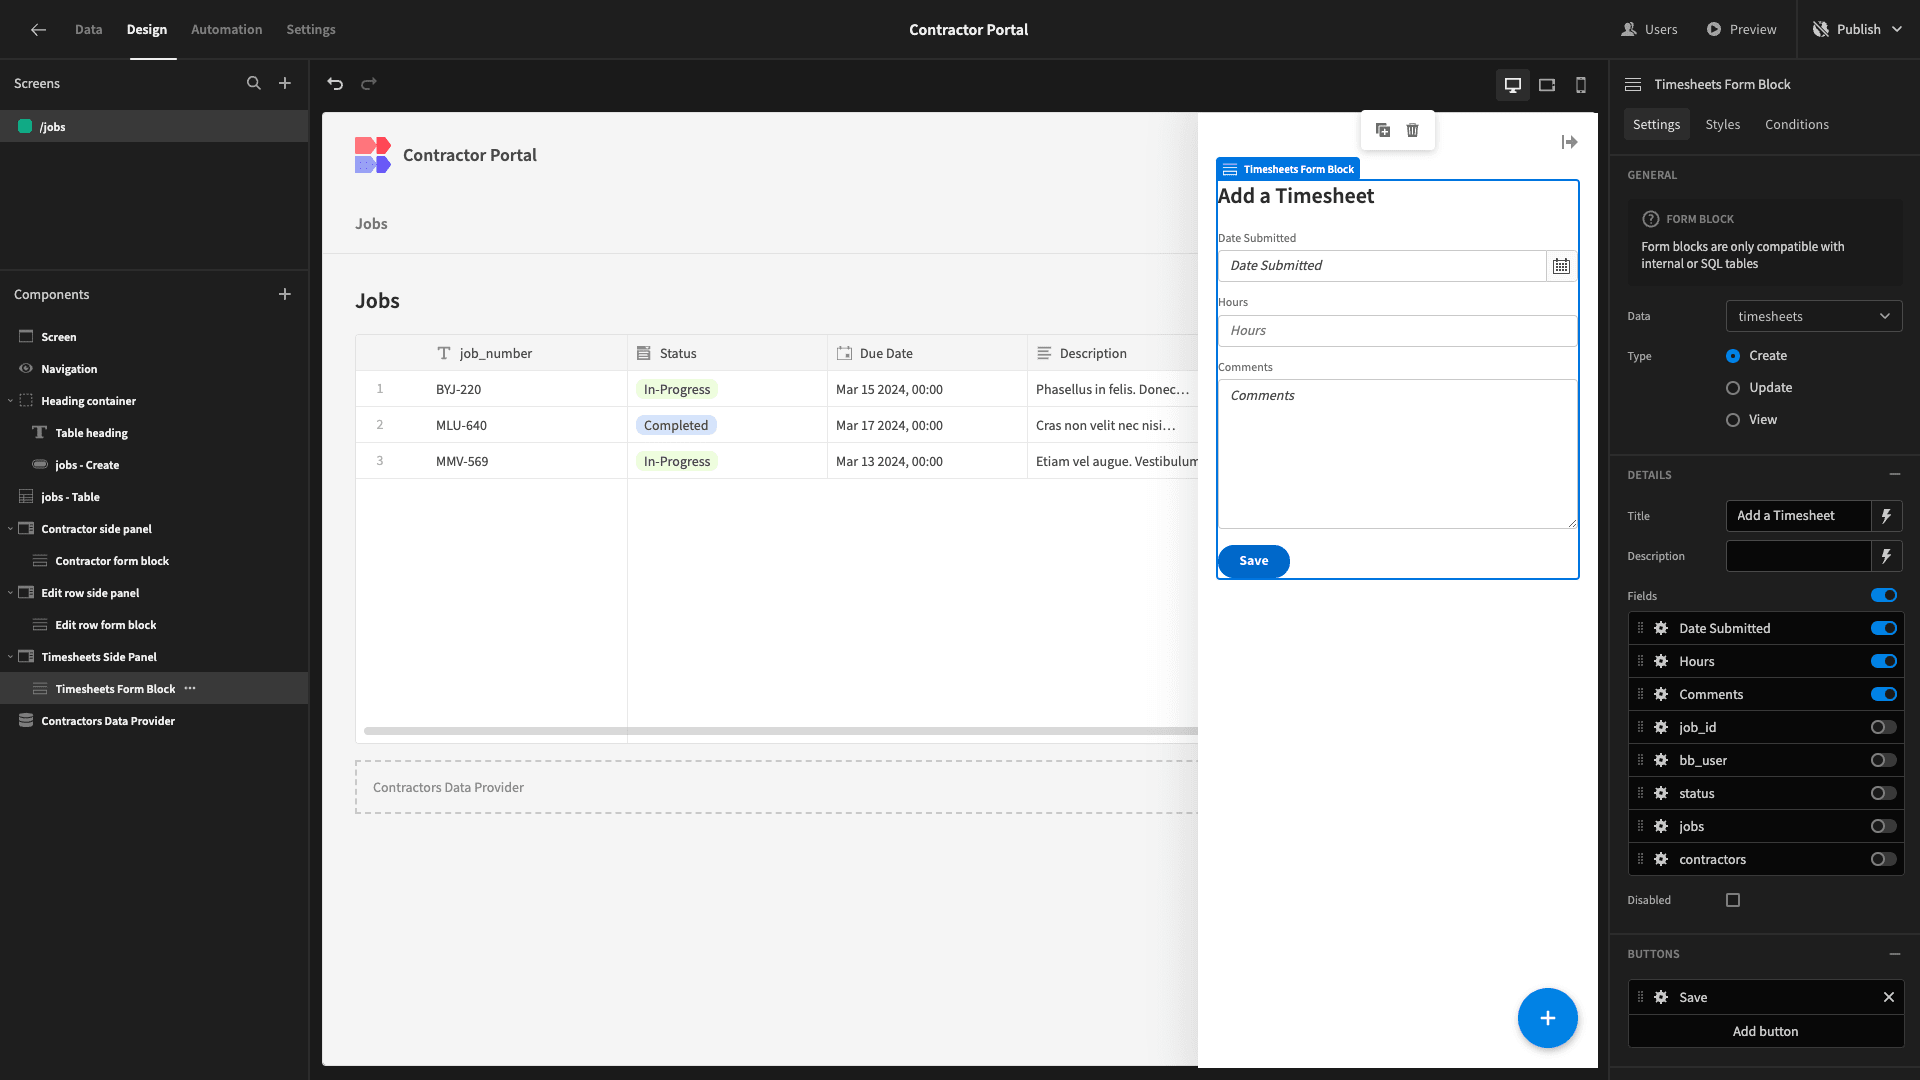
Under Styles, we’ll also set the Button Position to Top.
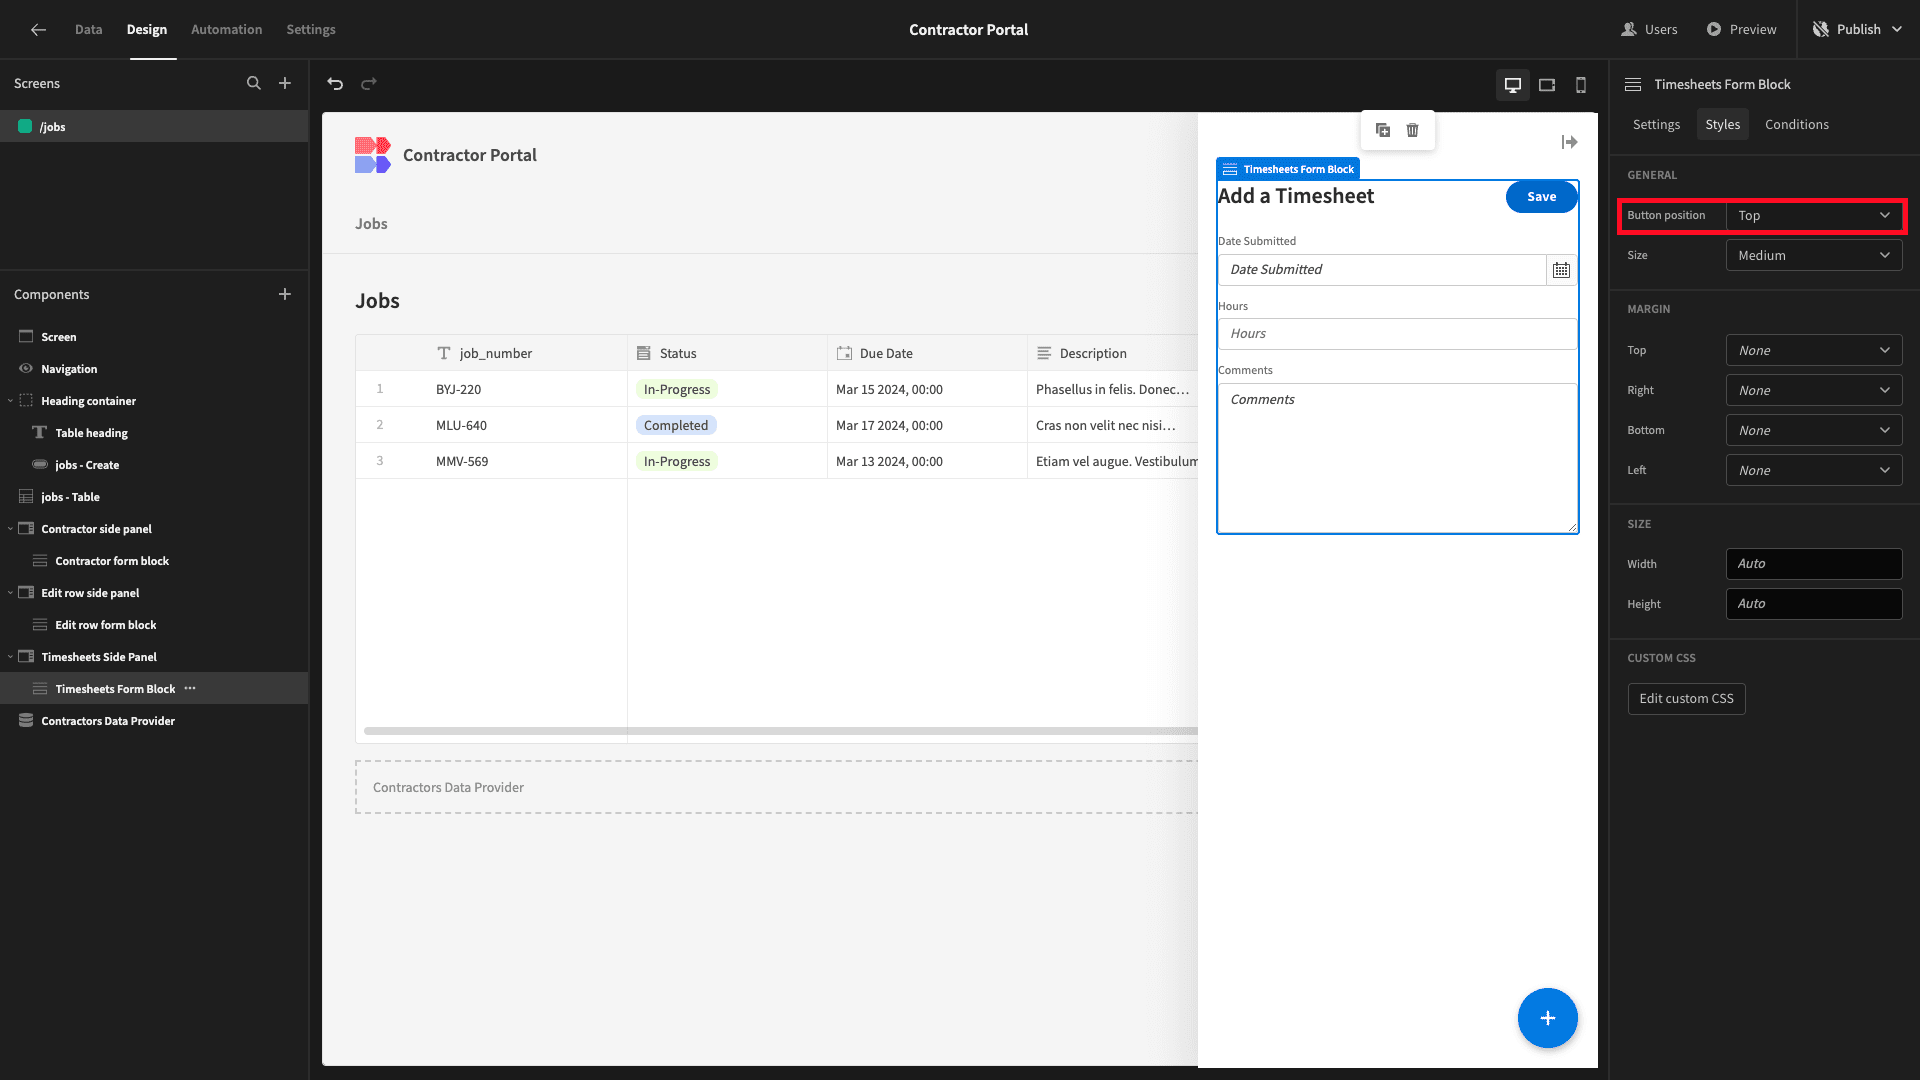
We’re going to populate values for the bb_user, job_id, and status attributes automatically.
But first, we’ll add some logic to open our side panel.
Within our Table, we’ll hit Add Button and set the display text to Add Timesheet.
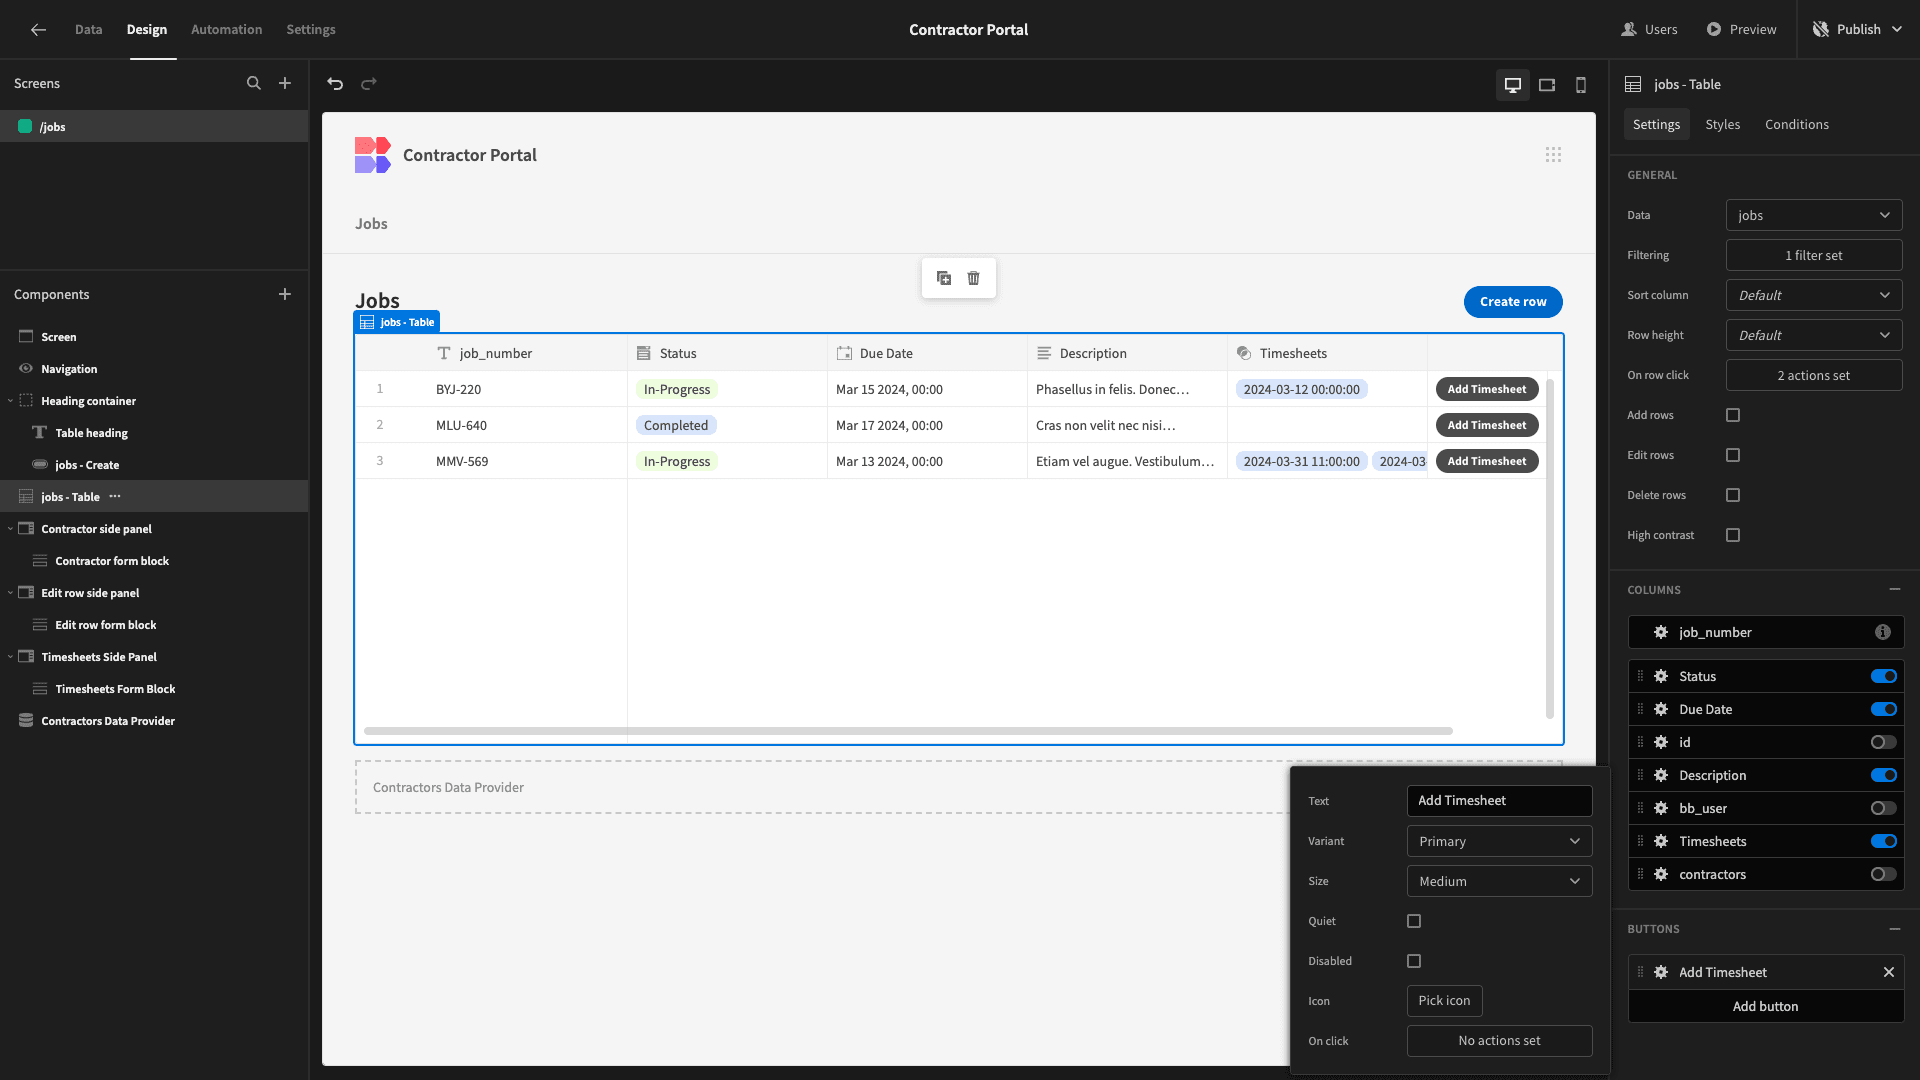
Then, we’ll open up the Actions drawer for this. We want to do two things:
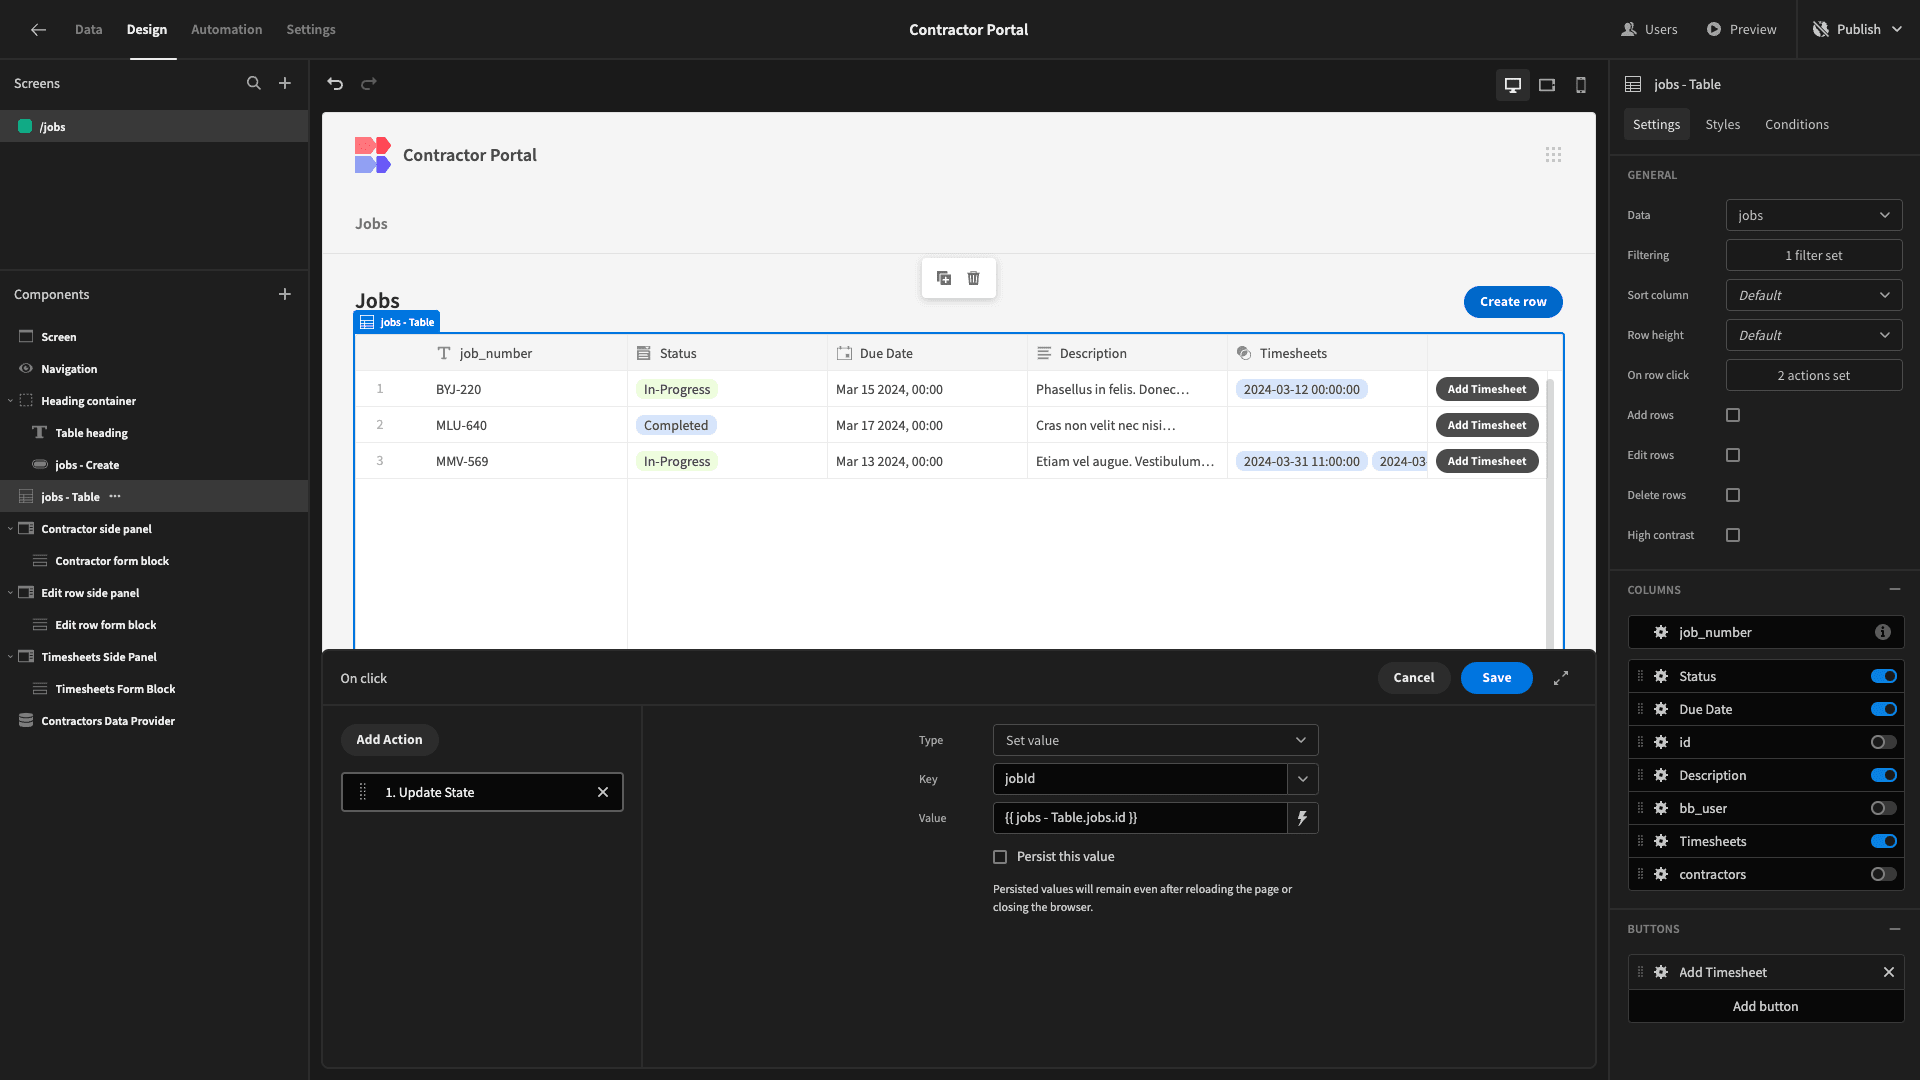
- Store the id attribute of the row of the relevant job as a state variable.
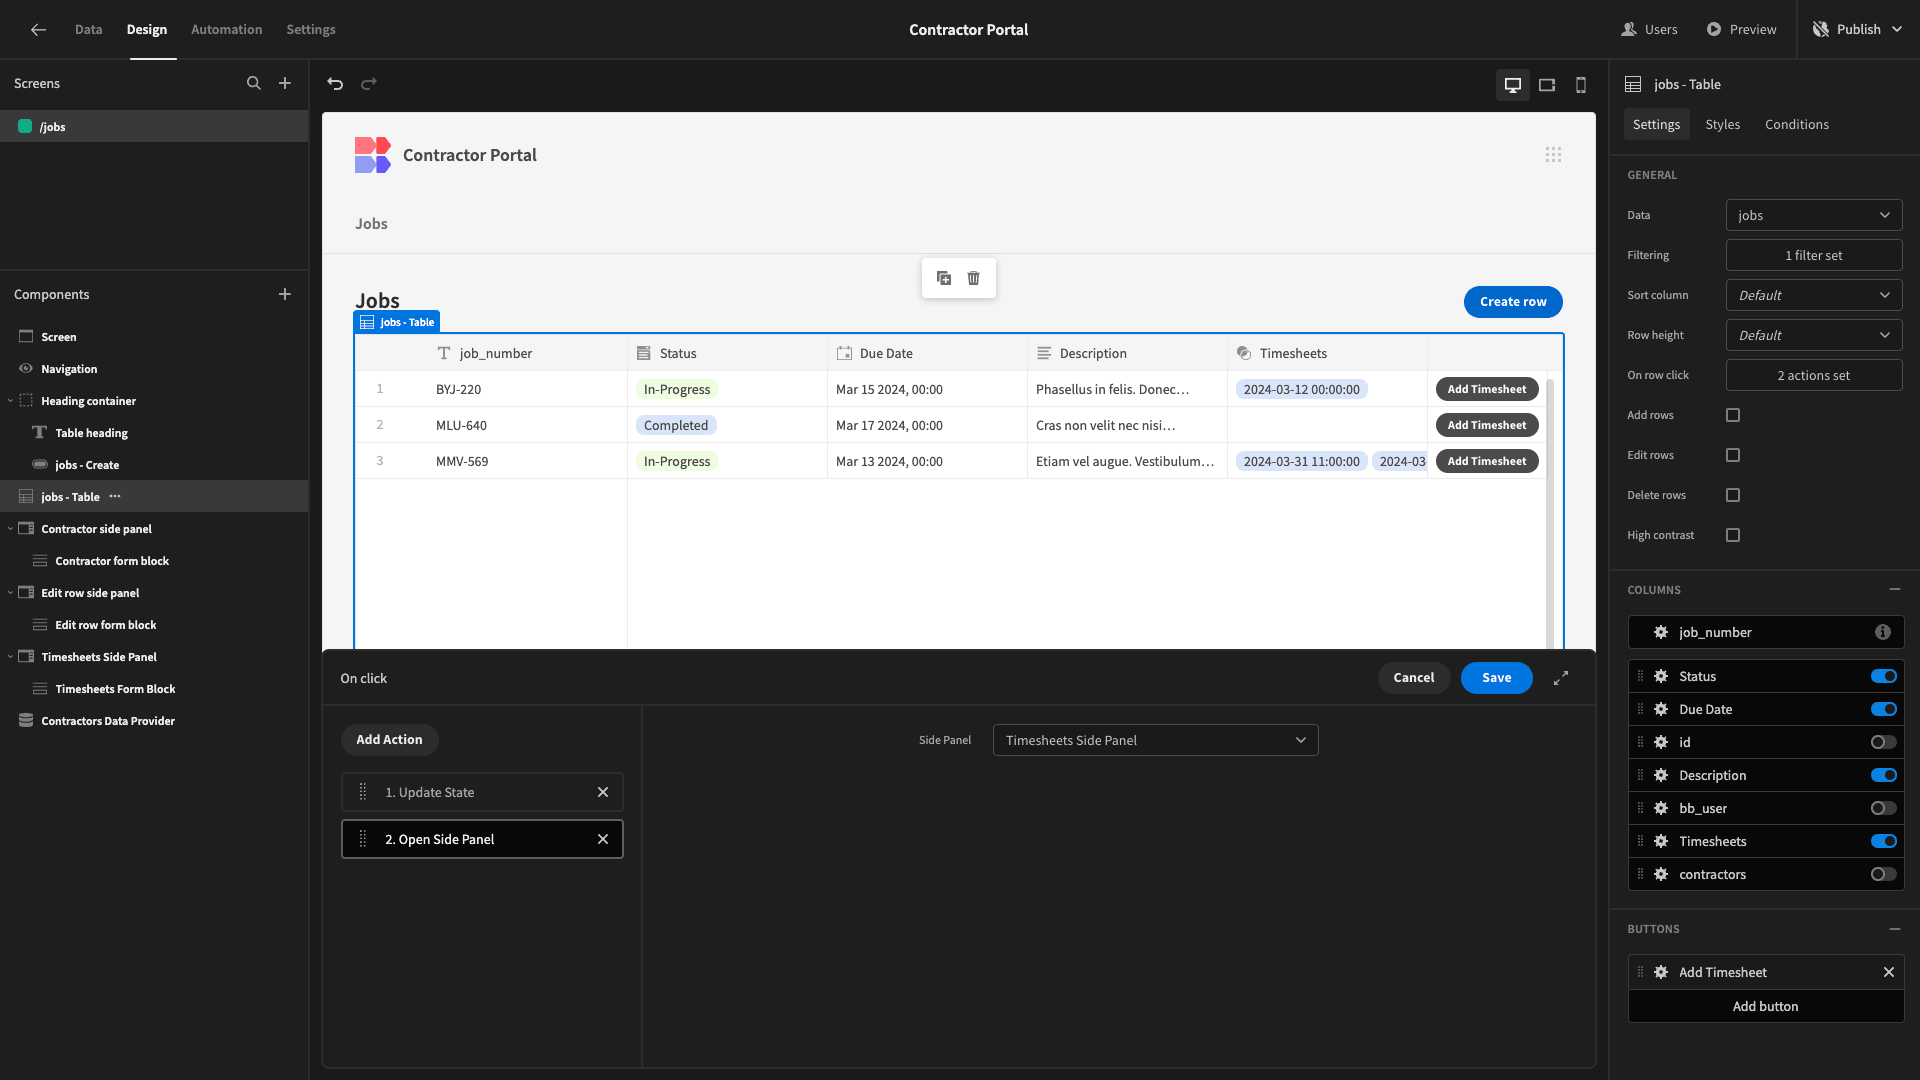
- Open up our new side panel.
So, we’ll first add an action called Update State. We’ll set our Key to jobId and our Value to {{ jobs - Table.jobs.id }}.
Then, we’ll add a second action called Open Side Panel and point it at our new side panel.
Now, we’ll head back to our Timesheets Form Block and open the Actions drawer for our Save button. Here, we have an action called Save Row. There’s an option here to manually add columns.
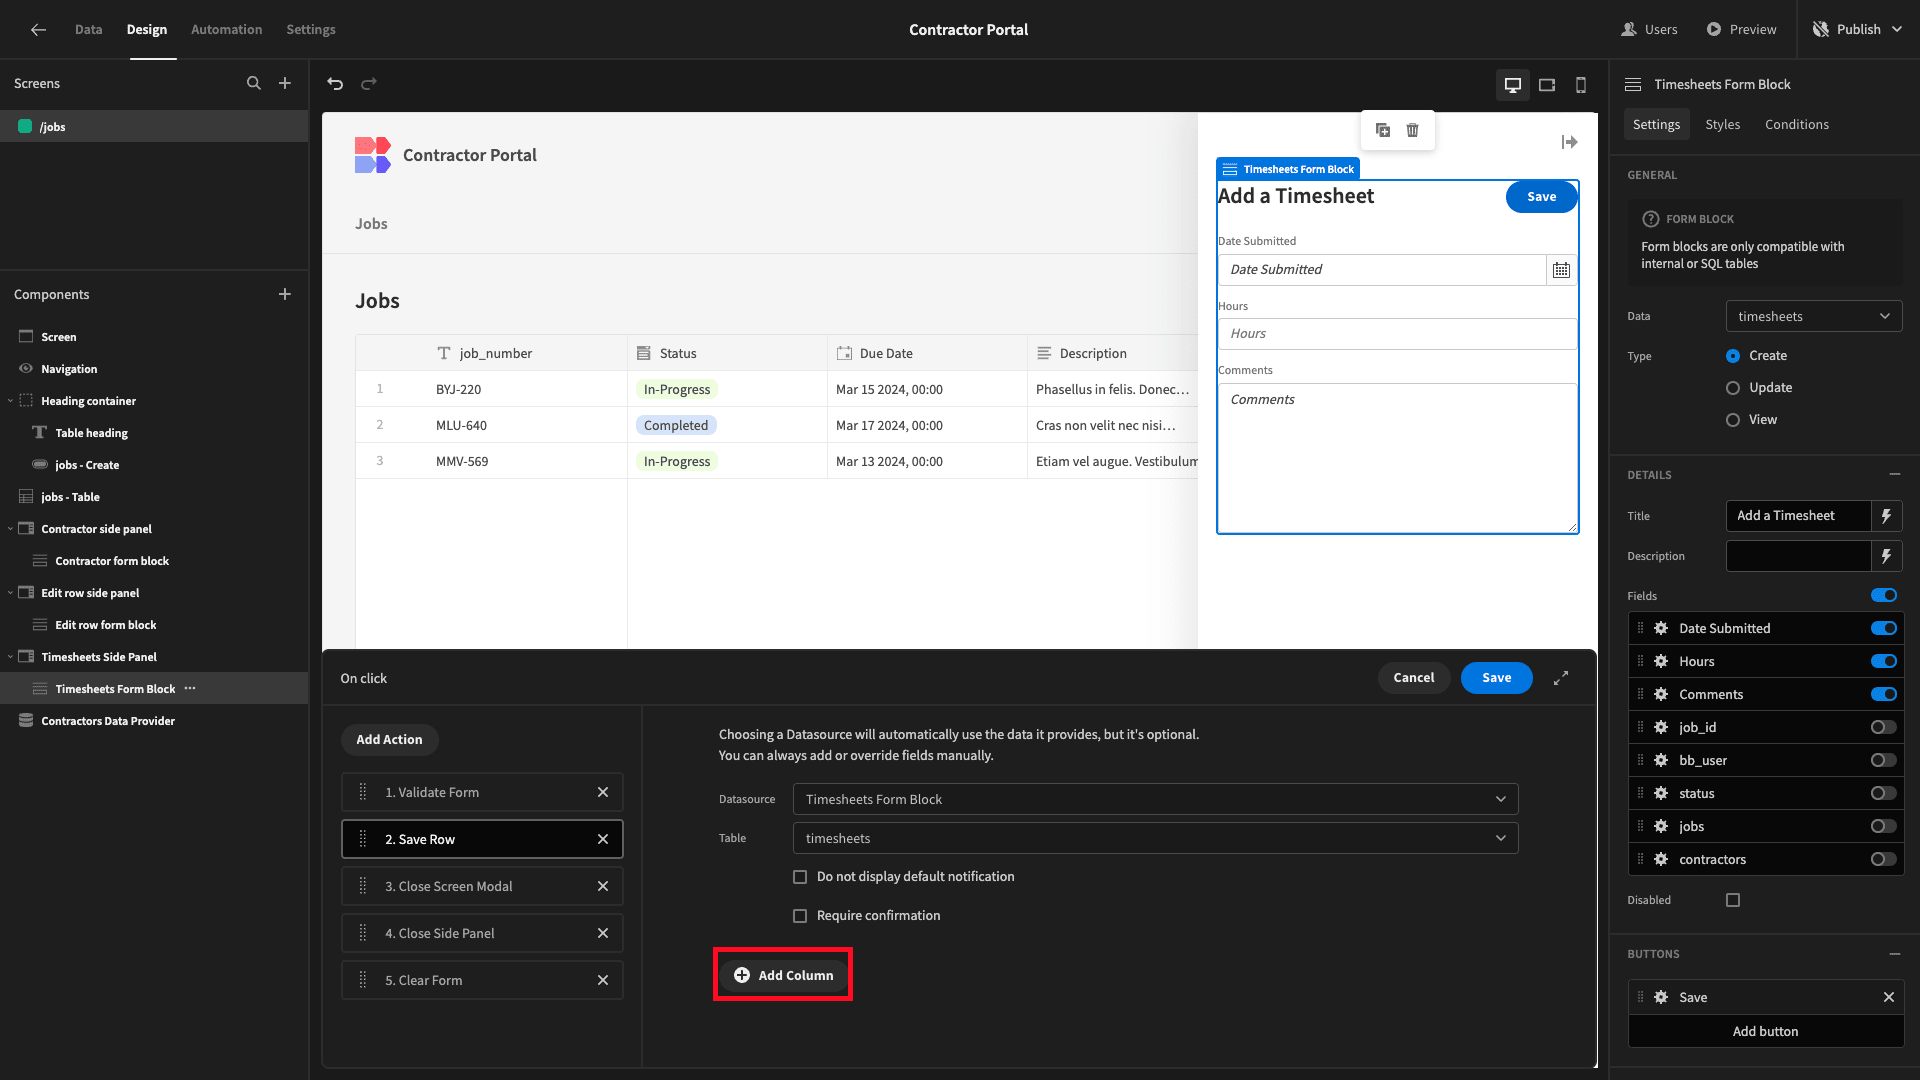
We’re going to add three columns - status, bb_user, and job_id.
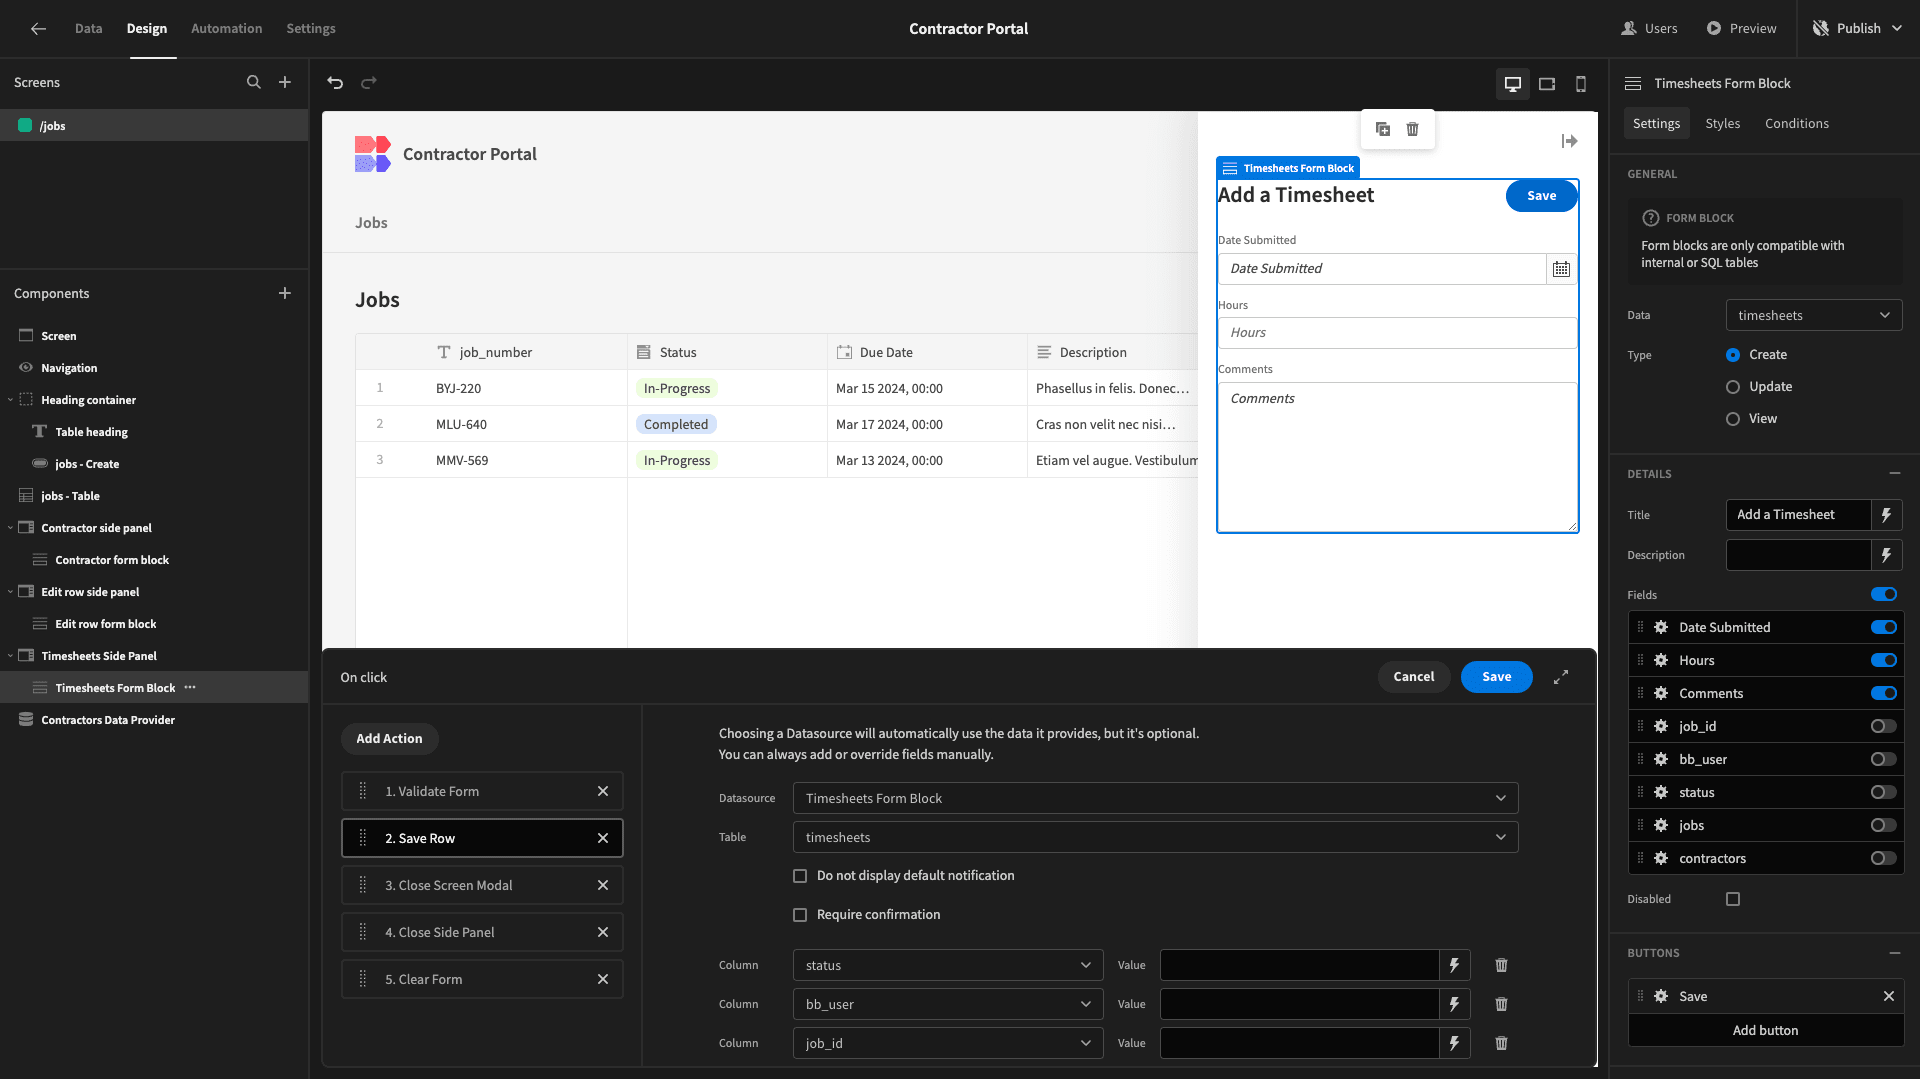
We’ll simply assign the status attribute to Submitted. Then, we’ll bind the bb_user and job_id attributes to {{ Current User._id }} and {{ State.jobId }} respectively.
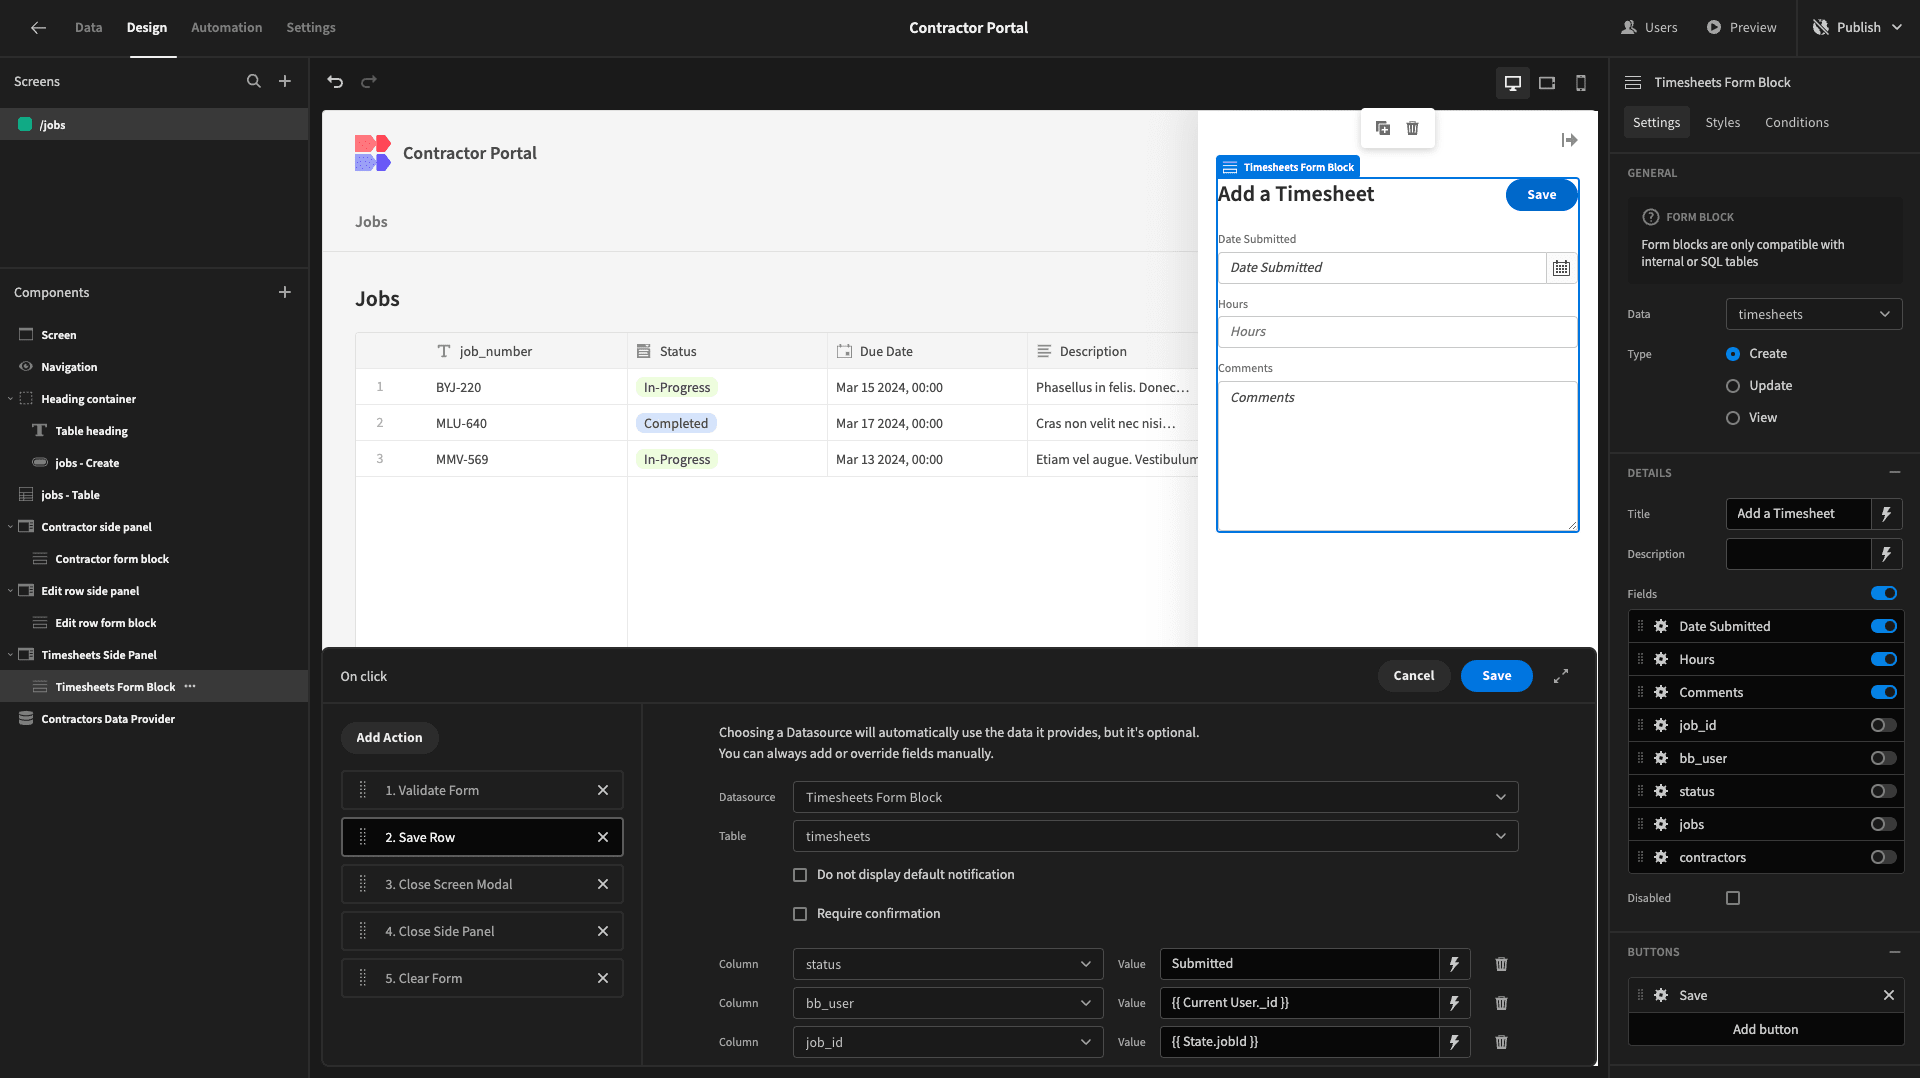
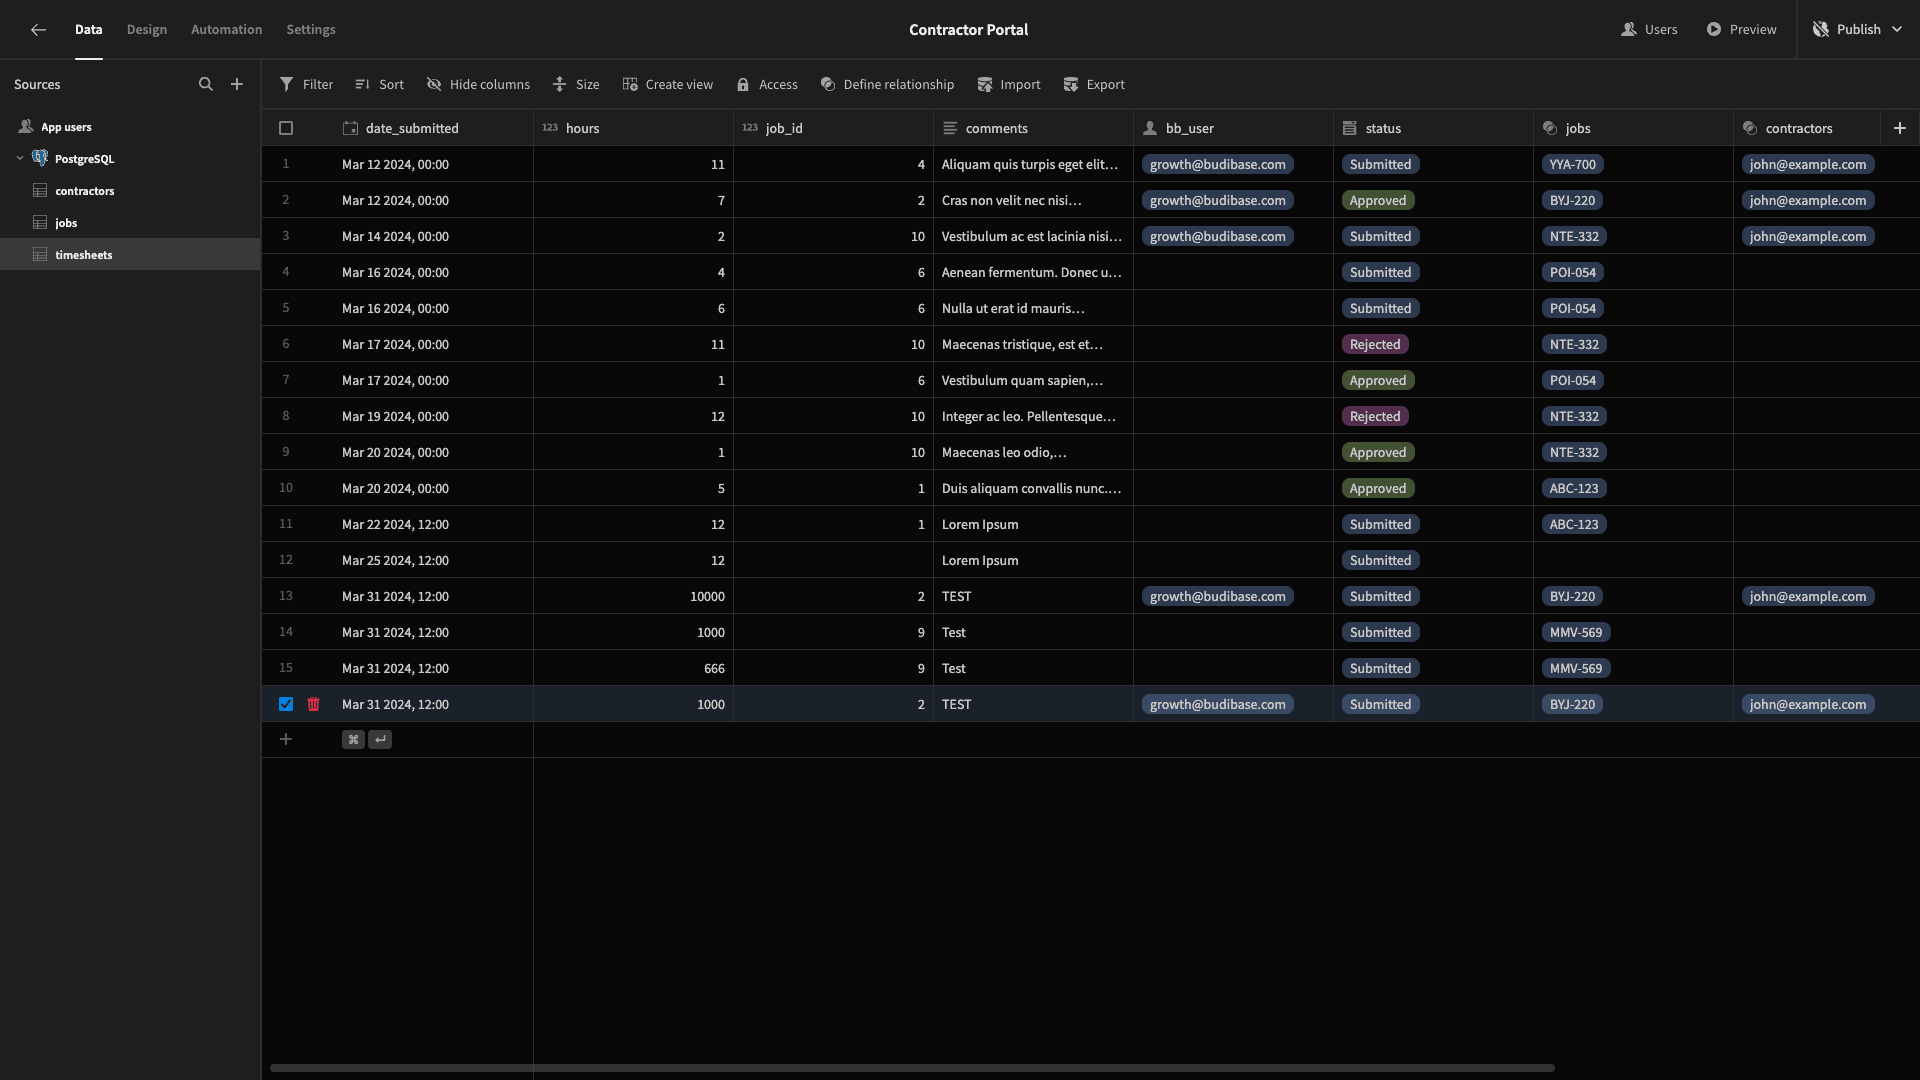
We’ll then preview our app and add a row to confirm that this works.
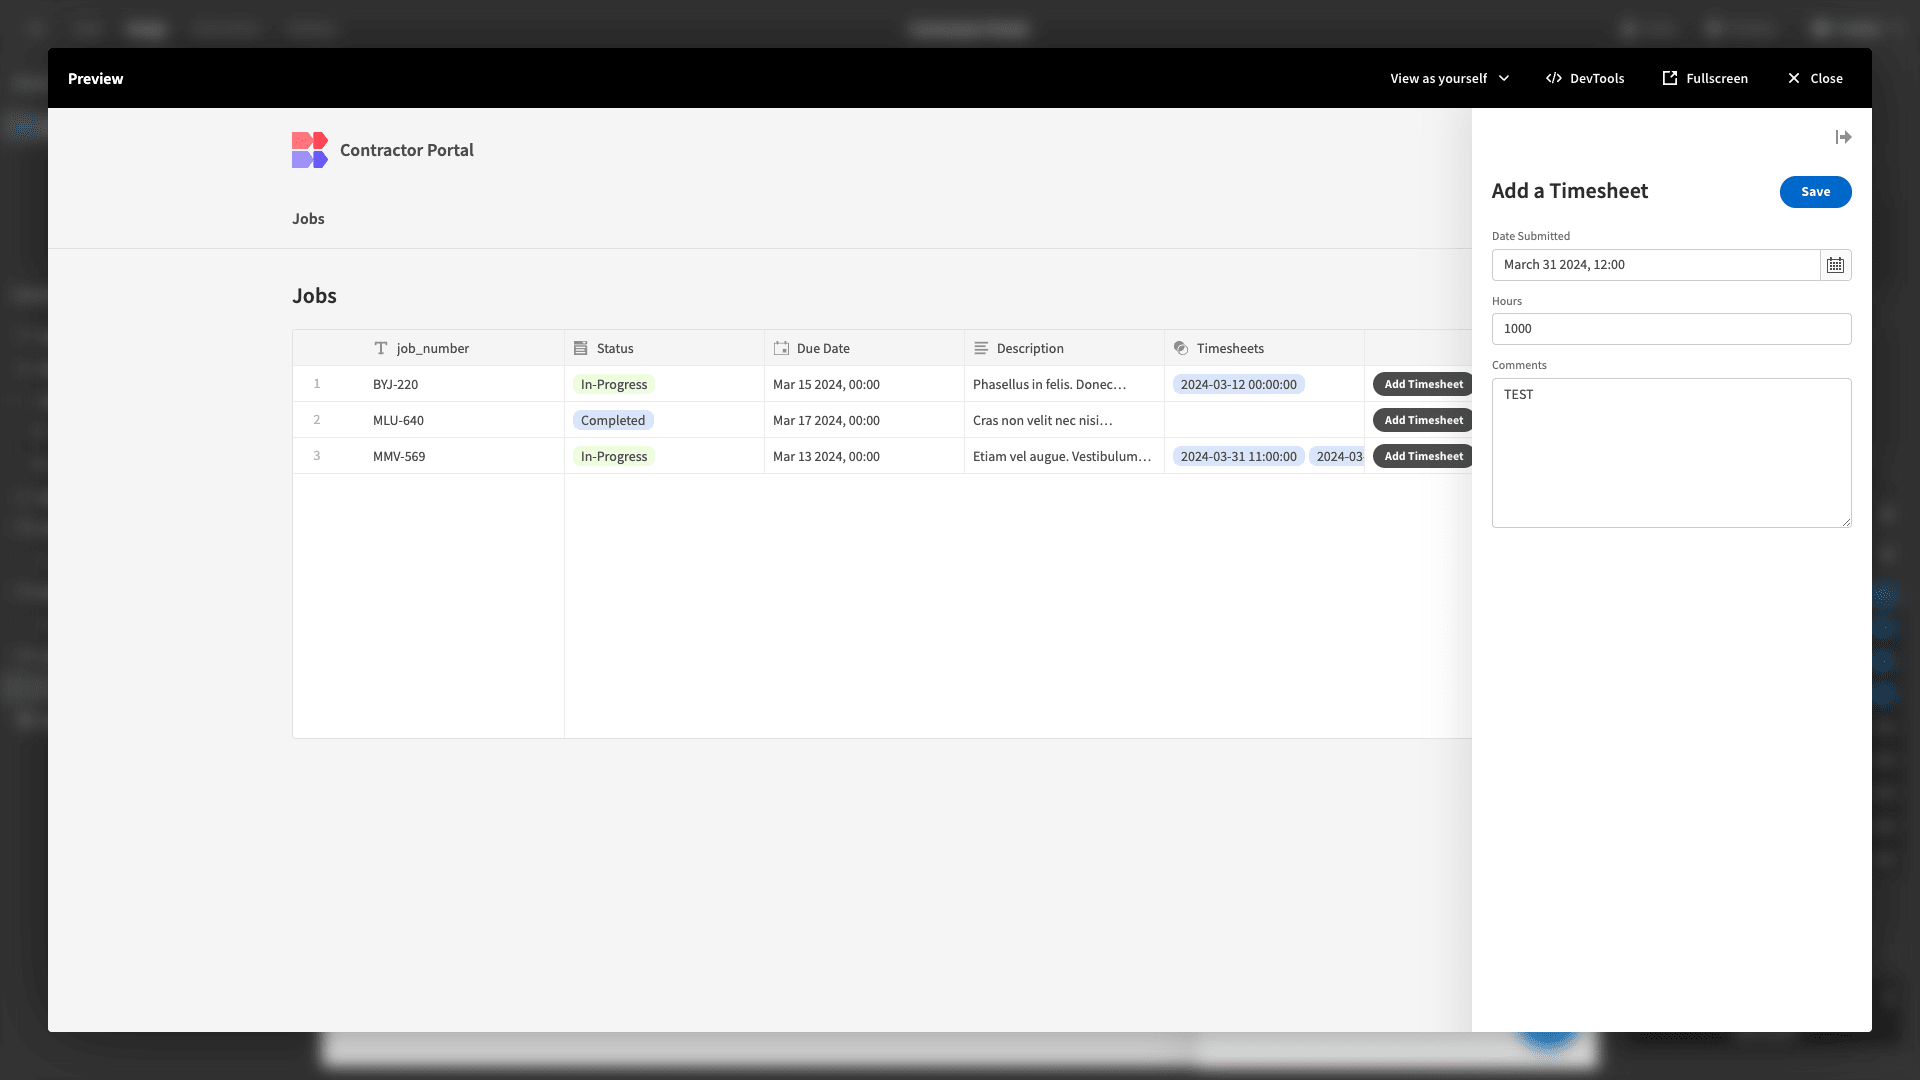
And we can see that it has.
The last small change we’ll make to our table is to update the appearance of the Create Row button. We’ll change its display text to Update Details and its Variant to Secondary, as well as select the Quiet option.

Claiming open jobs
Beneath our table, we want to add a section where contractors can view and claim open jobs.
We’ll start by adding a component called a Cards Block. This accepts a data source and iterates over it, displaying key information on cards for each entry. We’ve pointed ours at the jobs table. We’ve also set the Title to Open Jobs.

Next, we’ll add two filter expressions to this. So, the status must be Open, and the bb_user must be empty.
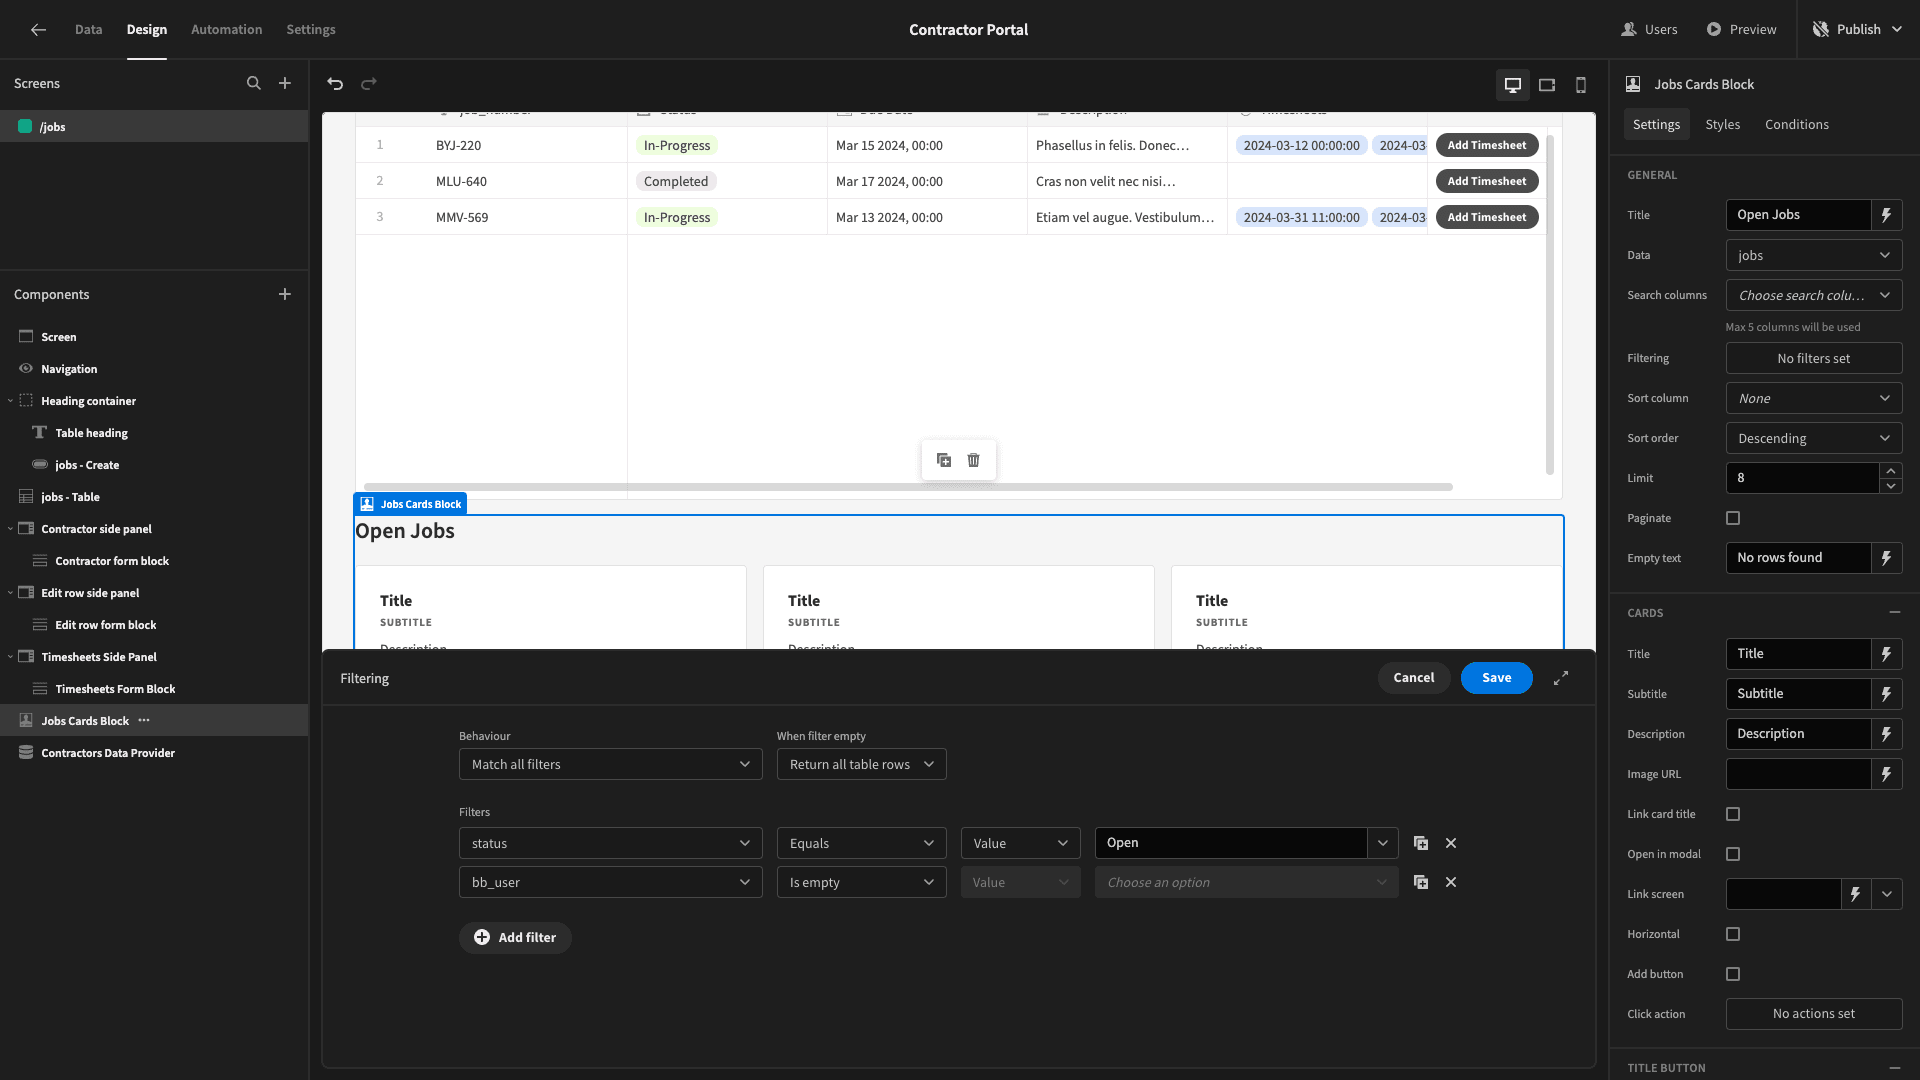
Now, we can only see a handful of cards for the rows that meet these criteria.
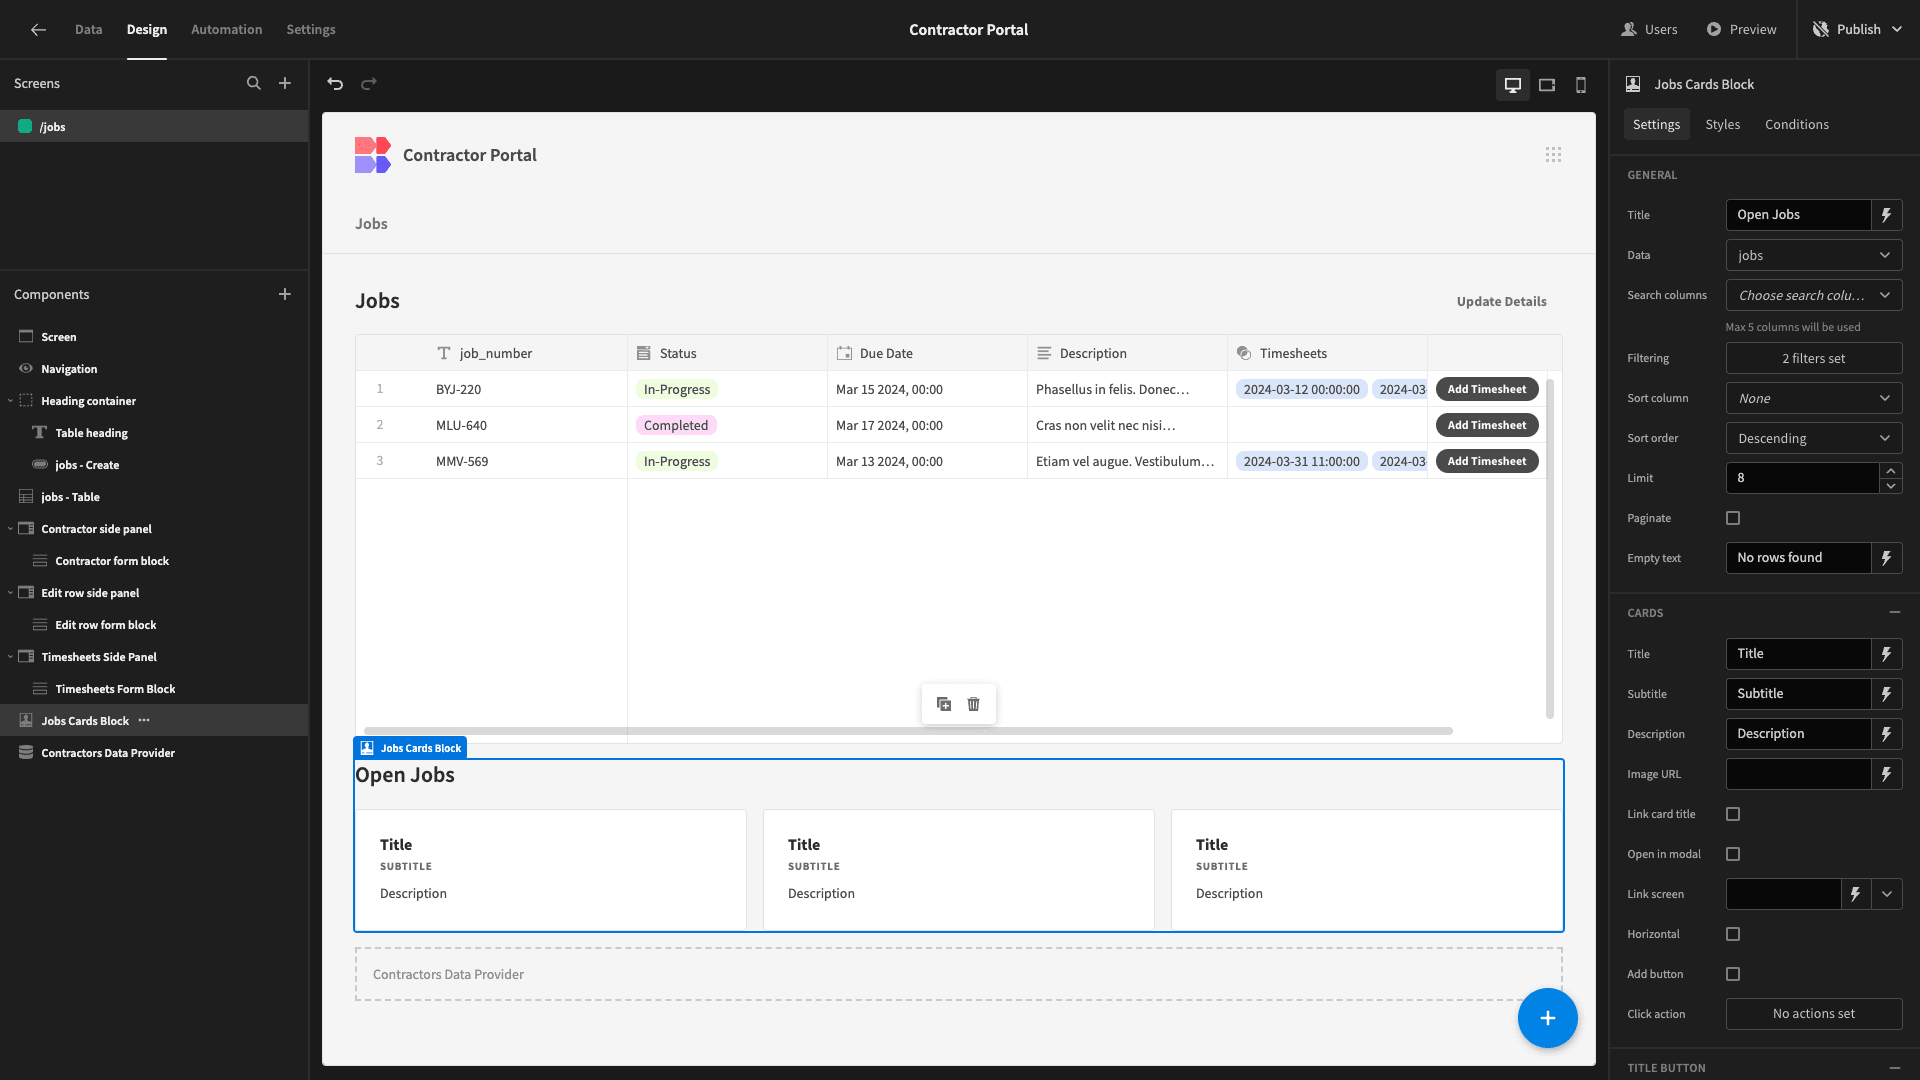
Then, we’ll bind the Title, Subtitle, and Description fields to our job_number, due_date, and description attributes. We’ve used the handlebars expression {{ date Jobs Cards Block.jobs.due_date “MM-DD-YY” }} to format our due_date attribute.

Next, we’ll add another Side Panel and nest an update Form Block for our jobs table within this.
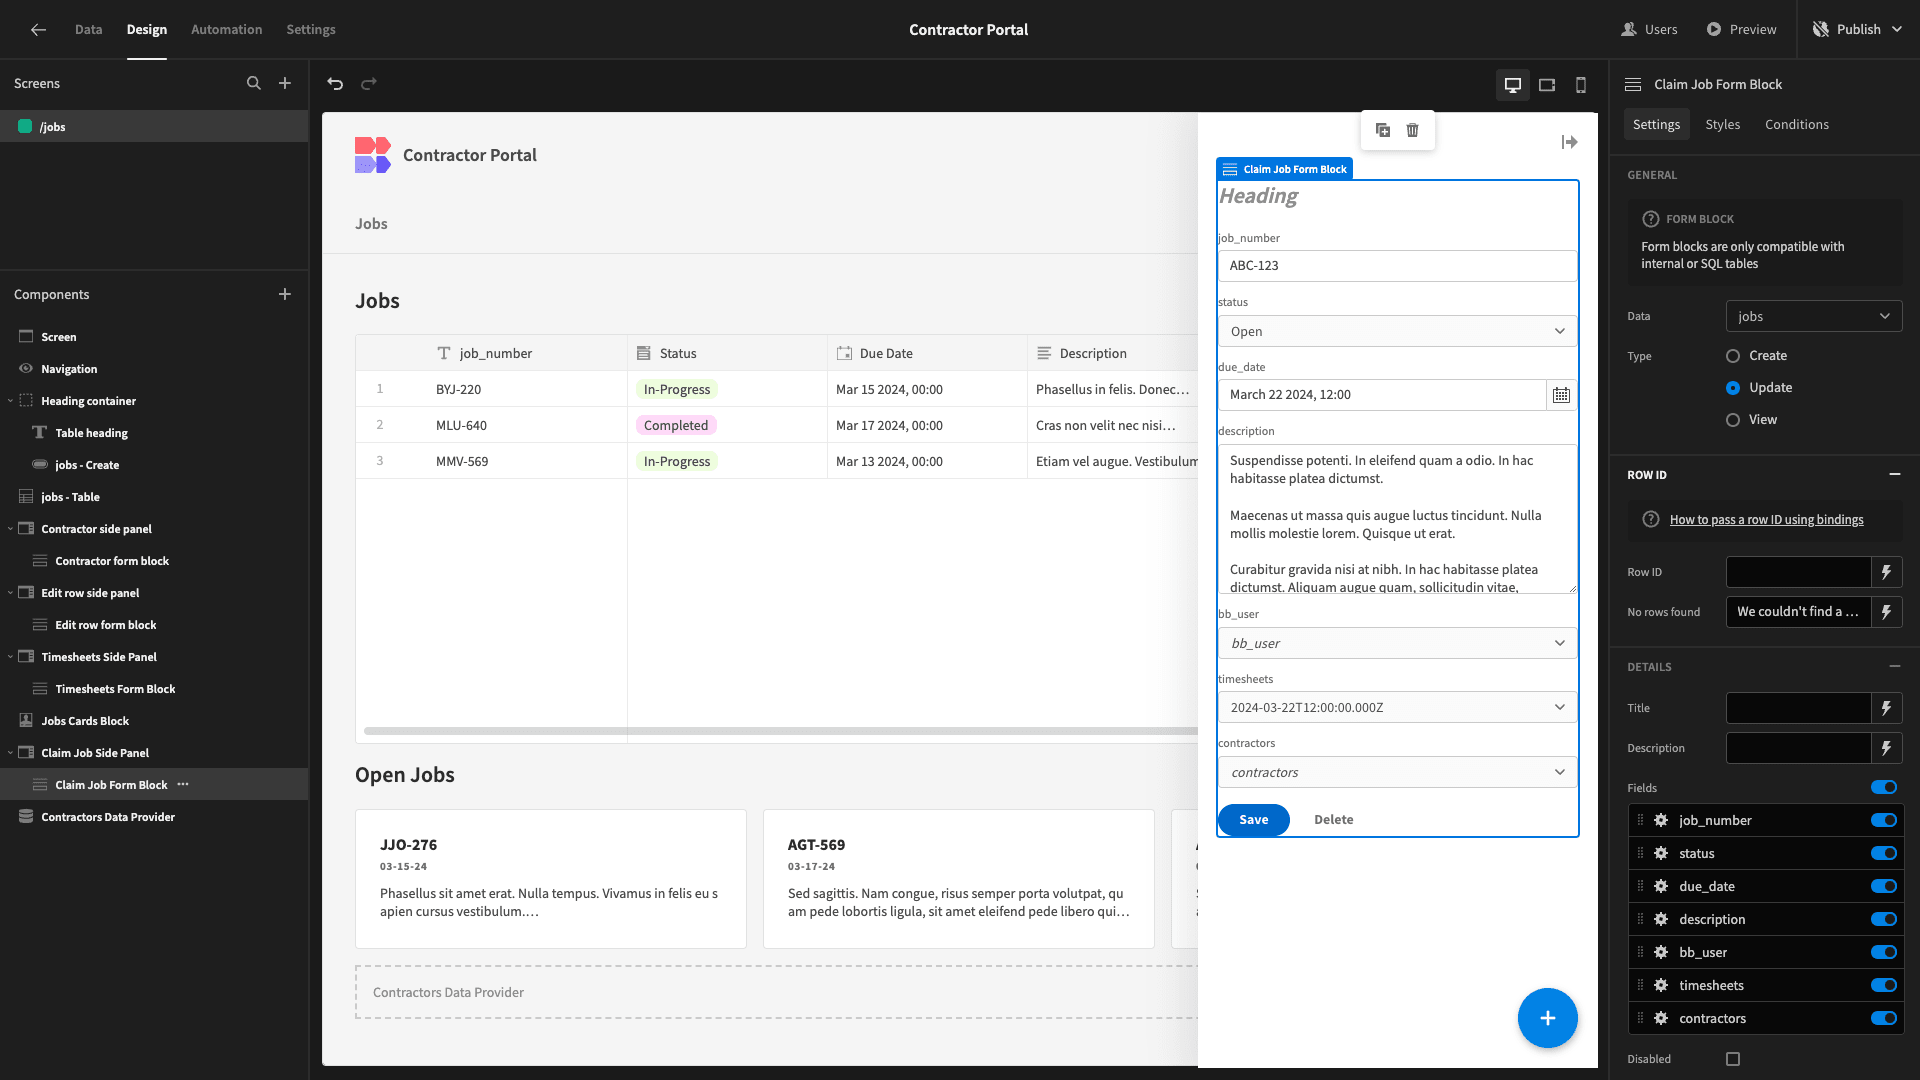
Once again, we need to implement some logic to point our form at the appropriate row.
On our Cards Block, we’ll add a button and set its display text to Claim.

Then, we’ll add the same actions as before - creating a state to store our _id attribute and opening our new side panel.

We’ll use this new state as the Row ID for our form. We’ll then set our Title to the job_number and remove everything except the due_date and description attributes. Then, we’ll select the Disabled option.
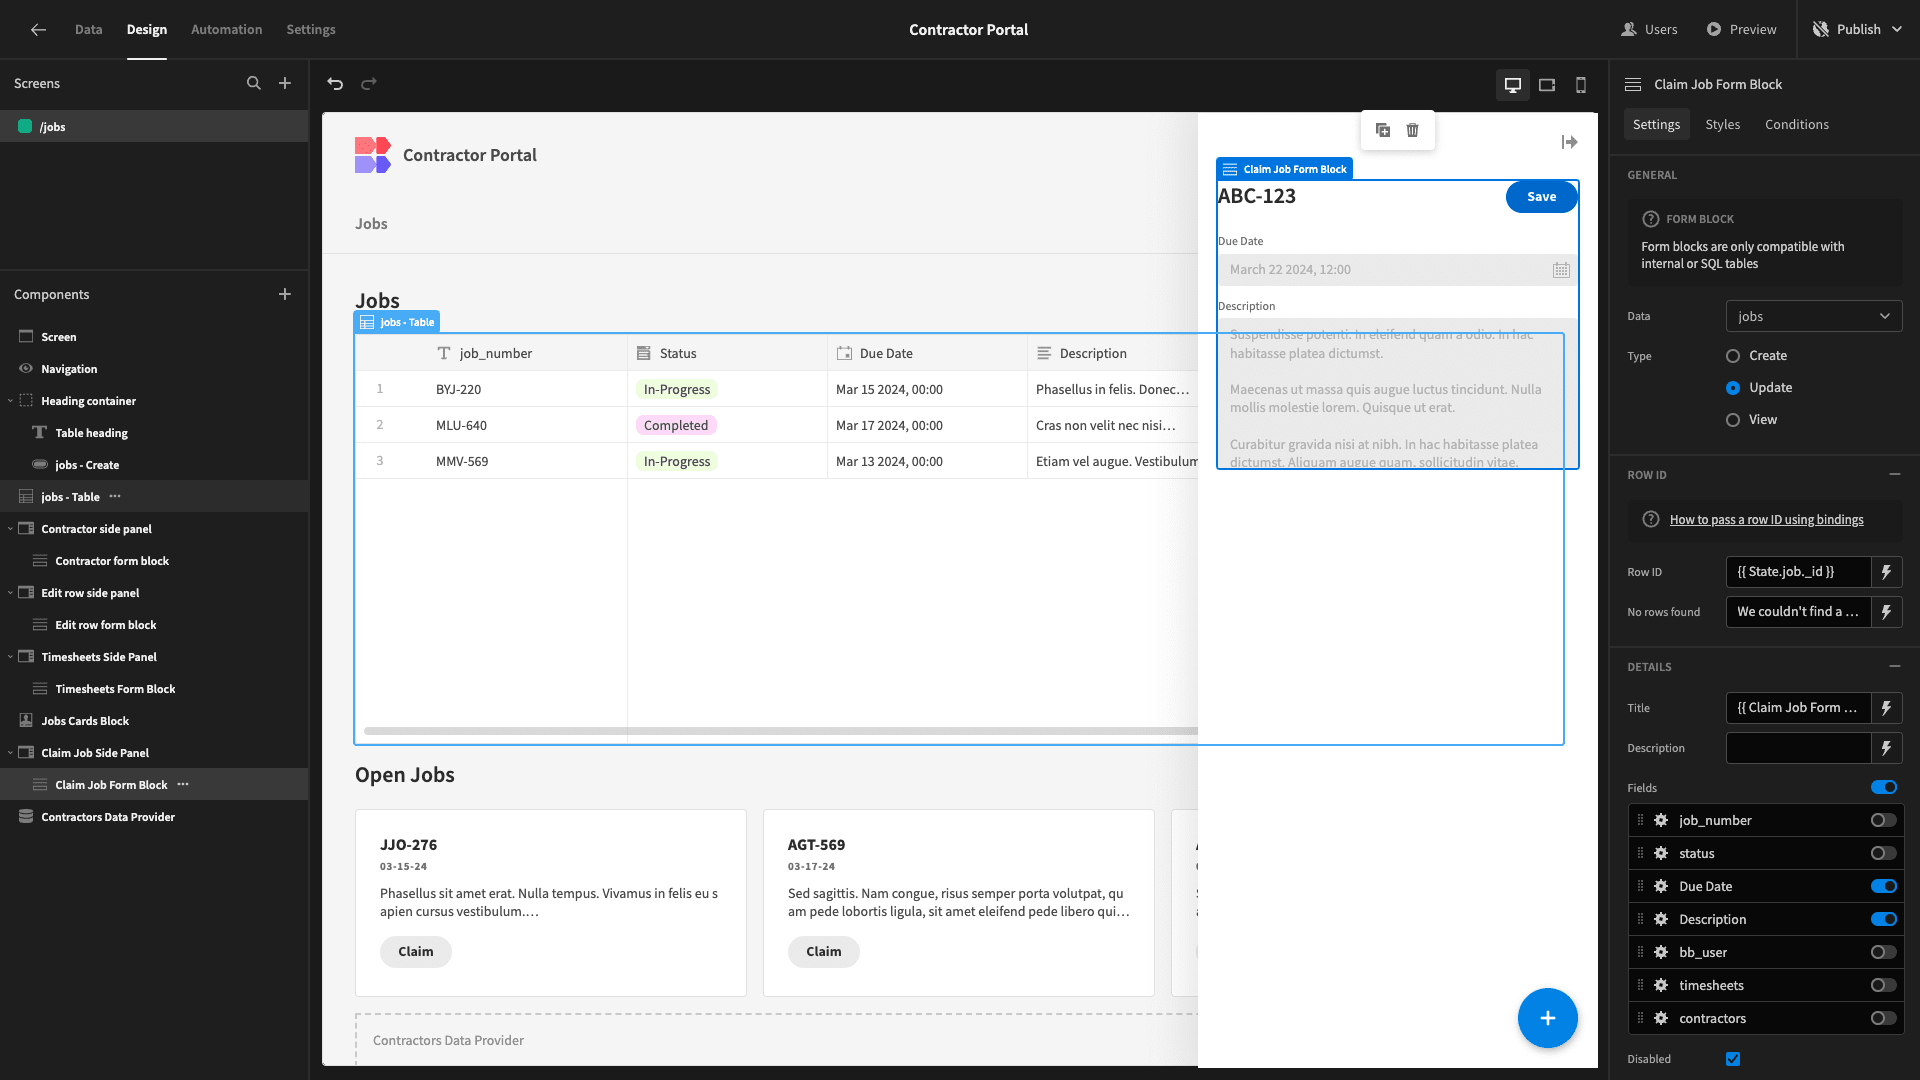
Next, we’ll change our button text to Claim and open up the Actions drawer.
Here, we’ll set the bb_user attribute to our current user and the status to In-Progress.
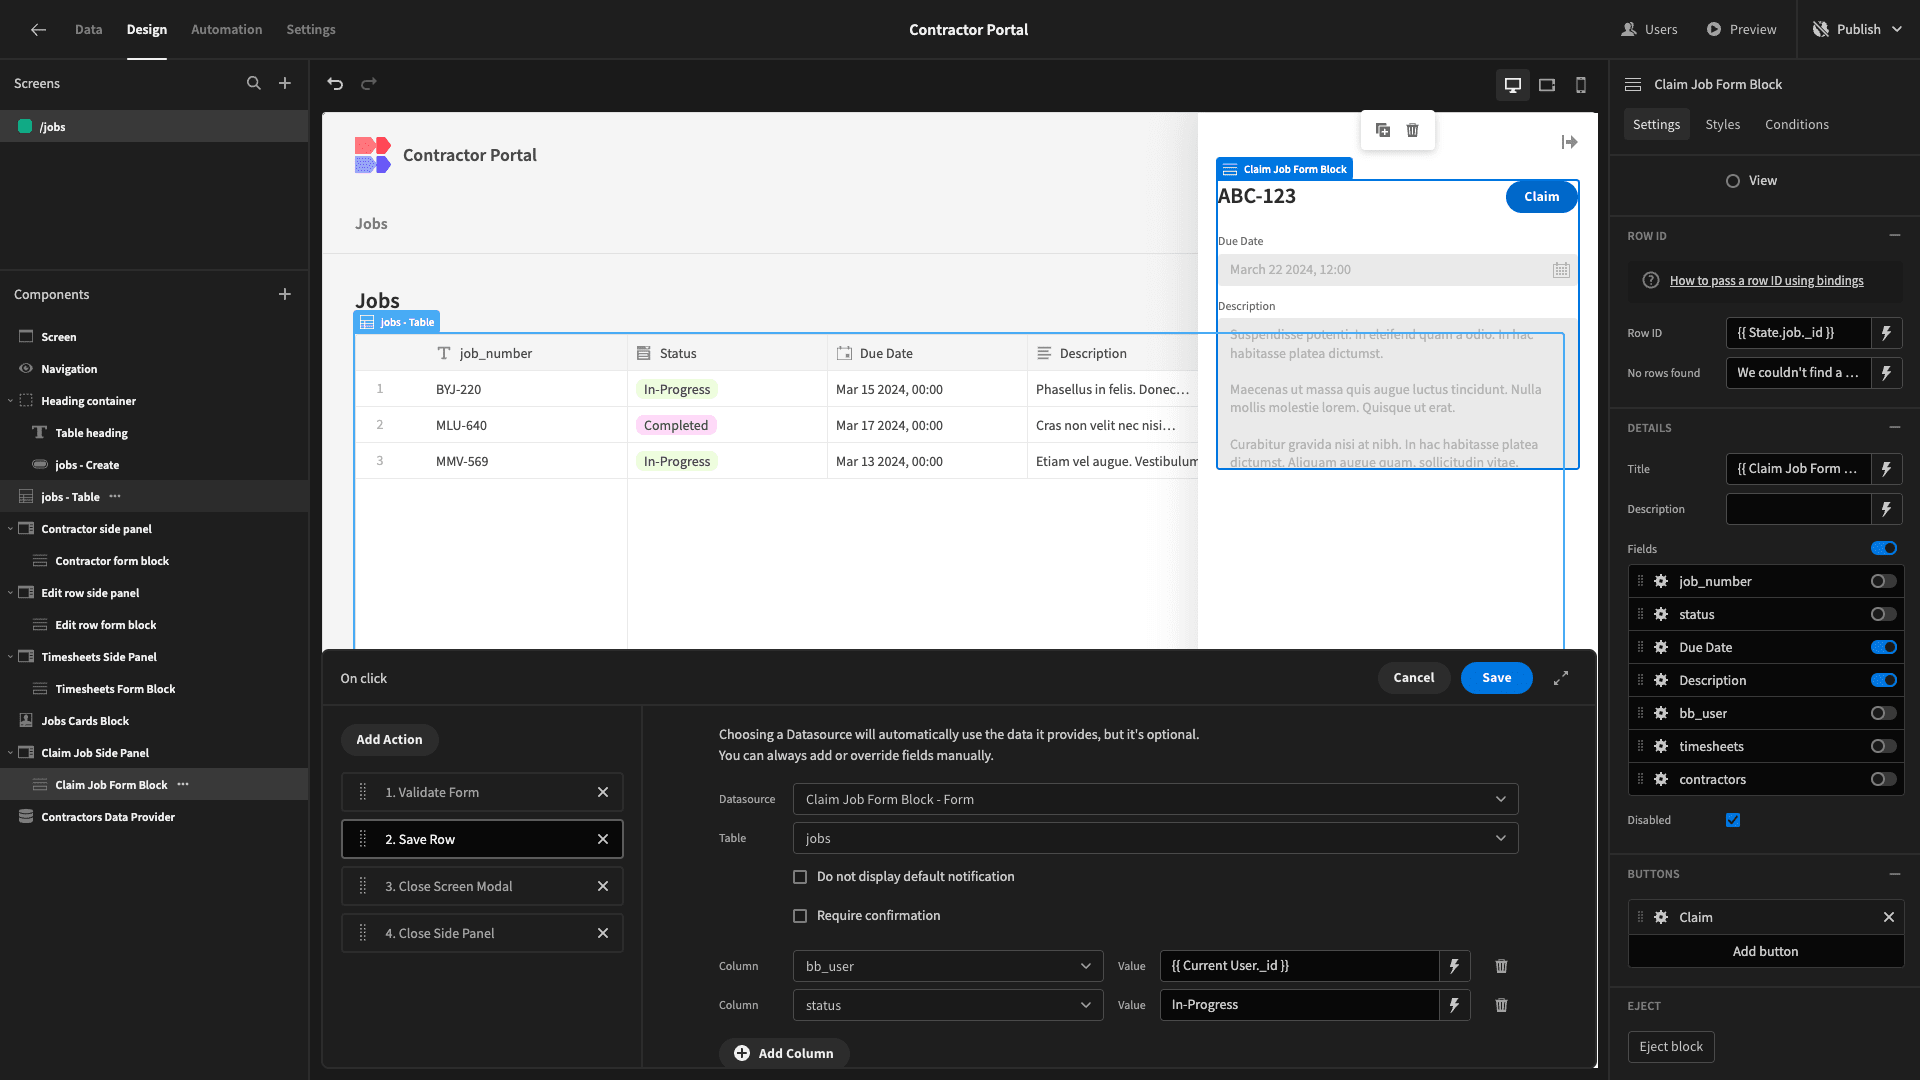
Once again, we’ll open up our app preview to test that this works correctly.
That’s this section of our contractor portal completed.
3. Adding admin functions
Next, we’re going to start adding screens for our internal users. Essentially, we’re going to create three CRUD screens - one for each of our connected database tables.
We’ll then modify each of these slightly, to suit our needs.
So, we’ll start by adding a screen again and selecting the Table with Details Panels option.
This time, however, we’re selecting all three of our database tables.

And we’re going to set the minimum role for accessing these new screens to Power.
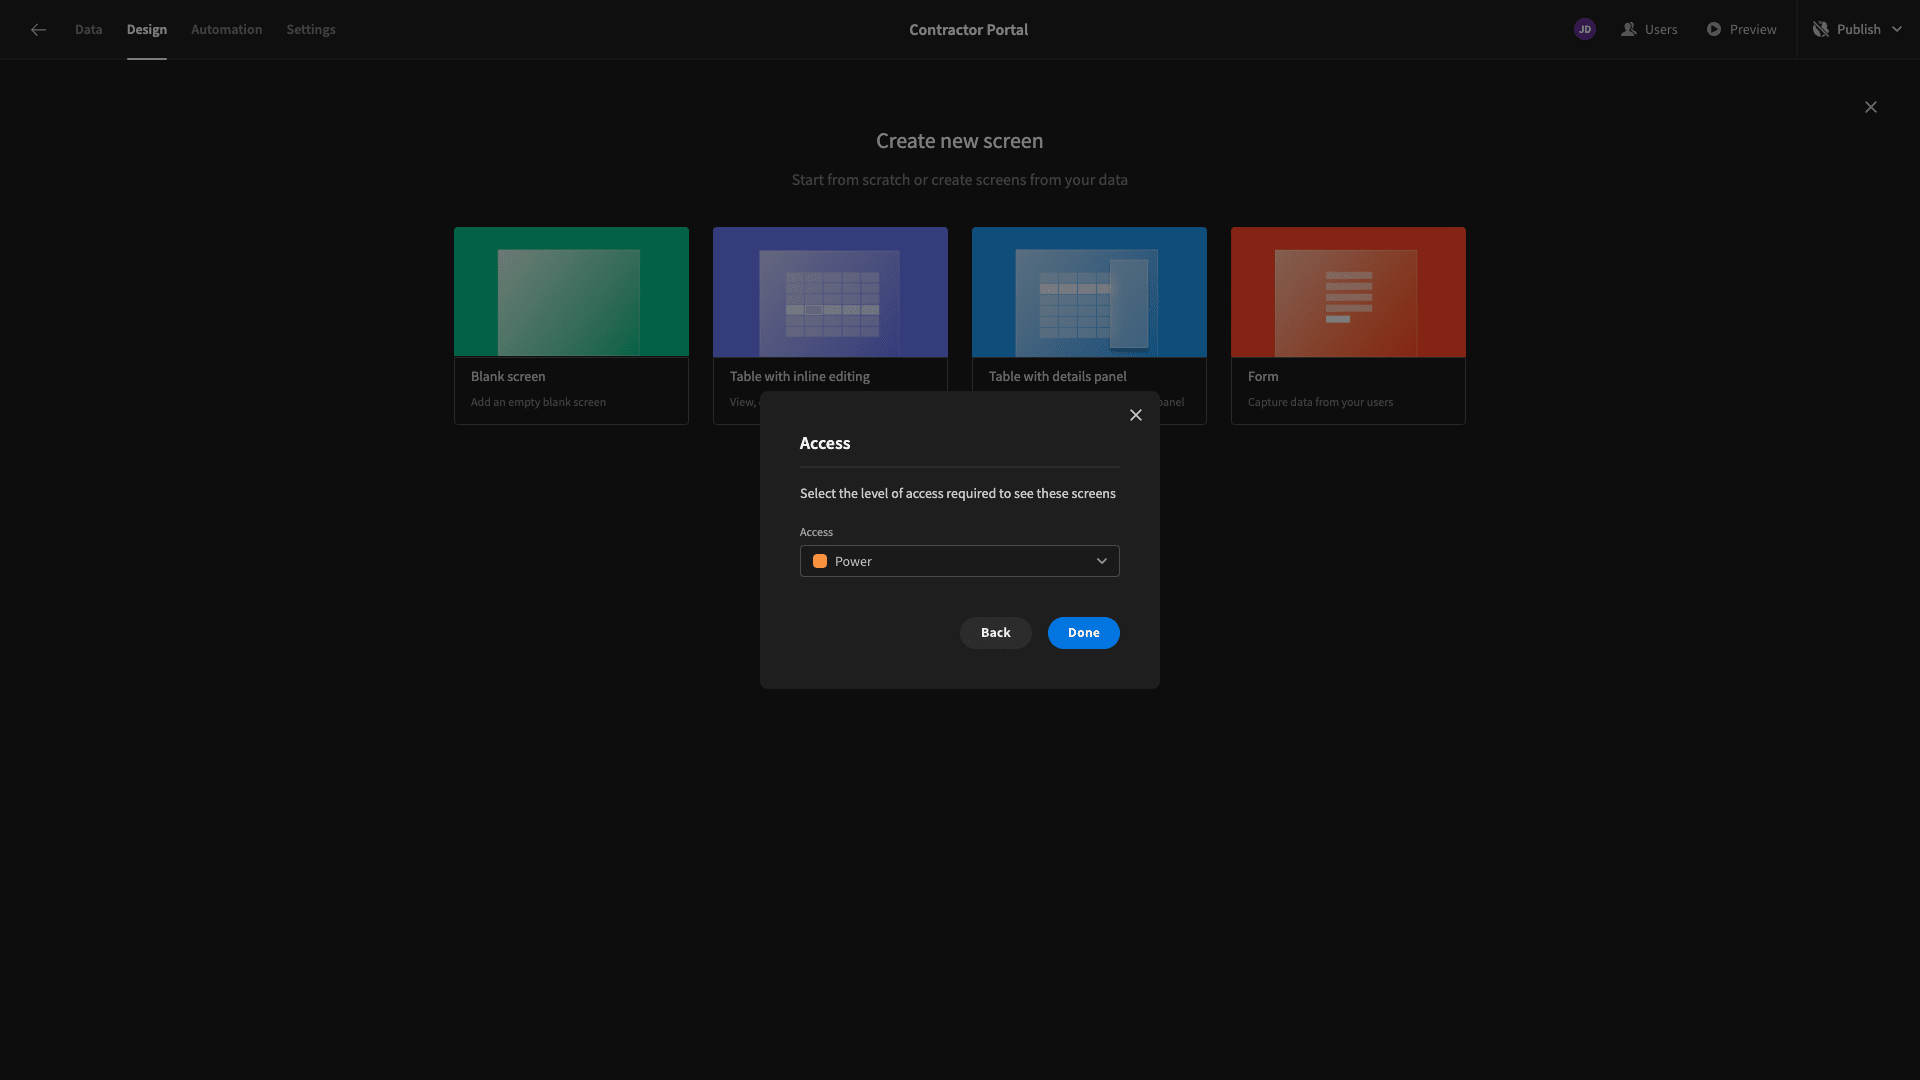
Now, we have a working CRUD screen for each of our three database tables.
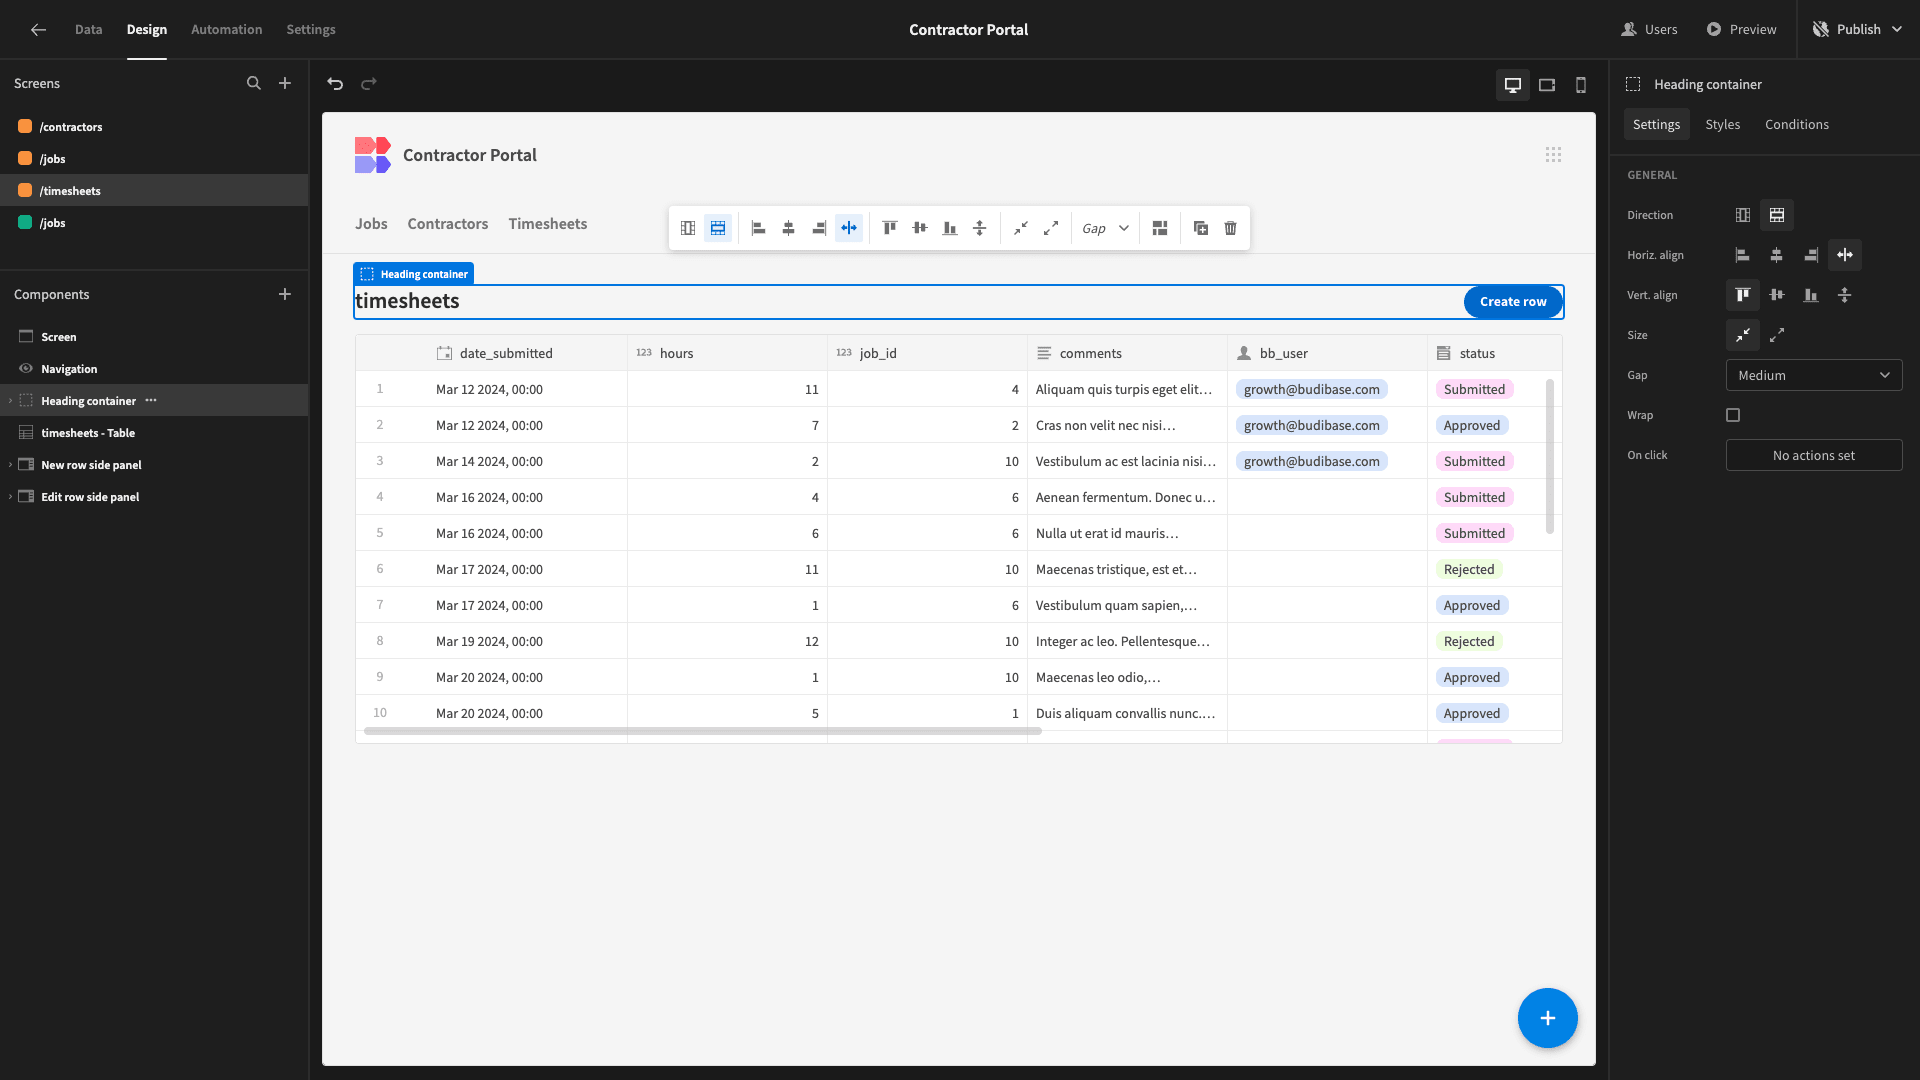
We’ll take each one at a time and configure the specific actions we want to enable our internal users to take.
Contractors
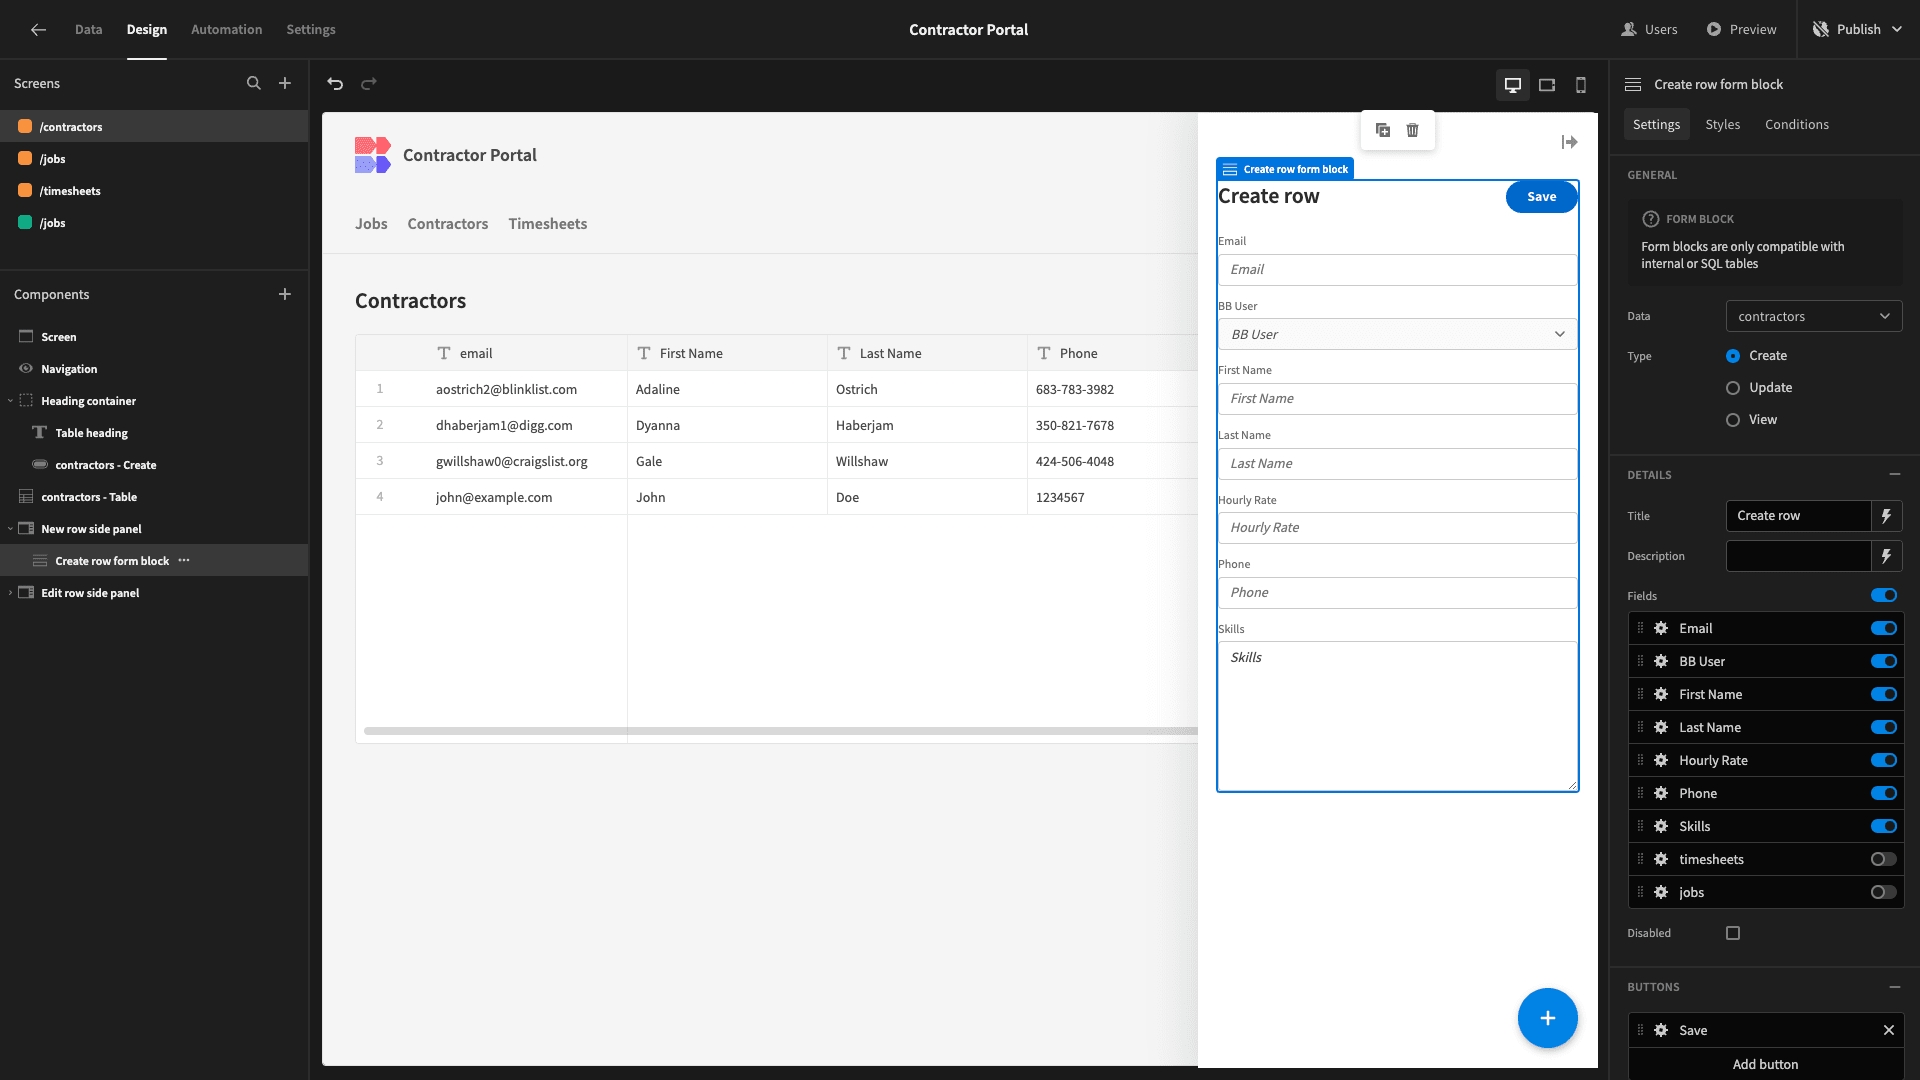
First up, our contractors table. We essentially want to give our internal users full CRUD functionality here, so we’re mostly going to be improving the design a little bit.
We’ll start by configuring which columns we want to appear on the table itself. By default, this will show everything.
To make our table easier to scan, we’ll pare this down to just the email, first_name, last_name, phone, hourly_rate, and jobs attributes. As always, we’ll also make our display text more readable while we’re here.
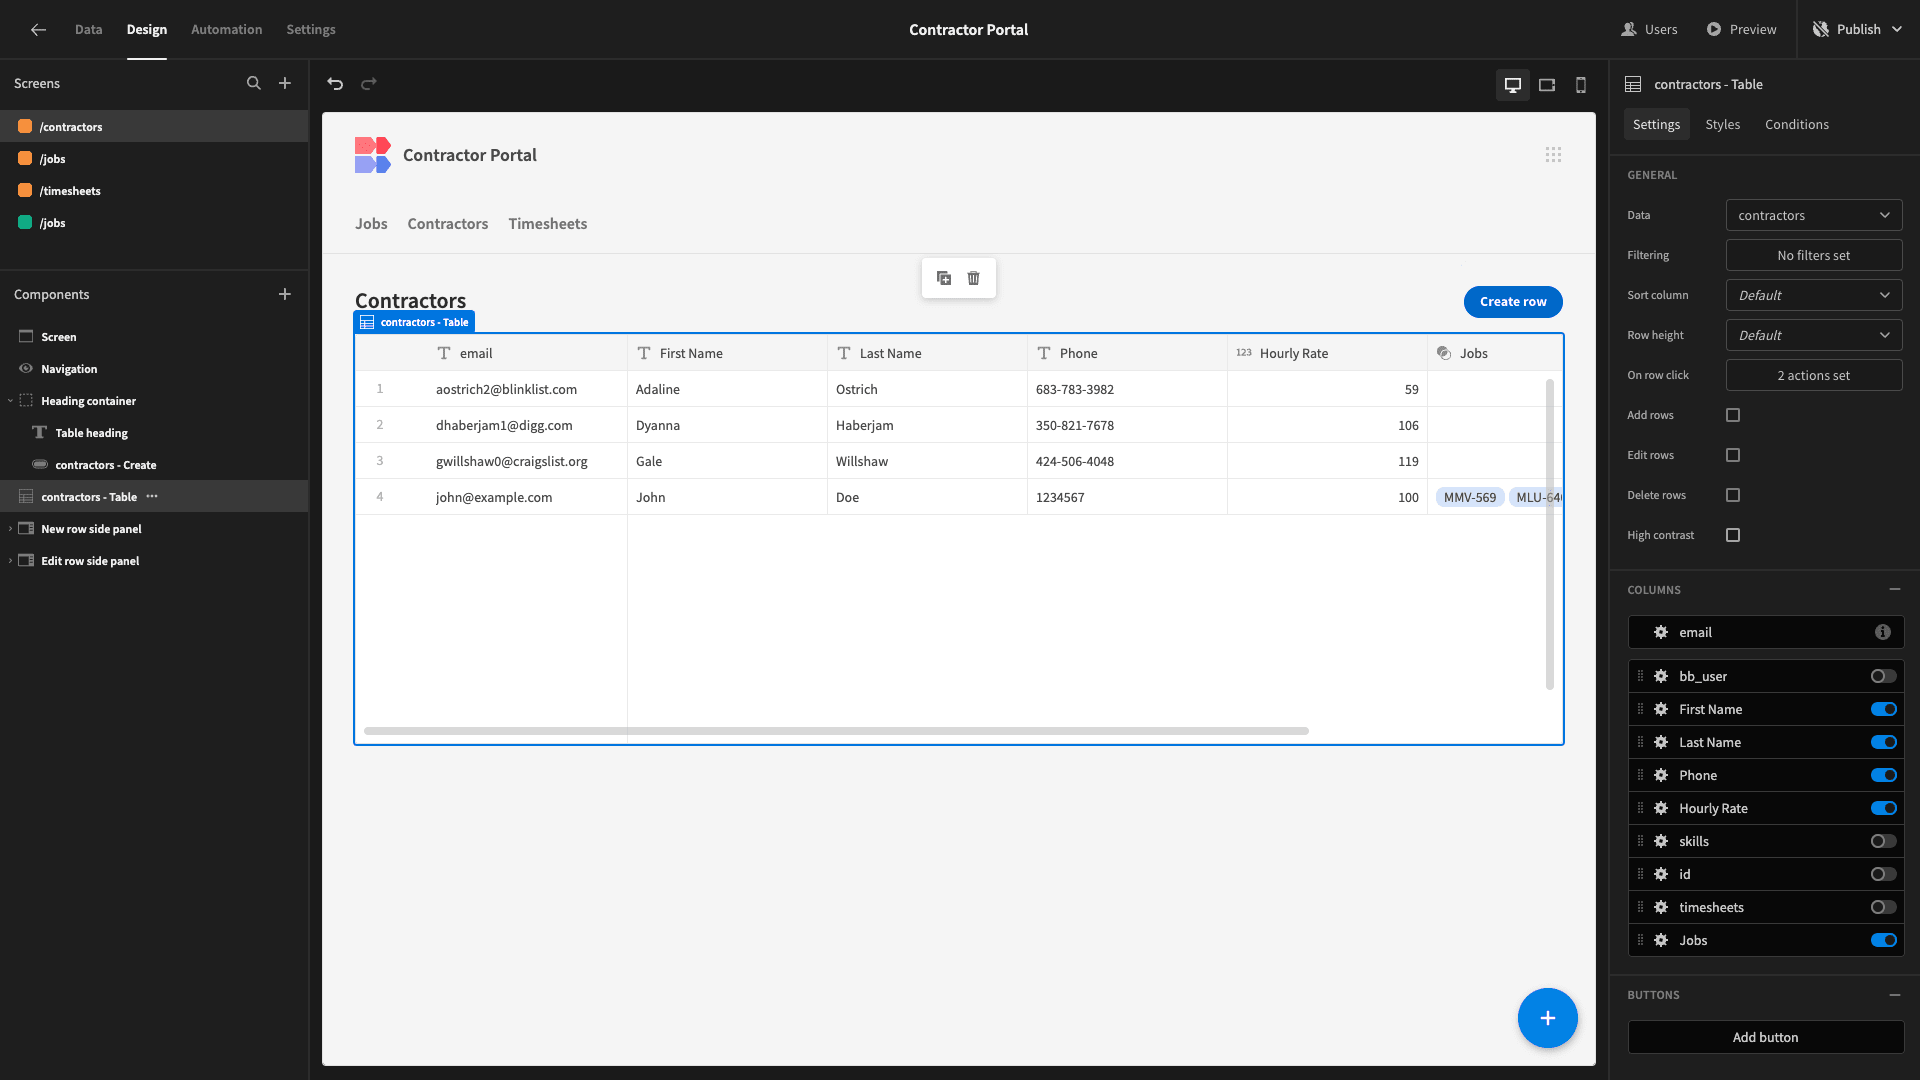
For each of our forms, we’ll simply remove the timesheets and jobs fields and tidy up our remaining display texts.
Timesheets
The admin screen for the timesheets table in our contractor portal will be a little more complex. Internal users will only be able to view the details of existing timesheets or update their status attributes, which will give us a basic approval workflow.
However, we also want to display some information that isn’t currently available in our timesheets table.
Specifically, we want to show our internal users the costs incurred by each contractor relating to a given timesheet.
This is where the relationships we set up between our tables earlier will be useful - as our timesheets entries contain the number of hours worked, while our contractors table stores the hourly rate for each respective user.
Head back to the timesheets table within our Data section. Here, we’re going to add a formula variable and call it cost.
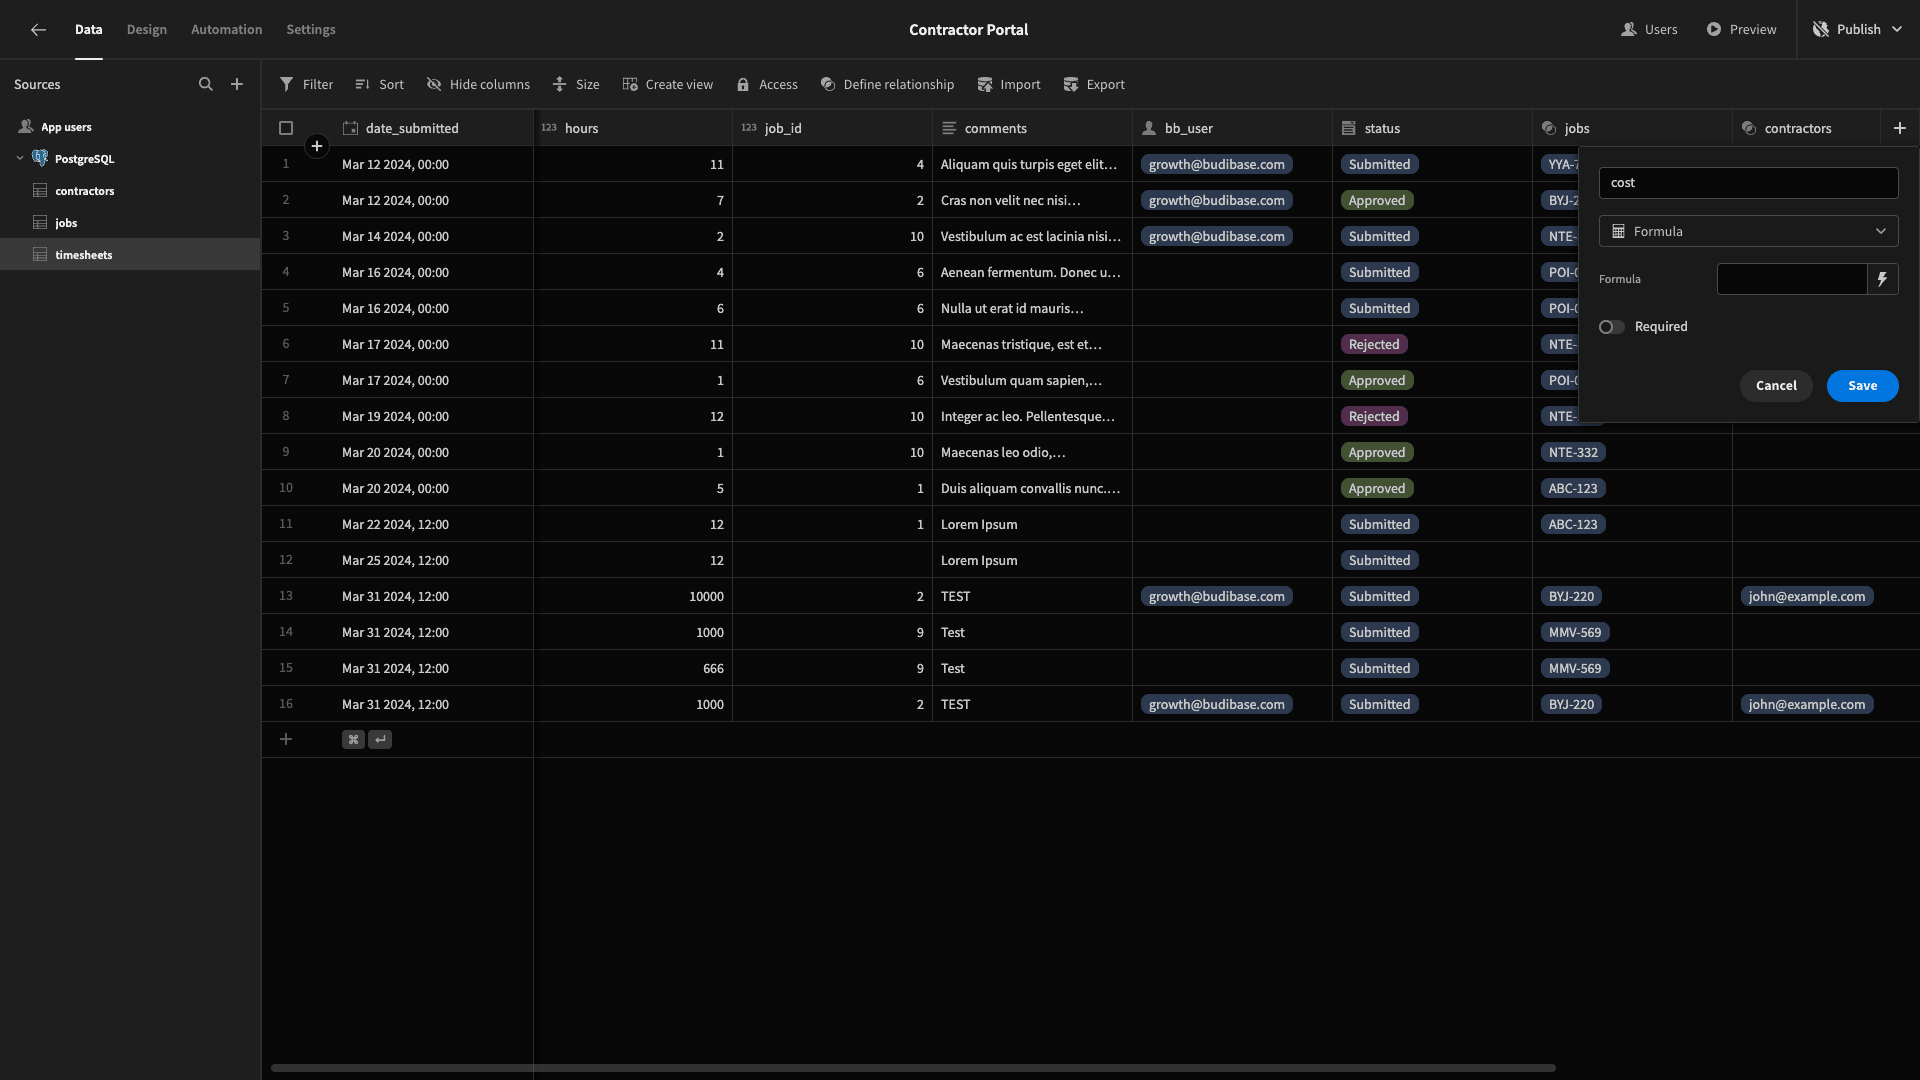
Then, we’ll hit the lightning bolt to access our built-in JavaScript editor.
Here, we can access data from within our table or related tables as bindable values in our code.
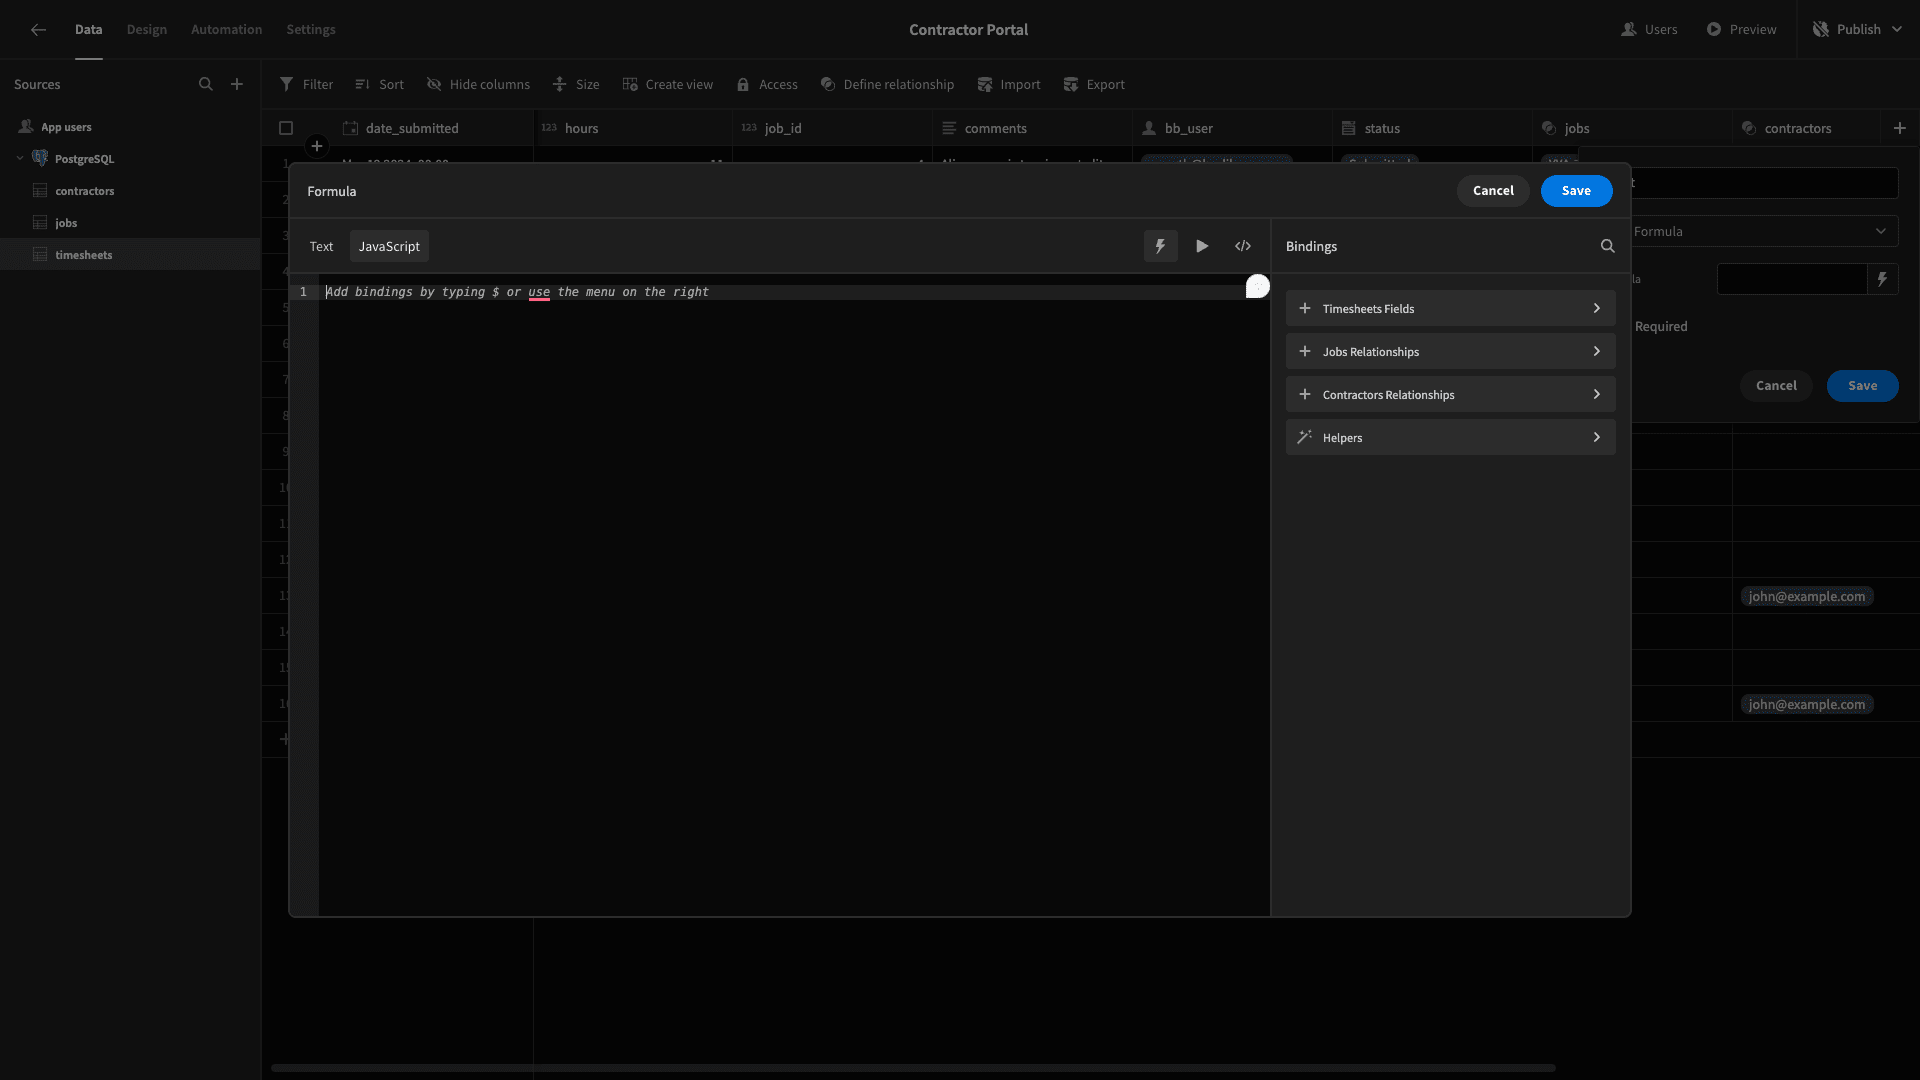
The code we’re going to use is:
1var rate = $("contractors.0.hourly_rate")
2
3var hours = $("hours")
4
5return rate * hours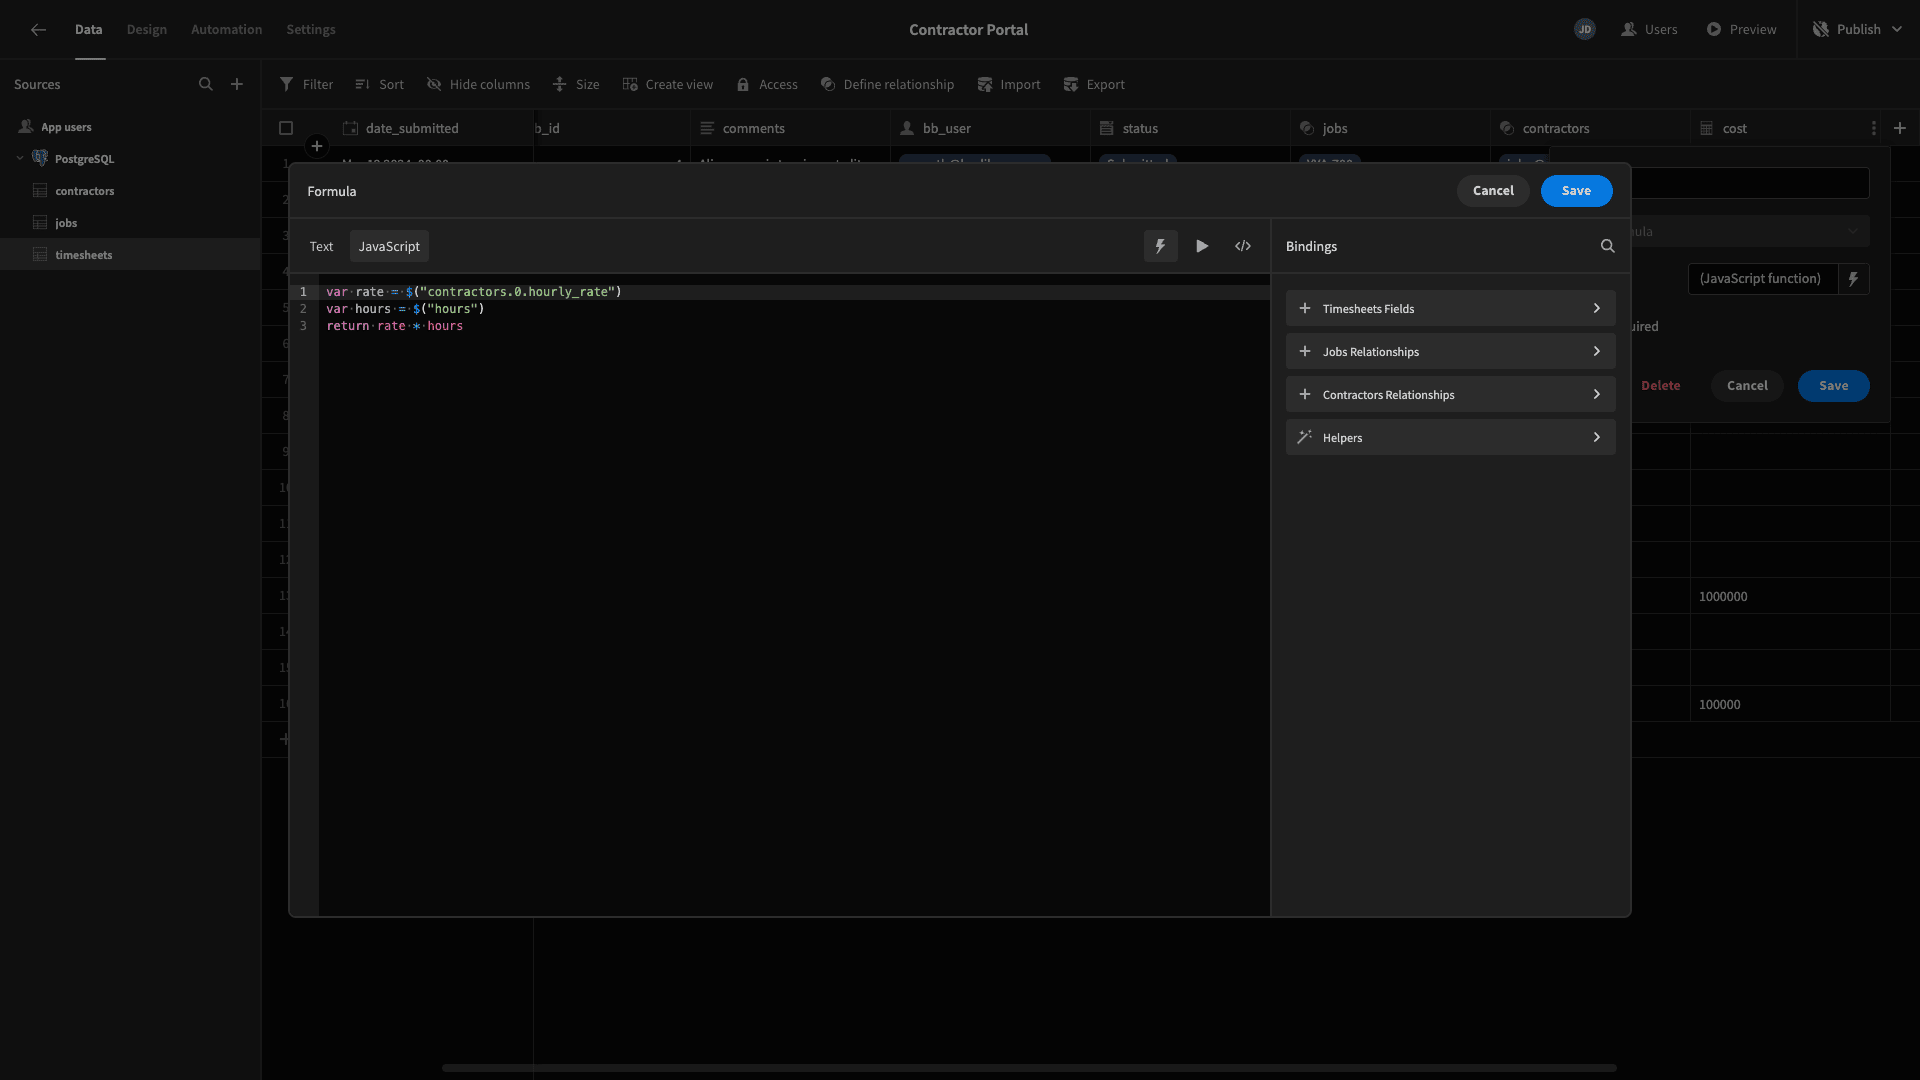
Now, we’ll head back to the Design section.
We’re setting our table to display the date_submitted, hours, status, jobs, contractors, and cost attributes.
In addition to tidying up our display texts, we’re removing our Create Row button and Side Panel since internal users don’t need to add timesheets.
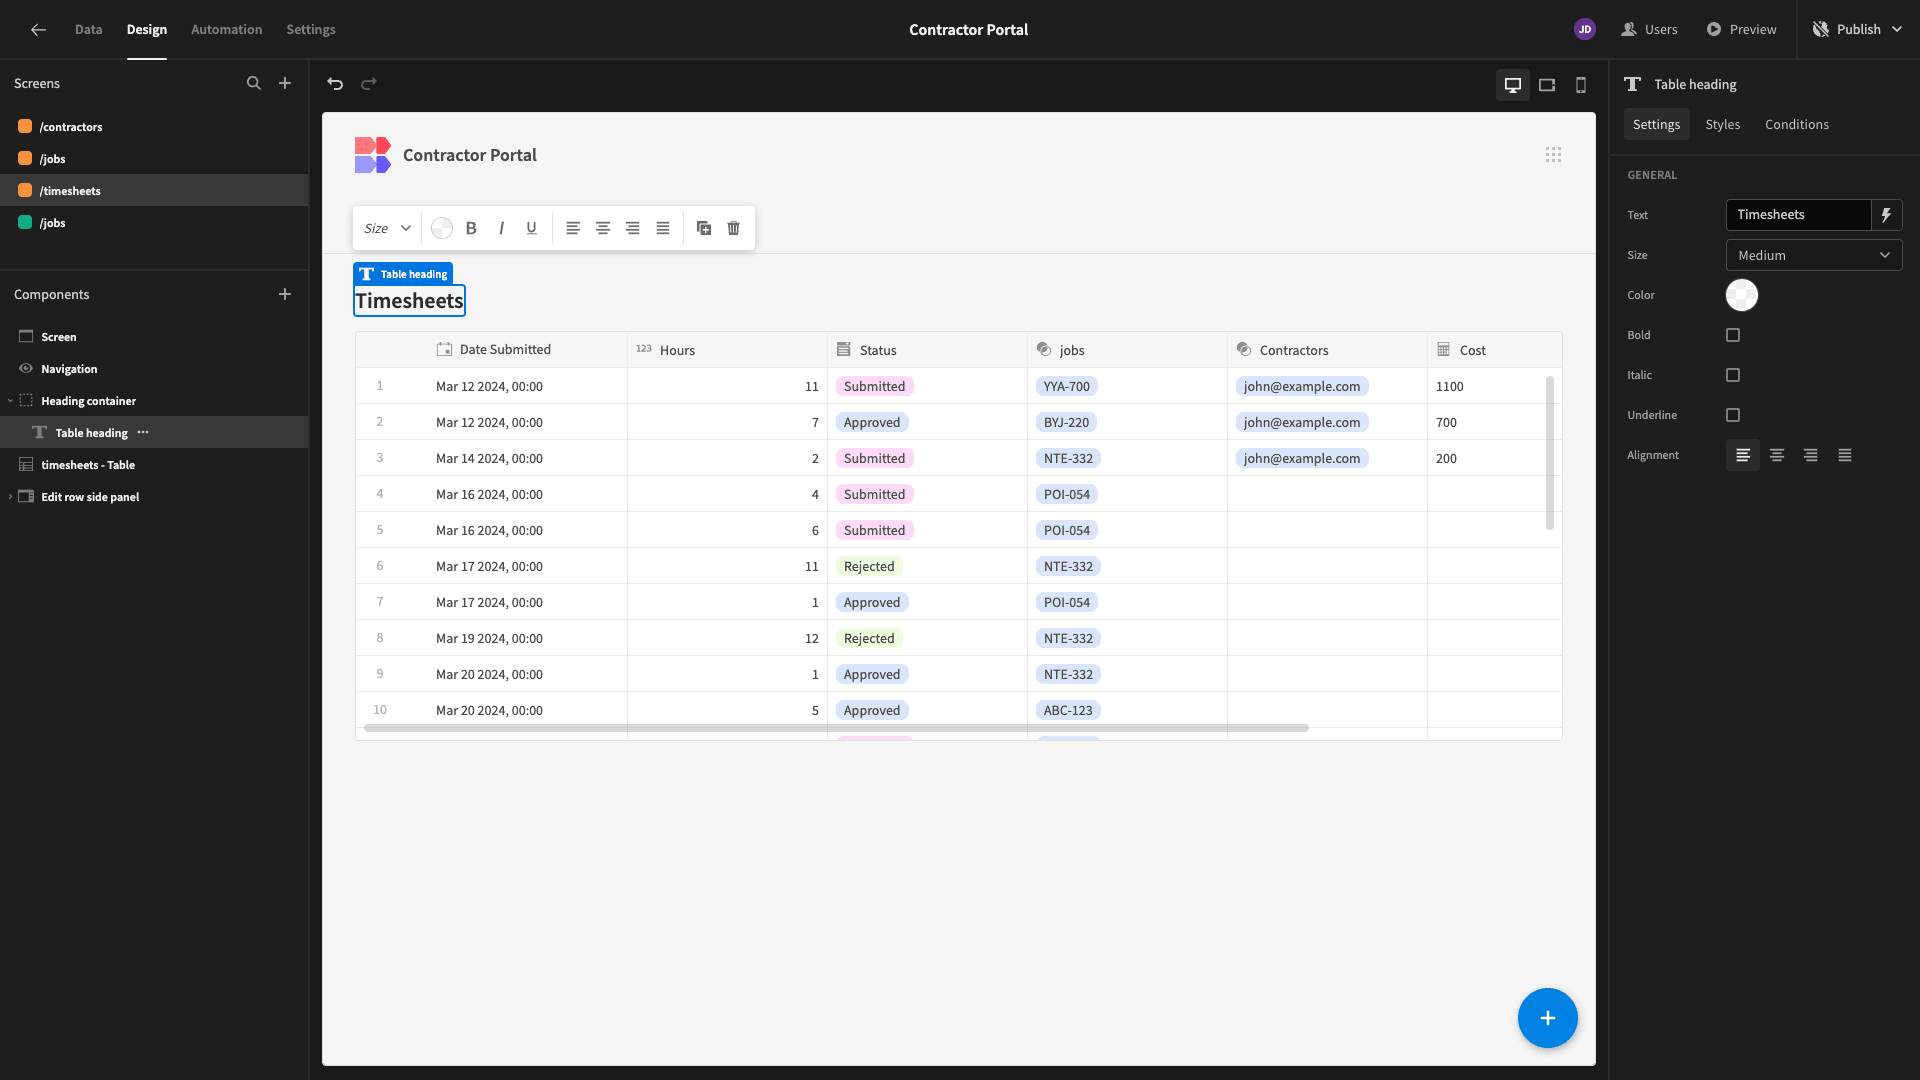
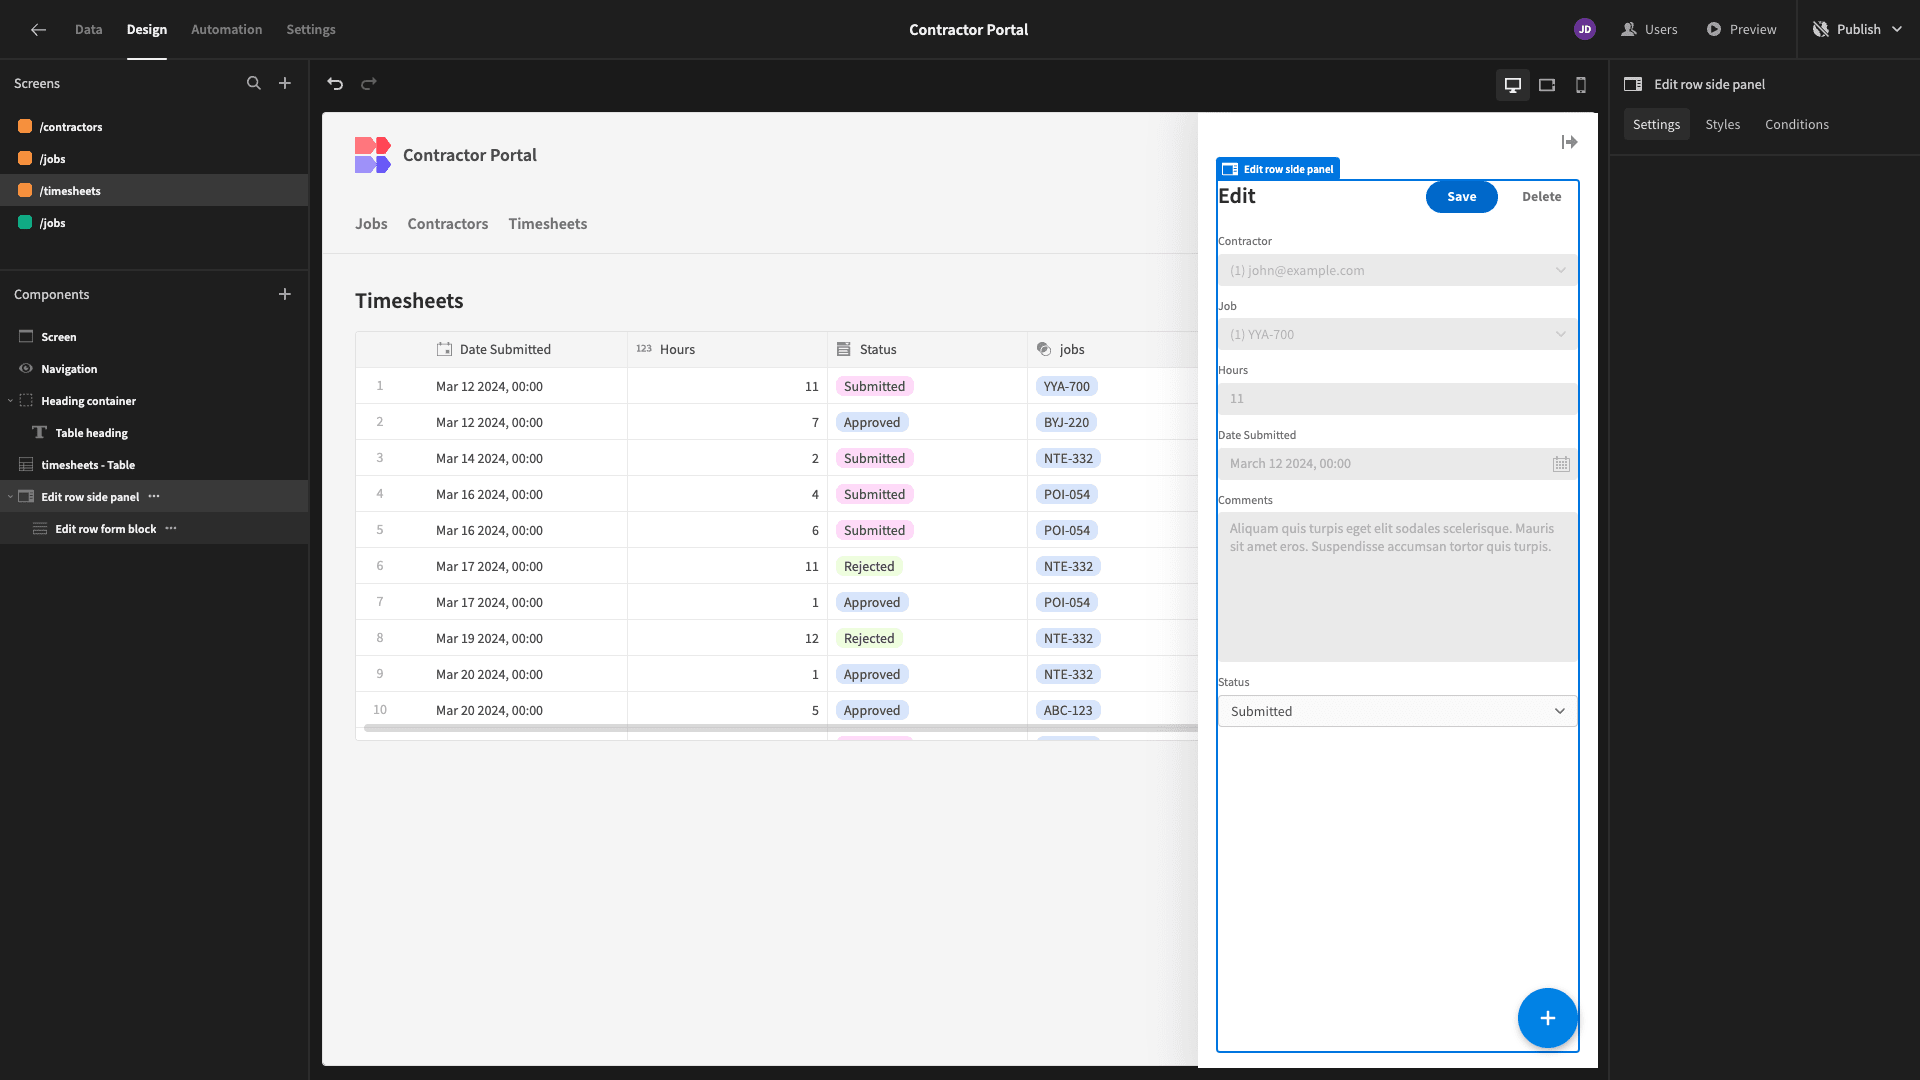
Then, in our Edit Row form, we’ll switch off job_id and bb_user. We’ll then select the Disabled option for all of the remaining form fields except for status. So, internal users can’t update rows except to approve or reject a timesheet.
Jobs
Lastly, we have our jobs table. This time, we want to give full CRUD access again, as well as display the total cost for each job by summing each of the related timesheets.
So, again, we’ll add a formula variable called cost. This one is a little more complex, though. We need to retrieve the hourly_rate from the relevant contractor, then iterate over the related timesheets, calculating the cost of each and adding it to a running total.
We’re also adding statements to simply return zero if either bb_user or timesheets is null.
So, our code is:
 1var initialCost = 0
 2
 3if ($("bb_user") == null){
 4
 5return 0
 6
 7}
 8
 9if ($("timesheets") == null){
10
11return 0
12
13}
14
15if ($("bb_user")!= null){
16
17var timeSheetsCount = $("timesheets").length;
18
19var rate = $("contractors.0.hourly_rate");
20
21 for (i = 0; i < timeSheetsCount; i++){
22
23 var timeSheetCost = rate * $("timesheets." + i + ".hours")
24
25 initialCost += timeSheetCost;
26
27 }
28
29}
30
31return initialCost
Back to the Design tab, we’ll simplify our table again, this time only displaying the job_number, due_date, status, contractors, and cost attributes.
For both of our forms, we’re going to deselect the timesheets and contractors fields, along with tidying up our display texts.
The only additional thing we need to do is set the default value of our status attribute to Open for new entries.
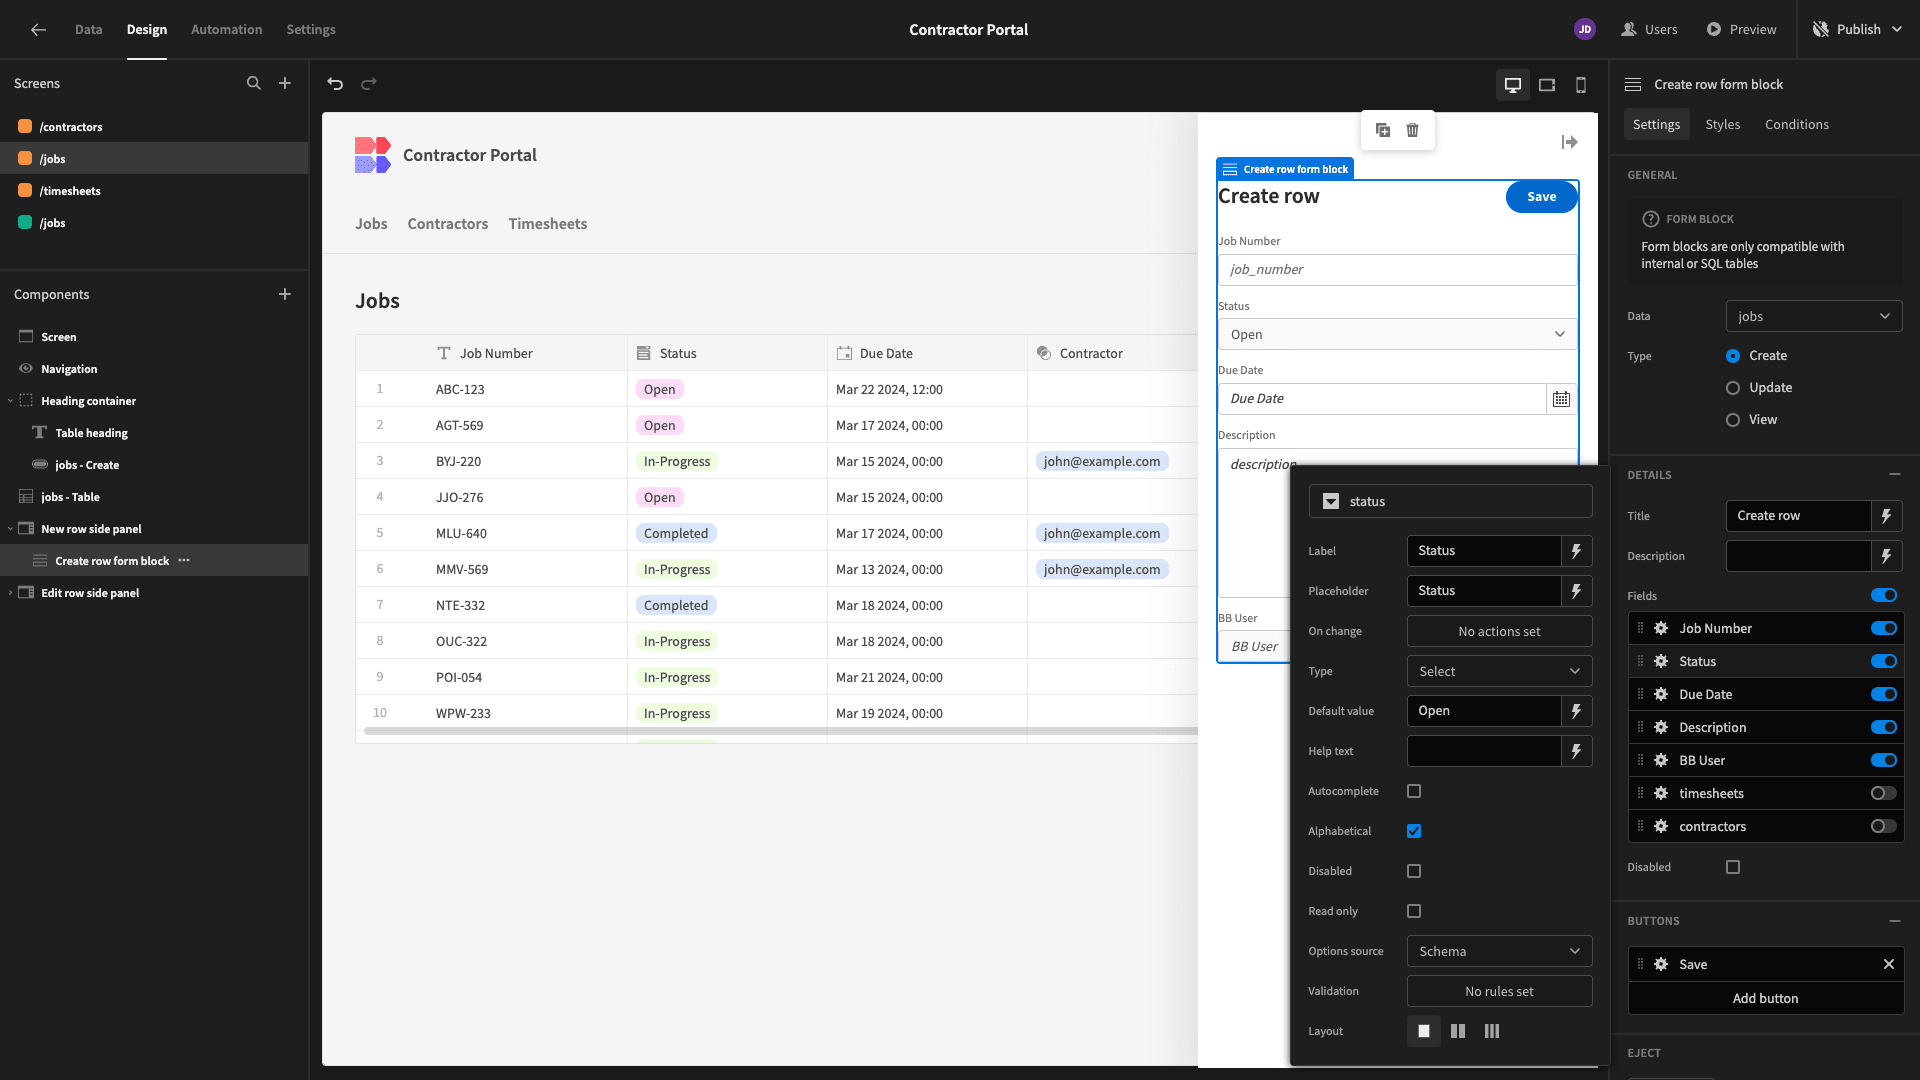
And that’s our final screen completed.
4. Design tweaks and publishing
Our contractor portal is almost ready to push live. However, before we do this, we want to make a few app-wide design changes before we do this.
First, our navigation bar is only really necessary for Power users, whereas our Basic users can only actually access one screen.
Head to Navigation and hit Configure Links. Here we can set the minimum role for displaying each of our navigation links to Power.
Now, the navigation menu will be hidden for Basic users.

Lastly, under Screen, we’ll set our app’s theme to Midnight.
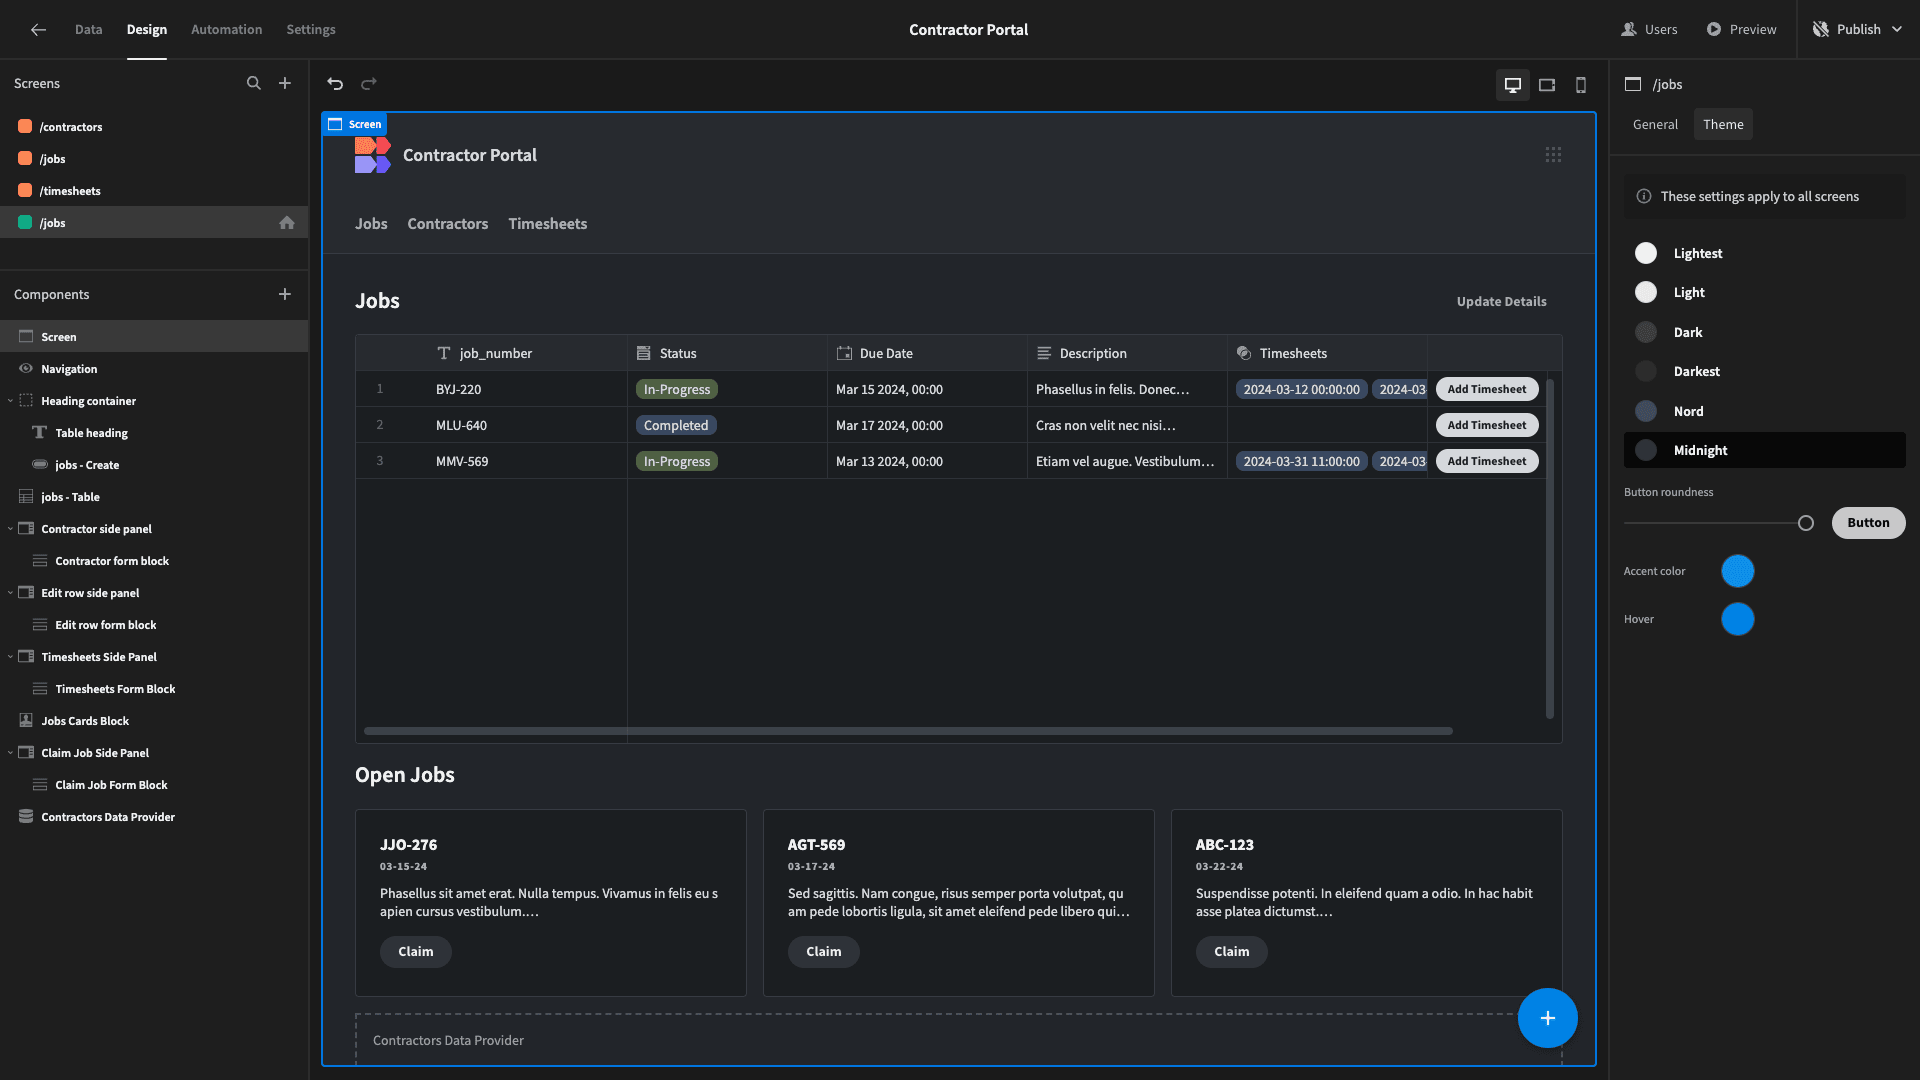
When we’re ready, we can hit publish to push our contractor portal live.
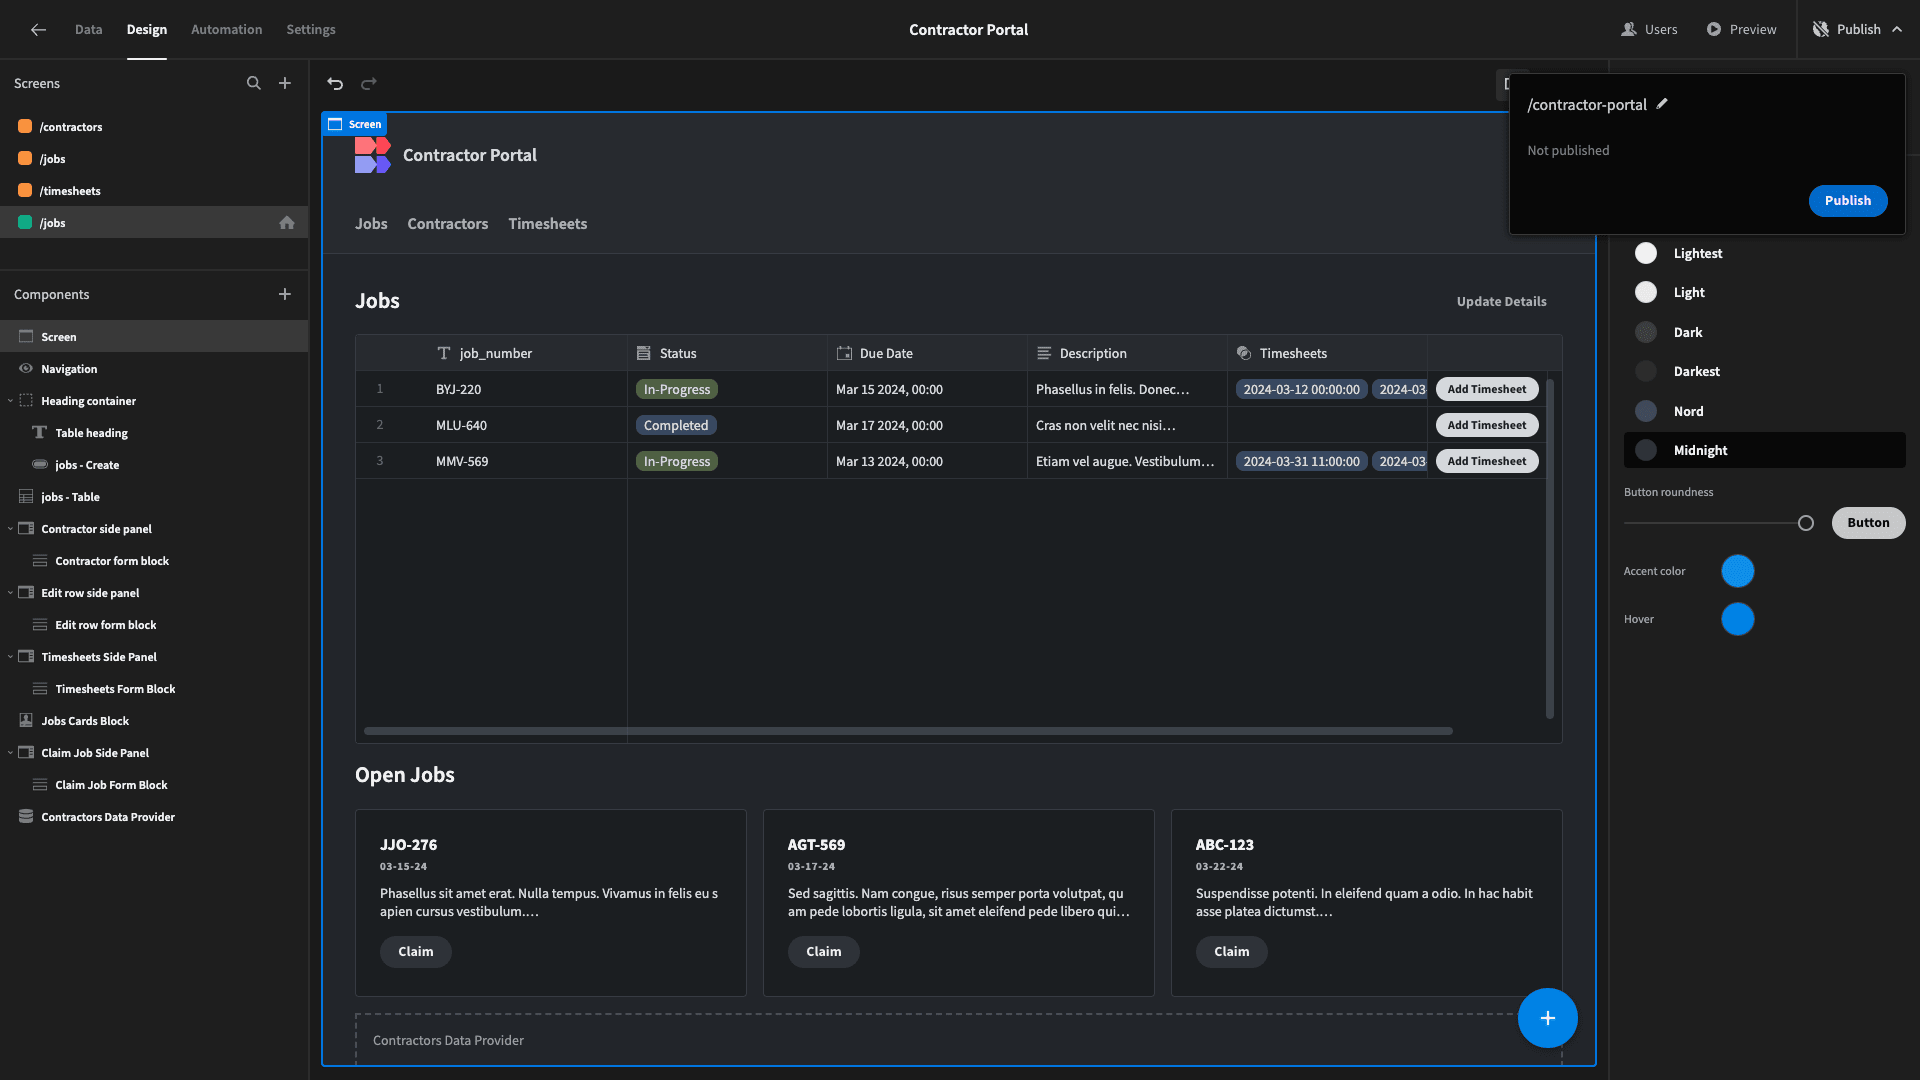
Here’s a reminder of what the finished thing looks like.

Budibase is the fast, easy way to build custom portals on top of just about any data source.
To learn more, check out our portal development page.