Public forms - how to build a public form in minutes
What is a public form
A public form is a digital form that is accessible to anyone on the internet. The difference between a public and private form is the access level. Private forms are only accessible to predefined users behind a secure log-in.
Public form examples
There are many examples where a user may want to create a public form. I’ve listed a few of these scenarios below:
A public survey.
Login form.
Sign up form.
Contact form.
Application form.
Information request form.
A COVID test response form.
A registration form.
Online payments.
Order forms.
Social media marketing.
The internet is increasingly made up of forms. It’s how we retrieve and update data, which is why there are different types of forms.
Public forms software
Public forms allow organizations to collect data from customers, prospects, partners, and stakeholders. But creating the actual public form requires software or an app. This might be a dedicated online form creator, form maker, Google Workspace, or any other platform that allows you to create a form.
Given that this is a recurring need for businesses there are many options for public forms software. There are a few things to keep in mind when you are picking the right tool for your forms though.
Firstly, there’s the pricing point. There are free forms that are quite limited, Then there are very expensive solutions, along with a wide range of options in-between. So figuring out how much you want to spend on it is crucial.
Then, you need to consider your requirements. Some public forms are self-hosted, so you control the source code. Others aren’t, so you need to redirect users to a third-party website.
Also, there are laws regarding what kind of authorization you need to process this data, in particular, if it is stored with an external app. There’s also what kind of data you can integrate your form with. For instance, Google Sheets, a database, or some other data source.
The most powerful forms can even save time by initiating automation actions based on form clicks.
And finally, there is the usability aspect of building a public form. You might find a free option, but if it’s too hard for users to interact with it, you might not be able to get the data you want.
In this article, we teach you how to build your public forms using Budibase, so that you can build forms for free with simple dra-ang-drop actions. You can use the cloud version, or host it yourself if you want. In addition, you can customize the forms in any way you want to, including complex components beyond just public forms.
Form types
Broadly speaking forms can be pigeonholed into the following two categories; single-step and multi-step.
Single-step forms
If you think of a form, this is probably what you picture. A simple, vertical flowing form that spans one screen, usually with a submit button. These types of forms are perfect when your form consists of a few simple inputs - as a rule of thumb, if you have more than 6 inputs, you should consider a multi-step form.
Examples of single-step forms
Multi-step forms
Multi-step forms are forms that span across multiple screens. They are also known as stepper forms and generally consist of 1 or 2 questions per screen. Multi-step forms are great when you’ve got a lot of inputs within your form or when you need to add media/explanations to questions.
Examples of multi-step forms
Building a public form
How to build a single-step public form
Both Budibase and Google Forms are great options for building a public form (single-step). Google Forms is free, proprietary software. The data submitted within your form is hosted with Google. On the other hand, Budibase is free, open-source, and perfect for building forms ; therefore, it’s possible to quickly build forms and store your data in the safety of your infrastructure. For this guide, we will use Budibase.
Step 1. Sign up for Budibase
If you’ve not signed up for Budibase, you can register here . Simply complete the sign-up process - it only takes a few seconds - and you’ll be ready to take the next step.
Step 2. Create a new app
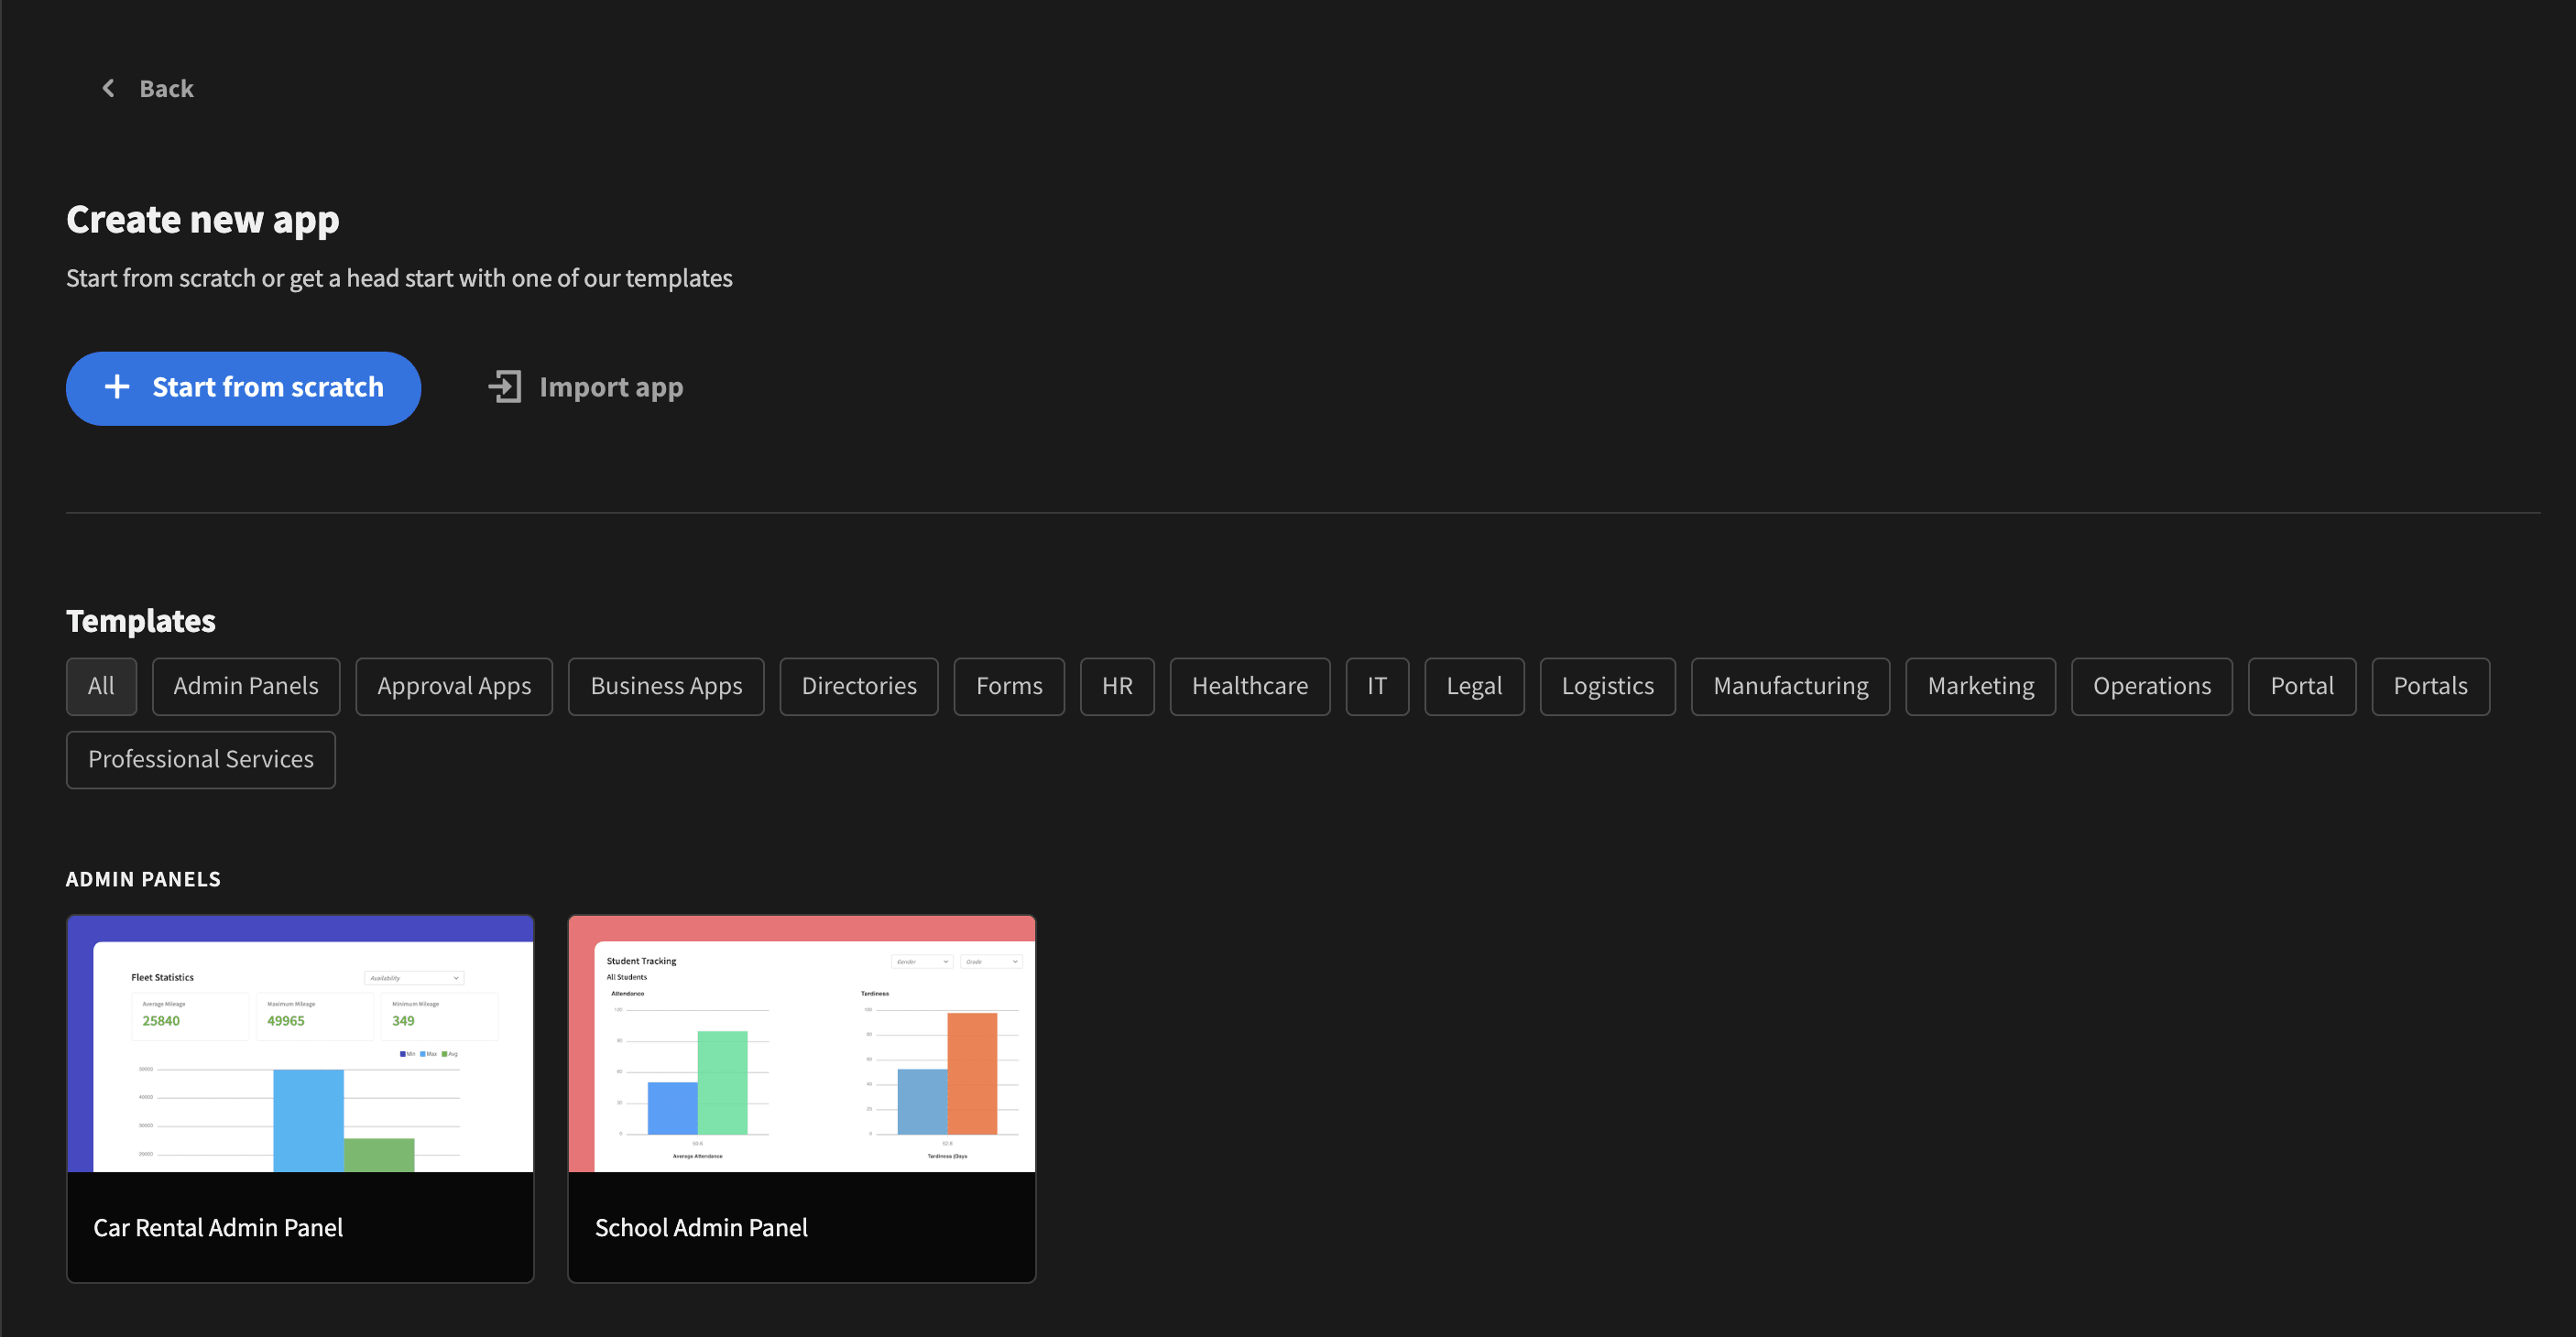
Click the ‘Create new app’ button, then click the ‘Start from scratch’ button. Name your app (only use letters, no spaces or special characters) - we’ll name our app Form. Budibase will generate a URL for you. If you are happy with the URL, click ‘Create app’.
Step 3. Set up your database
For demonstration purposes, we will use the Budibase DB as our data source. This is the easiest and fastest way to build a public form with Budibase.
You can also build forms using MySQL, Postgres, Airtable, MongoDB, Rest APIs, and more. We’ll cover each of these data sources in a different tutorial.
Click Budibase DB, then click ‘Continue’. Name your table: ‘Public Form’. And finally, click the ‘Create’ button.
Step 4. Create your data structure
Now that we’ve set up our database, we need to build its structure by adding fields/columns.
- Click the ‘Create column’ button, and name it
Name. Then click ‘Save column’. - Click the ‘Create column’ button, and name it
Email. Then click ‘Save column’. - Click the ‘Create column’ button, and name it
Company. Then click ‘Save column’. - Click the ‘Create column’ button, and name it
Company size. Click the Type dropdown and select ‘Options’. In the options text box (bottom) add the following (one per line):1 - 1011 - 100101 - 10001001+
Then click ‘Save column’.
- The final step within our data section, and a very important one, is to change the access of our database. To do this, click the ‘Manage access’ button. Then set both the Write and Read levels to ‘Public’. Click ‘Done’.

Step 5. Create your public screen
Navigate to the Design section of the Budibase builder. There are two ways to build a public form within Budibase; autogenerate screens (including a form), or build our form from scratch. In this demonstration, we will build our form from scratch.
Your first step is to change the access from Basic to Public (Filter by access dropdown under the Screens tab).
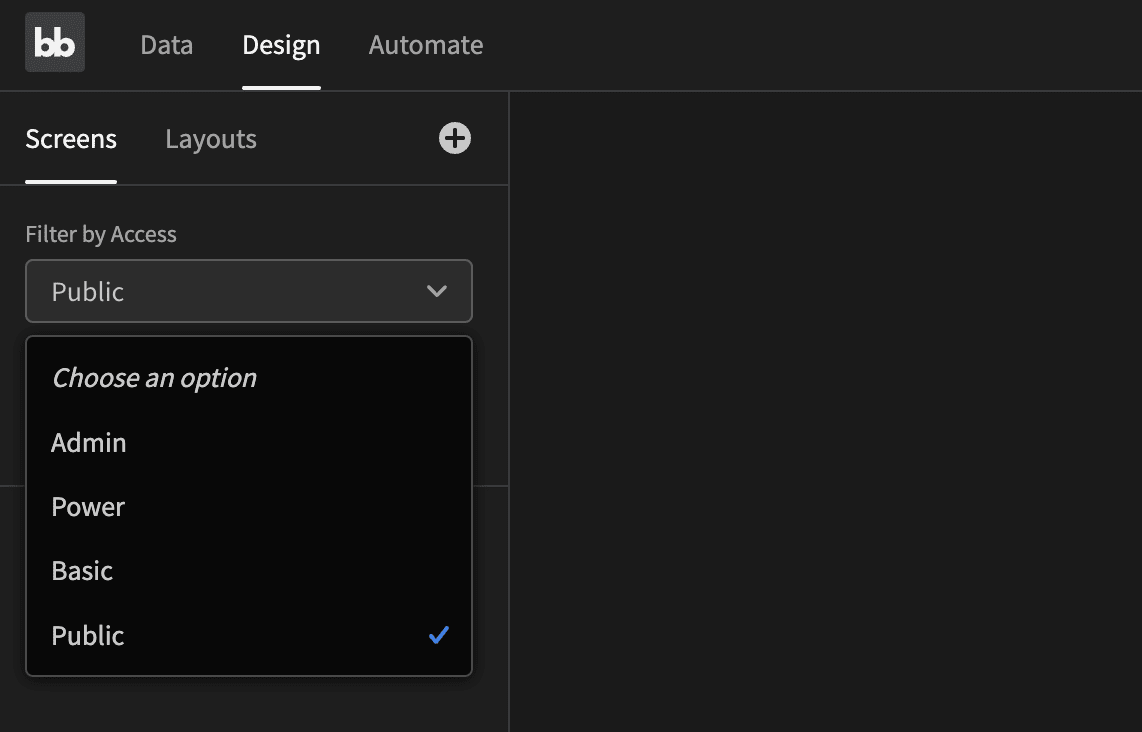
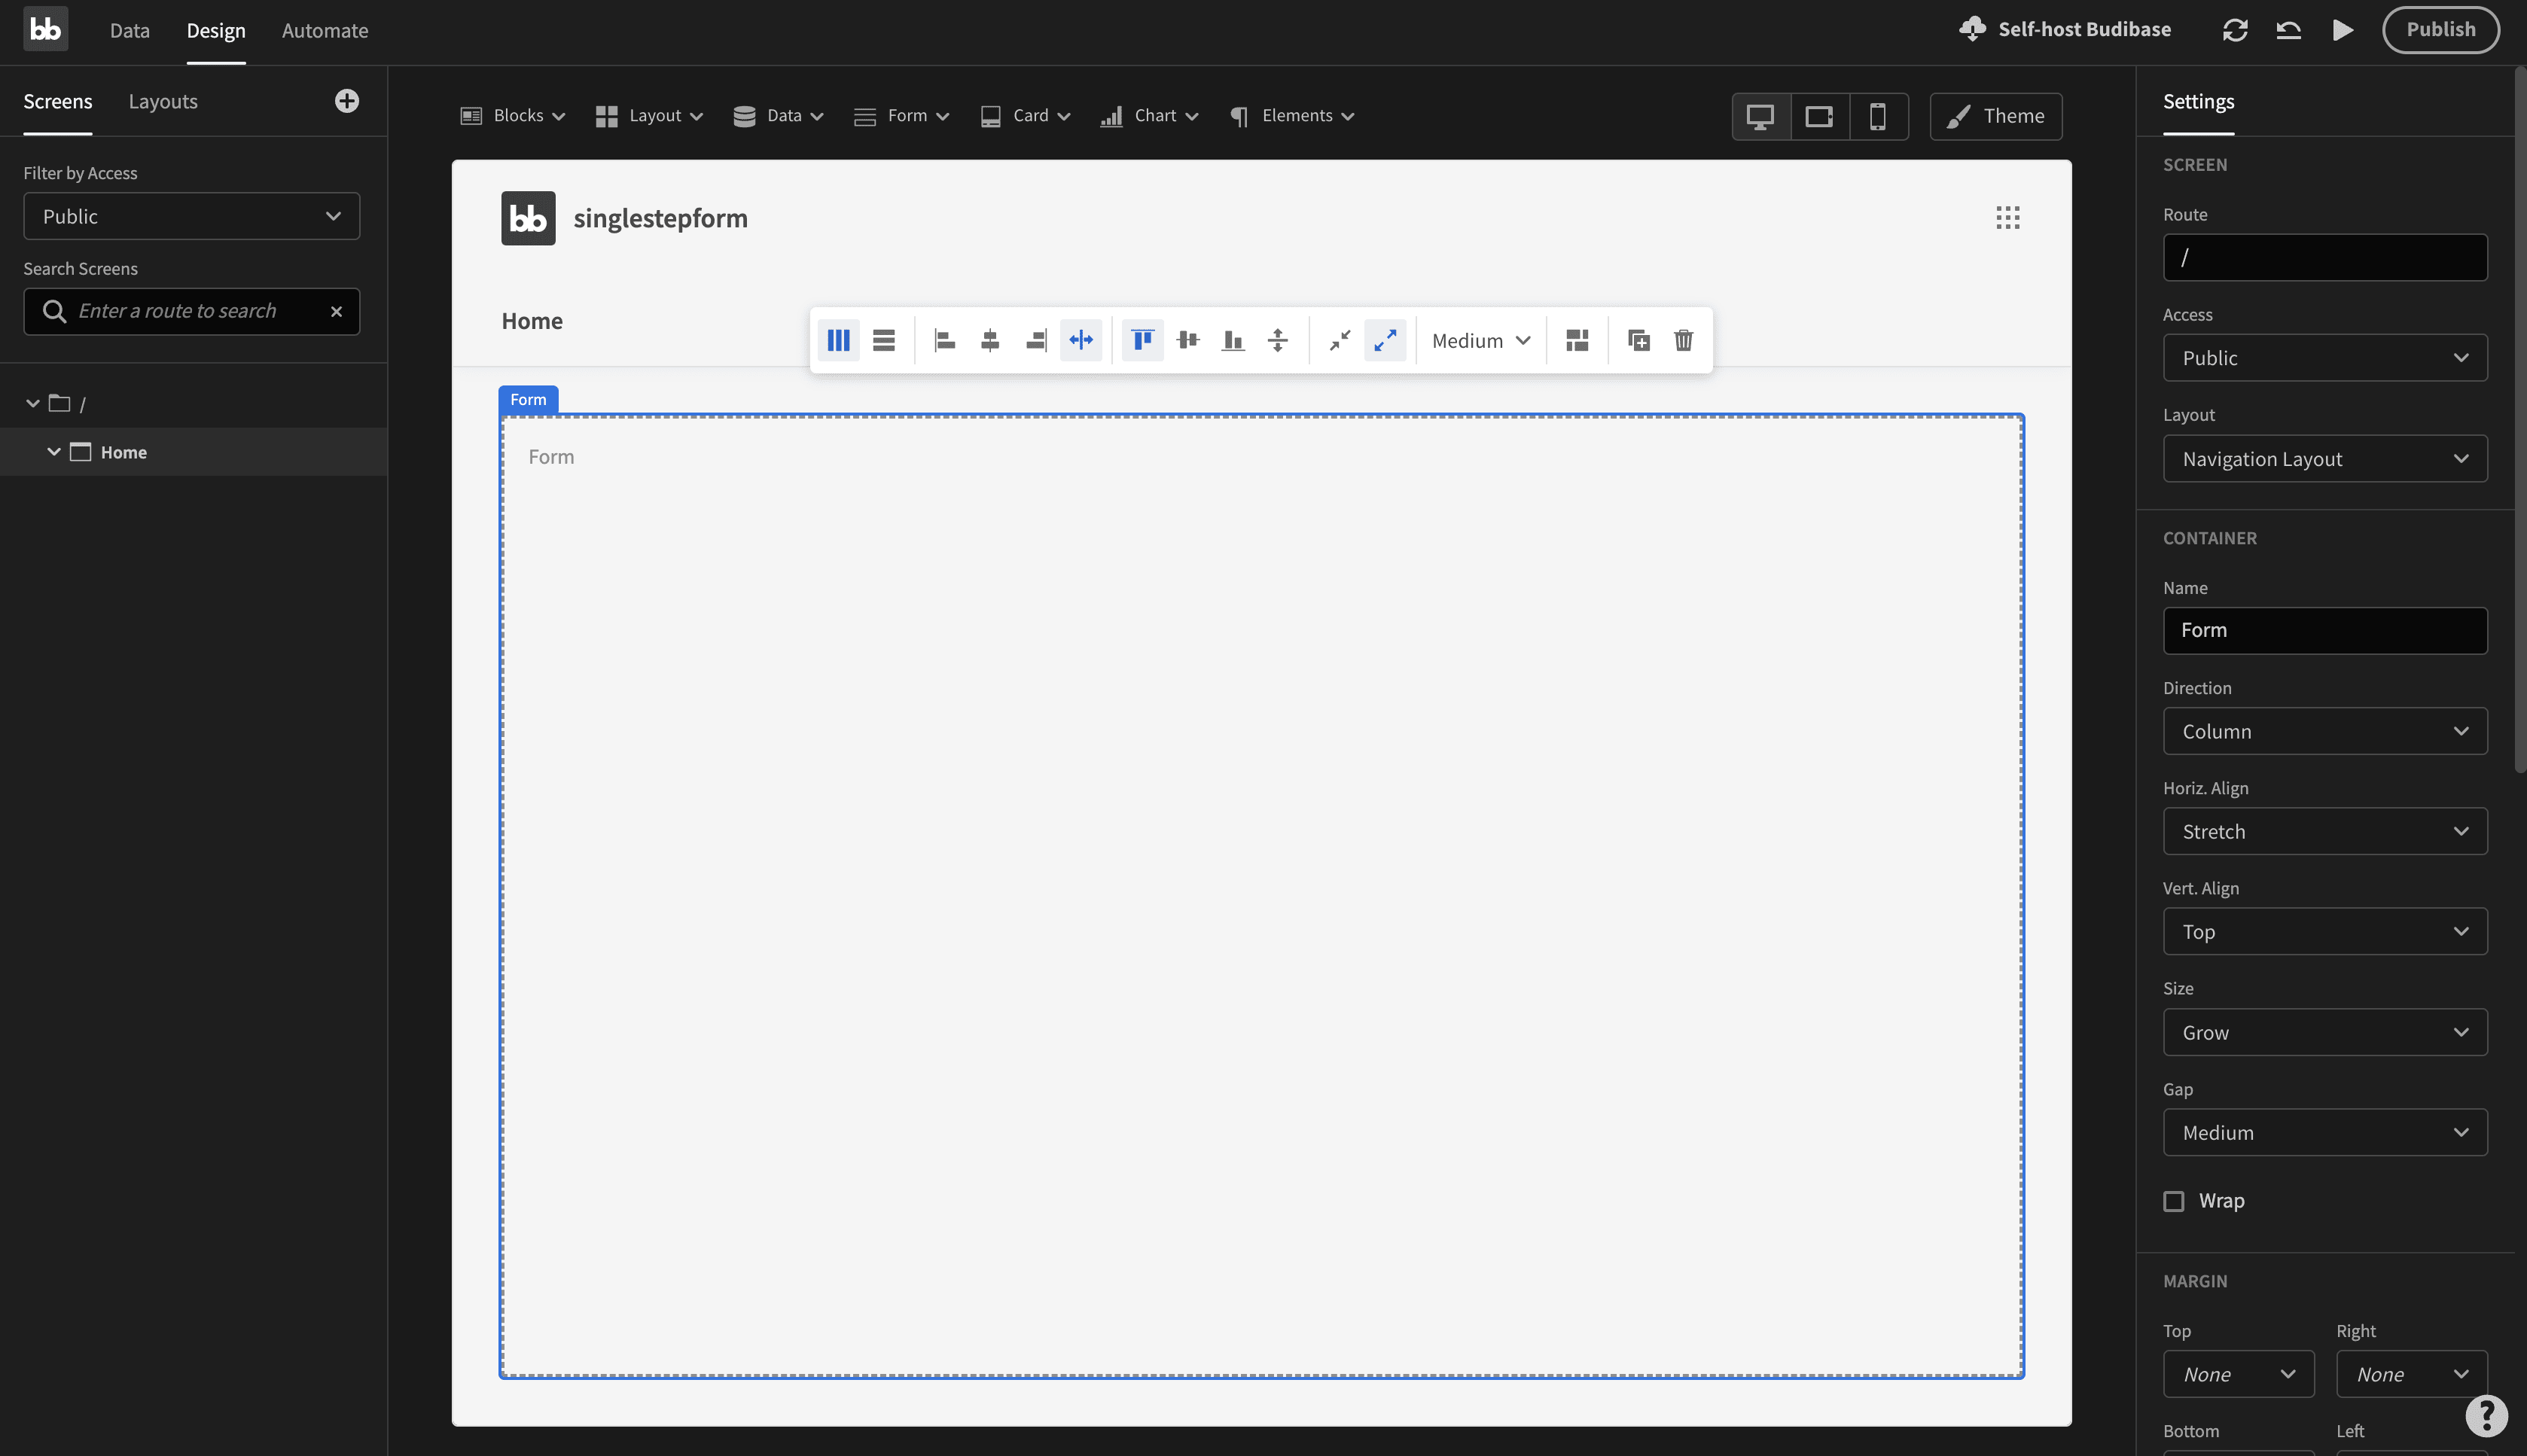
Now click the ‘+ Add screen’ button. Select ‘Blank’ and click ‘Add screens’. Name your screen Form and use / as the URL. Your screen will now look like this:
Step 6. Build your public form
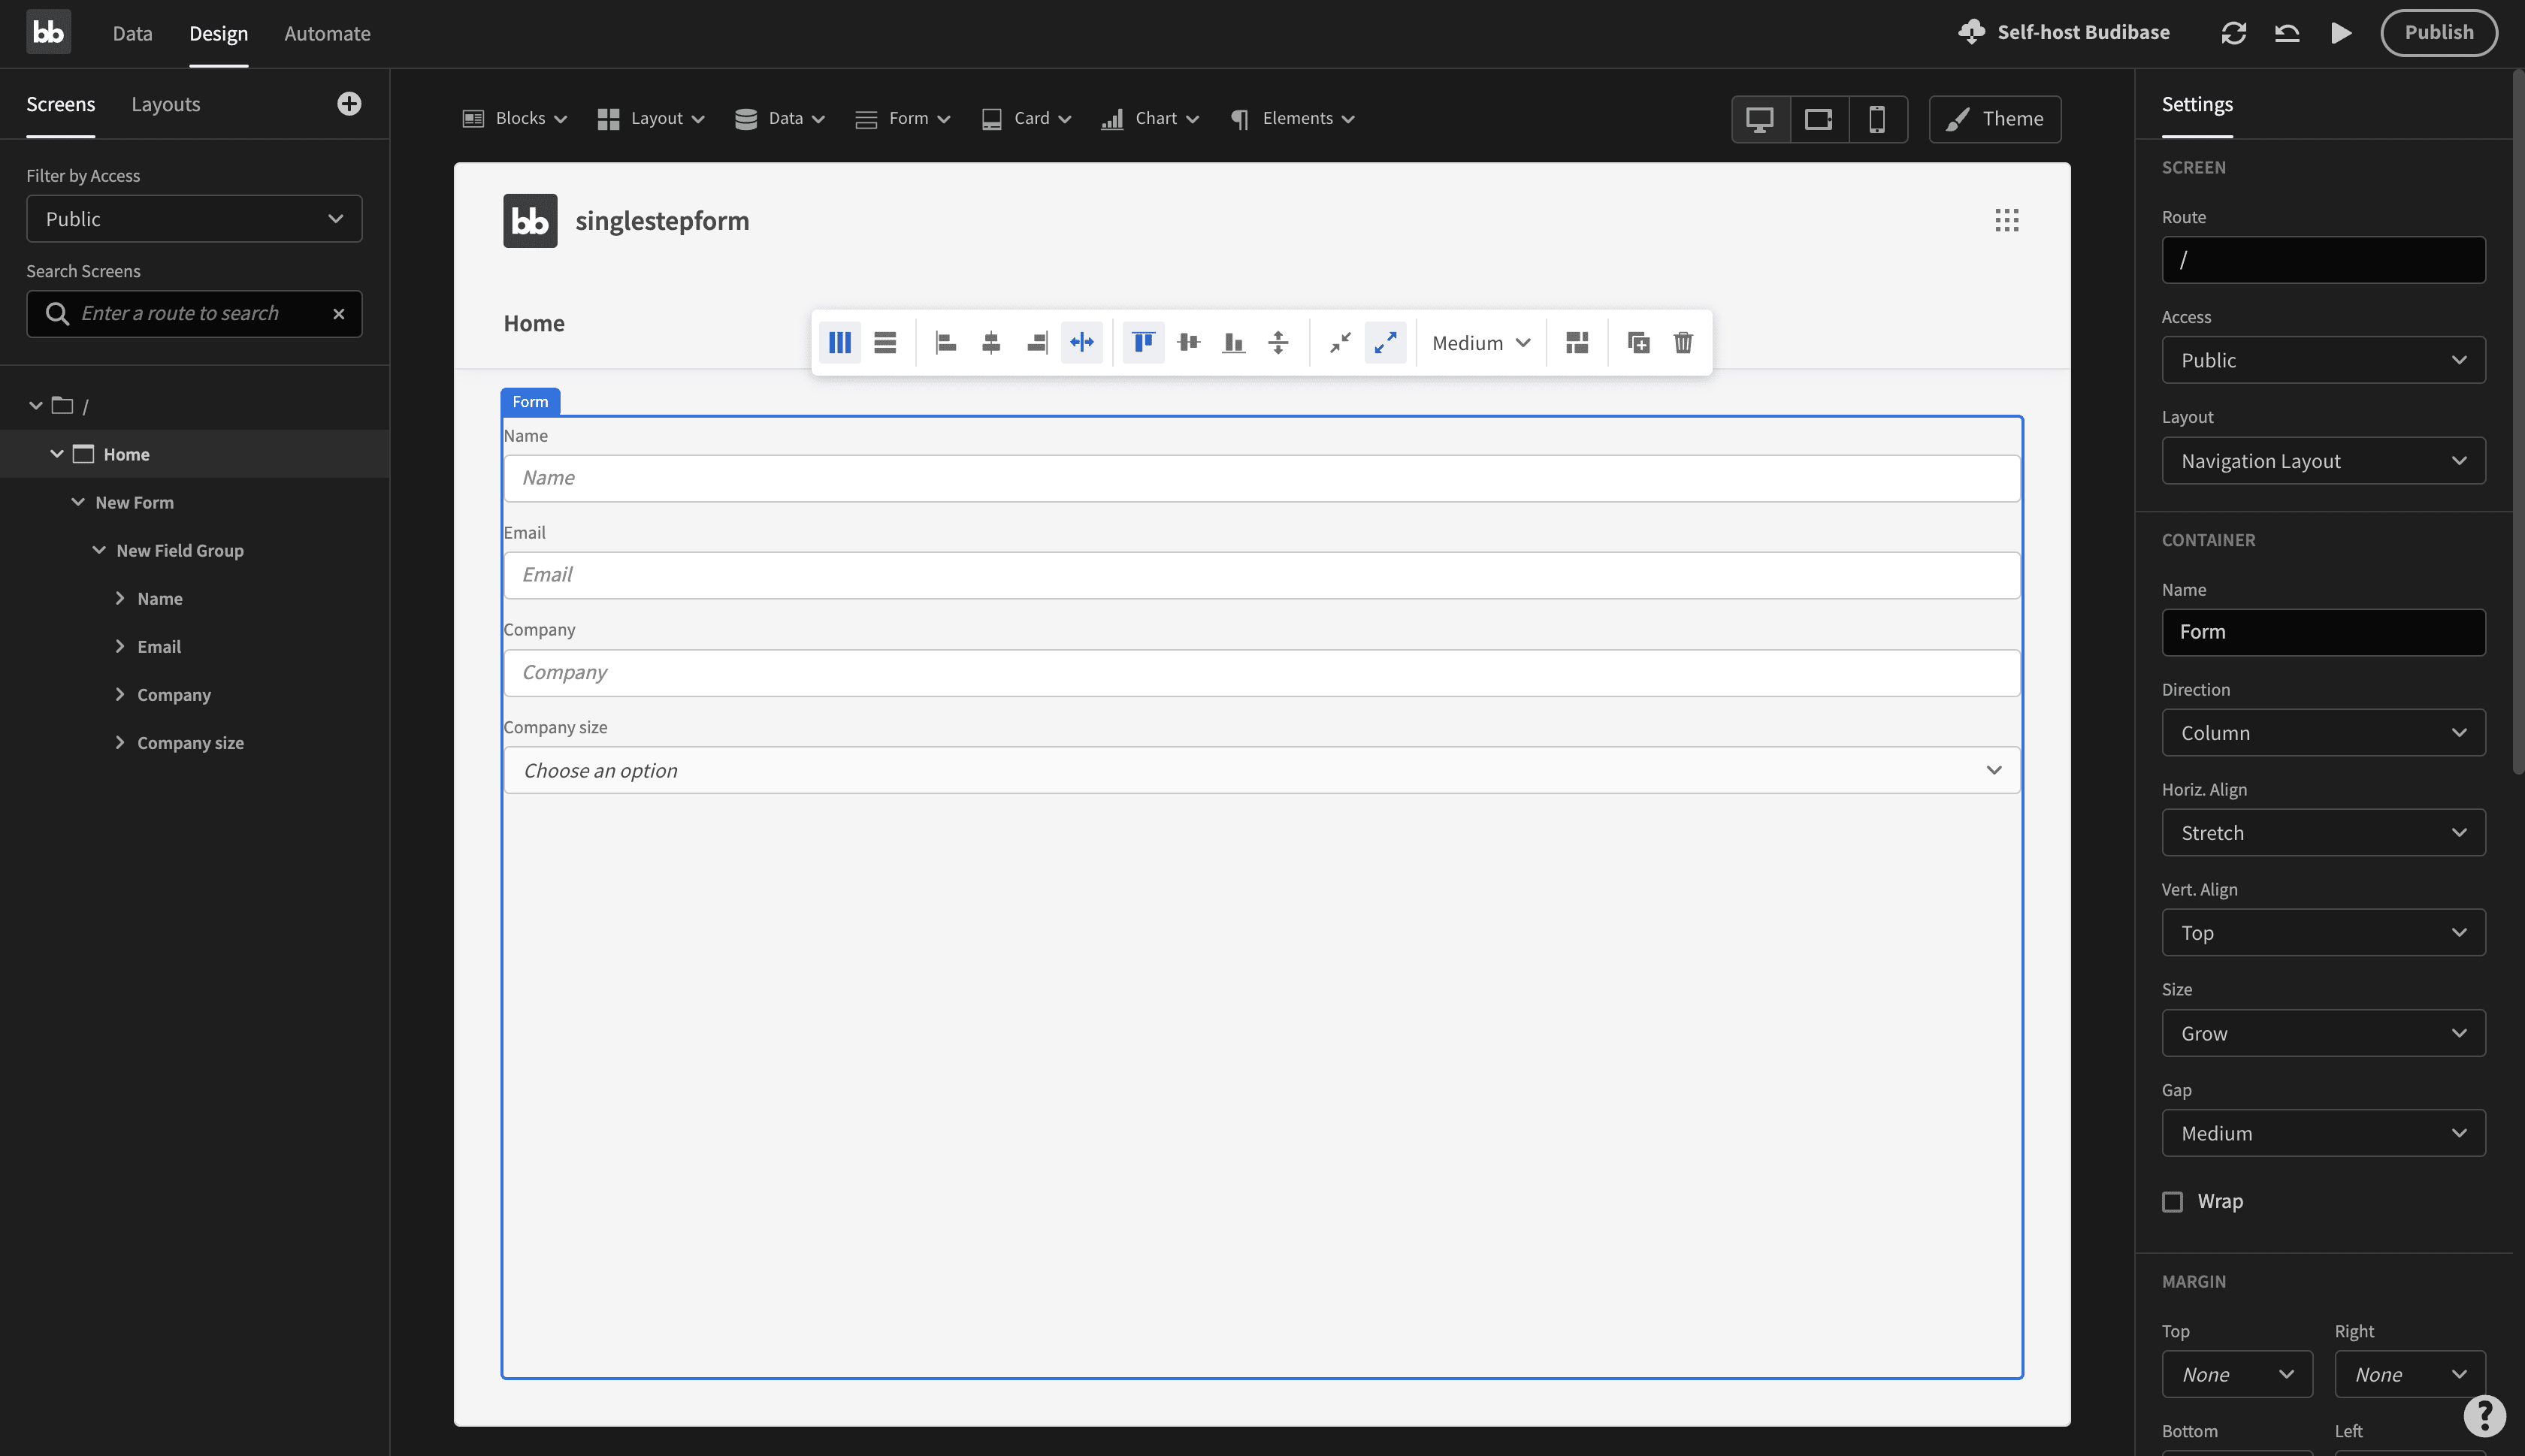
First, we will add a Form component. You will find this under the Form dropdown. In the settings panel (to the right of your screen), under the Schema label, select the dropdown and select Public Form.
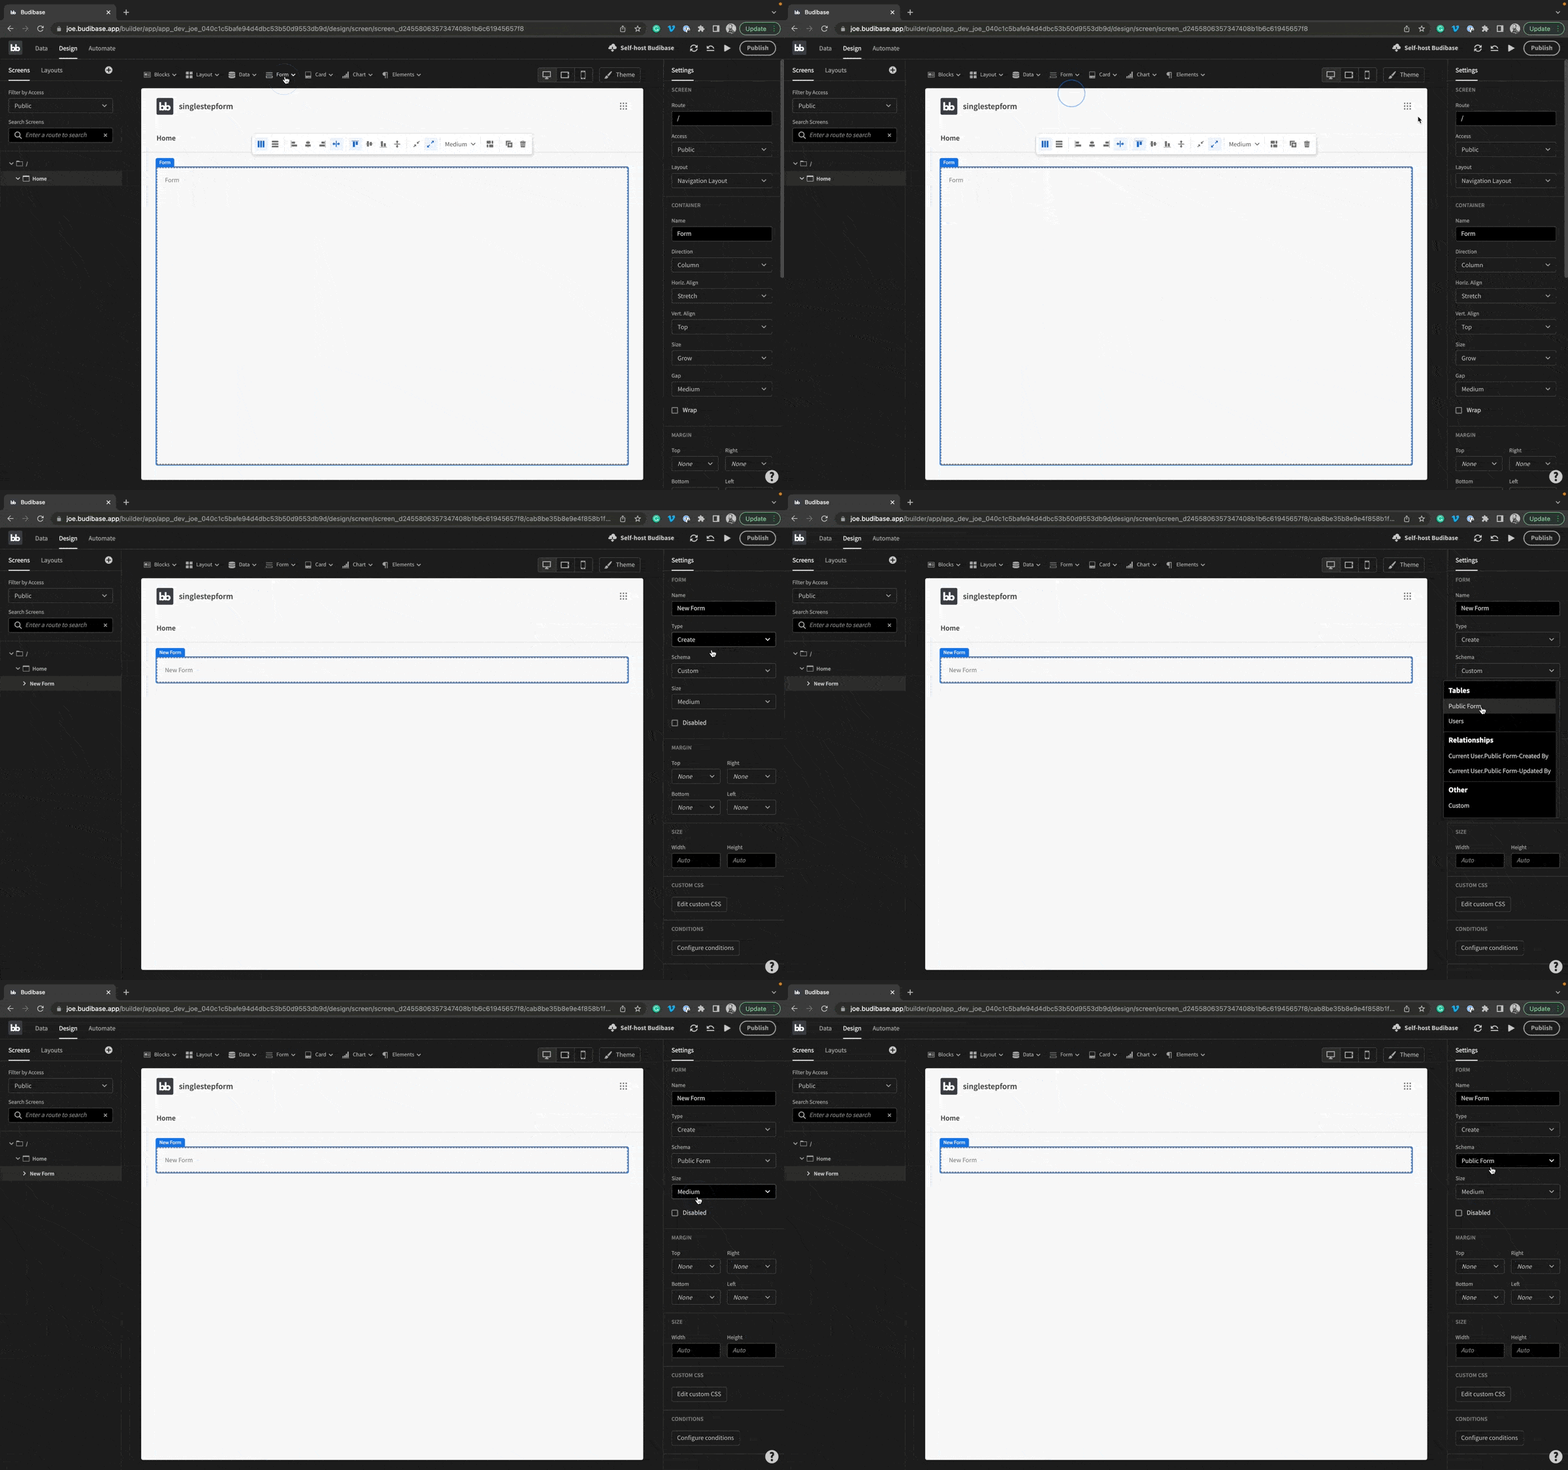
Now, add a Field Group component (under the Form dropdown). In the settings panel, click the ‘Update form fields’ button, then click ‘Update’. Your screen should now look like this:
Step 7. Add and configure submit button
To complete the creation of our public form, we will add a submit button. To add a button, click the Elements dropdown, and select Button. In the settings panel, under the Text label, update the button’s text to Submit
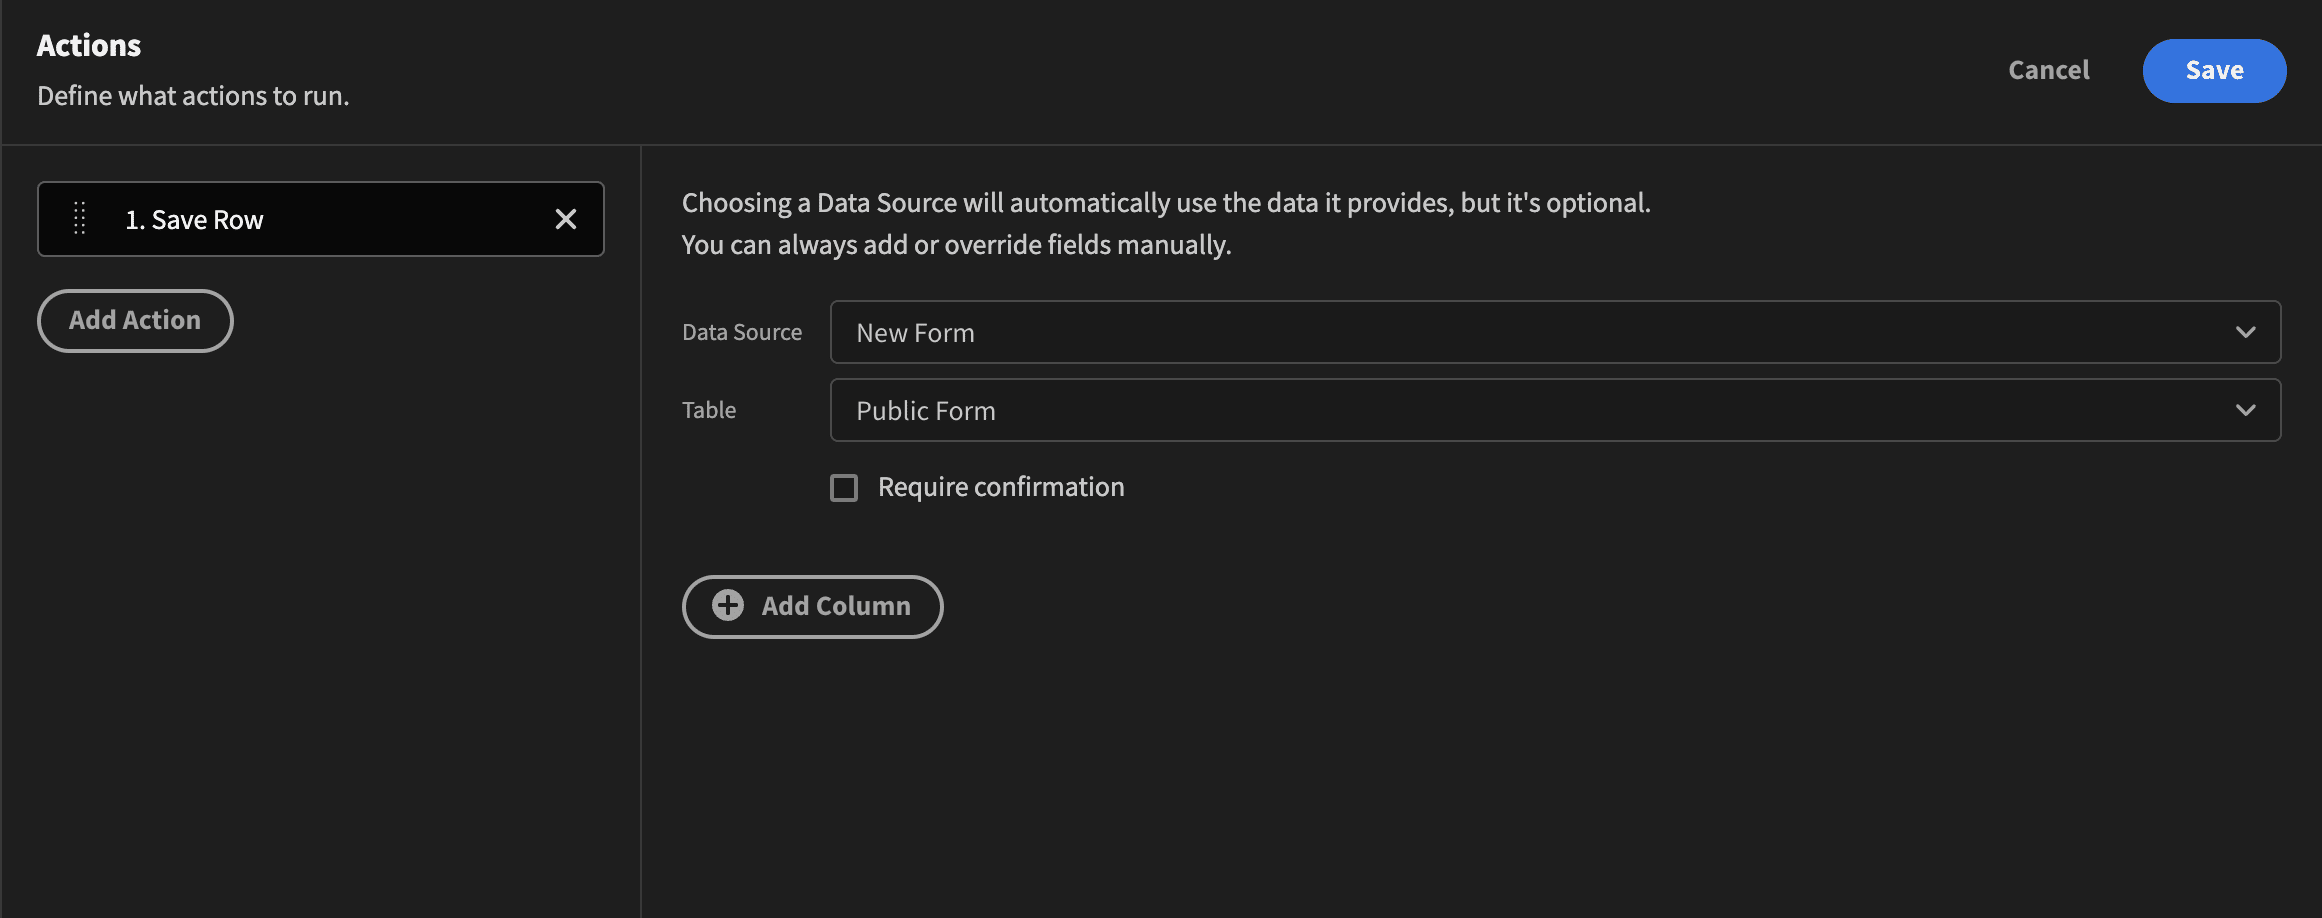
We now need to tell our button what to do when clicked. To do this, under the label On Click, click the Define actions button. Now click the `Add Action’ button, and select ‘Save Row’. Change the Data source to ‘New Form’ (the name of your form component in the tree) and Table to ‘Public Form’ (the name of your table). Click ‘Save’. Our form is now fully operational.
Step 8. Style our new form
Our form is looking a little lustreless. Let’s bring it to live with some style updates. First, we’ll remove our navigation by clicking Layouts, then in the settings panel, selecting ‘None’ under Navigation.
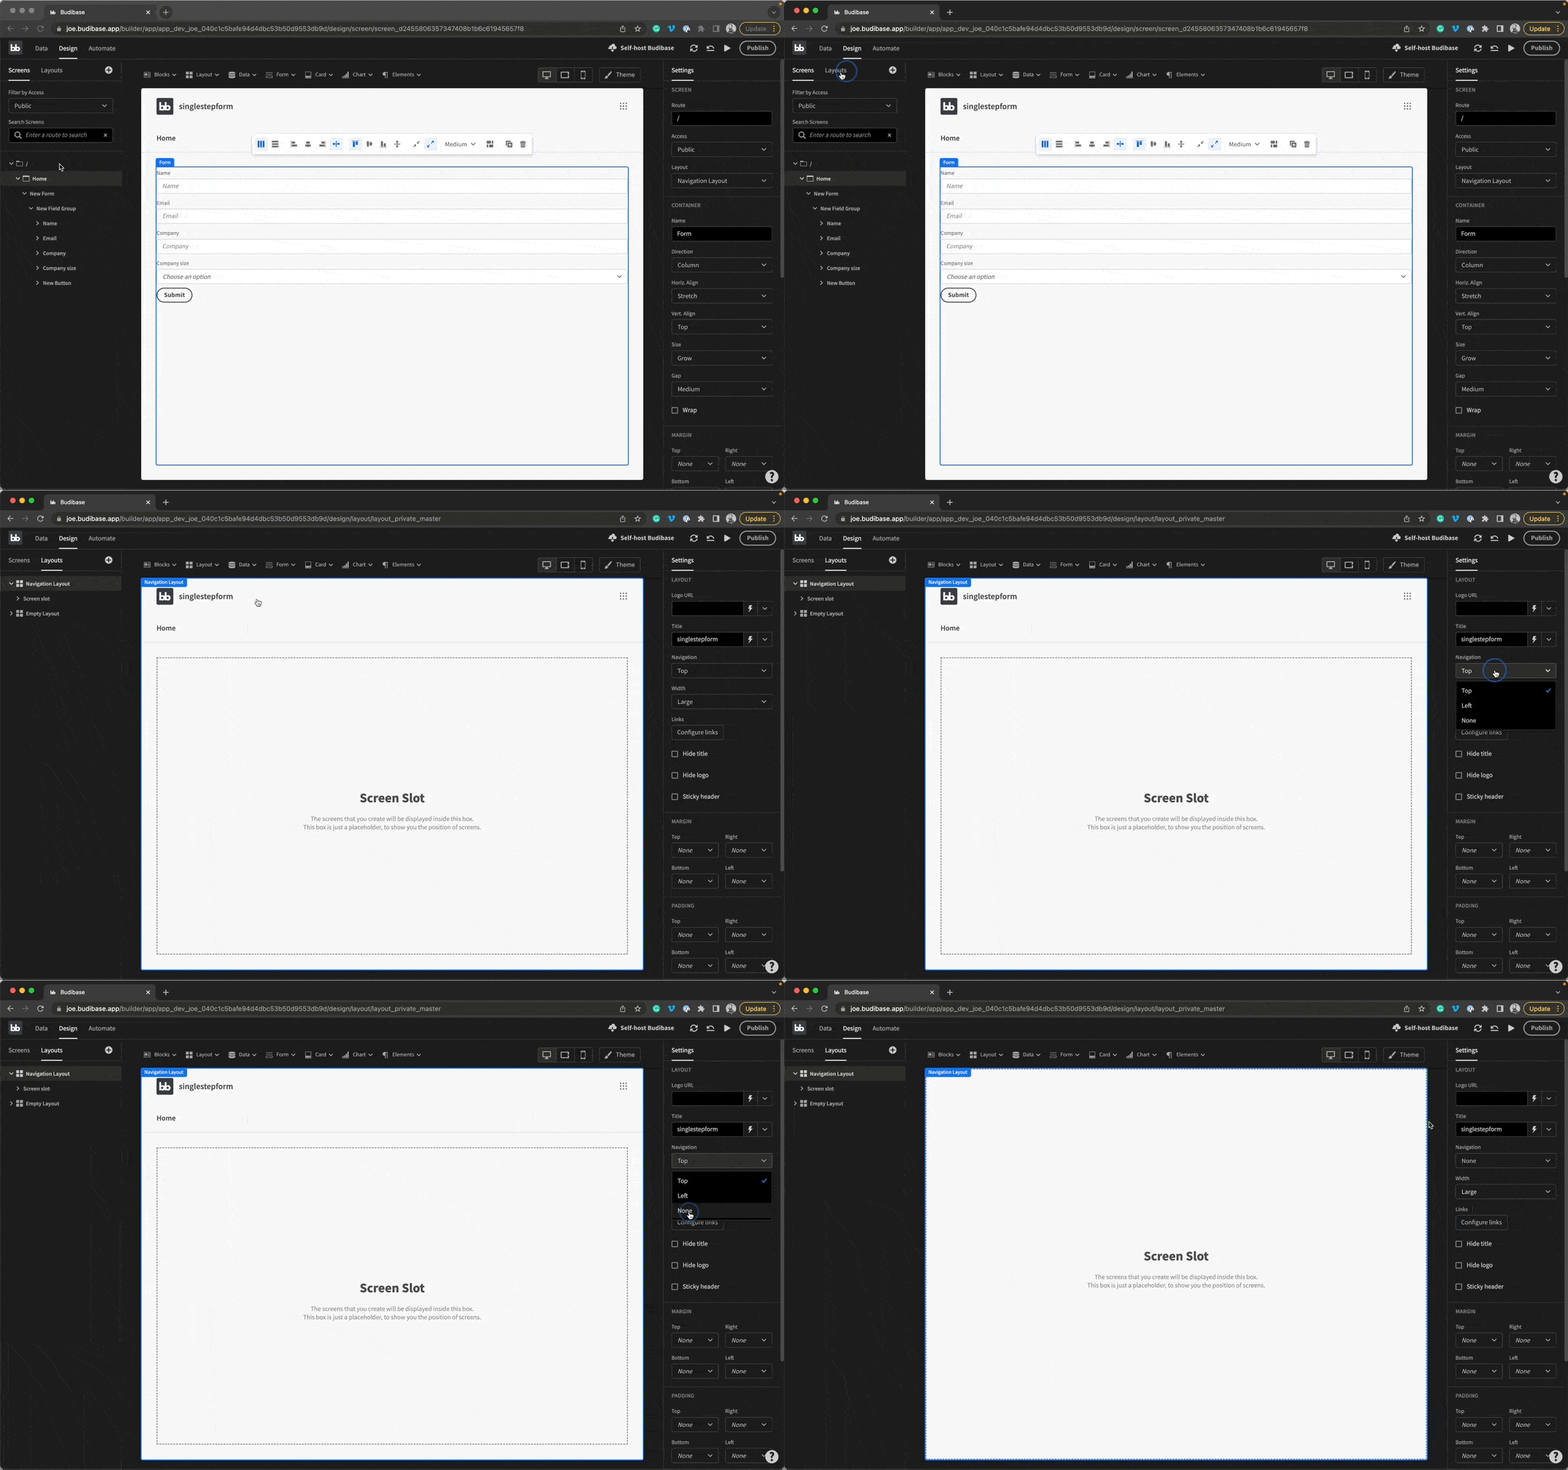
After removing the Navigation, go back to the ‘Screens’ tab, and follow the instructions below:
Resize our form and update spacing
- Click on the ‘Home’ option in the component navigation tree. In the settings panel, under ‘Horiz Align’, choose ‘Center’.
- Click on our New Form component, and in the settings panel, change the Size to ‘Large’.
- Add a new container and drag it above your form component (in the component tree). Then nest your Form component under the new Container component.
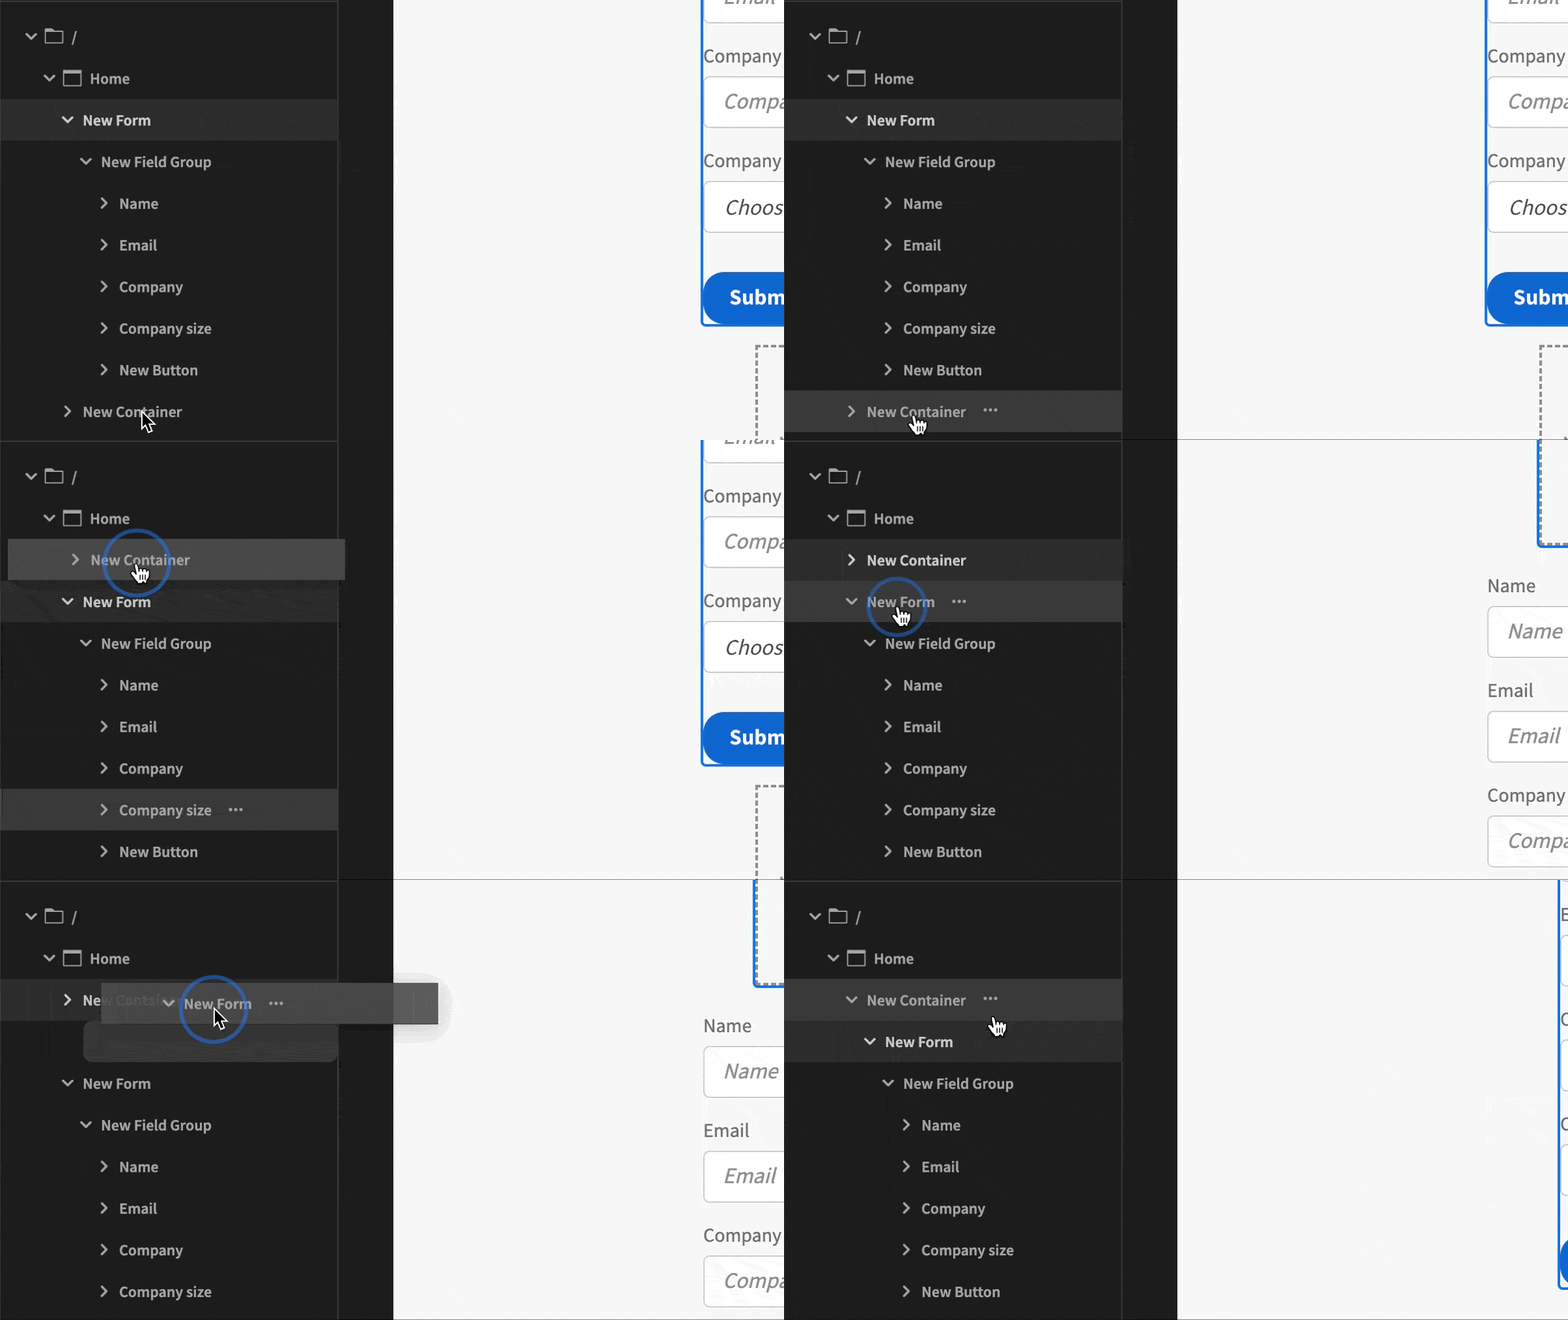
Click the ‘New Container’ component, and in its settings panel: - Under Horiz. Align, select ‘Left’.
- Under PADDING, change:
- Top to
64px - Right to
16px - Bottom to
128px - Left to
16px
- Top to
- Under SIZE, change the width to
520px
Update the theme

- Click the Theme button
- Beside the ‘Theme’ label, select Darkest
Add a logo, title and description
- Add an Image from the Elements dropdown
In the settings panel, under URL, link to your image.
Under Size, change the width to
48px.
- Add a Header from the Elements dropdown
- In the settings panel, change the Text to
Contact sales - Update the Size to ‘Large’.
- In the settings panel, change the Text to
- Add a Paragraph component from the Elements dropdown
In the settings panel, under Text, add description text. We will add:
Please complete the form below and we will respond as soon as possible.Change the Color to a lighter grey (see screenshot below)
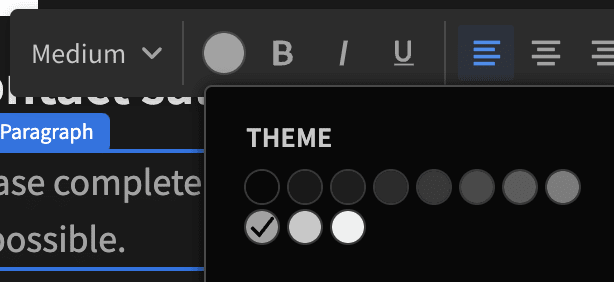
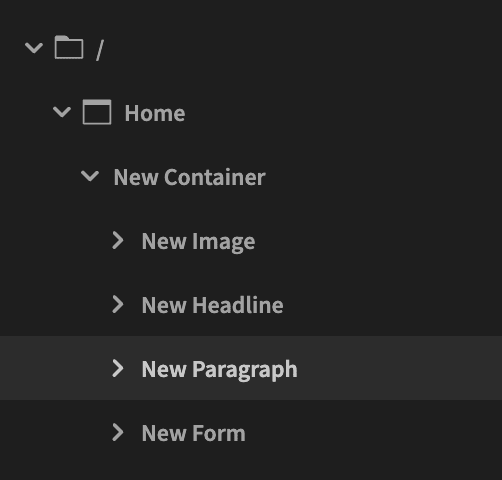
Now structure your component navigation tree like the image below:
Step 9. Preview and test your app
Click the Preview icon (play icon, highlighted in blue below) to preview your app.

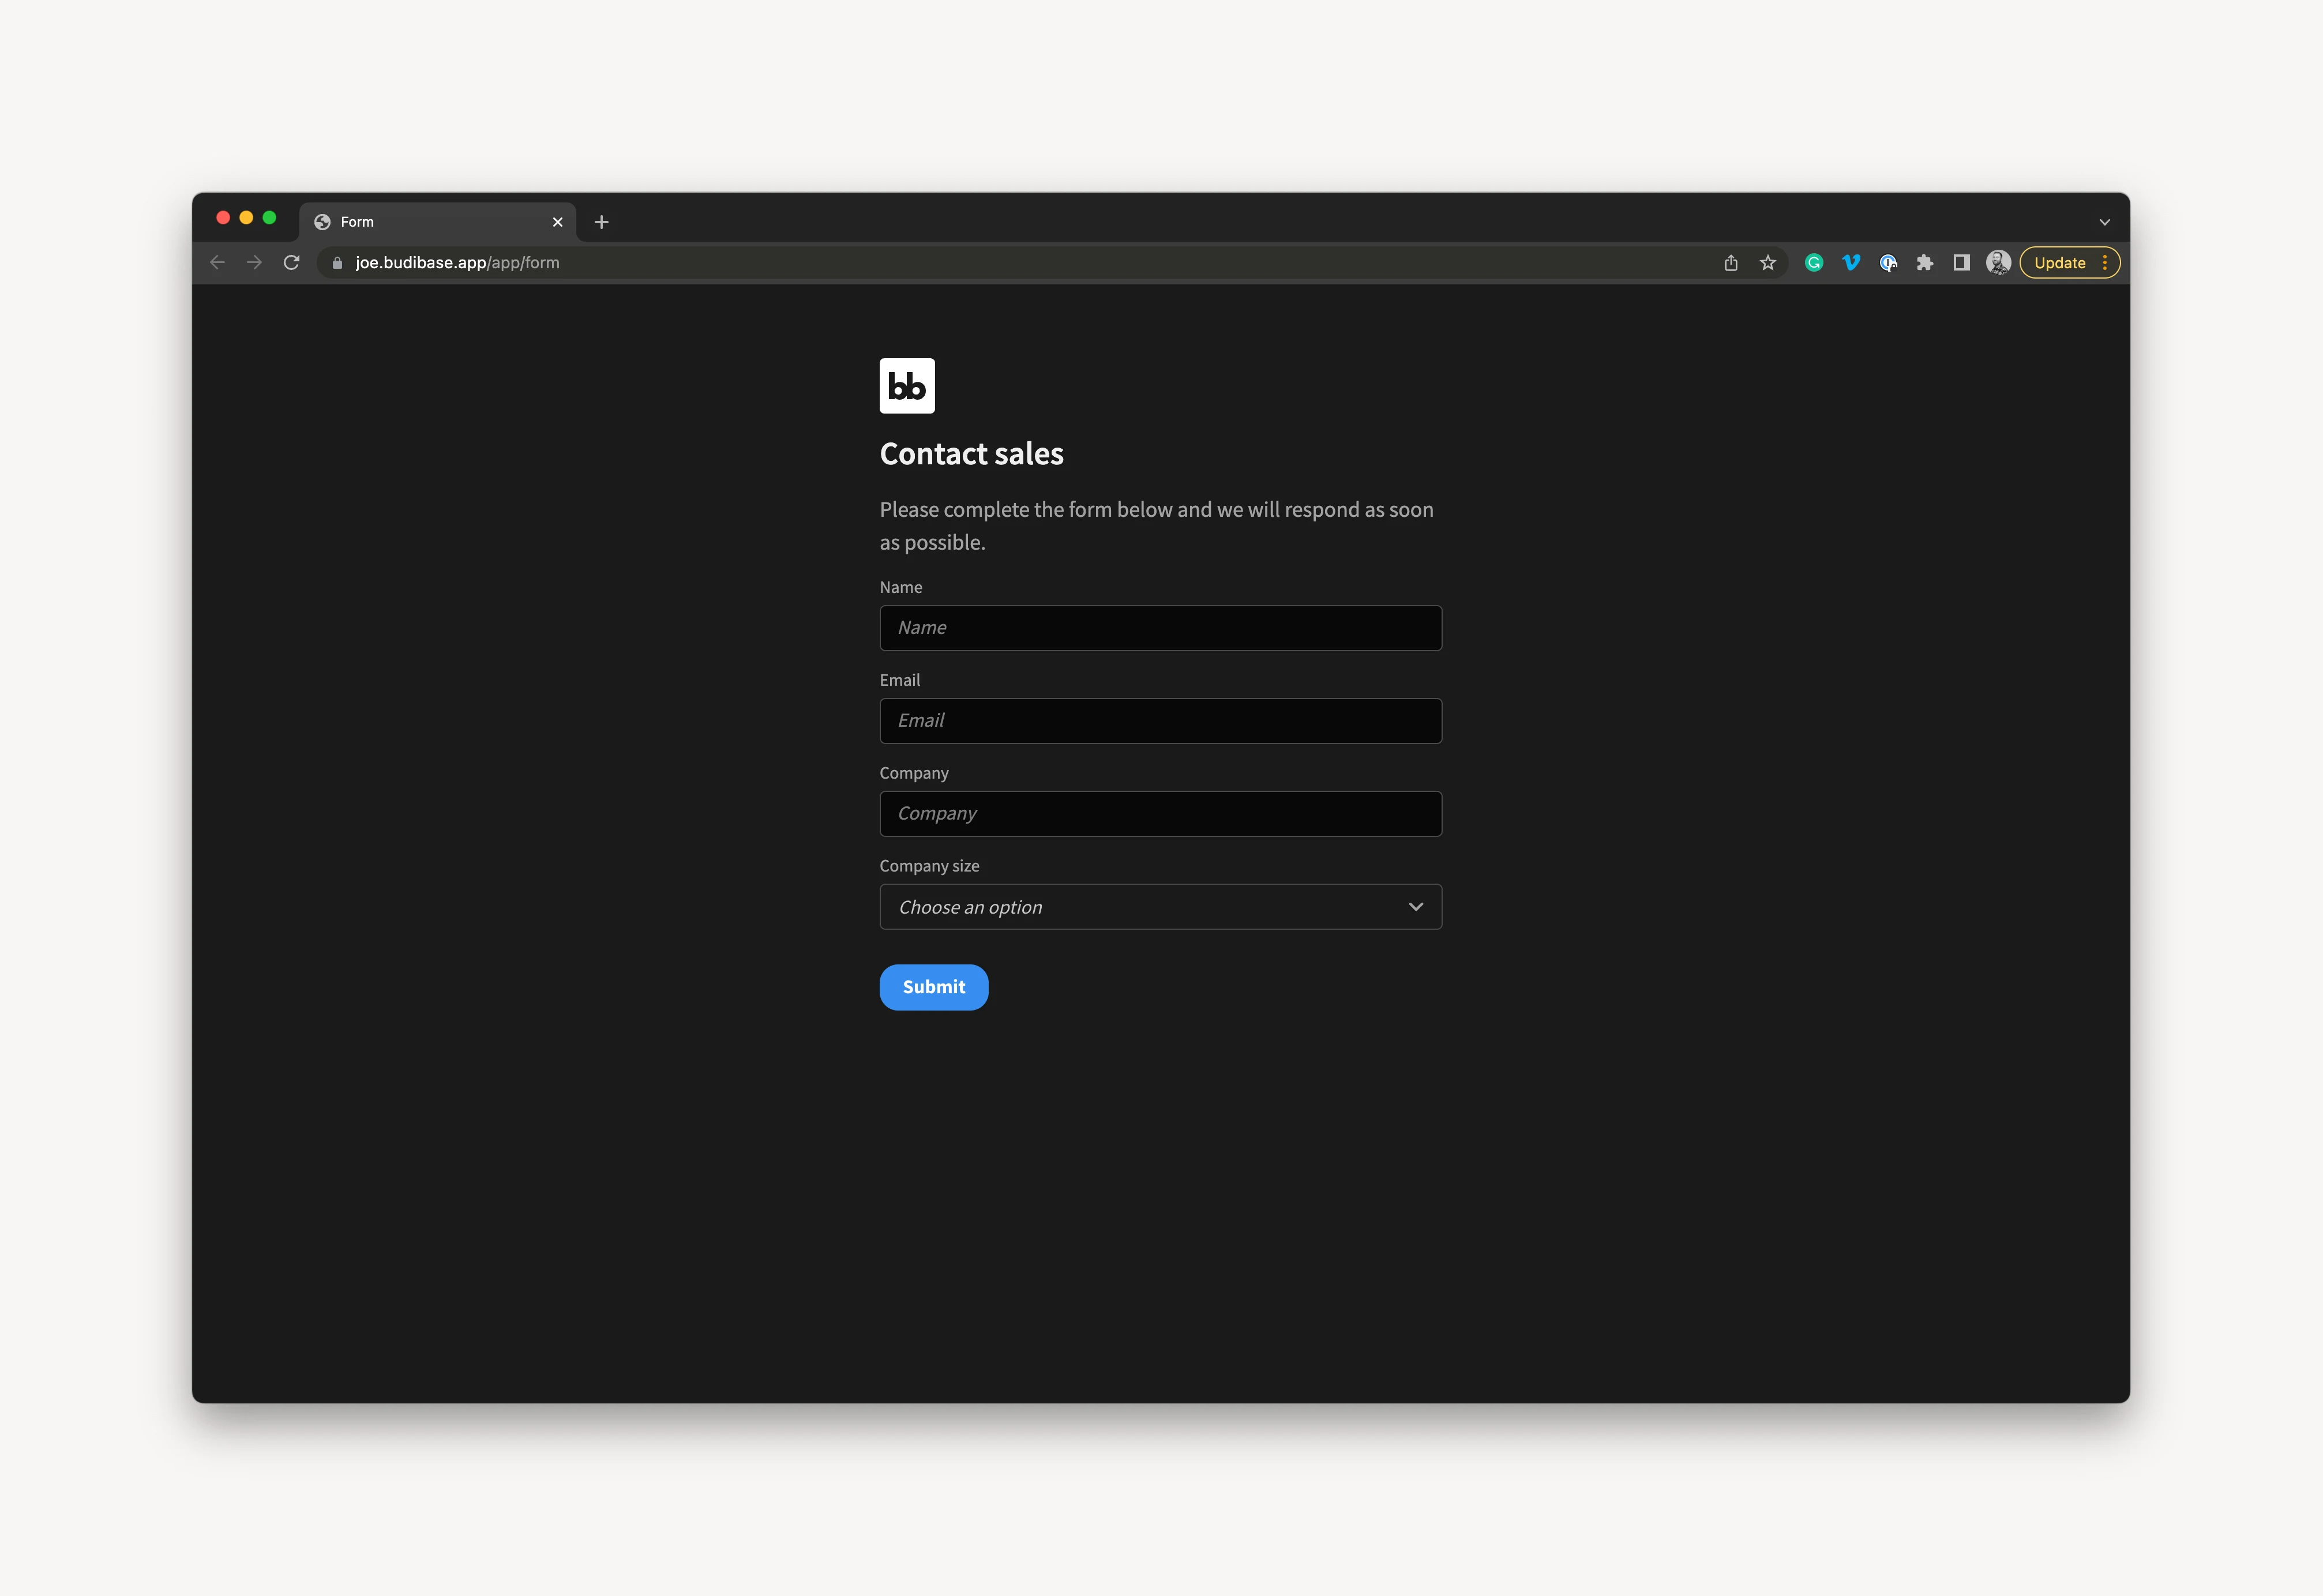
Your new public form should look something like this:
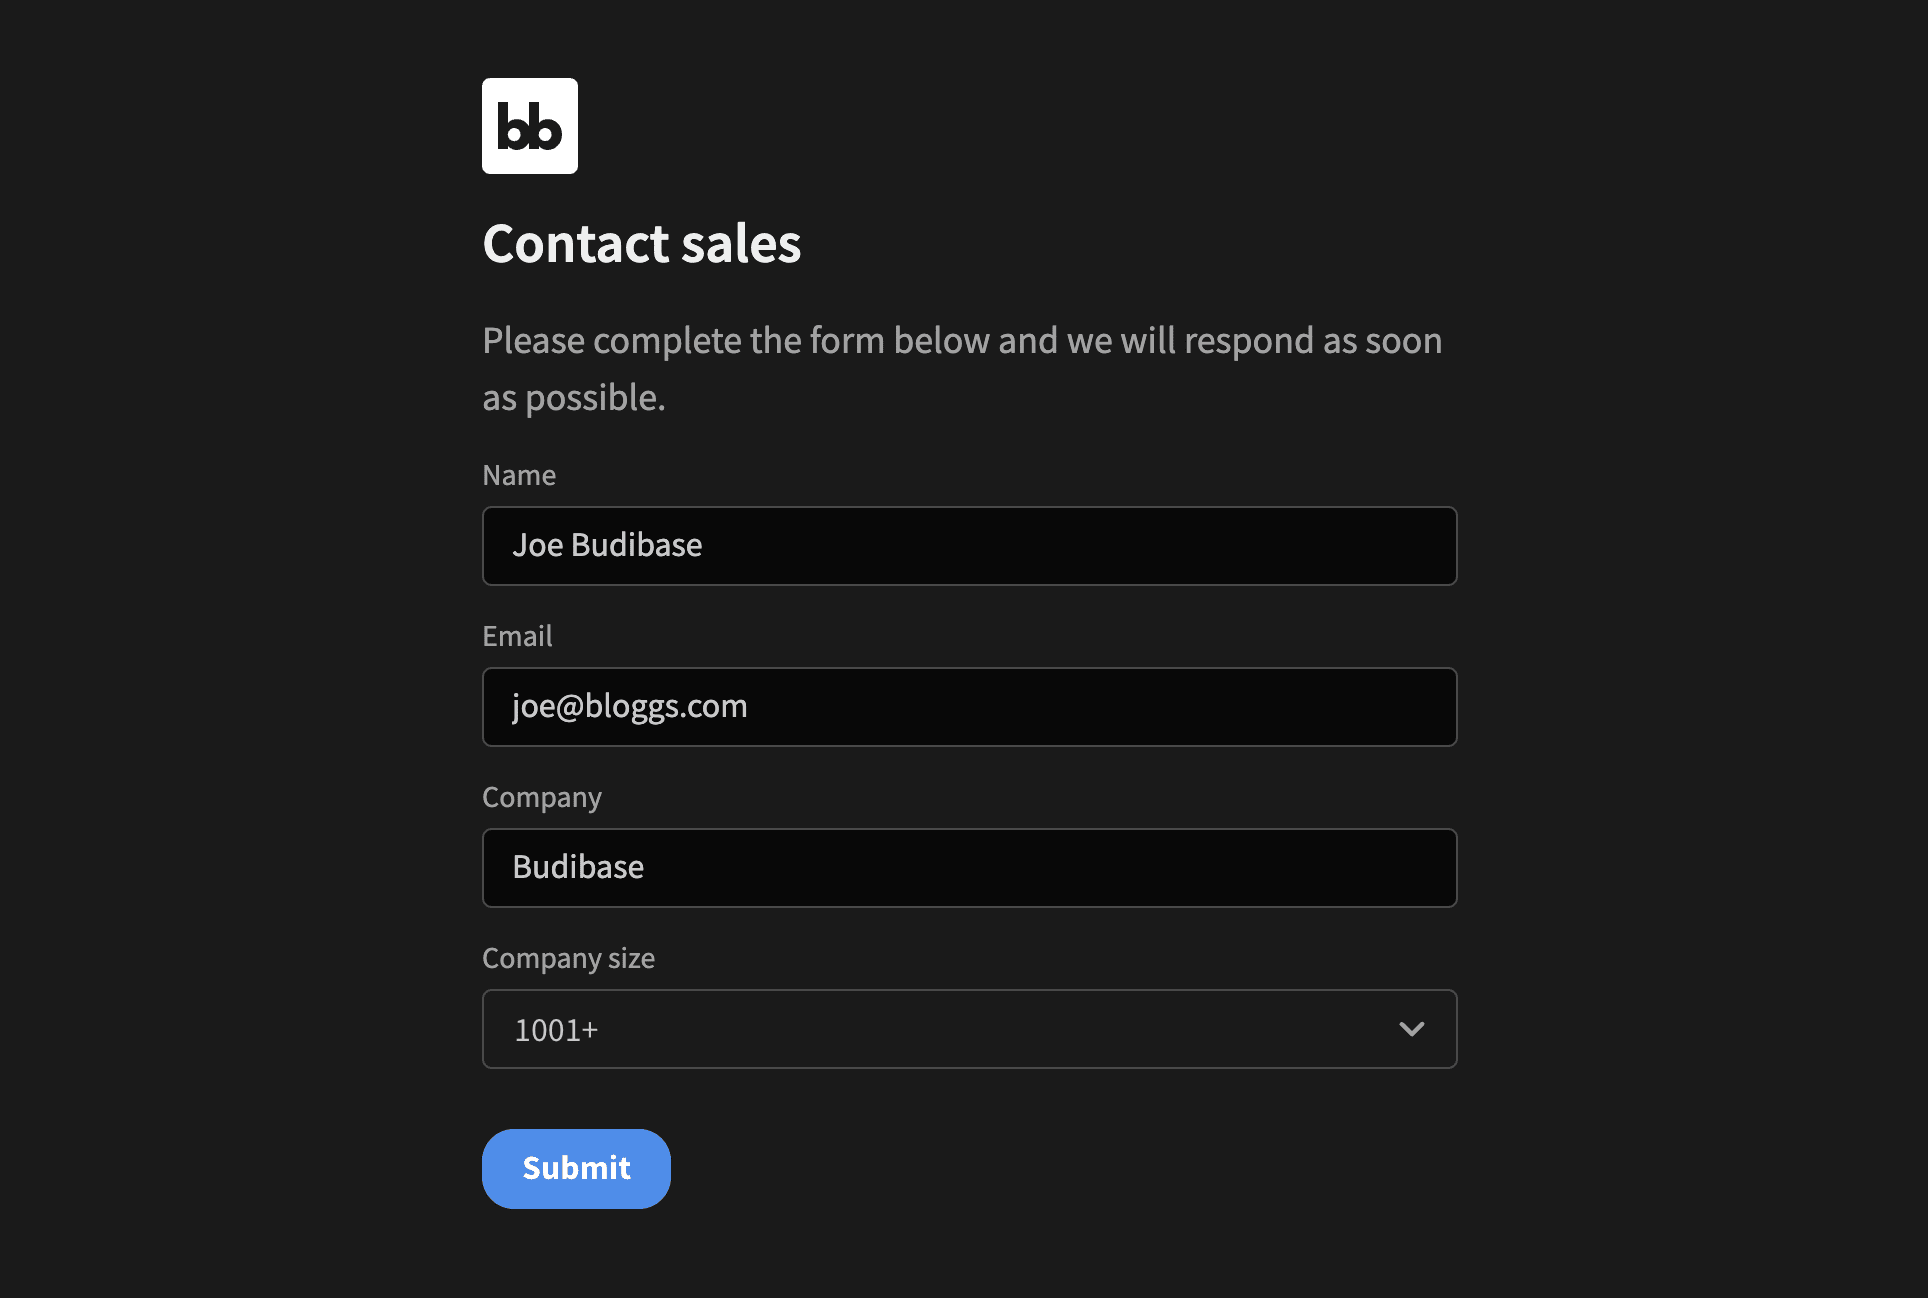
You can now test your form. Fill out your form with the following information and click the submit button.
- Name -
Joe Bloggs - Email -
joe@bloggs.com - Company -
Budibase - Company size -
1001+
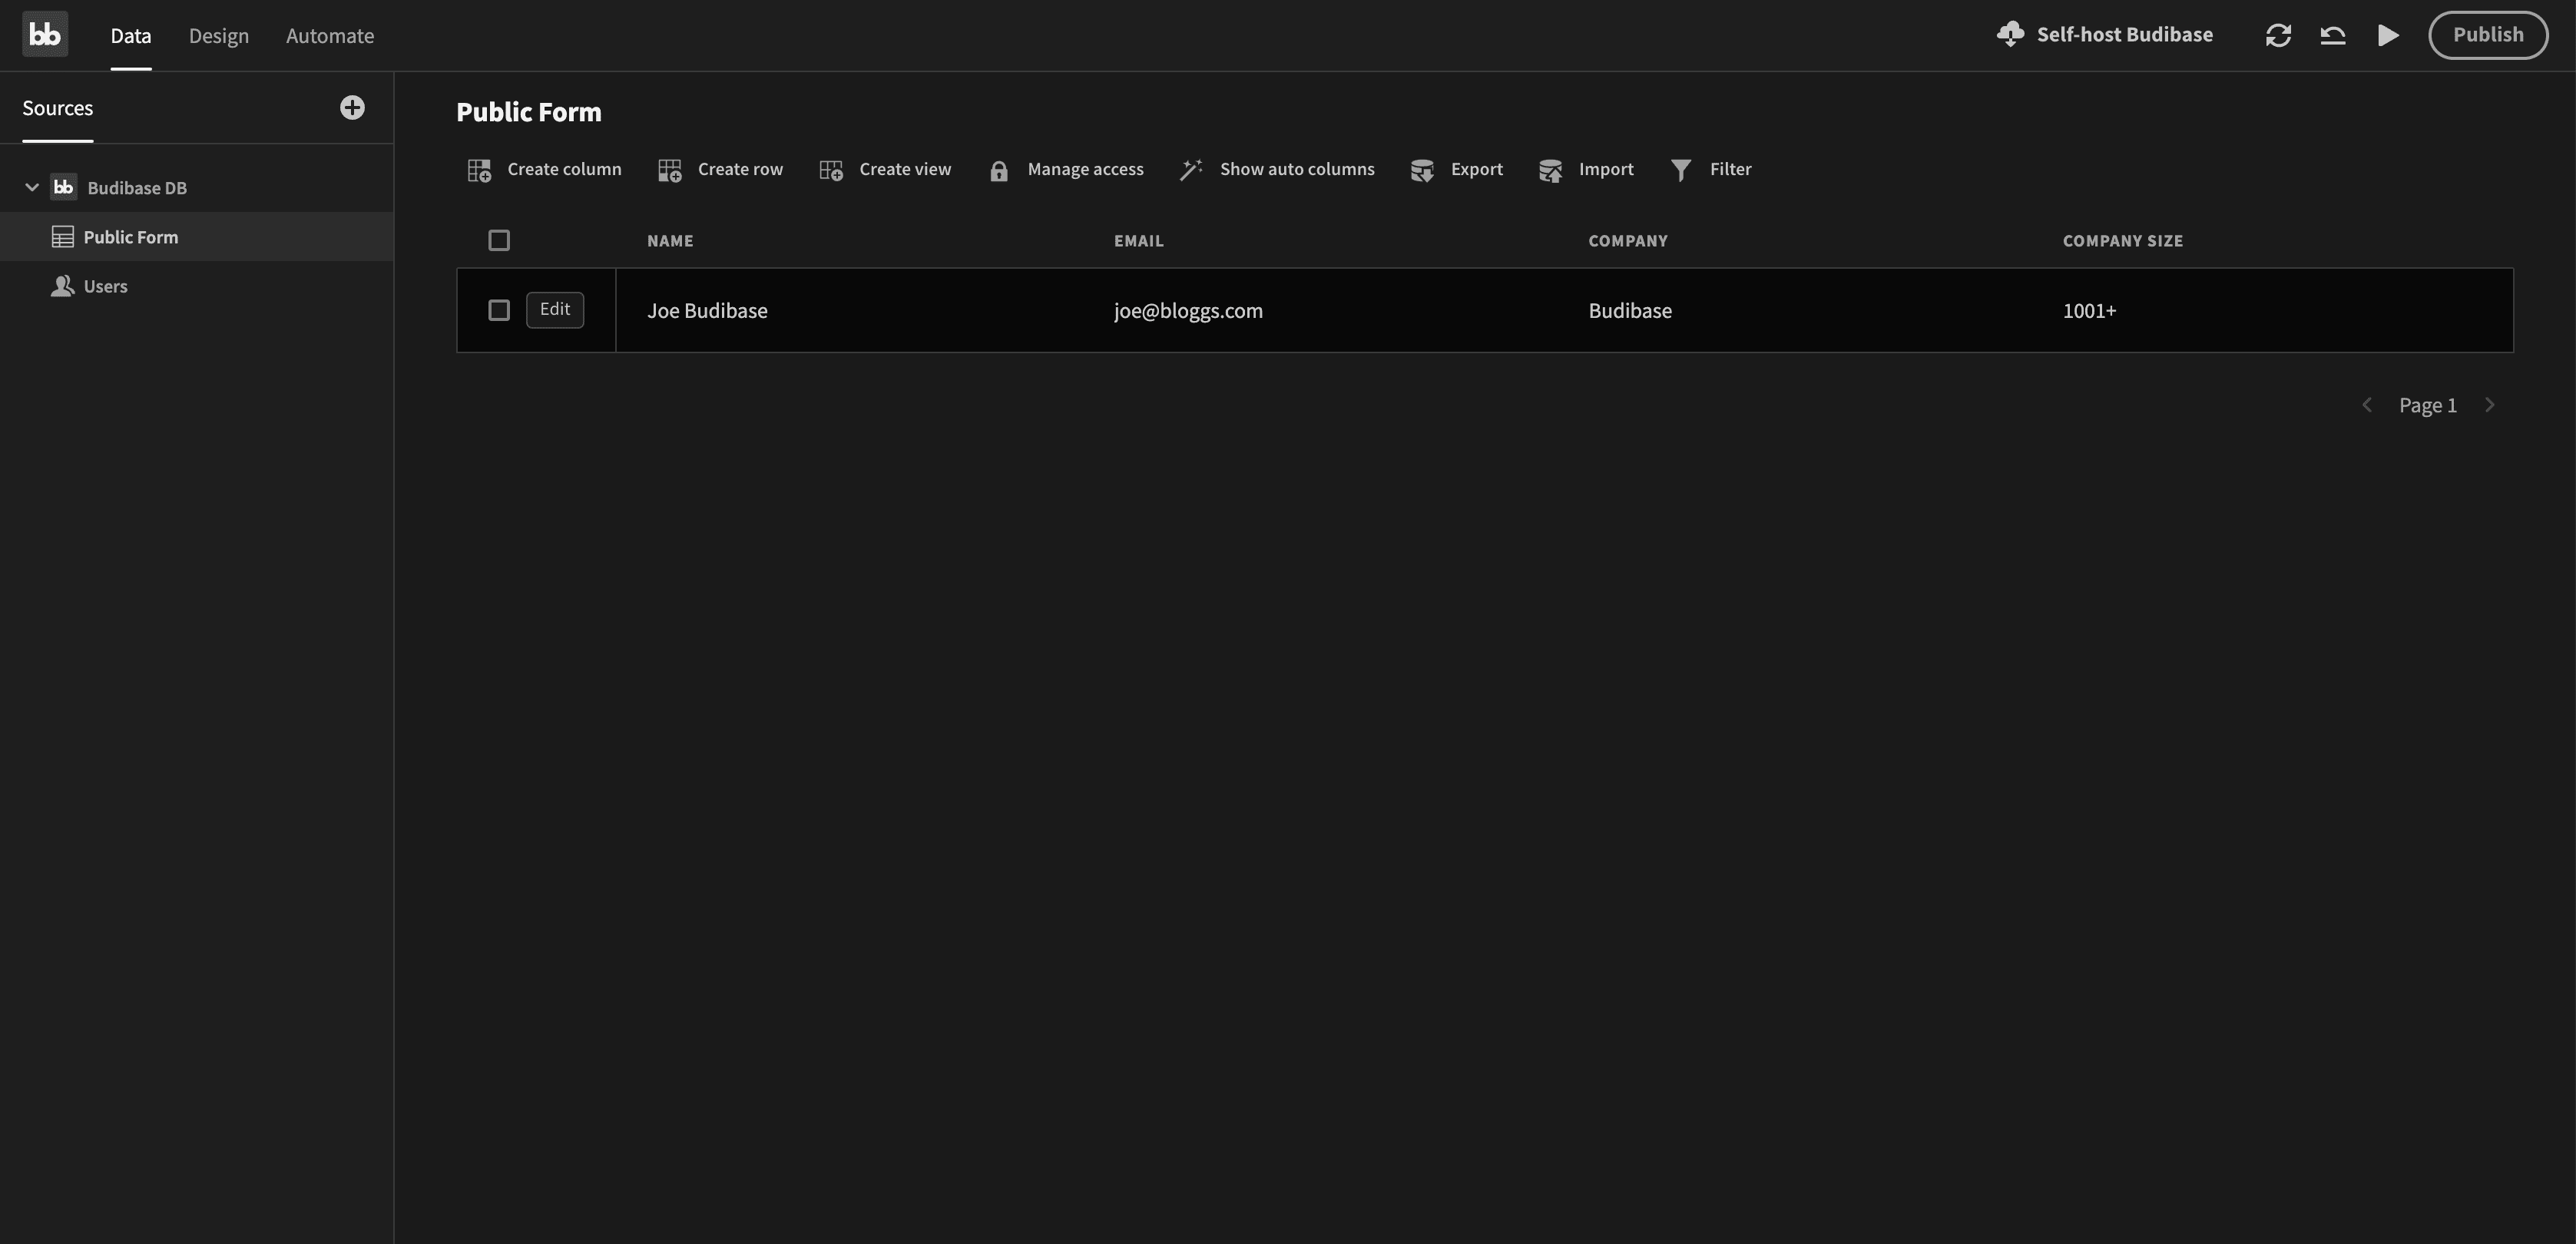
After submitting the form, if you navigate back to Budibase, and look at your Public Form table in the data section, you will see our test entry.
If you are happy with your form, you can now publish it.
Step 10. Publish your app
To publish your app, simply click the Publish button, beside the preview button.
Currently, to view your app, you have to navigate back to the app section (click bb icon, top left), and click the more icon beside your app, then click ‘View published app’. This will change in the near future, and when you click publish Budibase will provide you with the URL.
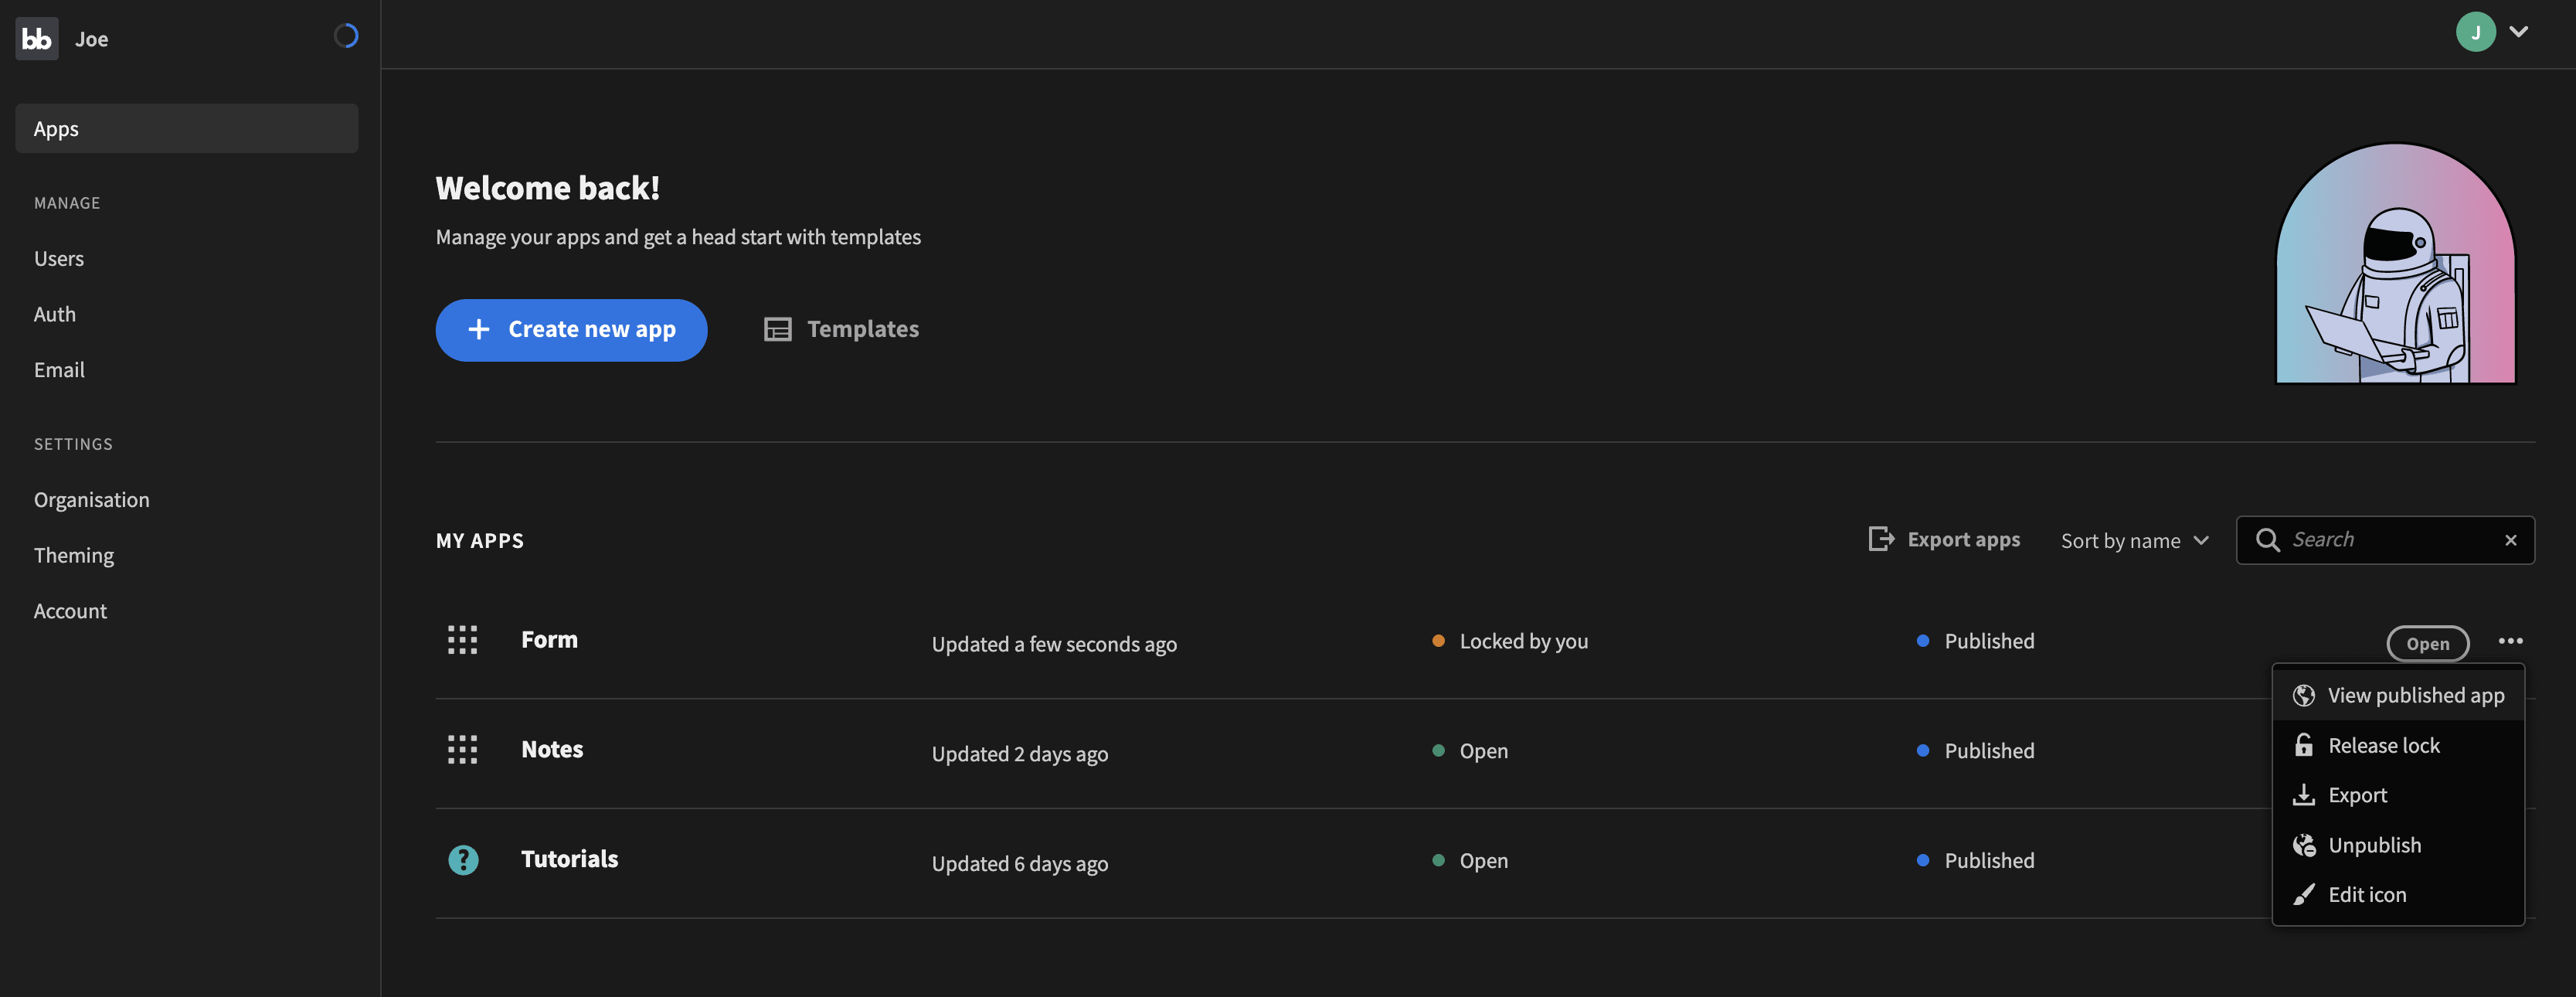
Your new public form should look beautiful like the one below:
Check out our top tips for form UI design .
How to build a multi-step public form
Building a multi-step form follows the same process as building a single-step form, but involves a few additional steps which I’ve detailed below:
Budibase form steps
You can use Budibase to create multi-steps forms. In general, you just need to add the form steps component. Then you use button components to navigate between steps and submit data.
You can navigate between steps with the onclick action “change form step”:
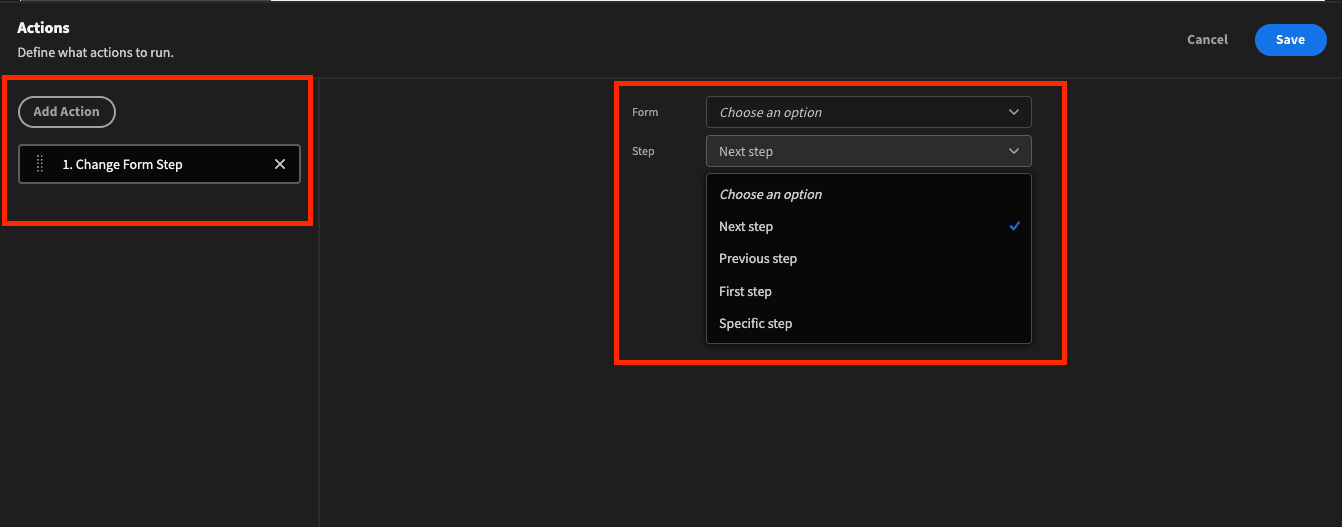
In it, you can use buttons to navigate to the next step, to the previous step, to the first step, or to a specific step.
Therefore, you can have a simple sequential flow or a form with multiple iterations and a complex navigation system.
Step 11. Add Form Step components
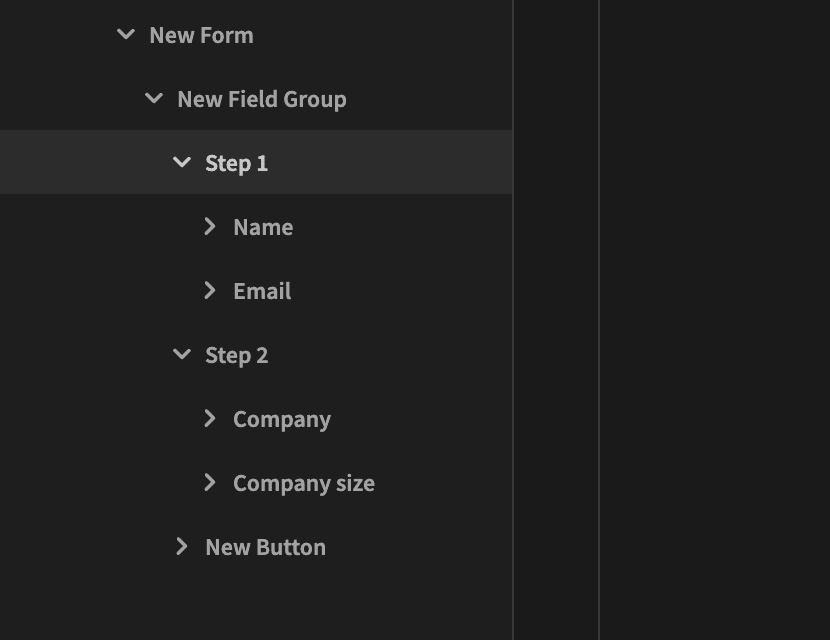
To turn our single-step form into a multi-step form, we must use the Form Step component. Click on the New Field Group component in your navigation tree, then add 2 Form Step components (add one, then click on New field group component, then add another). After doing this, nest the Name and Email component under Step 1, and Company and Company size under step 2. See the image below for further direction:
Step 12. Change our button text depending on the step
For our first step, we don’t want our button to say Submit, we want it to say Next. To do this, click the button, then click Configure conditions (at the bottom of settings).
What we want to do next, is tell Budibase to update our button text to say next if the current step is 1. To do this, we add the following values to our Conditions settings:
- Update setting
- Text
- Next
- Click the lightning bolt, and on the left hand side, select ‘New Form.Current Step’, and select Save.
- Equals
- Number
- 1
See the image below for guidance.

Click Save, and the Button should be updated.
Step 13. Tell our button to move from one step to the next
Our button currently has an action to Save a row, but we don’t want to save a row for the first step. So, we will tell Budibase, when the user is on step 1, don’t save, and instead, move them to the next step when the button is clicked. To do this, we must go back into our button Conditions, and enter the following:
- Update setting
- On Click
- Click Define actions button, then click Add Action, select ‘Change form step’. Then change Form to ‘New Form’ (should be selected), and Step to ‘Next Step’. Click ‘Save’.
- Click the lightning bolt, and on the left hand side, select ‘New Form.Current Step’, and select Save.
- Equals
- Number
- 1

Step 14. Preview and test our new public multi-step form
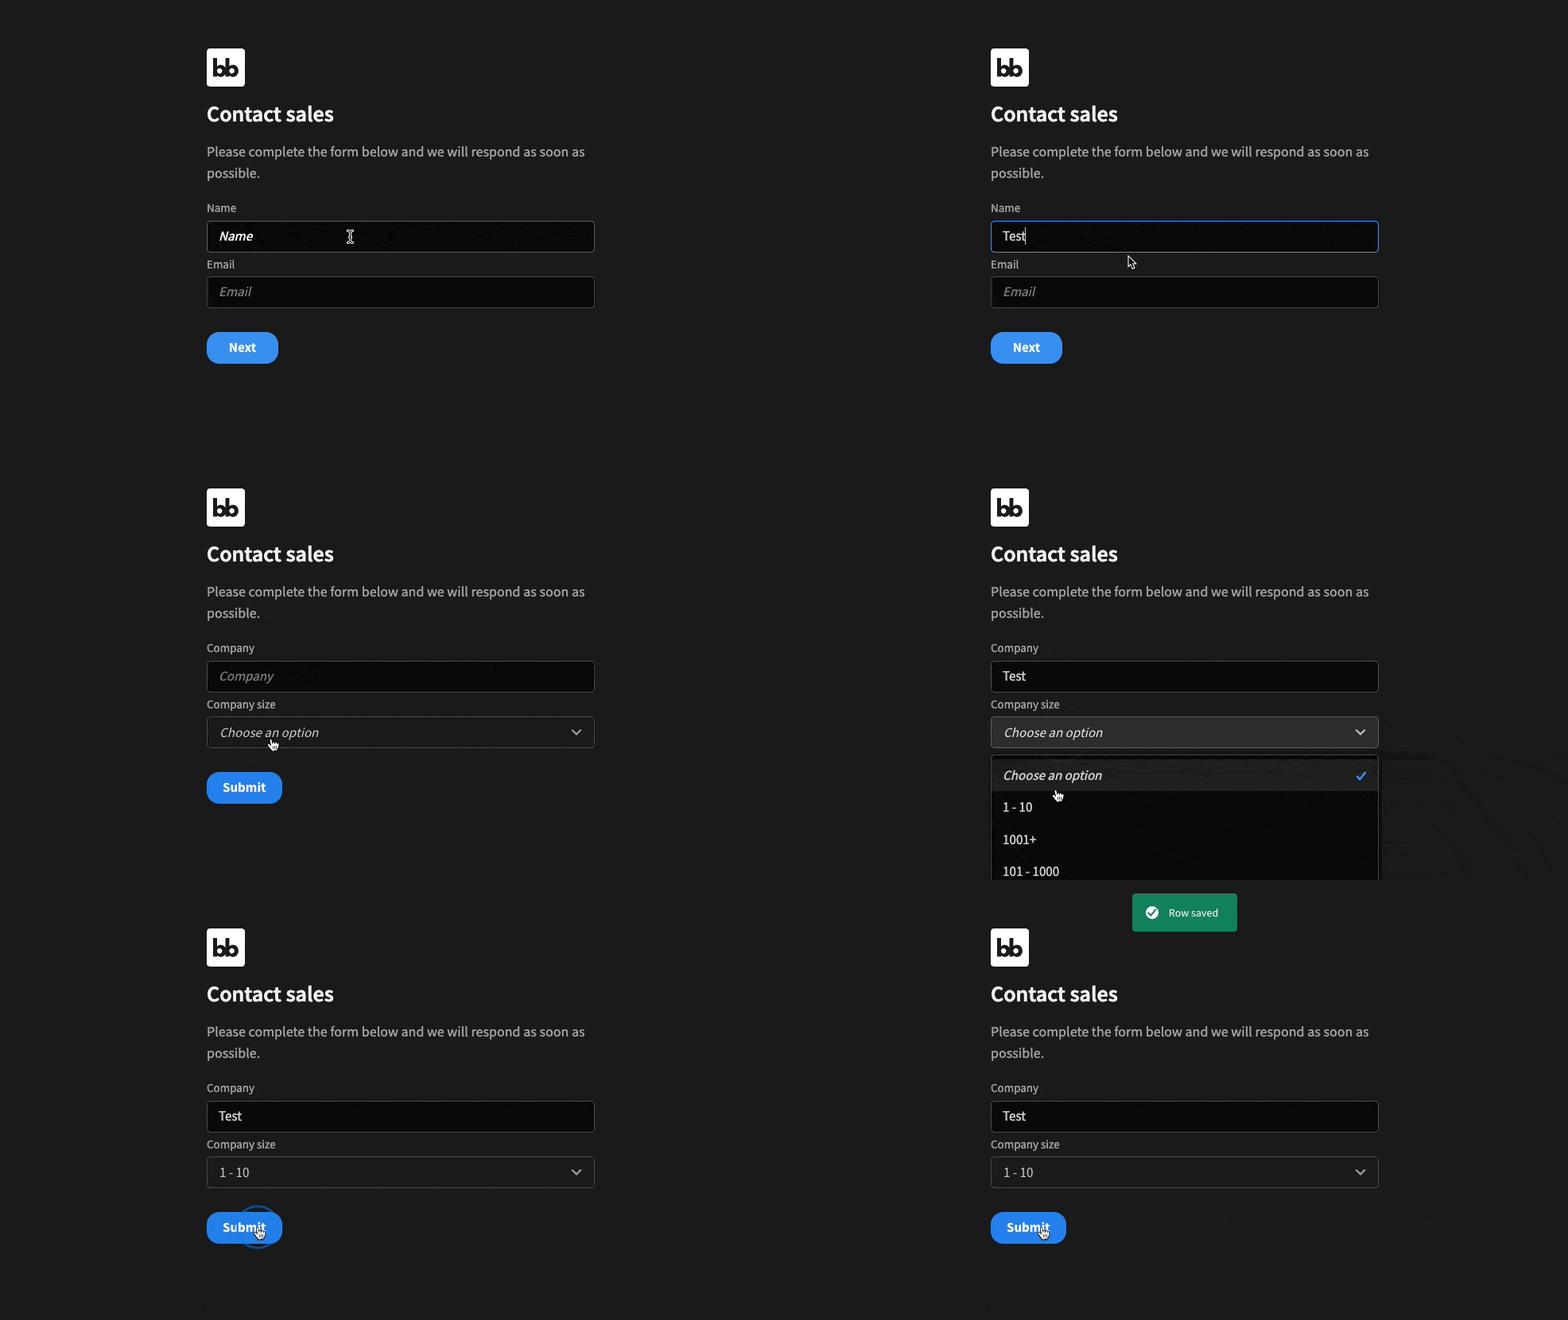
Click the preview button. In our form, enter Test for the name, and Test for the email. Click Next.Then enter Test for the Company and 1 - 10 for Company size, and press Submit.
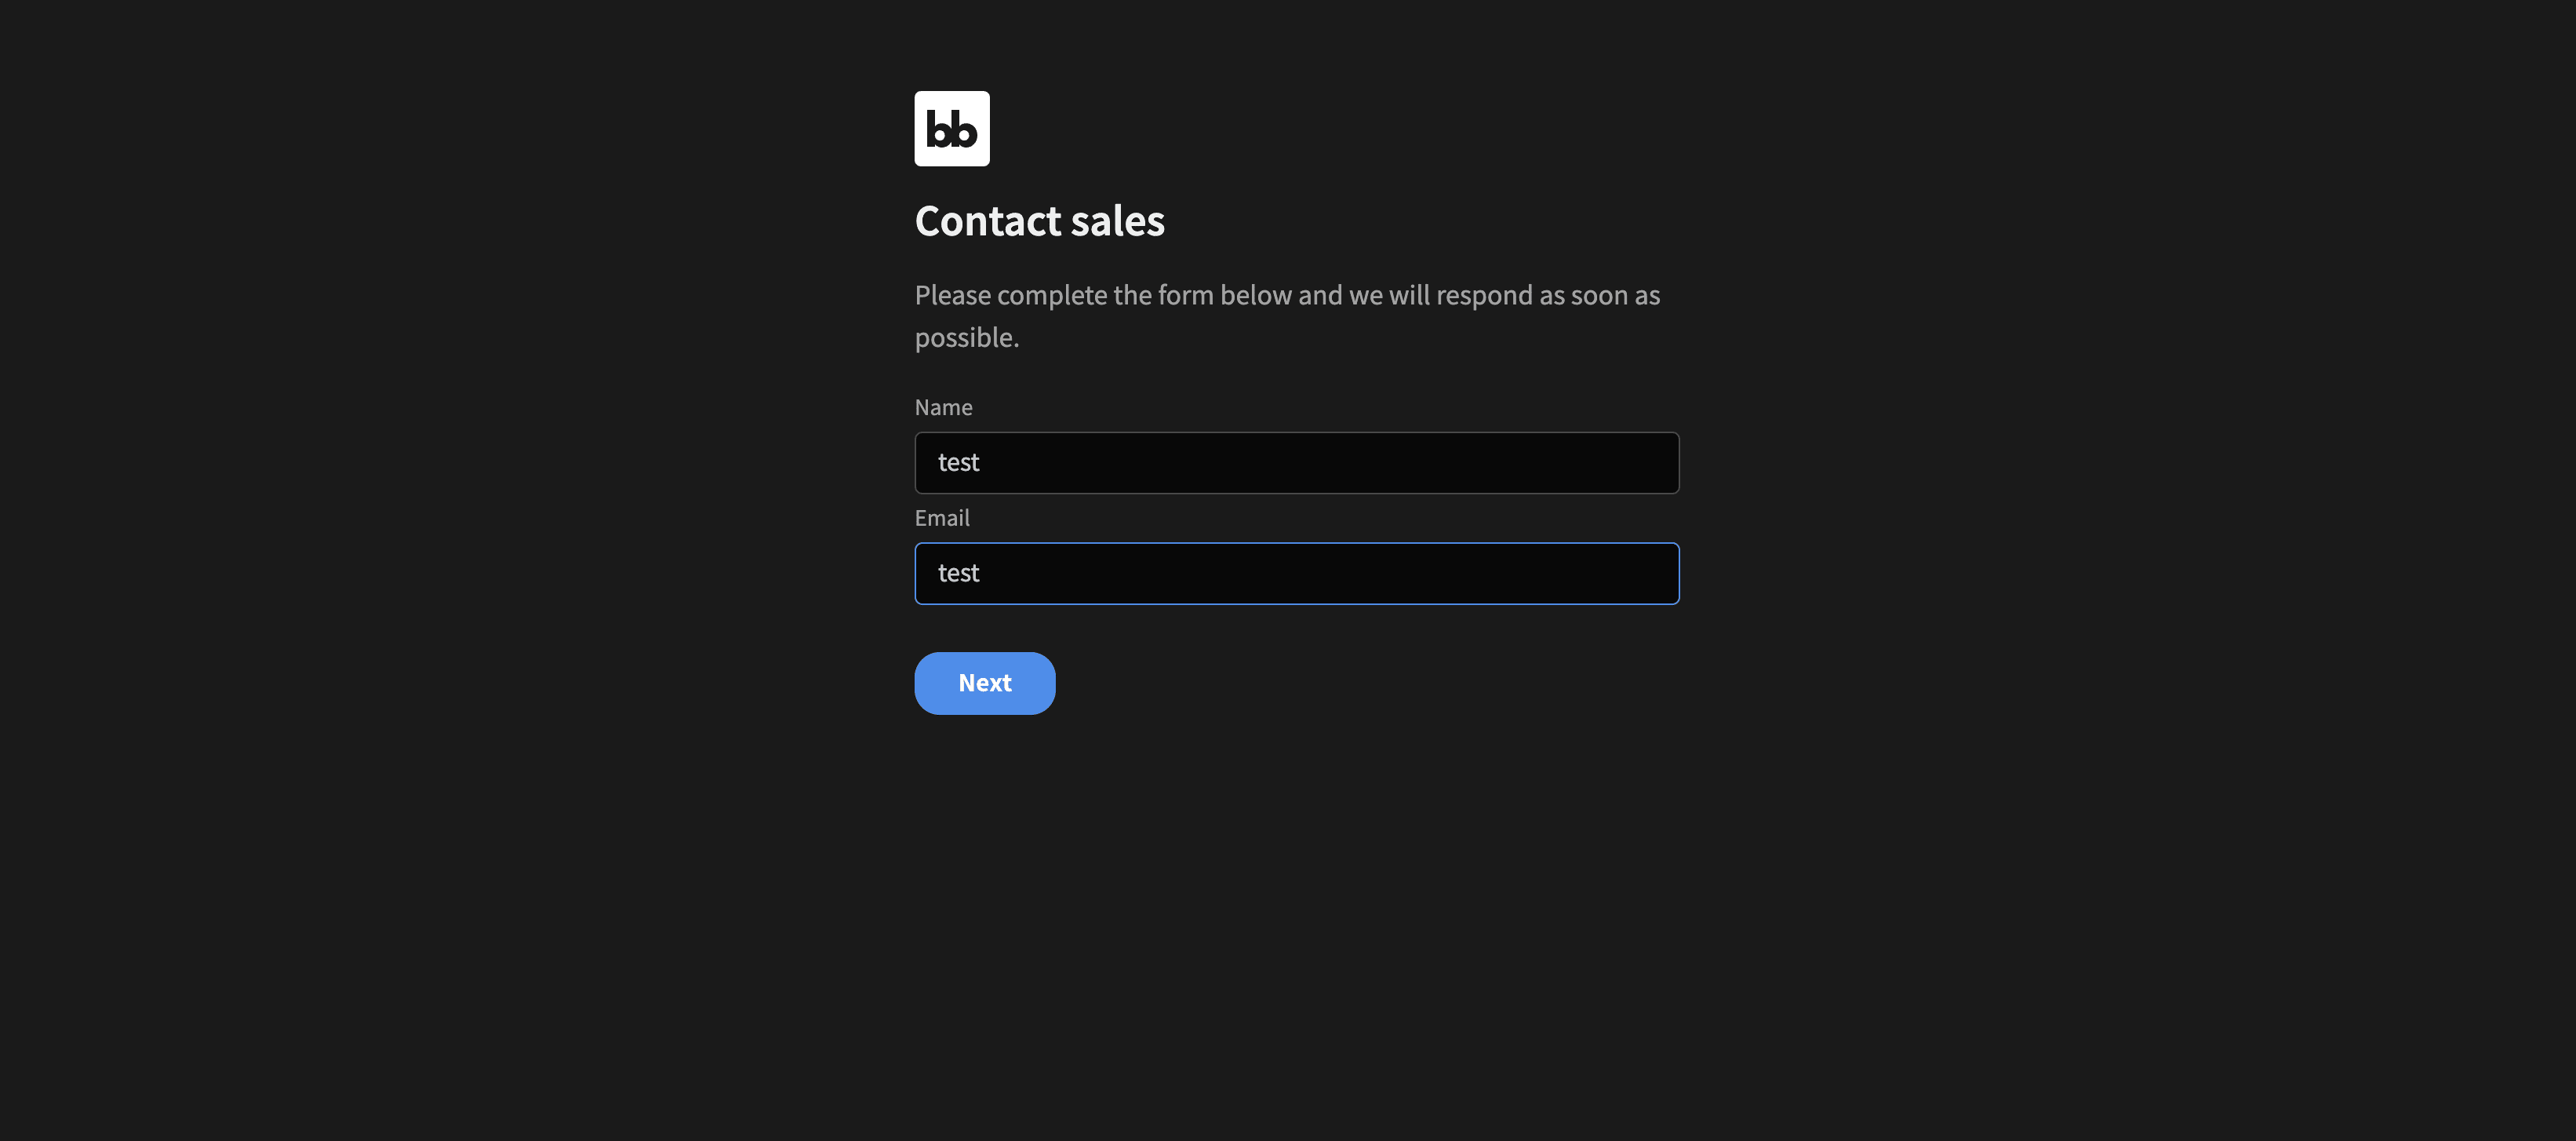
After submitting the form, if you navigate back to Budibase, and look at your Public Form table in the data section, you will see our test entry.

Step 15. Publish your app
To publish your app, simply click the Publish button, beside the preview button.
Currently, to view your app, you have to navigate back to the app section (click bb icon, top left), and click the more icon beside your app, then click ‘View published app’. This will change in the near future, and when you click publish Budibase will provide you with the URL.
What to do after setting up your Public Form
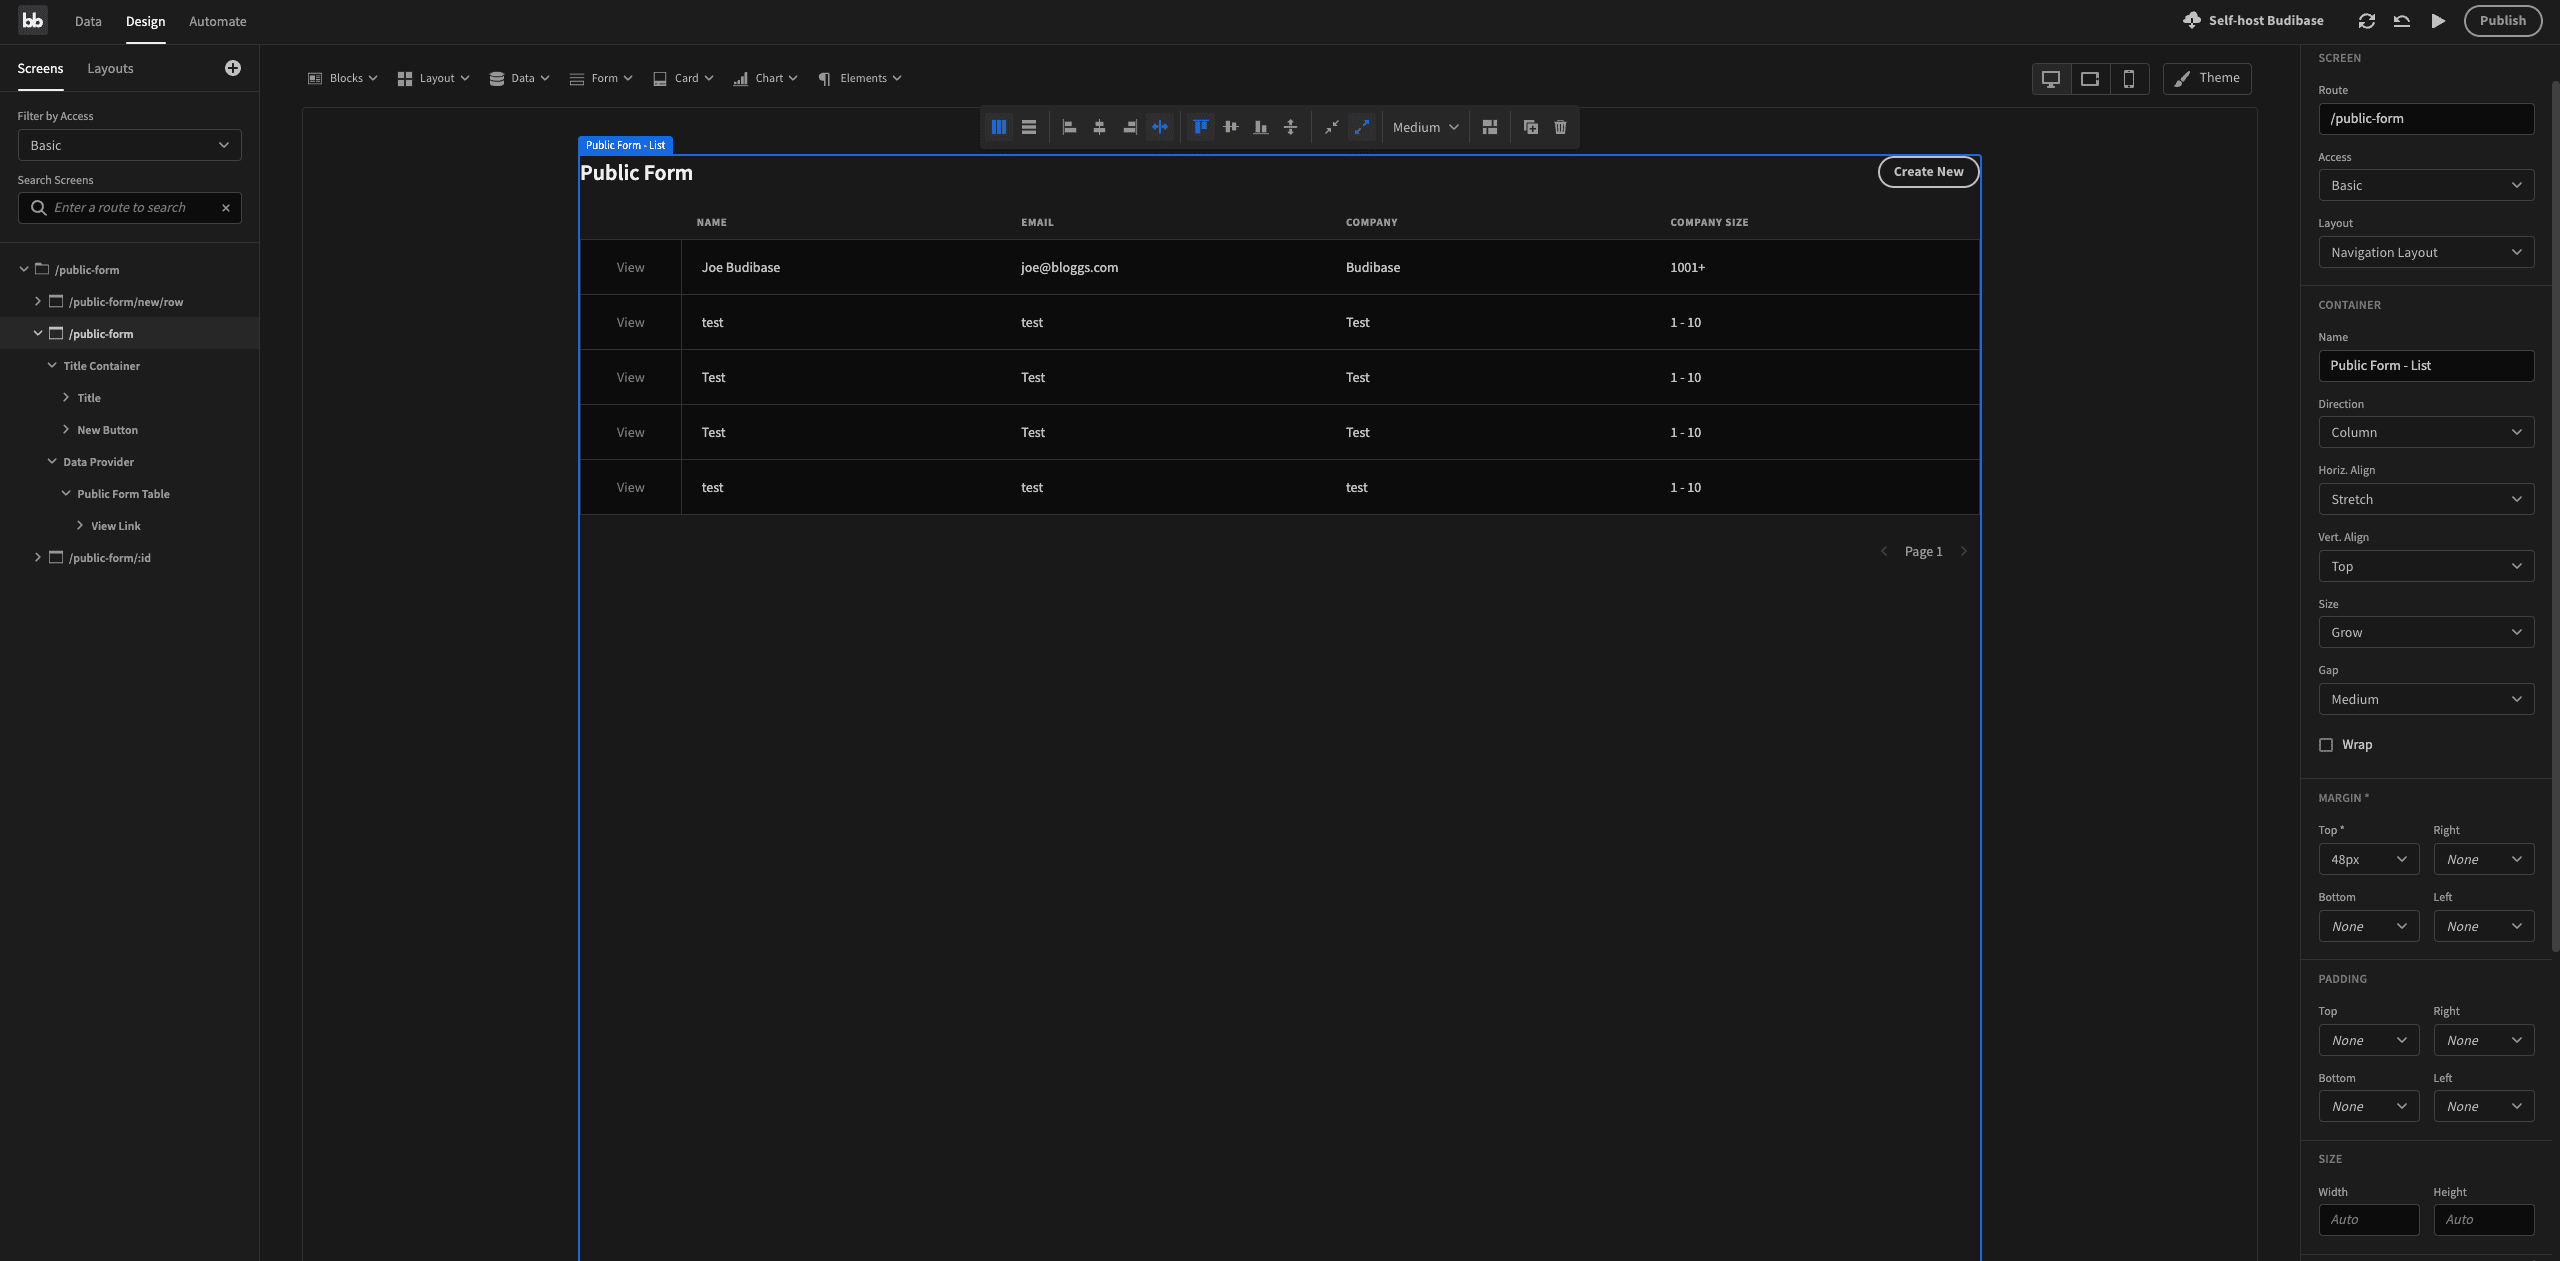
Personally, I would autogenerate CRUD screens (with basic access level). This way, I would have a UI to view, update, delete form submissions and create new ones too.
I hope you found this guide helpful. If you have a need or desire to build web apps and internal tools quickly, sign up to Budibase today . It’s free and open-source, has over 13,000 Github stars, and is loved by employees at Google, Microsoft, SpaceX, and more.