How to make an App from Excel Spreadsheets
We love to hate spreadsheets. They’re everywhere. We use Excel for everything from planning our vacations and weddings, to managing inventories, payroll, and just about any other business process under the sun.
But, like any blunt instrument, spreadsheets are almost the most elegant solution. Today, we’re going to look at a better way to manage data, calculations, and workflows. That is, how to make an app from Excel spreadsheets.
You see, spreadsheets offer a huge amount of flexibility - there’s a reason why they’re so ubiquitous. They also provide incredible usability, at least on a small scale. But as we’ll see in a minute, these benefits have to be weighed up against some pretty significant downsides.
At Budibase, we’re on a mission to revolutionize the way businesses build tools, manage data, and streamline their processes.
Why would I want to make an app from an Excel spreadsheet?
Why move from Excel to apps? Without getting too philosophical - lots of reasons.
The core question here is where do spreadsheets fall short?
Spreadsheets leave a lot to be desired across a few key areas. Stop for even just a second, and you’ll no doubt be able to think of a time when you’ve been stuck with a huge, unwieldy, or disorganized spreadsheet.
When you add in multiple users, things get very messy, very fast.
This introduces a whole swathe of unnecessary risks, including:
- Data loss.
- Unauthorized access.
- Reduced integrity.
- Usability issues.
- Human error.
- And more.
The more mission-critical your data or any associated processes, the more important this becomes.
So, let’s think about some scenarios where using a spreadsheet would be untenable, and you’d be wise to build a web app instead.
First, say you had a large data sheet, with thousands of rows. It doesn’t matter what the subject of the data is, you’ll still encounter a few core issues. For one, it will be seriously hard to find any specific value.
In turn, this makes it more likely that you’ll make mistakes. You’ll also suffer from poor accountability and oversight if you have a bunch of colleagues working on your data at the same time.
In a different scenario, you might have a more manageable data set, but your end-users mean that spreadsheets aren’t a suitable solution. For instance, self-service workflows or really any kind of sign-up tool.
These are generalizations, of course.
All the same, they illustrate some serious shortcomings in Excel and other spreadsheet tools. These include poor scalability, low levels of oversight, a high scope for error, and inefficient user experiences.
Check out our ultimate guide on spreadsheets vs databases for more information.
Of course, given that you’re here, you probably already know all this.
So what can you do to turn Excel into apps?
How to turn Excel spreadsheets into apps with Budibase
With Budibase, building custom business apps and web applications couldn’t be easier. There are actually two different ways that you can go about turning your spreadsheets into applications with our low-code development platform.
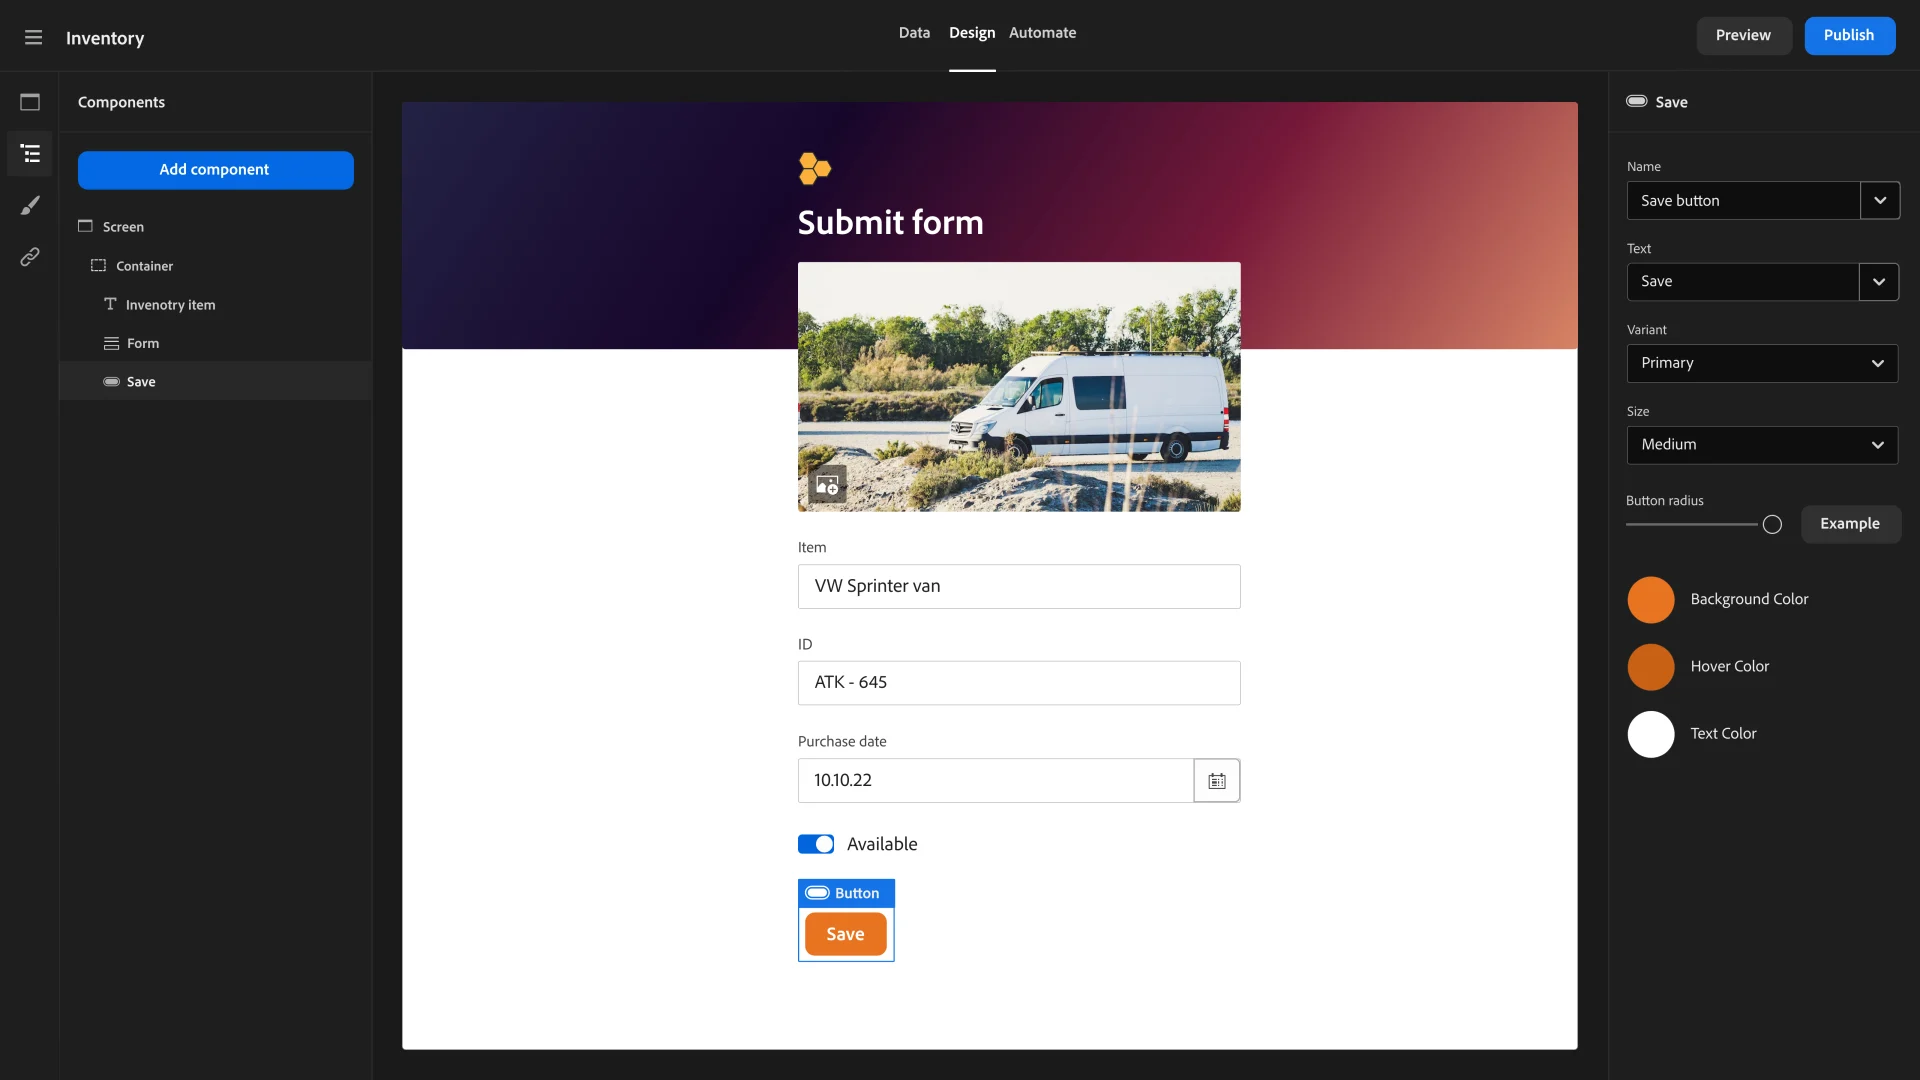
At least, you can get started in a couple of different ways, depending on whether you want to replace your spreadsheets or build extra tools to help make them more effective. After this, you’ll enjoy the same fast, flexible, low-code app-building experience.
Let’s take a look at your options for beginning to move from Microsoft Excel to applications in Budibase.
Option 1 - Importing CSVs
First up, you can use BudibaseDB to turn your spreadsheets into a fully-fledged database. Our built-in database tool offers full support for CSV uploads. So, you can import individual Excel sheets and transform them into database tables, more or less instantaneously.
This means you’ll first need to export each sheet as a comma-separated Excel file. That is, assuming your spreadsheet has more than one sheet.
Once you’ve built a new app, you can simply select BudibaseDB as the data source, and upload your first file. Then, you can add more tables and upload more files, if you need to.
This gives us the option to add some more advanced functionality than would be available in Microsoft Office, including building relationships between tables.
It’s worth noting that if you opt for CSV uploads to connect your data, this won’t be a real-time connection to your original spreadsheet.
If you need to continue using your spreadsheet software as well as your new app and keep both up to date with the latest version of your data, you’ll want to opt for the second method.
You might also like our round-up of the top Airtable alternatives .
Option 2 - Integrating with Google Sheets
Budibase offers a dedicated data connector for Google Sheets. Nowadays, there’s a fair chance you’re using Google’s Excel alternative anyway.
All you need to do is sign in to your Google account, and paste your spreadsheet’s URL into our connector UI. Budibase will then pull in your existing Google Sheets data, in real-time. Once you publish your app, any update made in one platform will be reflected in the other.
This is critical if you want to build an app for certain functions but carry on using your spreadsheet tool for others. For example, if you wanted a dedicated tool for data entry, but you still wanted to analyze results in a spreadsheet.
Check out our guide to using a form to enter data to Google Sheets to find out more.
Turn a spreadsheet into an app - step by step
The beauty of Budibase is that you’re in control of how complex or simple you want to make your custom tools. Either way, you’ll enjoy the same intuitive, fast, and flexible developer experience.
So, we can follow the same initial steps to get our app started, and then you have the freedom to add more complex design, functionality, and customization to suit your specific requirements.
We’ve laid out eight steps below for turning a spreadsheet into an app, but after the first four, you’re free to use as few or as many of the rest as you need.
Let’s jump right in.
1. Sign up to Budibase and create a new app project
First of all, you’ll need to get set up with a Budibase account and start a new app project. Budibase is free to use, in the cloud, or self-hosted.
When you create your account, you’ll be prompted to choose between self-hosting and Budibase Cloud. This is an important decision, as it will impact how you deploy your tools later.
However, if you’re not 100% certain just yet, don’t worry - you’ll have the option to export your apps later and import them into a different tenant if you change your mind.
Our open-source, low-code platform is the ideal solution for enterprises, SMBs, and hobbyists alike.
Our mission is to build the world’s largest suite of open-source business solutions. We put our users on the front line of this mission. Use Budibase to create the perfect custom tools for your needs, in minutes.
Check out our pricing page for more information.
2. Connect or import your data
Once you’ve created your app project, you’ll be prompted to choose a data source. Remember, we have two different options here.
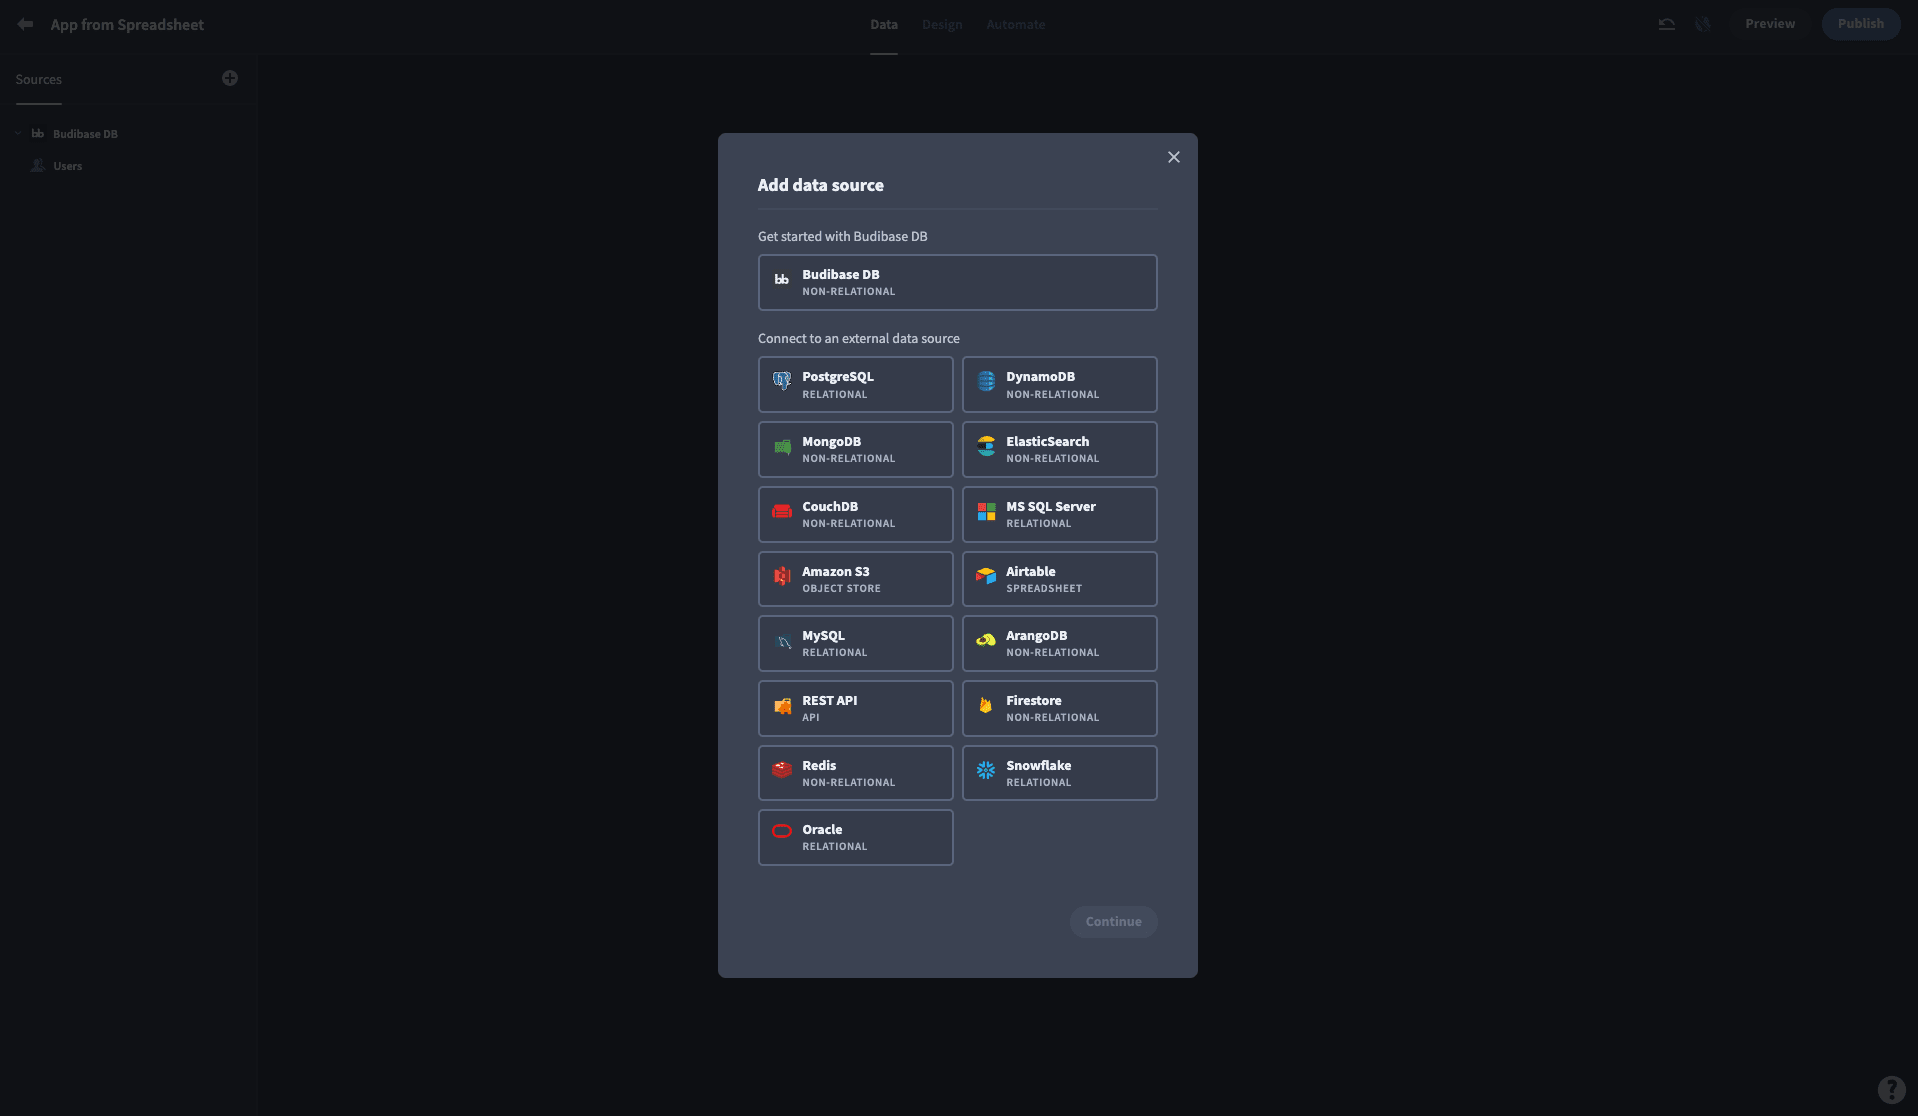
So, option number one is using BudibaseDB and uploading CSV files.
As you might have guessed, that means we need to select BudibaseDB as our data source:
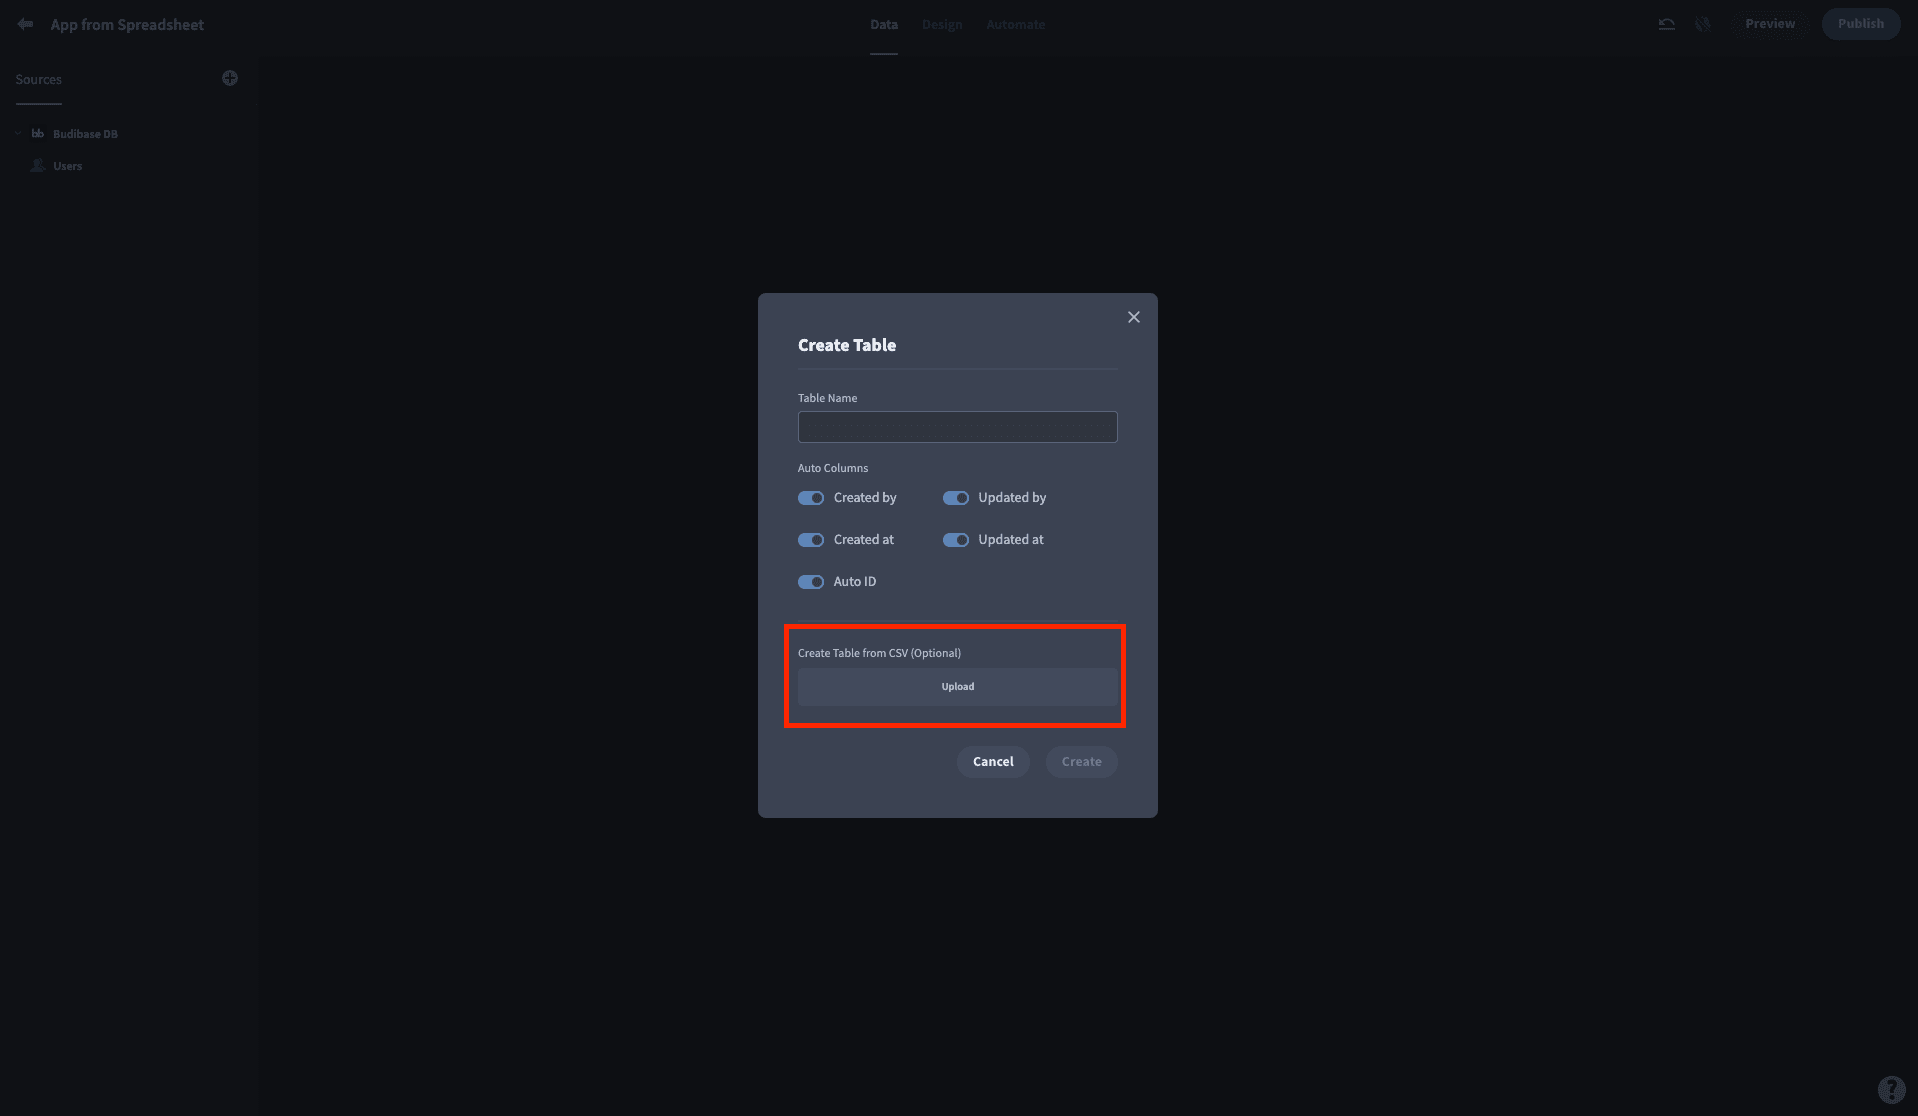
We’ll then be prompted to create a table. At the bottom of this modal, we can select Upload to add our CSV files:
For our tutorial, we’re going to upload a simple sales table, with basic information about our customers.
Then, we can choose the data type for each heading and set which one we’d like to use as our Display Column:
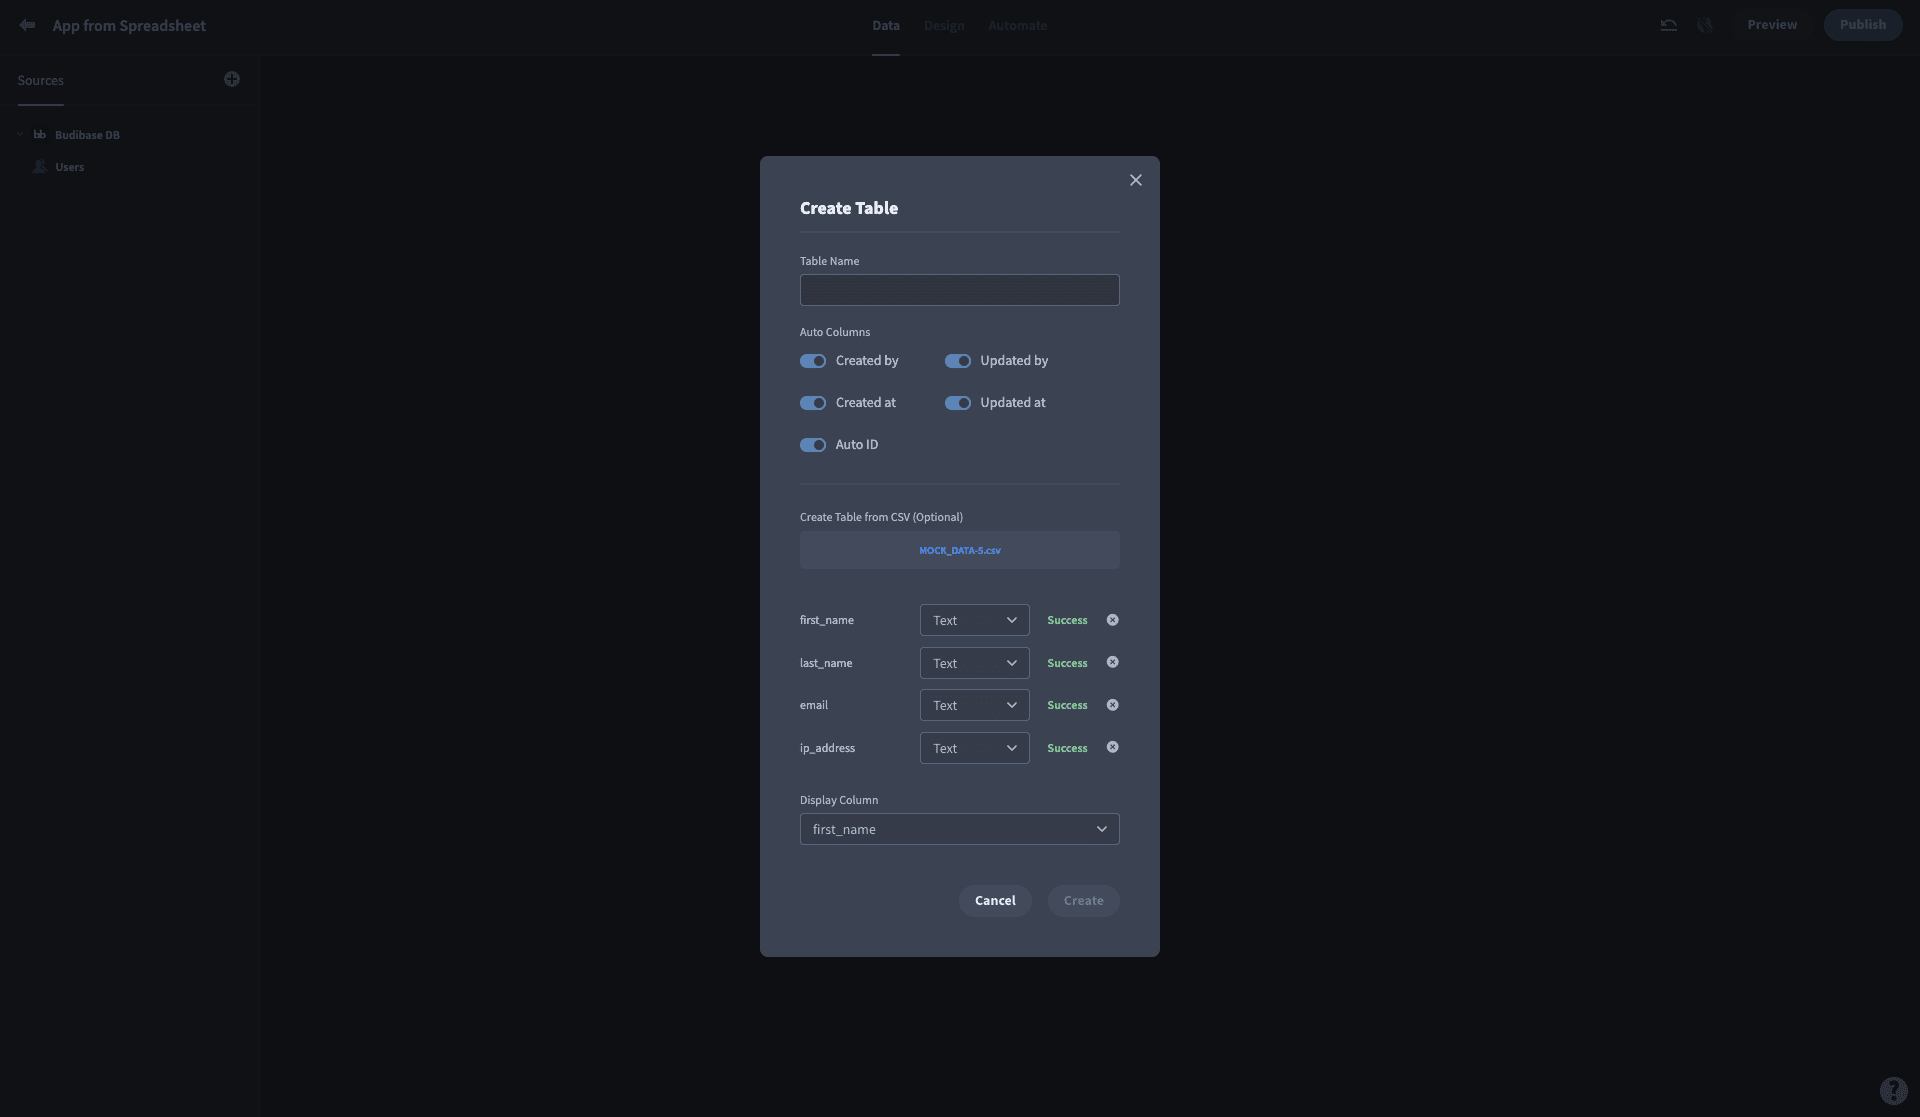
We can repeat this process to add more tables from CSV files using the Plus icon in the top left of our screen.
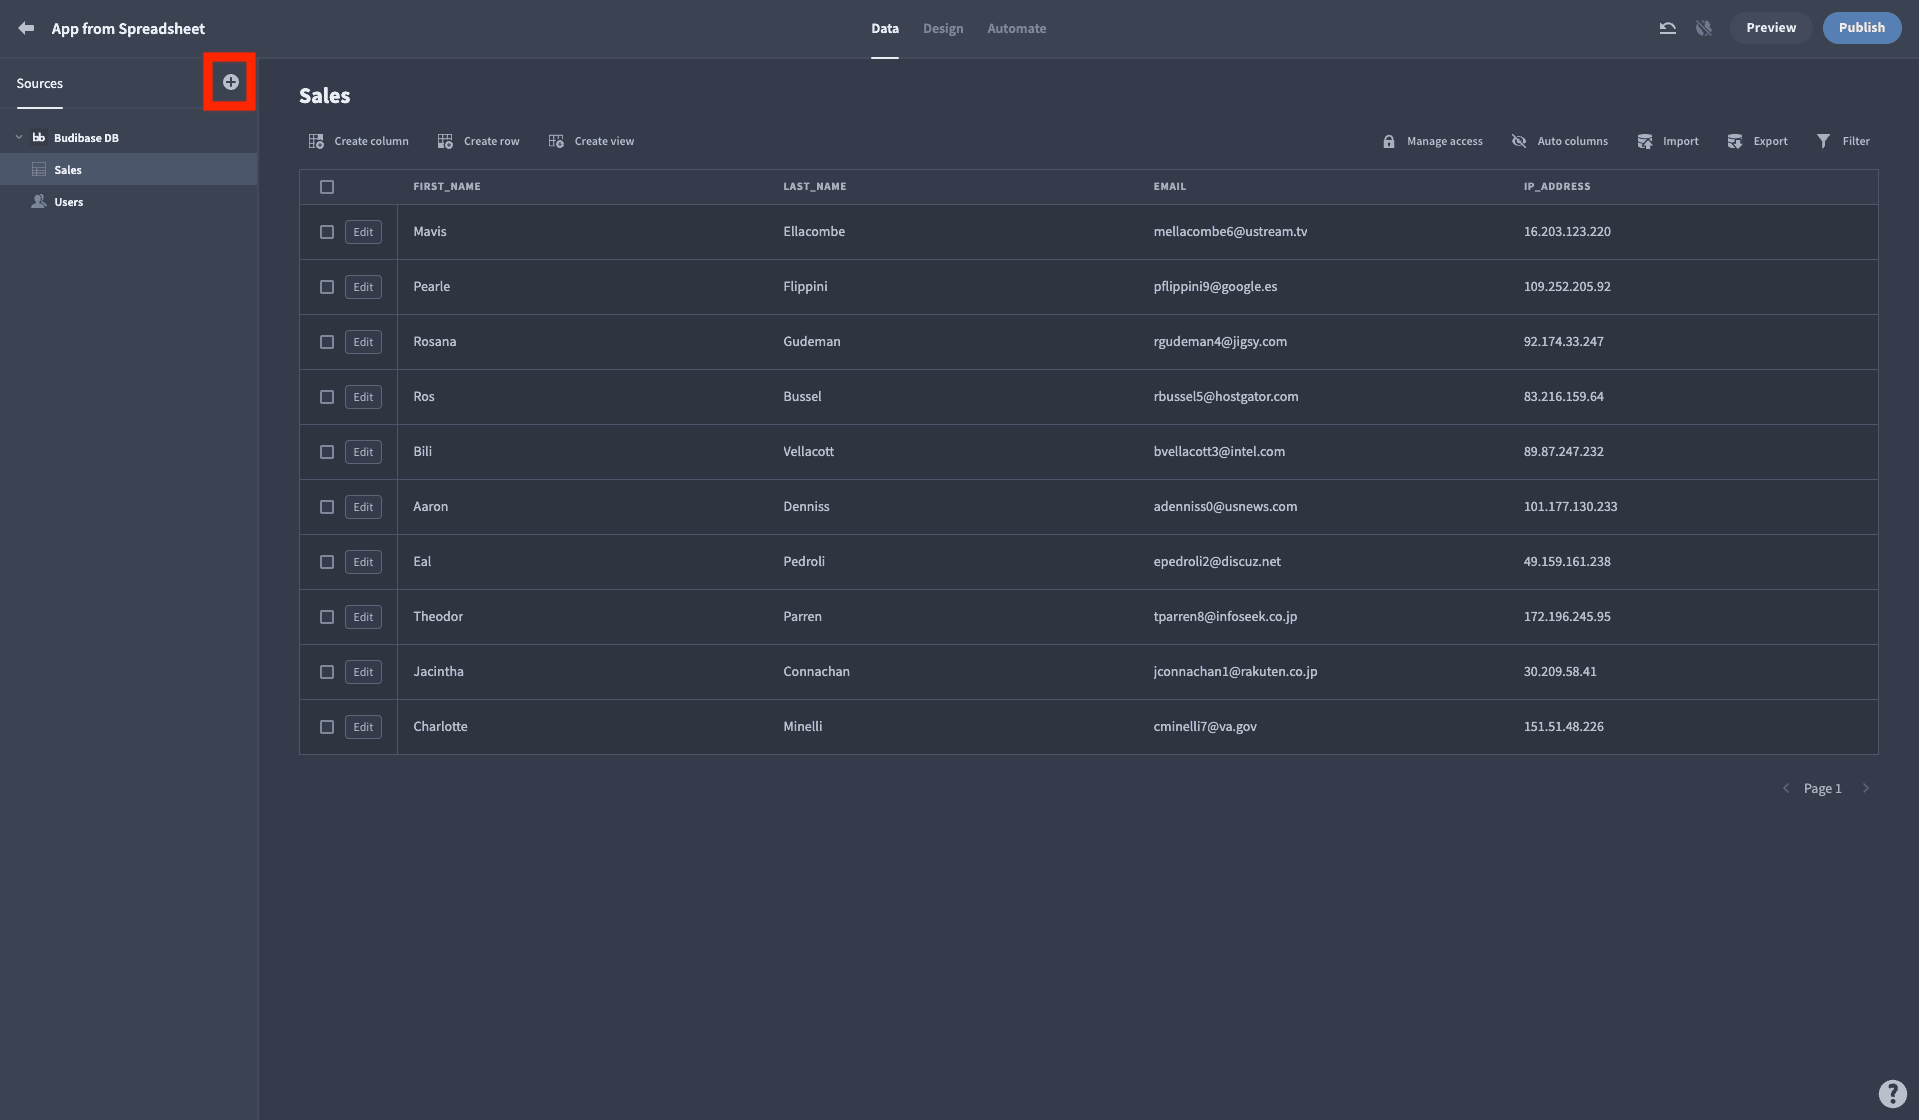
Option two means connecting directly to a Google Sheets file as a data layer for our app. We’ll start by adding a new data source, just like before. Except this time, we’ll choose Google Sheets instead of BudibaseDB.
Then, we can sign in to our Google account, paste our spreadsheet URL into Budibase data connector UI, and import each individual table that we want.
Take a look at our guide to legacy app modernization .
3. Configure your data layer
Once our data is successfully pulled into Budibase, we can follow a few extra steps to make it our own. One of the really cool things about Budibase is how our data tools bridge the gap between spreadsheets and databases, in terms of functionality, usability, and flexibility.
That is, you can do things with your existing data, that just wouldn’t be possible in Excel.
Let’s look at a couple of examples of how we can configure our data to create an app from an Excel spreadsheet.
First, let’s talk about relationships. So, earlier we uploaded a CSV file for all our Sales data. Let’s say we had another table called Baskets. This stores information on the products each sale actually contained.
This won’t be much use unless we relate each sale to a basket.
On either table, hit the Create Column button, and choose Relationship under the Type dropdown:

We can then name our relationship variable, and choose whether we want a many-to-many or one-to-many relationship between the tables. This allows us to do things like create formula variables in one table, based on values in relevant rows in the other.
We can also set broad access controls at this point, under the Manage Access button, but we’ll return to this a little later since access deserves a topic of its own.
4. Build your interfaces
With our data layer configured, we can start to customize your app interface. Now, of course, there’s a lot of potential for variation here. At least, the types of UIs you build will obviously depend on what you want to achieve.
For replacing Excel spreadsheets, though, we can think in terms of a couple of broad categories. These include:
- Dashboards.
- Admin panels.
- Sign-up forms.
- Data entry tools.
- CRUD tools.
Luckily, none of these types of apps are earth-shatteringly complicated.
In fact, these are all basically variations on a couple of simple designs. So, when you make an app from an Excel spreadsheet, you’ll need screens to:
- Display and present data.
- Add and update data.
- Or both.
Budibase is here to give you a headstart in any case.
We offer fully functioning, autogenerated CRUD apps , at the press of a button. Use these screens for all kinds of data entry, management, and self-service applications.
Check out our ultimate guide to form UI design for inspiration.
Start by hitting Add screen under the Design tab:
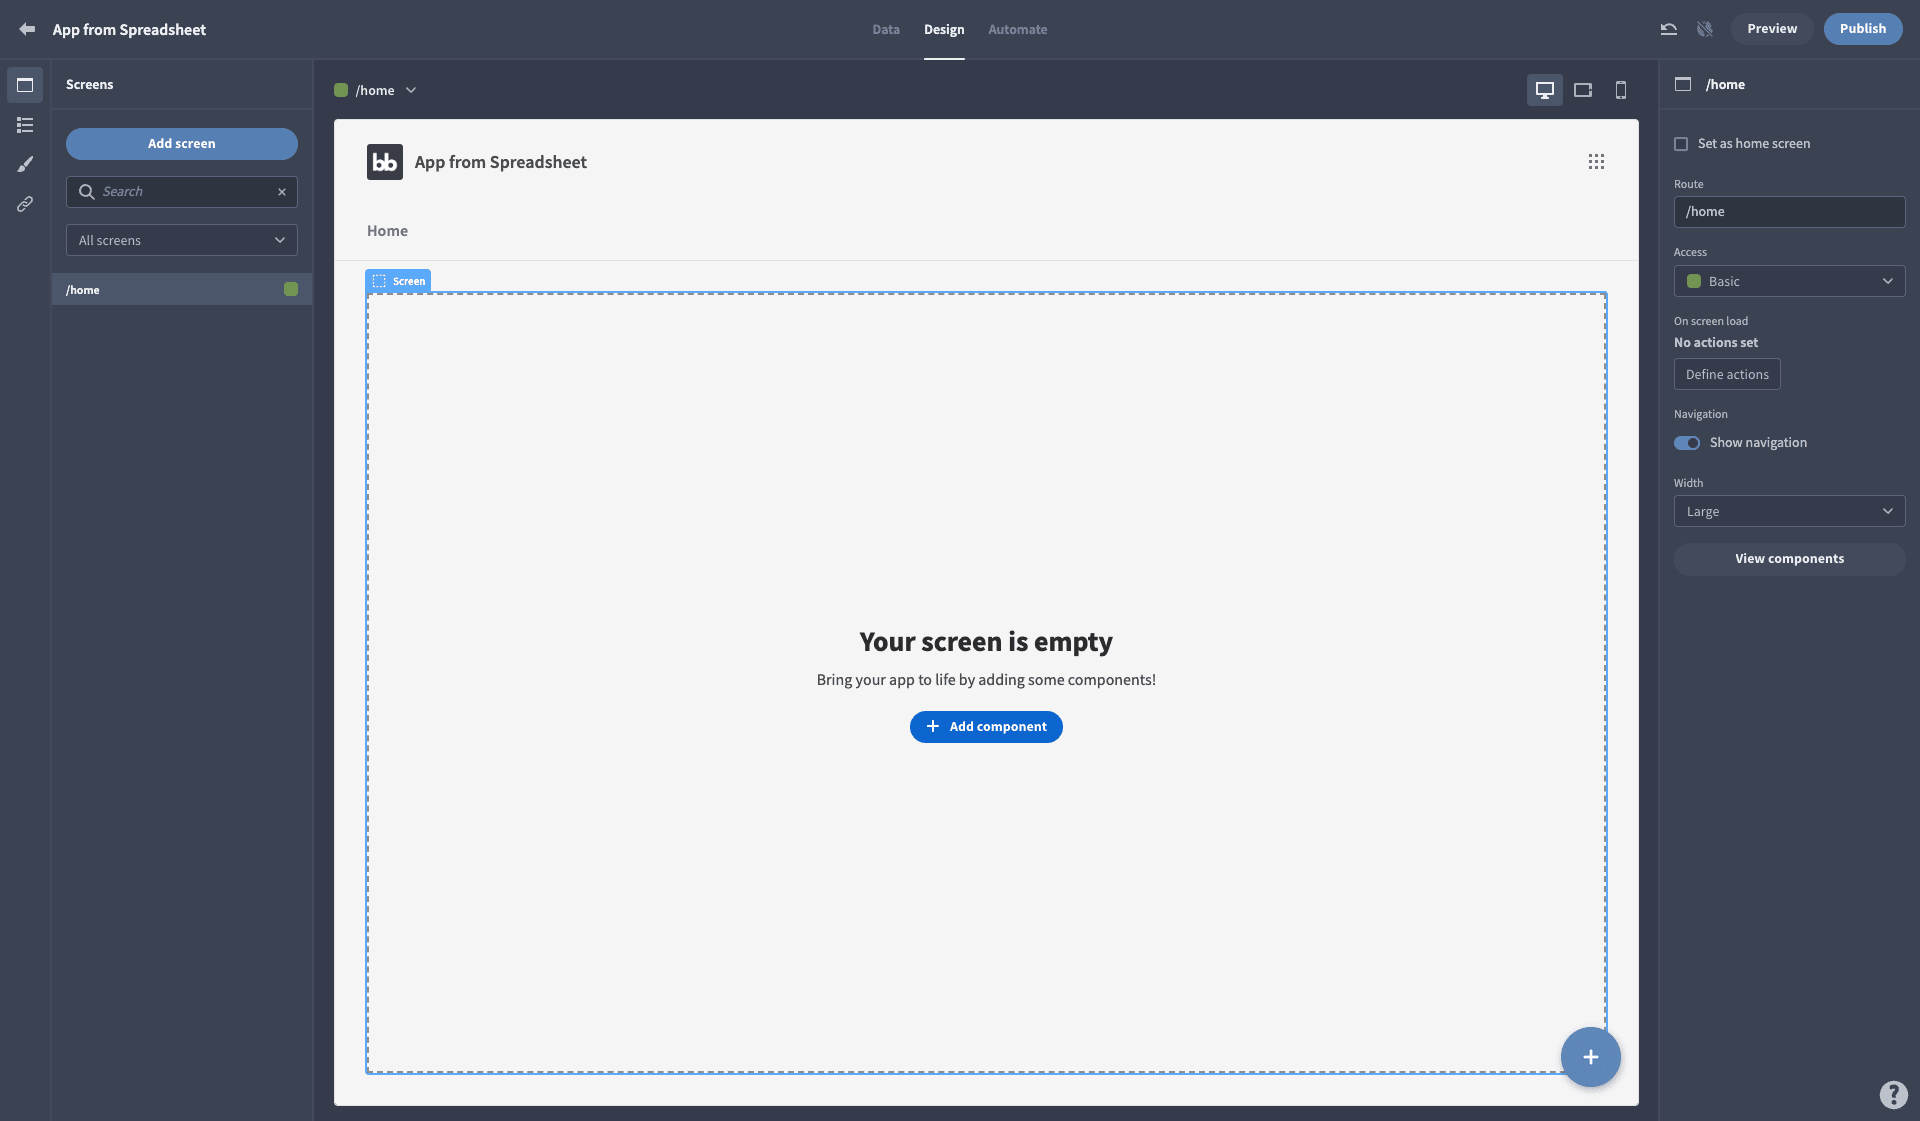
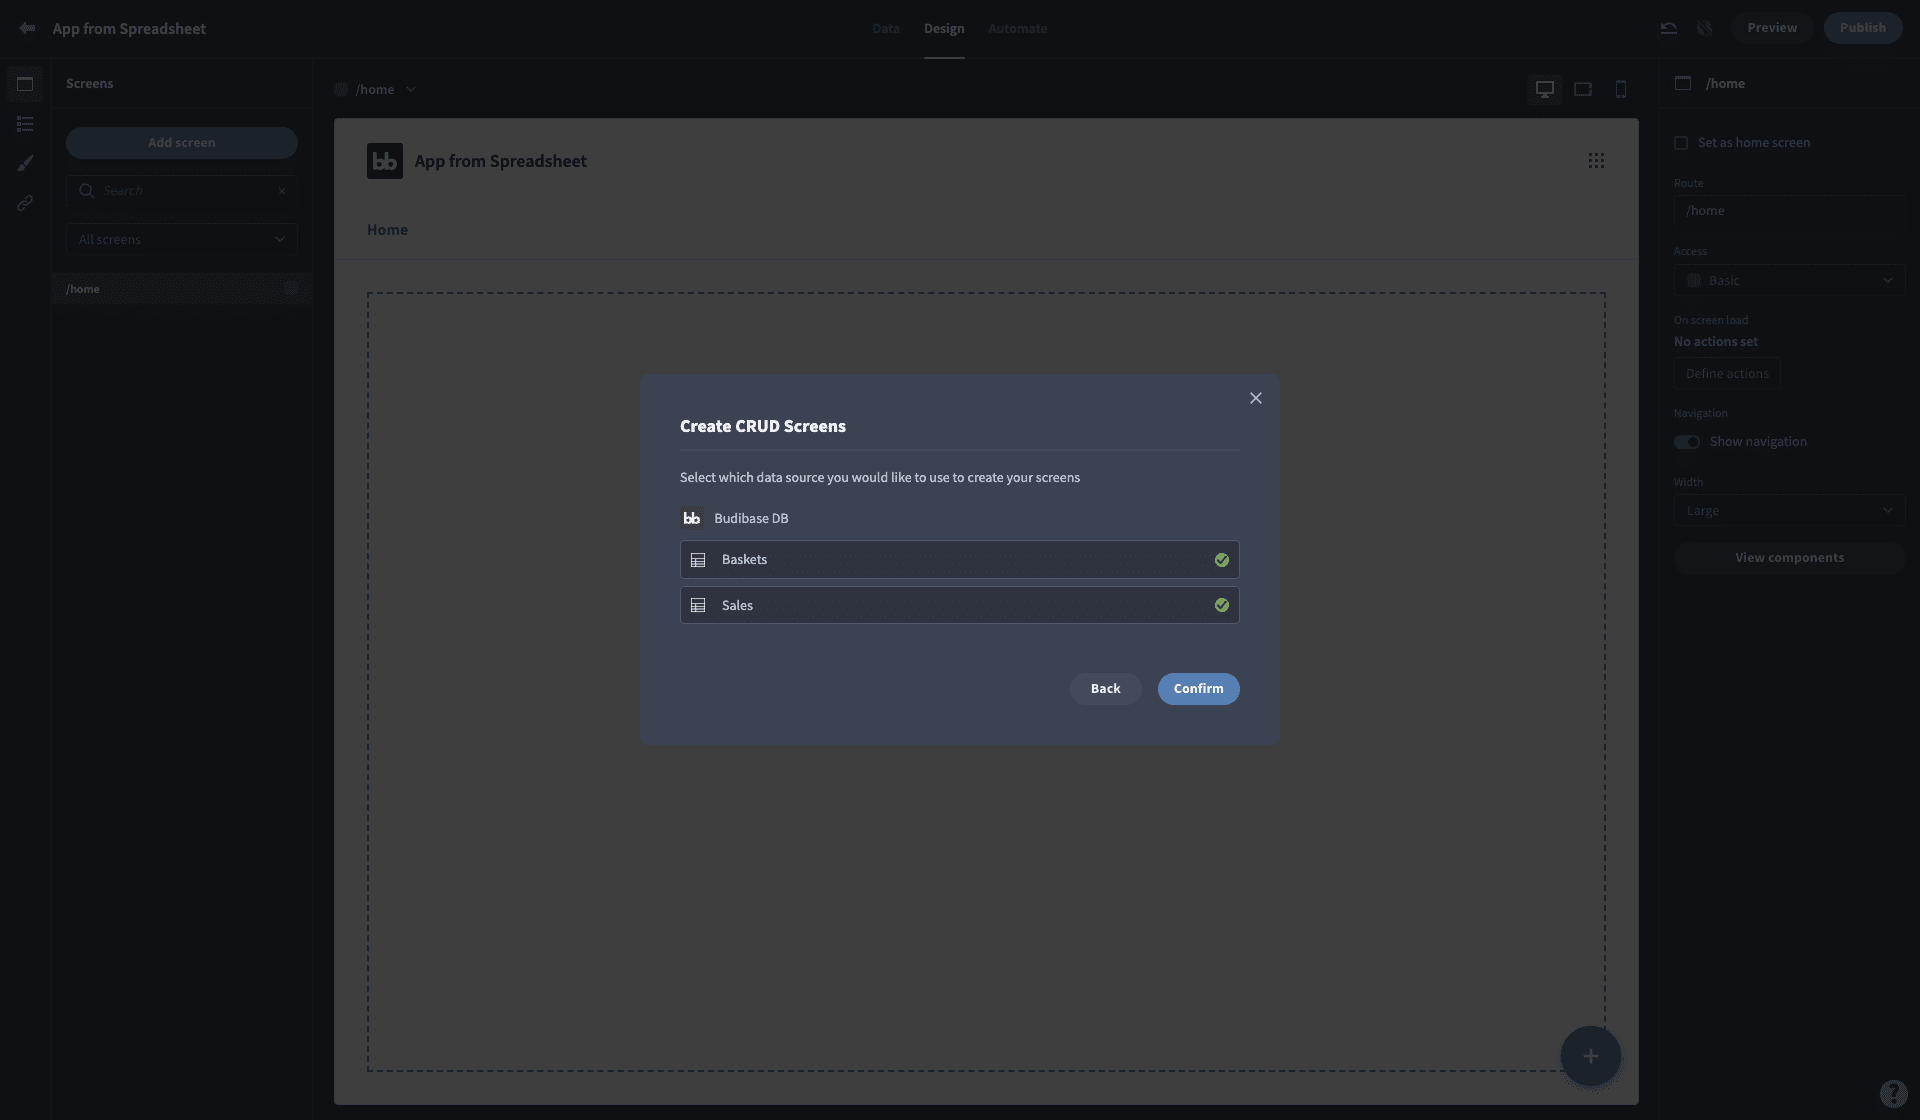
Select the data sources you want to build CRUD screens for:
And choose an access level:
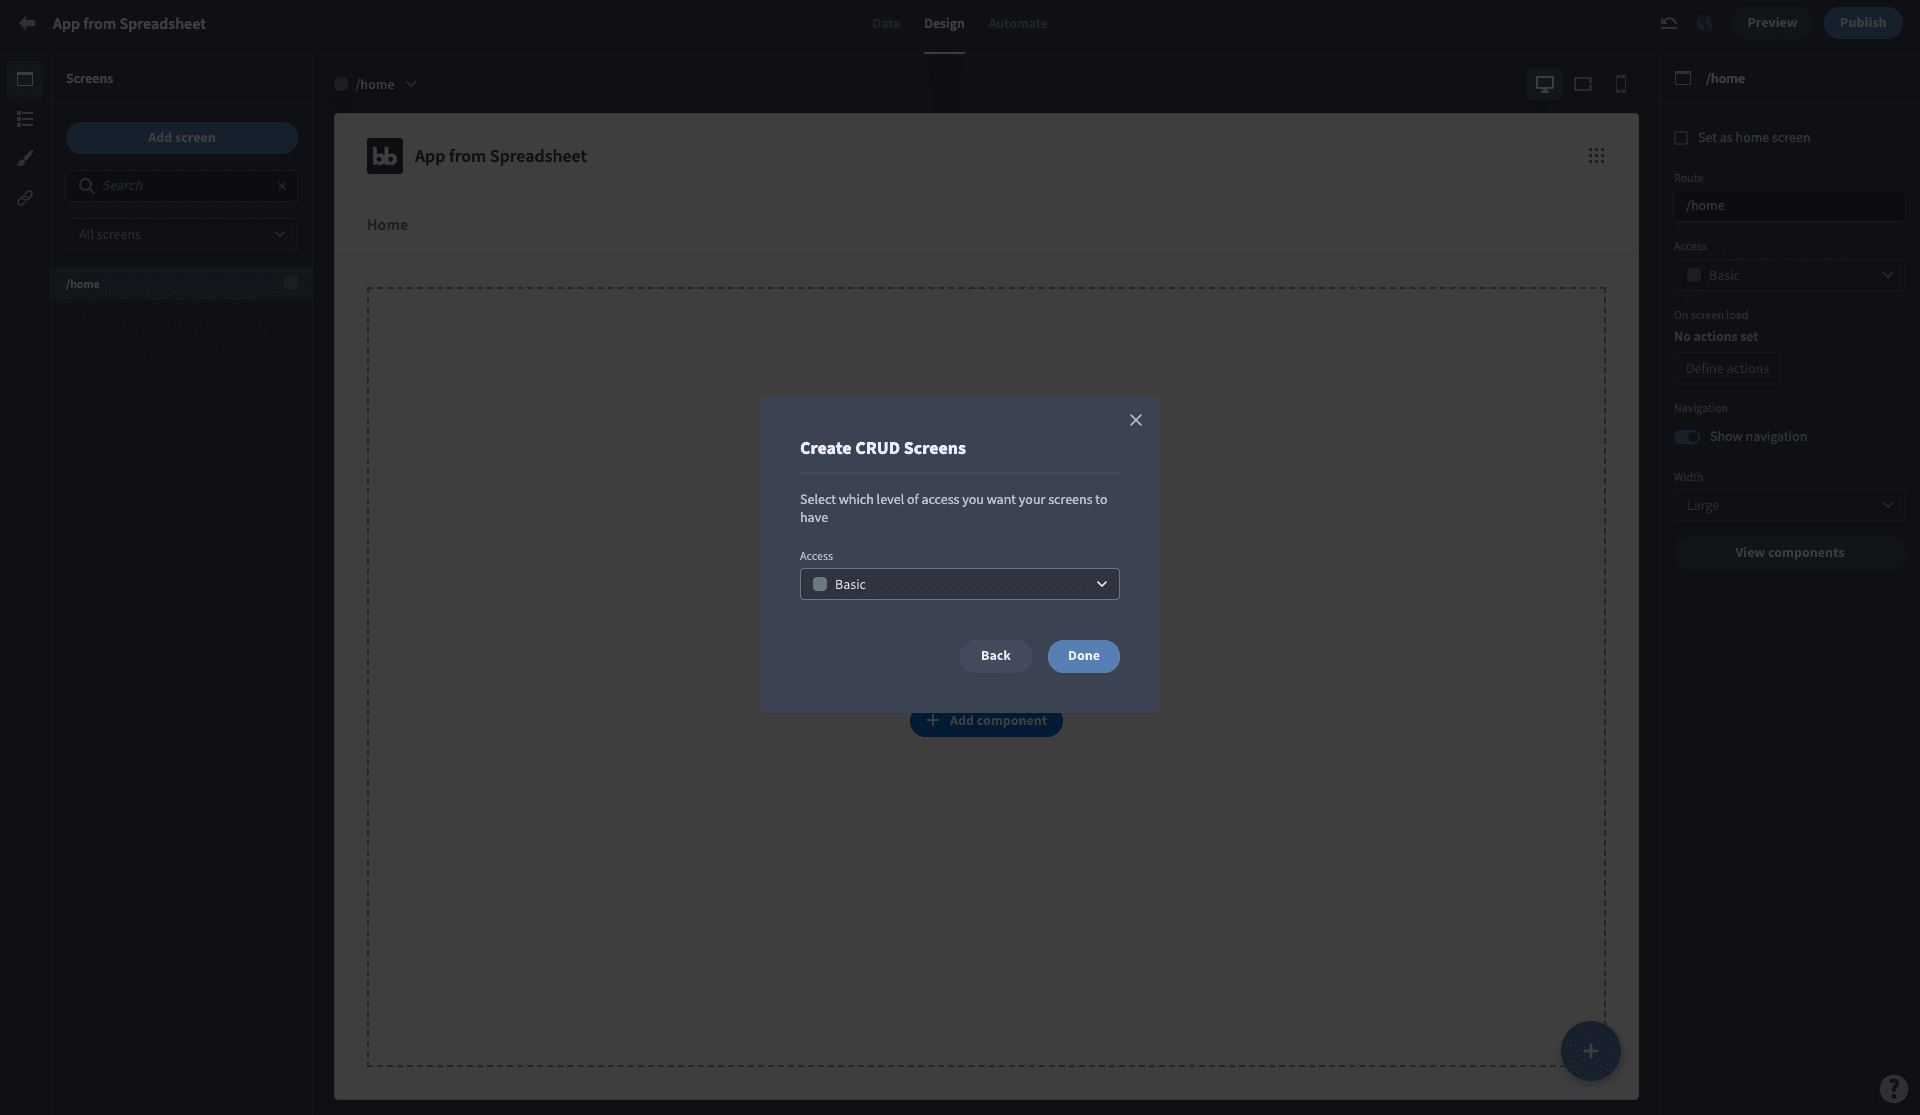
And there you have it. In three clicks, you have a fully deployable CRUD app. Of course, you can also customize this to your heart’s content.
Alternatively, your app might be more tightly focused on analyzing and presenting data. Budibase makes this a breeze too.
We offer a full suite of visualization components, including charts, graphs, stat cards, dynamic filters, and more.
Each of these can be used to display, transform, and aggregate back-end data, using bindable JavaScript and Handlebars expressions.
You might also like our guide to building a Google Sheets dashboard .
5. Create business logic
Next, we can add extra layers of business logic. There’s a good chance your workflows are a bit more complex than simply letting users loose to add or update data.
For instance, you might have specific layers of approval, auditing, vetting, or validation that you need to build into your app. This is one clear area where moving away from spreadsheets presents clear opportunities to improve efficiency.
That is, you can achieve these things within Excel or Google Sheets, but only to a limited extent. Even where this is possible, you can still expect a large amount of human intervention.
Codifying your processes with Budibase is the perfect way to introduce workflow automation or simply build dedicated interfaces to make manual tasks faster and easier. We’ll return to automation in a few minutes.
One way to add business logic to your spreadsheet-based apps is by creating custom formula variables. Since you’re a spreadsheet user, this should be a familiar idea. When we combine this with relationships, things get really special.
Let’s think back to our Sales and Baskets sheet example from earlier. Say we wanted to flag any Sales that relate to a Basket over a certain threshold.
For ease, we’ll say this is $1,000. We’ll think about what we want to do with this information in the next step, but for now, let’s just focus on actually flagging relevant entities.
We’ll start by creating a formula variable on the Sales table:
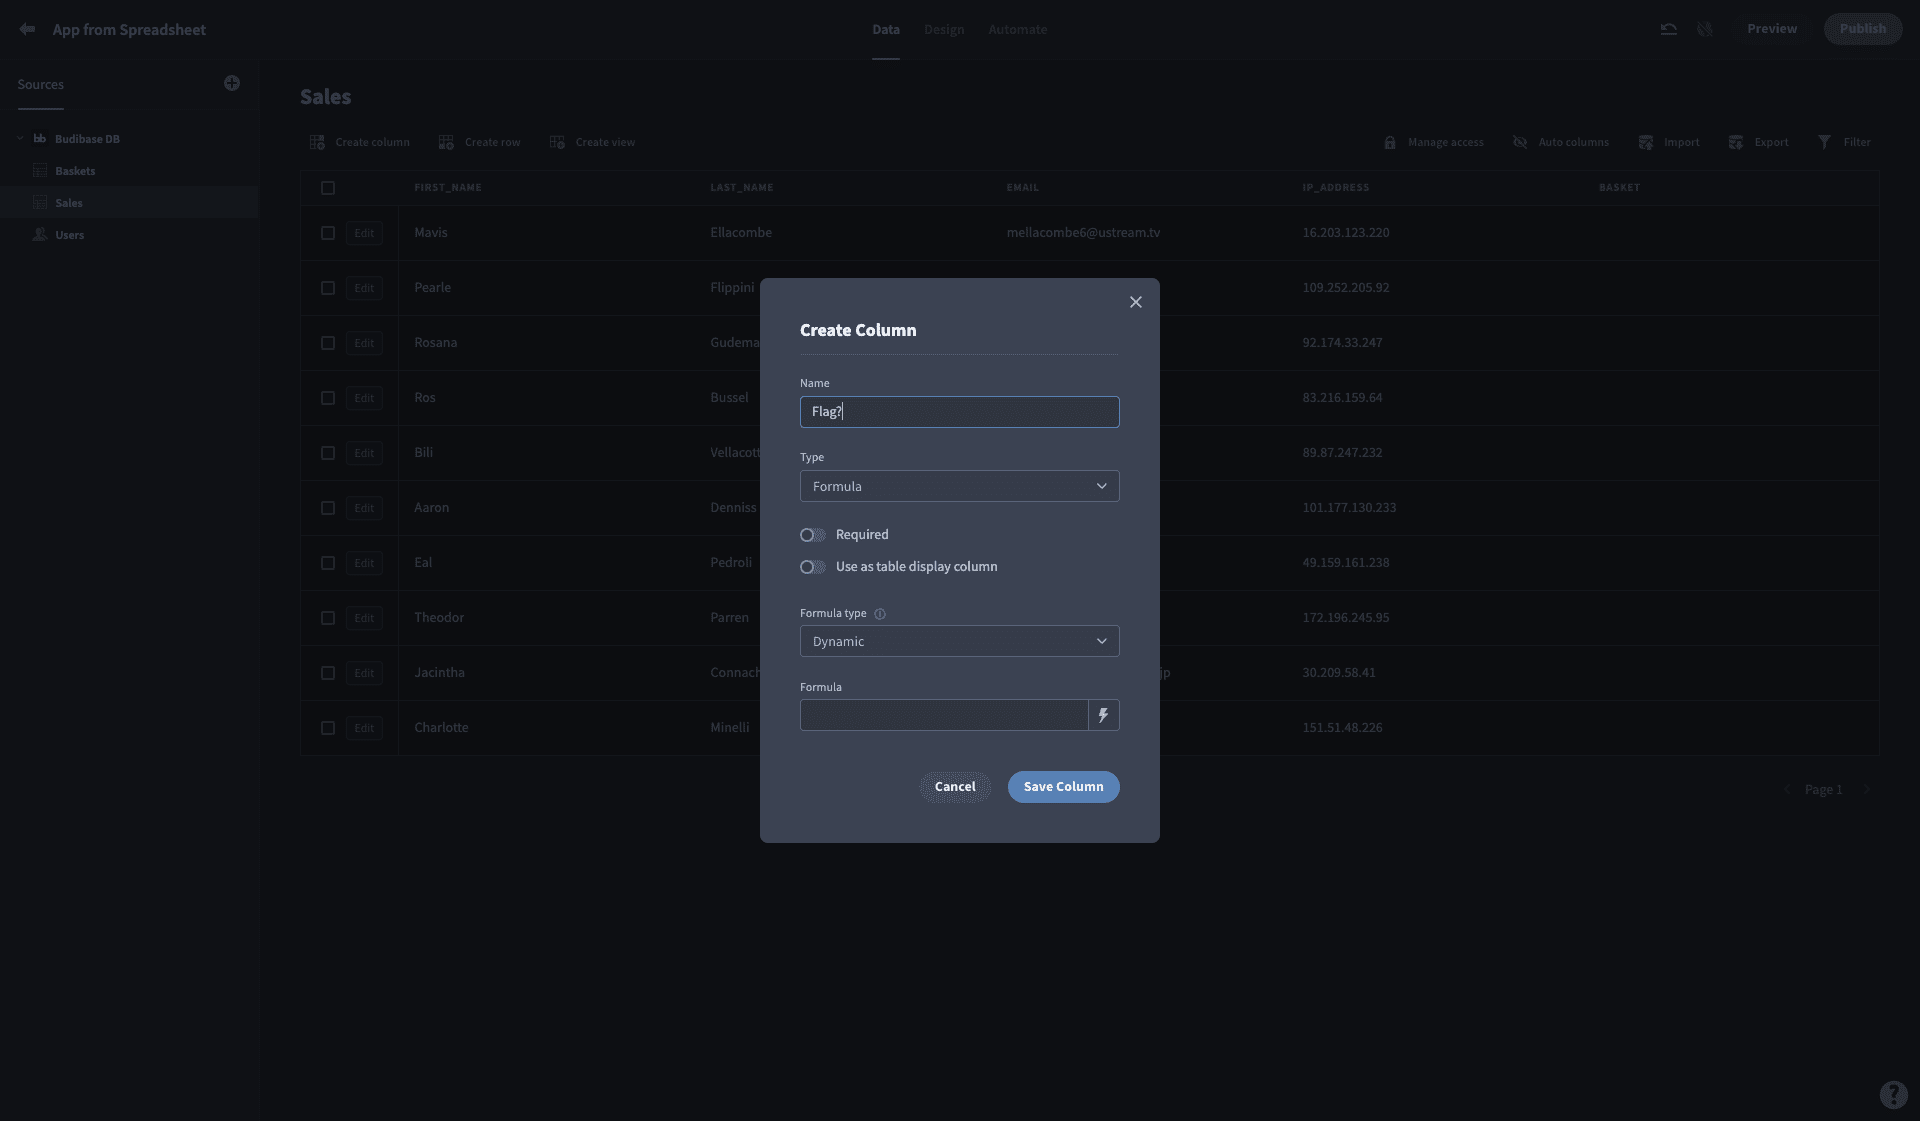
Then, we have a choice of using Handlebars expressions or custom JavaScript. We can also call in any values we need from related rows on the Baskets table:
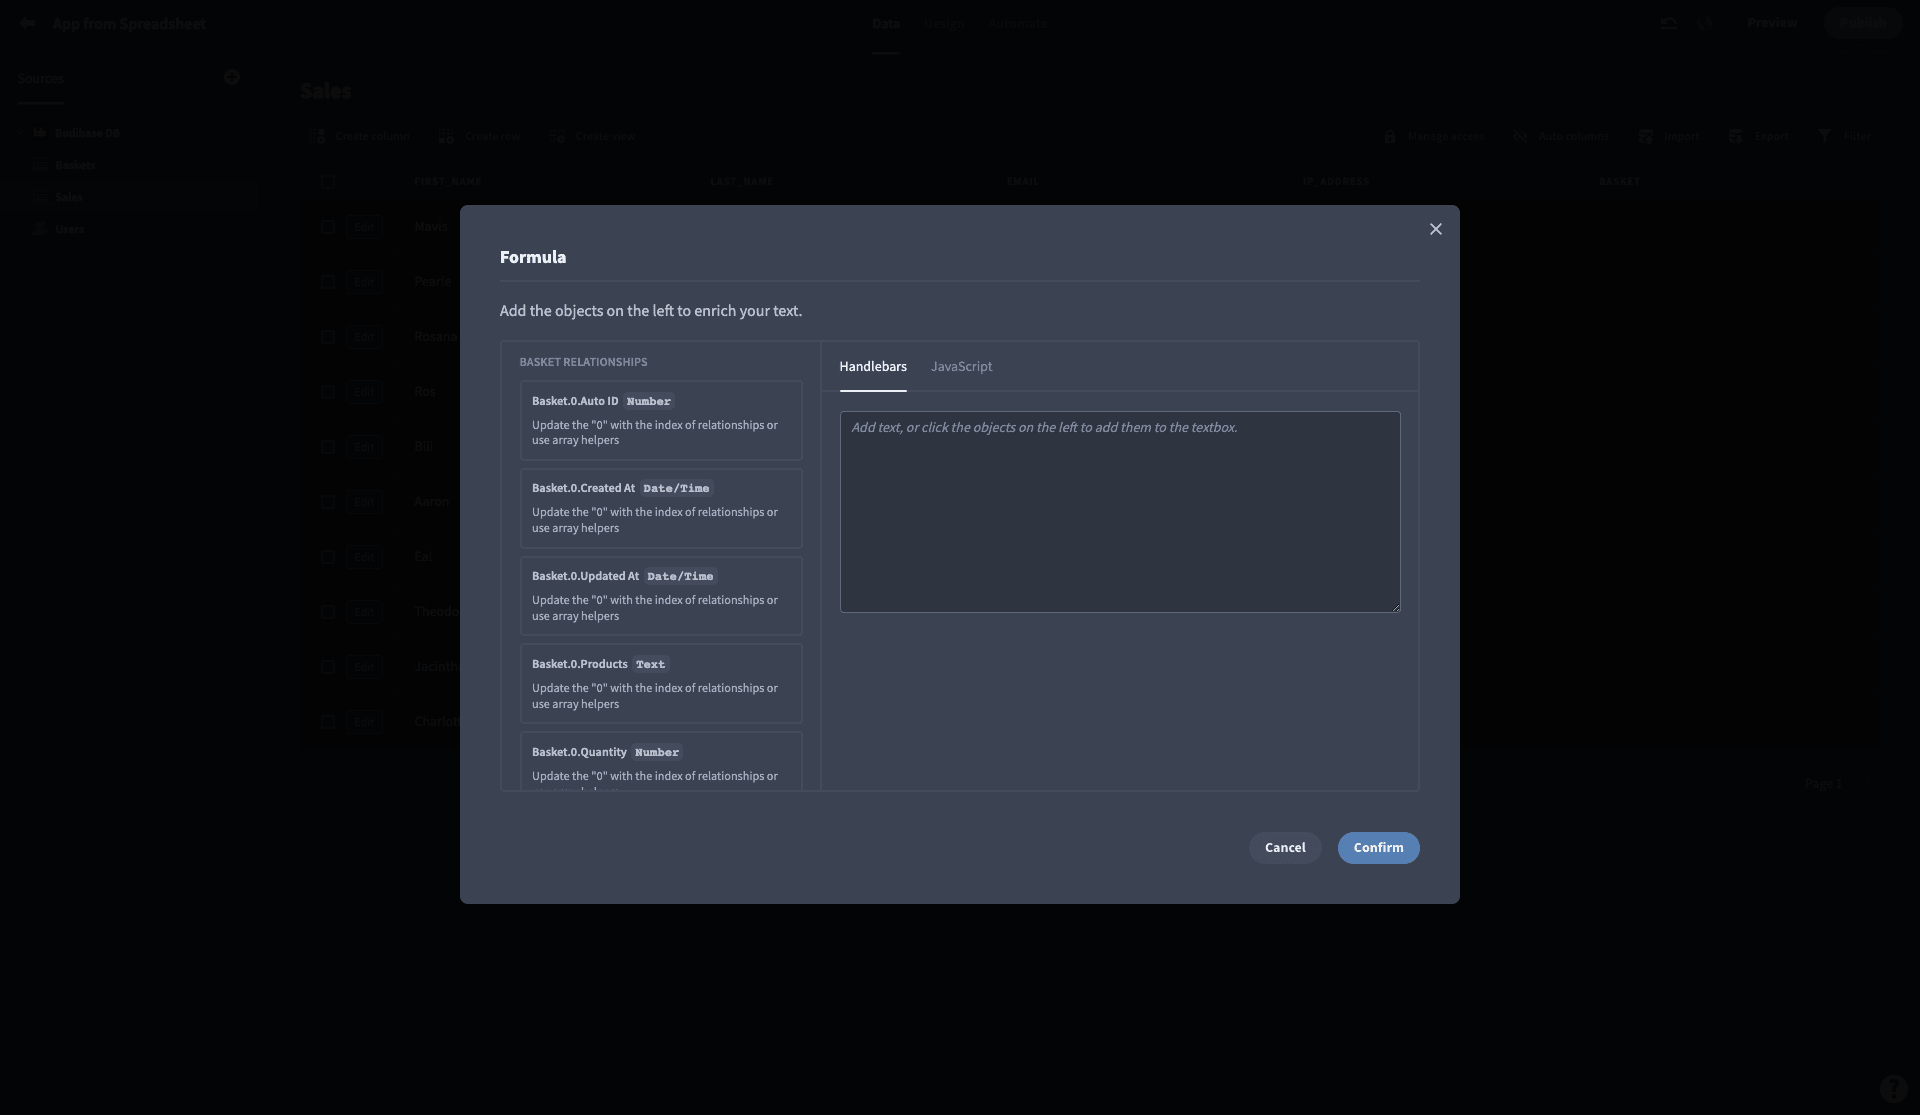
For our purposes today, keep in mind that each Sales entry should relate to a single Baskets row.
We want a bit of conditional logic, so we’re going to use JavaScript rather than handlebars. We’ll start by declaring a variable and setting it to the Cost variable in the first (and only) related Baskets row:
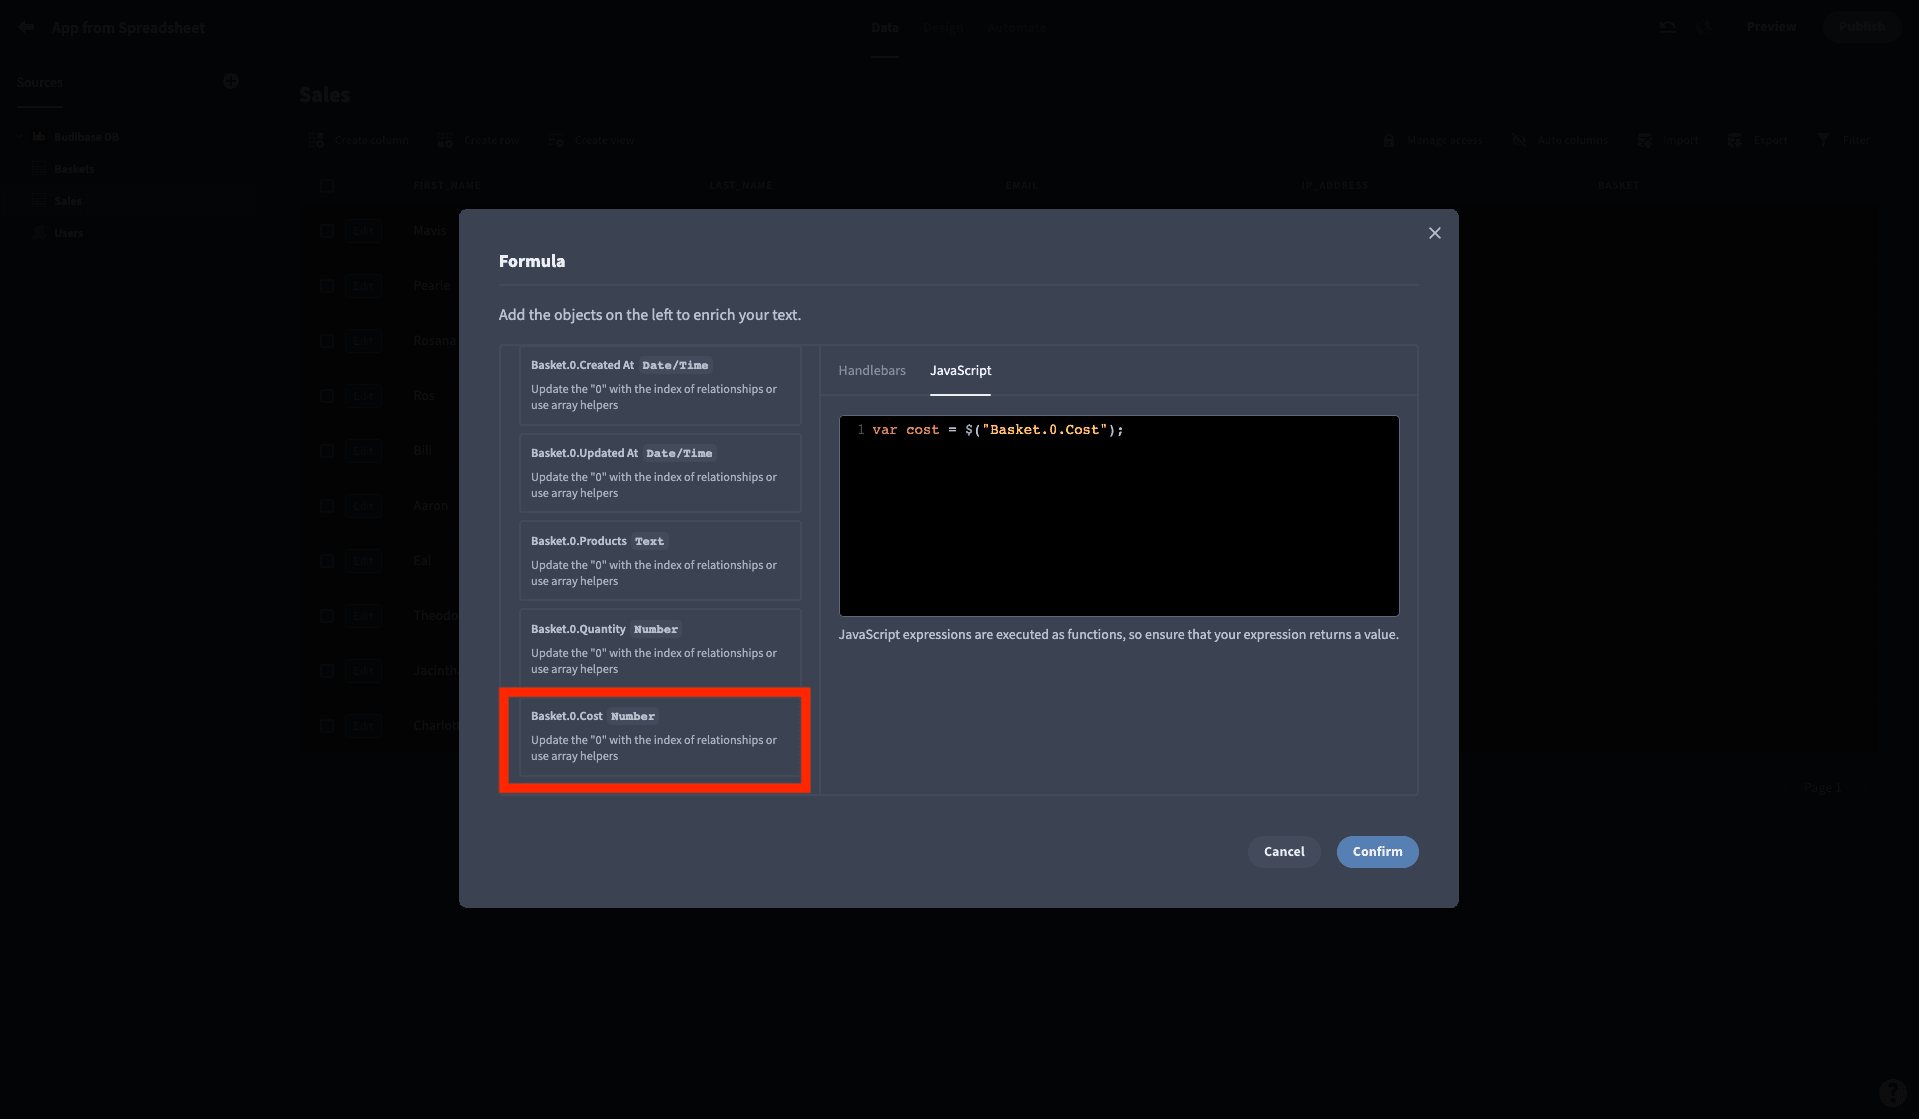
Note, if we had more than one related row, we’d need to specify which one we mean in our JavaScript expression. The 0 in $(“Baskets.0.Cost”) means that we’re talking about the first related row.
Next, we’ll use an if statement to assess whether our cost variable is greater than or equal to 1000. We’ll return true as a boolean value if so:

And then we’ll add an else statement to return false for smaller or missing values:
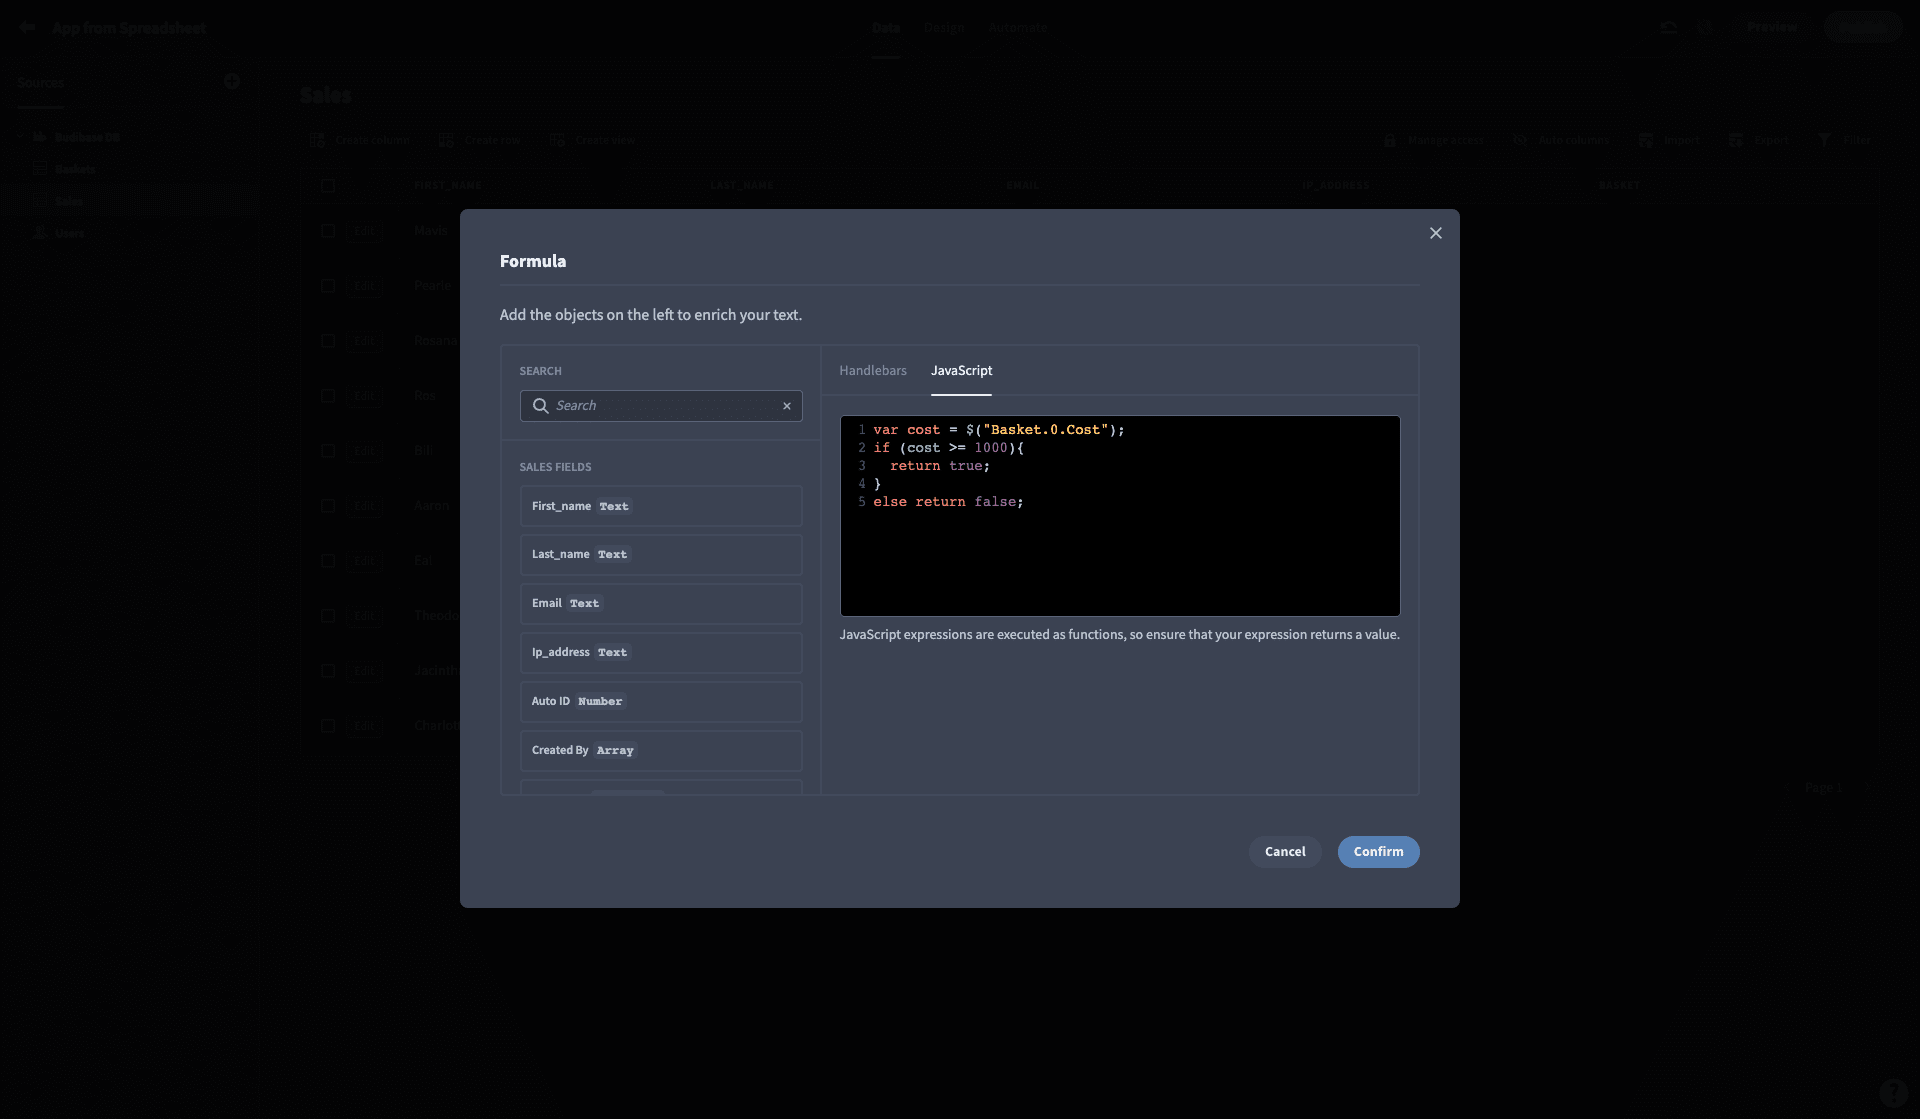
Then we can take a look at our table to make sure our formula outputs the values we expect:
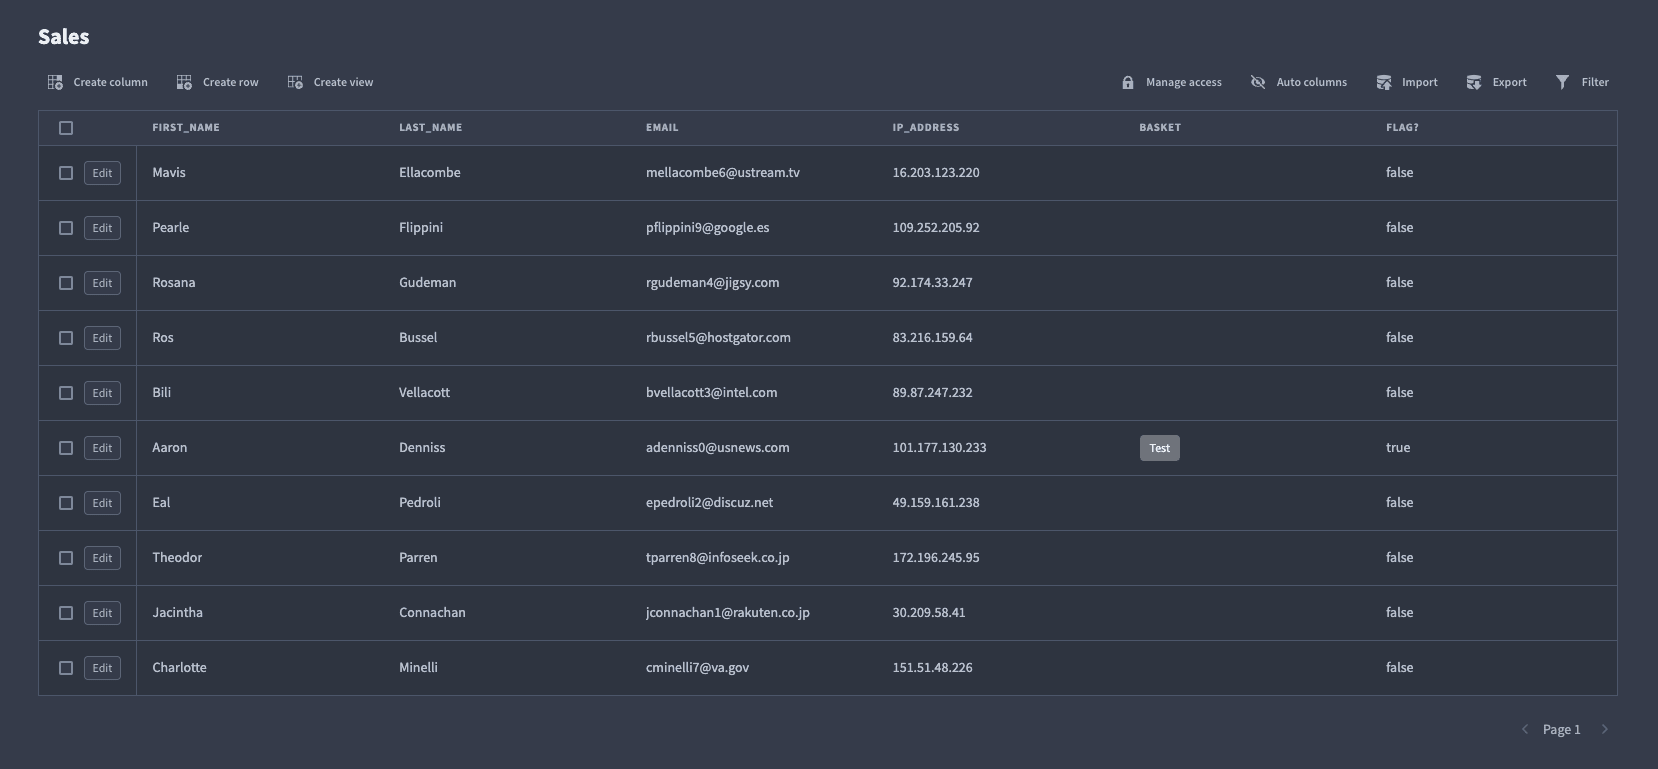
This is a simple piece of business logic that would be difficult to achieve in a spreadsheet since Excel doesn’t really support relationships between tables.
Take a look at our guide to integrating multiple databases .
6. Add automations
Replicating business logic is great and all, but the real efficiency dividends come when you start to automate actions based on this. So, we can quickly identify sales worth more than $1,000, but what are we going to do with this information?
To be blunt, there wouldn’t be much point in automatically categorizing our sales if human users still needed to manually take action on the back of this.
So, let’s say for example that we’re flagging large orders to that we can send these customers’ details to our sales team, for premium after-care.
You might want to send relevant rows to a dedicated data set in your CRM or simply email your team to notify them. It all depends on what your software stack looks like.
Lucky for you, Budibase makes it easy to build custom automations, without writing a single line of code.
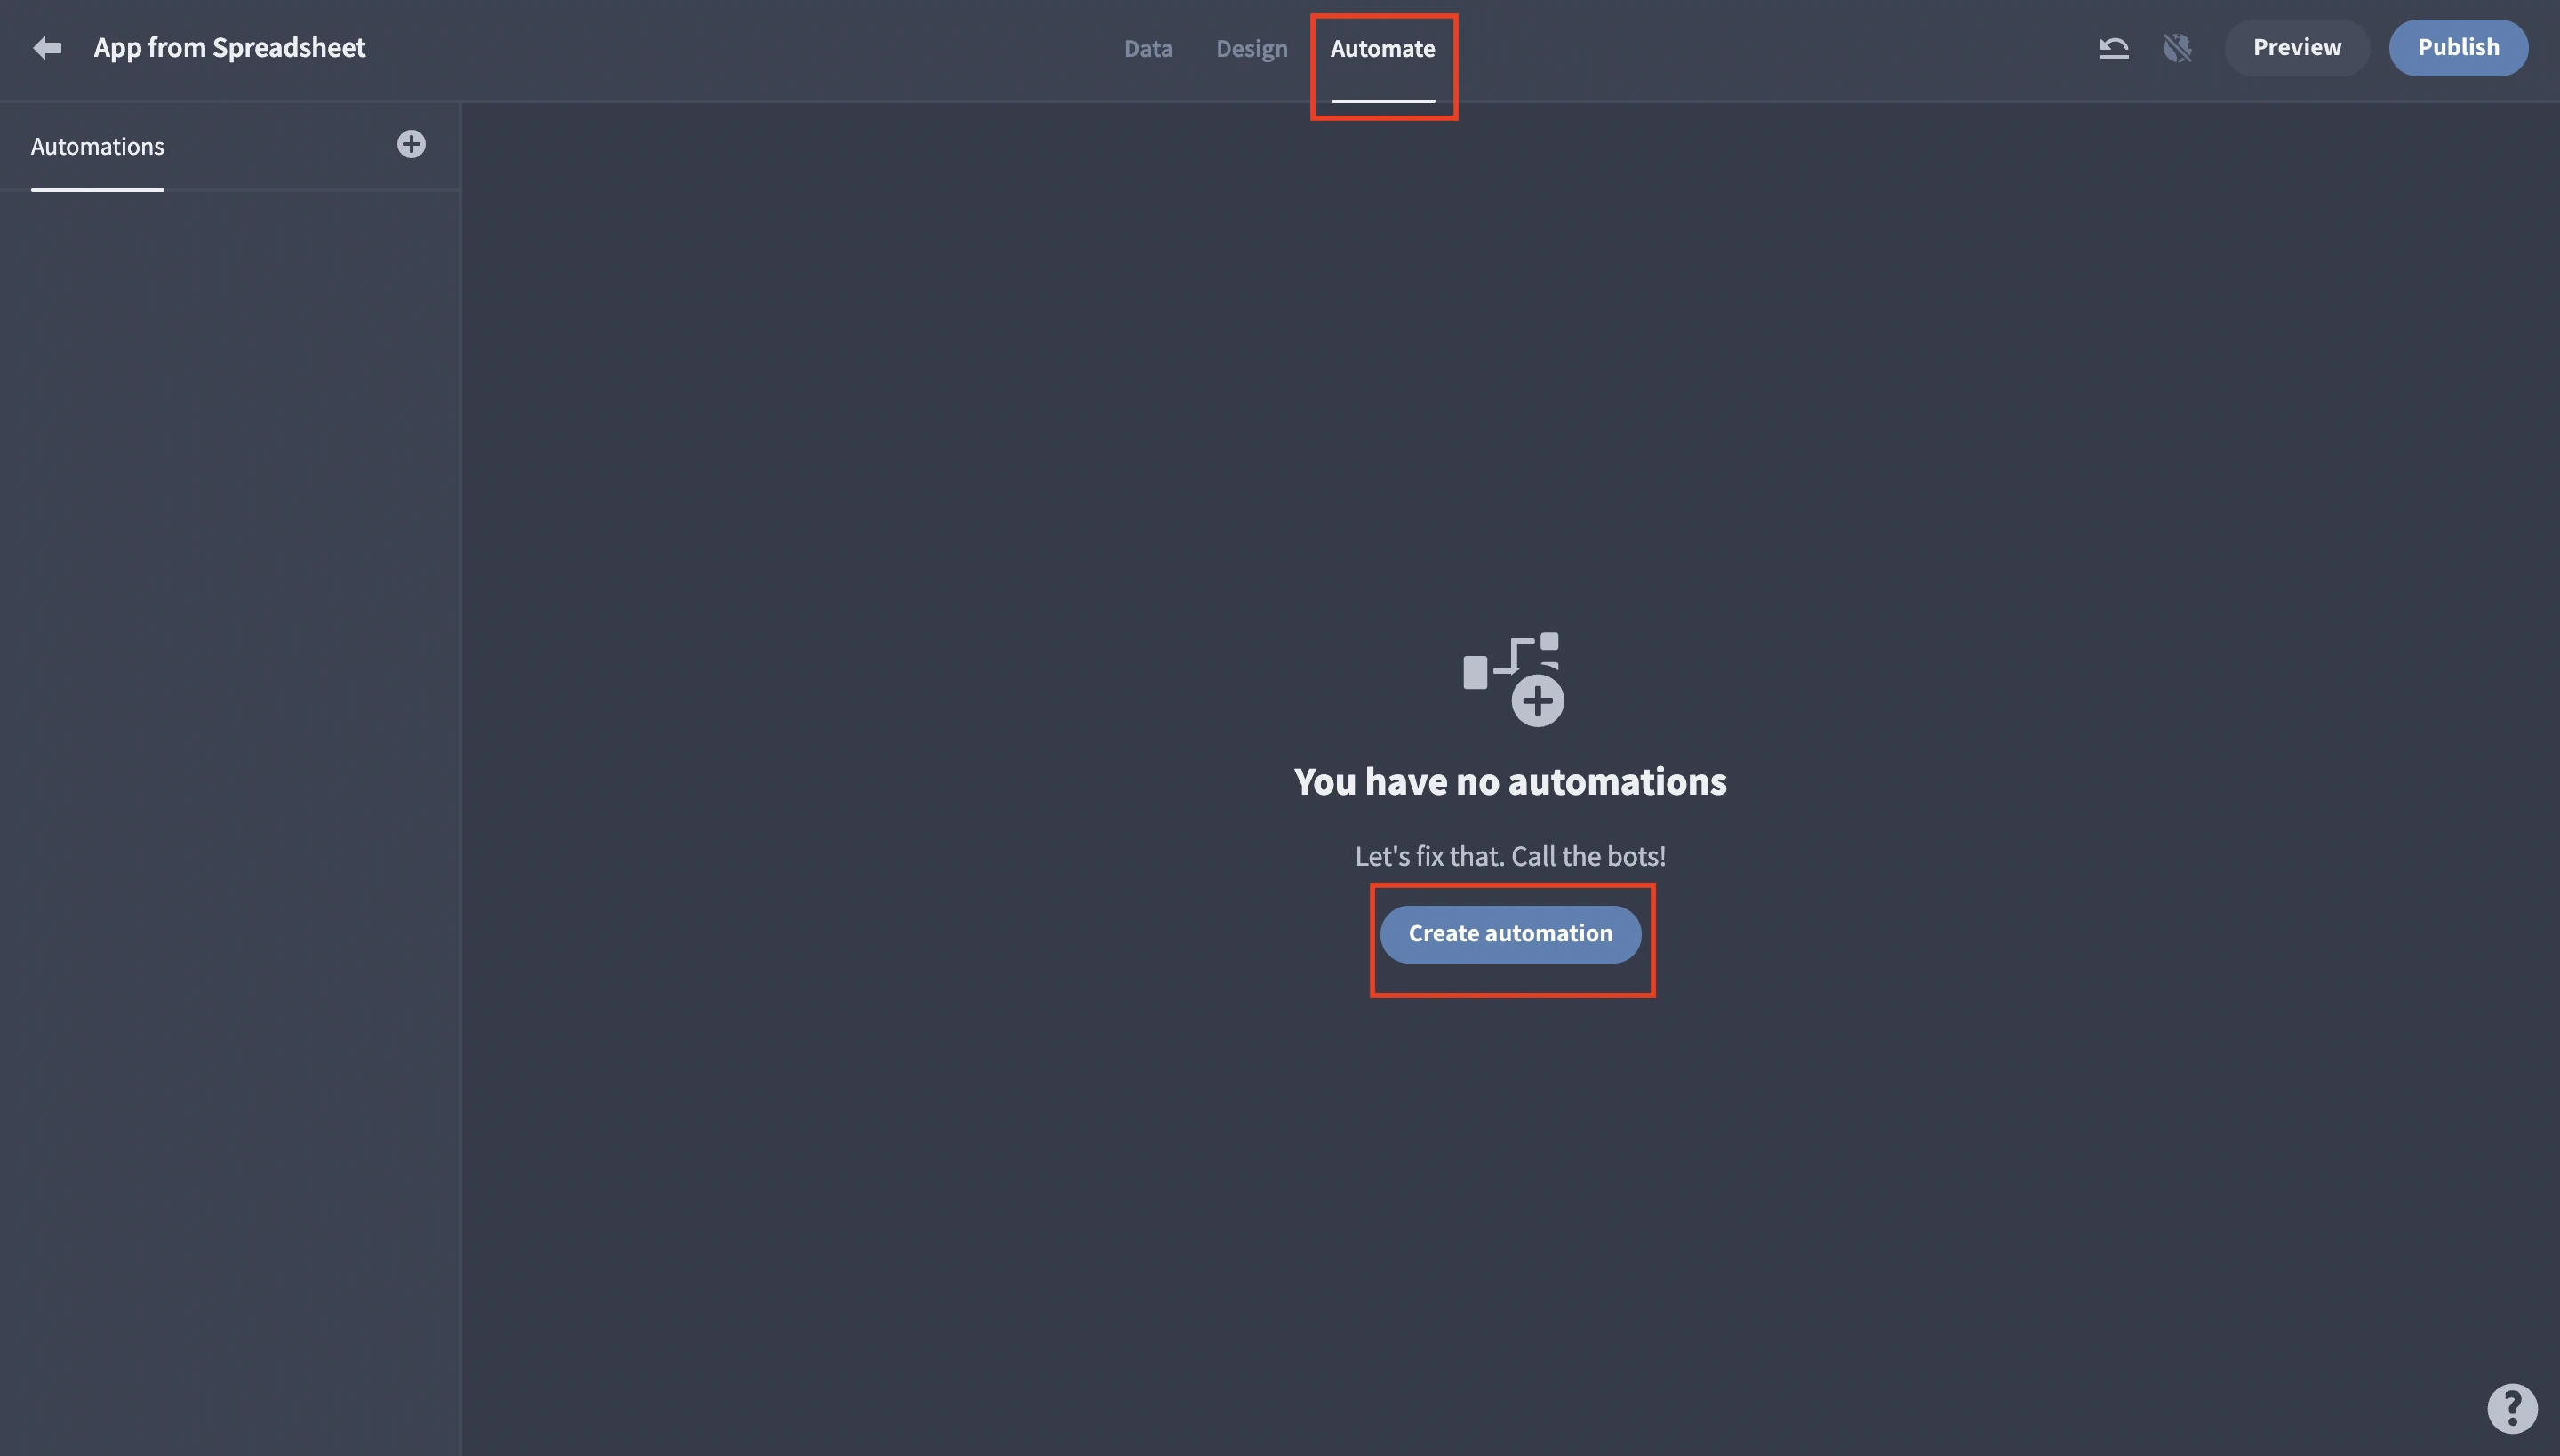
Let’s take a quick example of how to build an automation in Budibase. First thing’s first, head over to the Automate tab at the top of your screen and choose Create automation:
Next, we’ll need to give our automation a name and decide on a trigger:
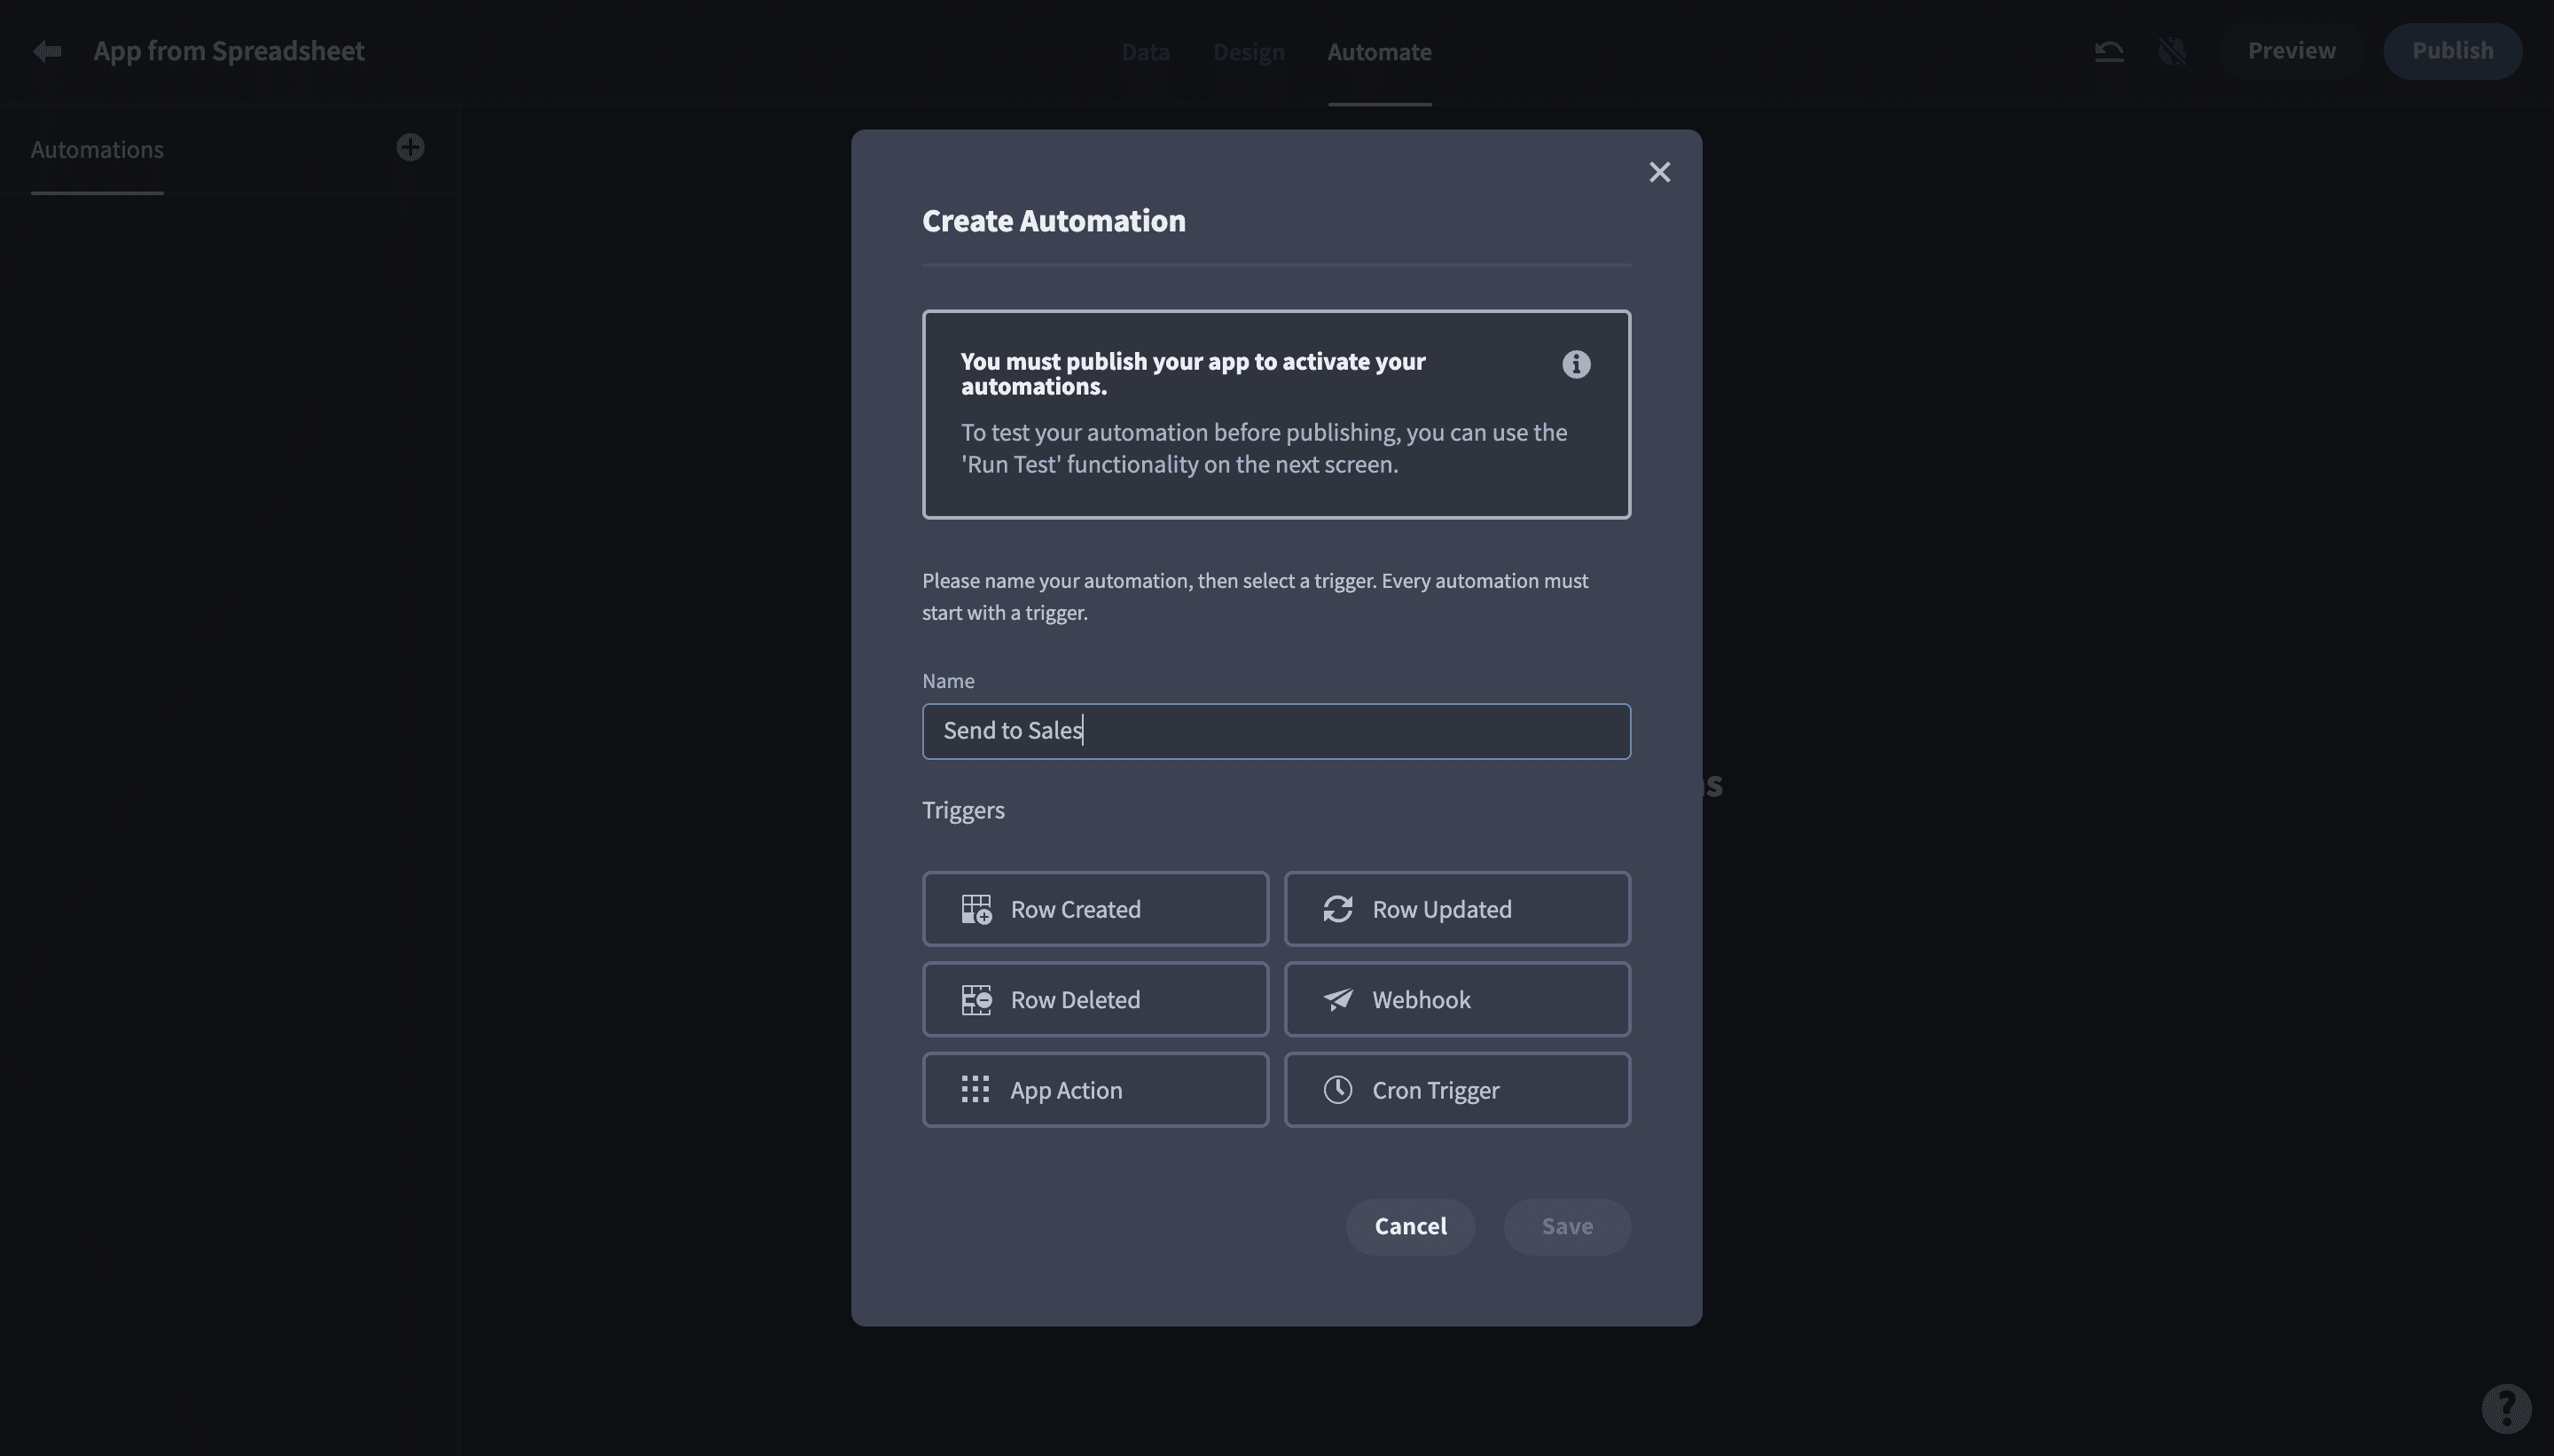
We’ve got a few different options that might work for our use case. We want to choose the trigger that will cover every potential scenario while still minimizing the number of times our automation needs to run.
We’re going to opt for a Row Updated trigger - specifically, for the Sales table.
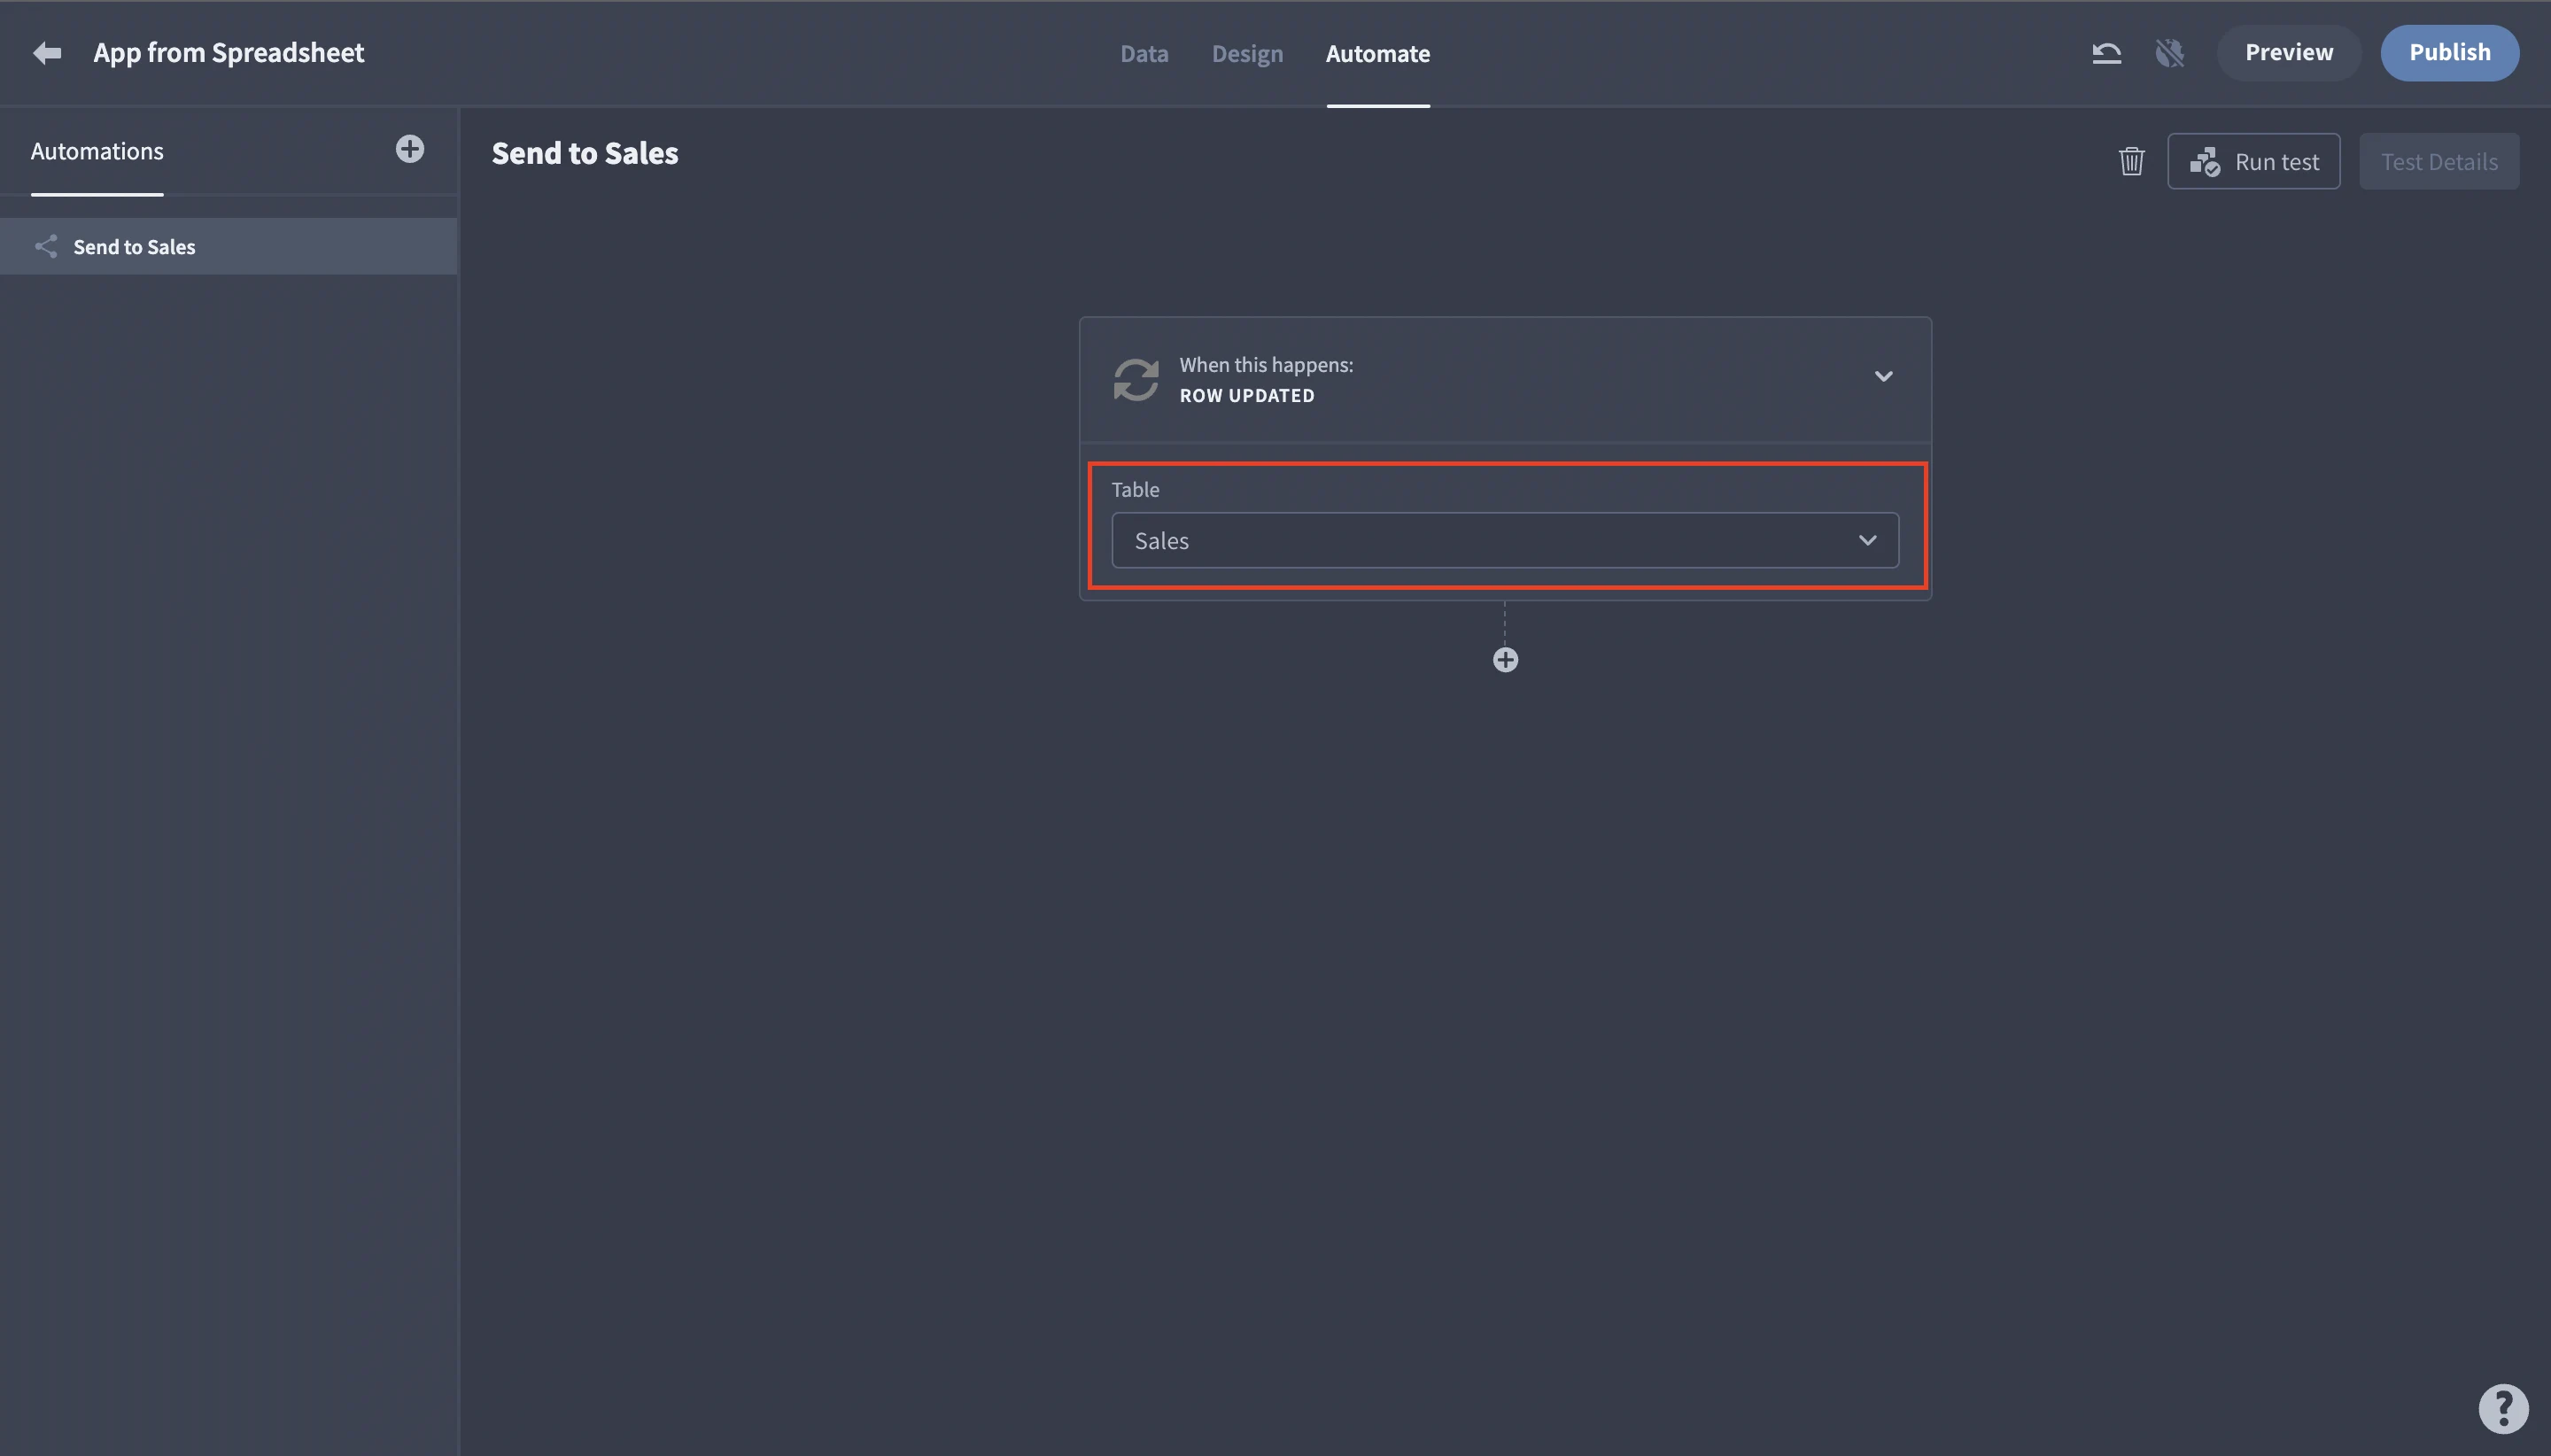
Next, we’ll add a condition block:
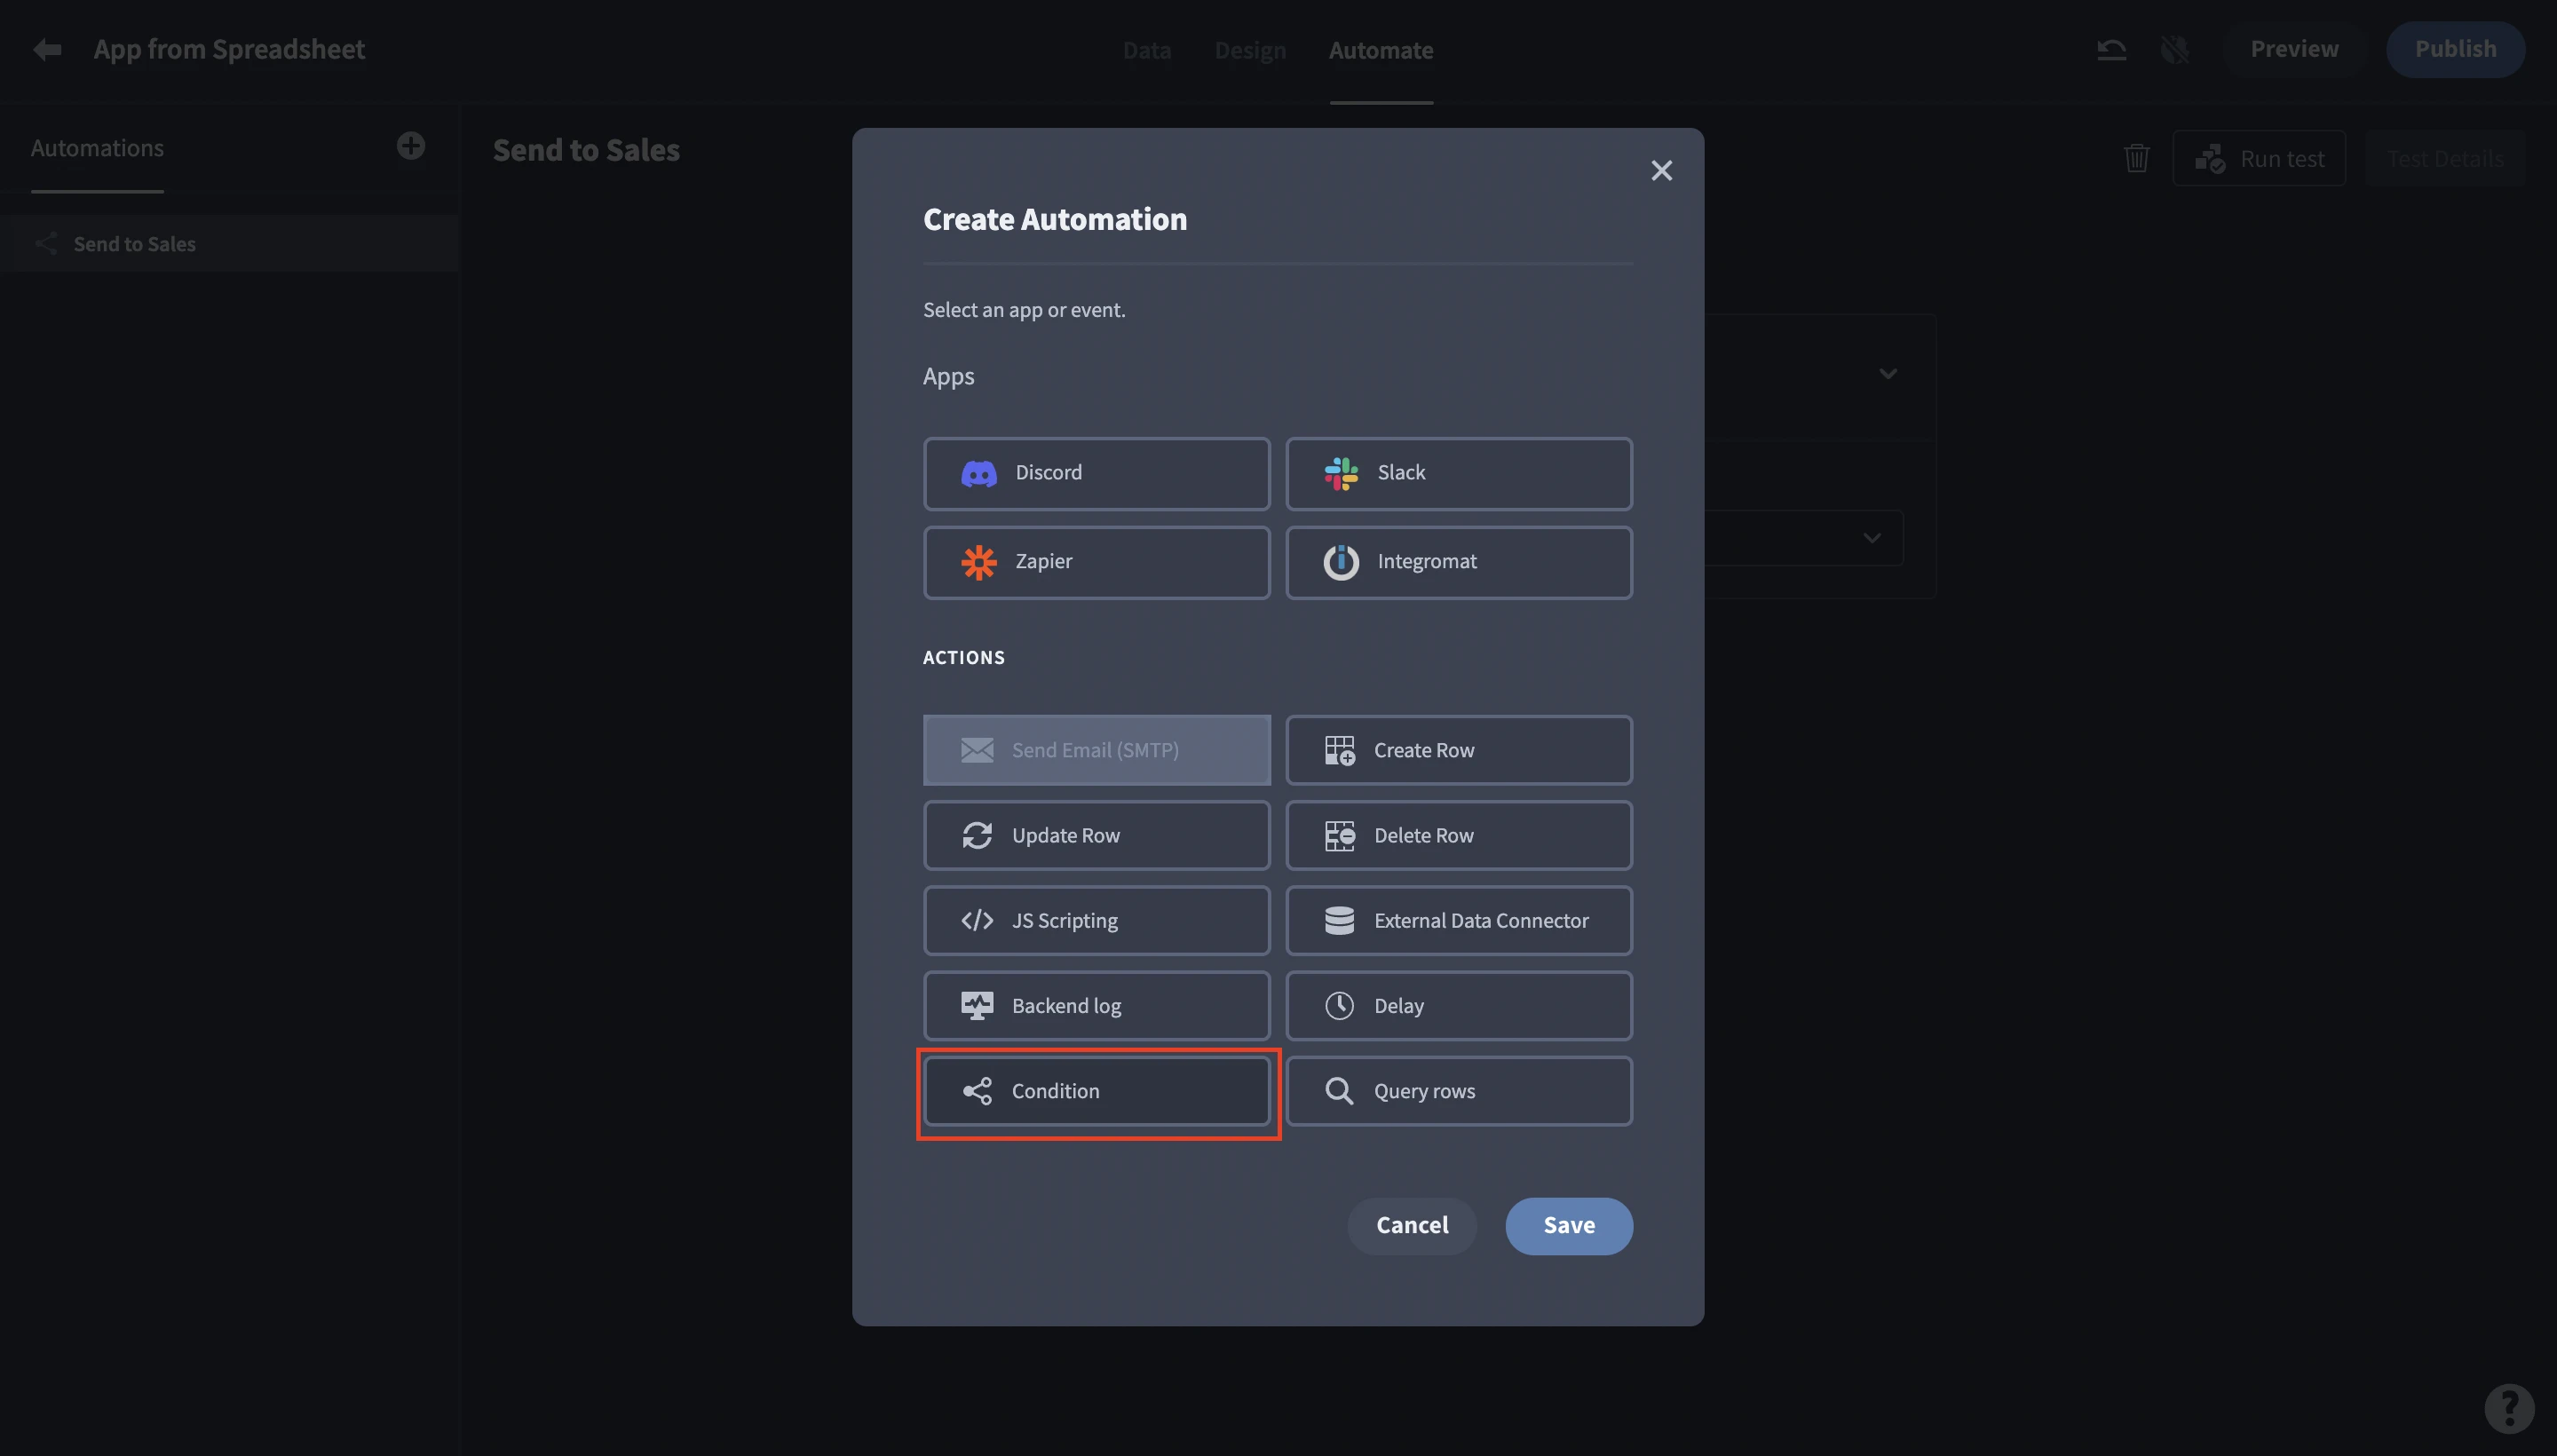
We’ll bind the Flag? variable in the trigger row as our Reference Value, set the condition to Equals, and put return true as a JavaScript function in the Comparison Value:
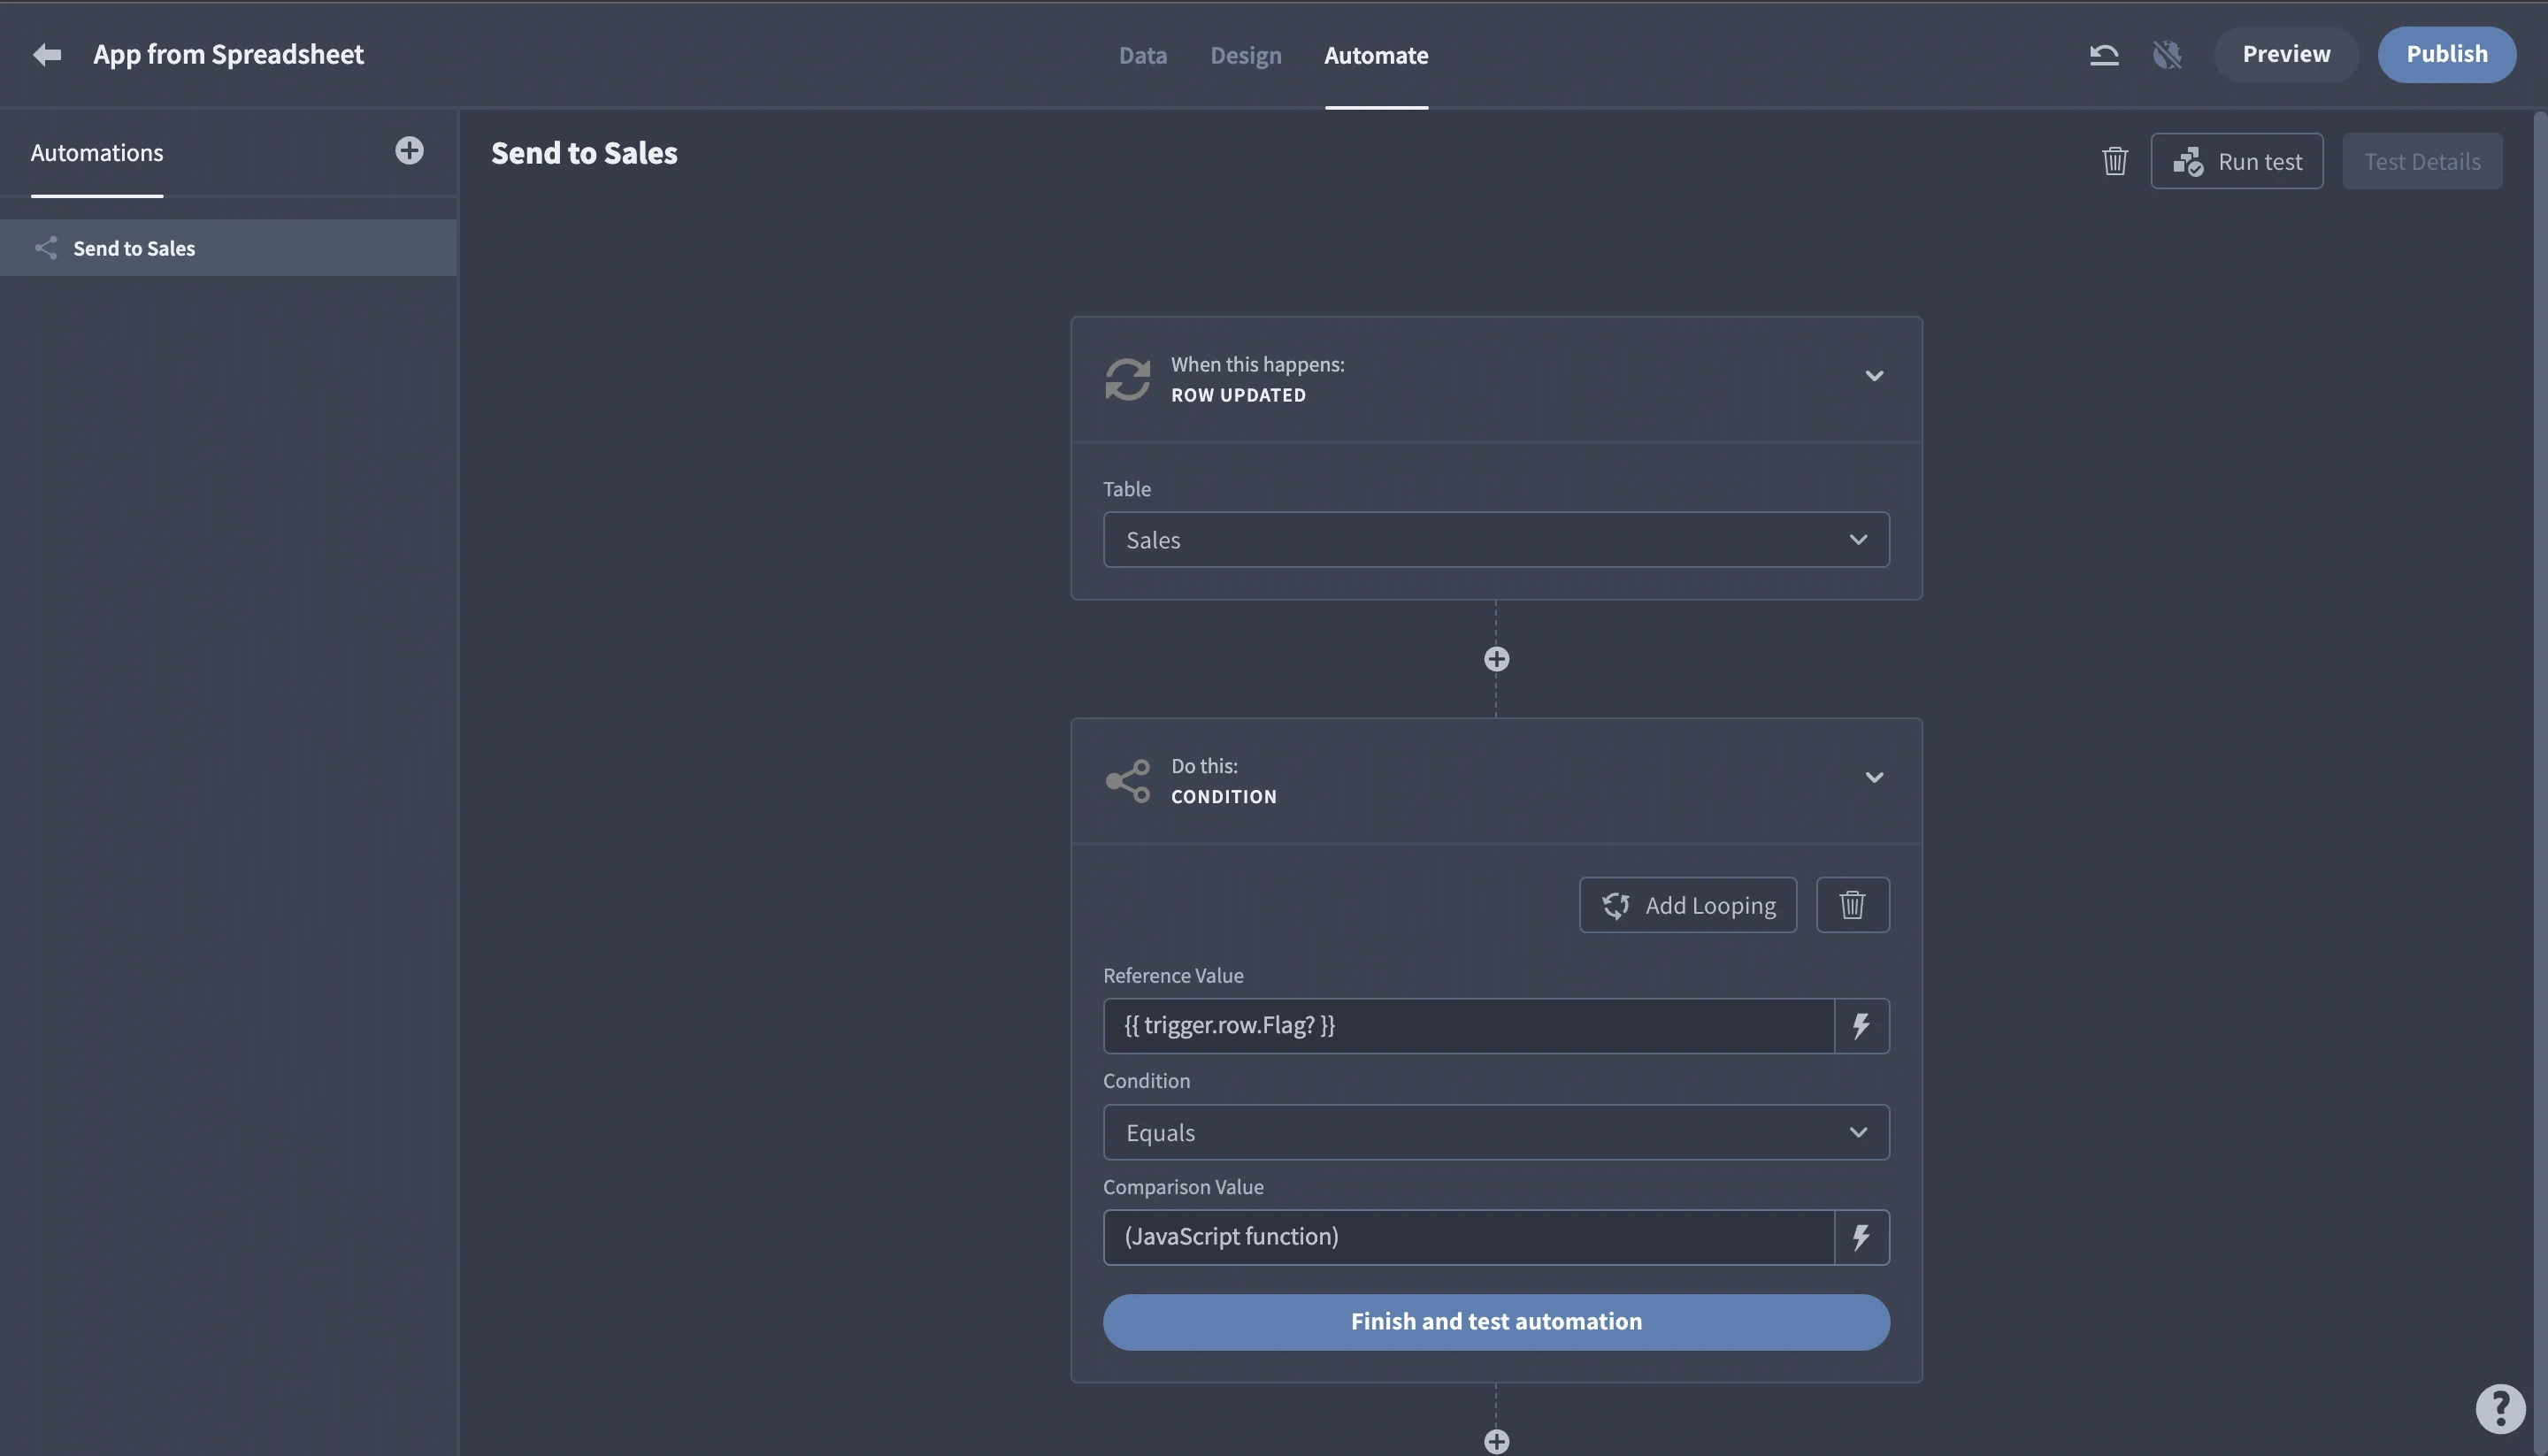
We have a bunch of options for what we could do next.
Just for the sake of keeping our example simple, let’s say you want to use Zapier to send the entire row to an external CRM.
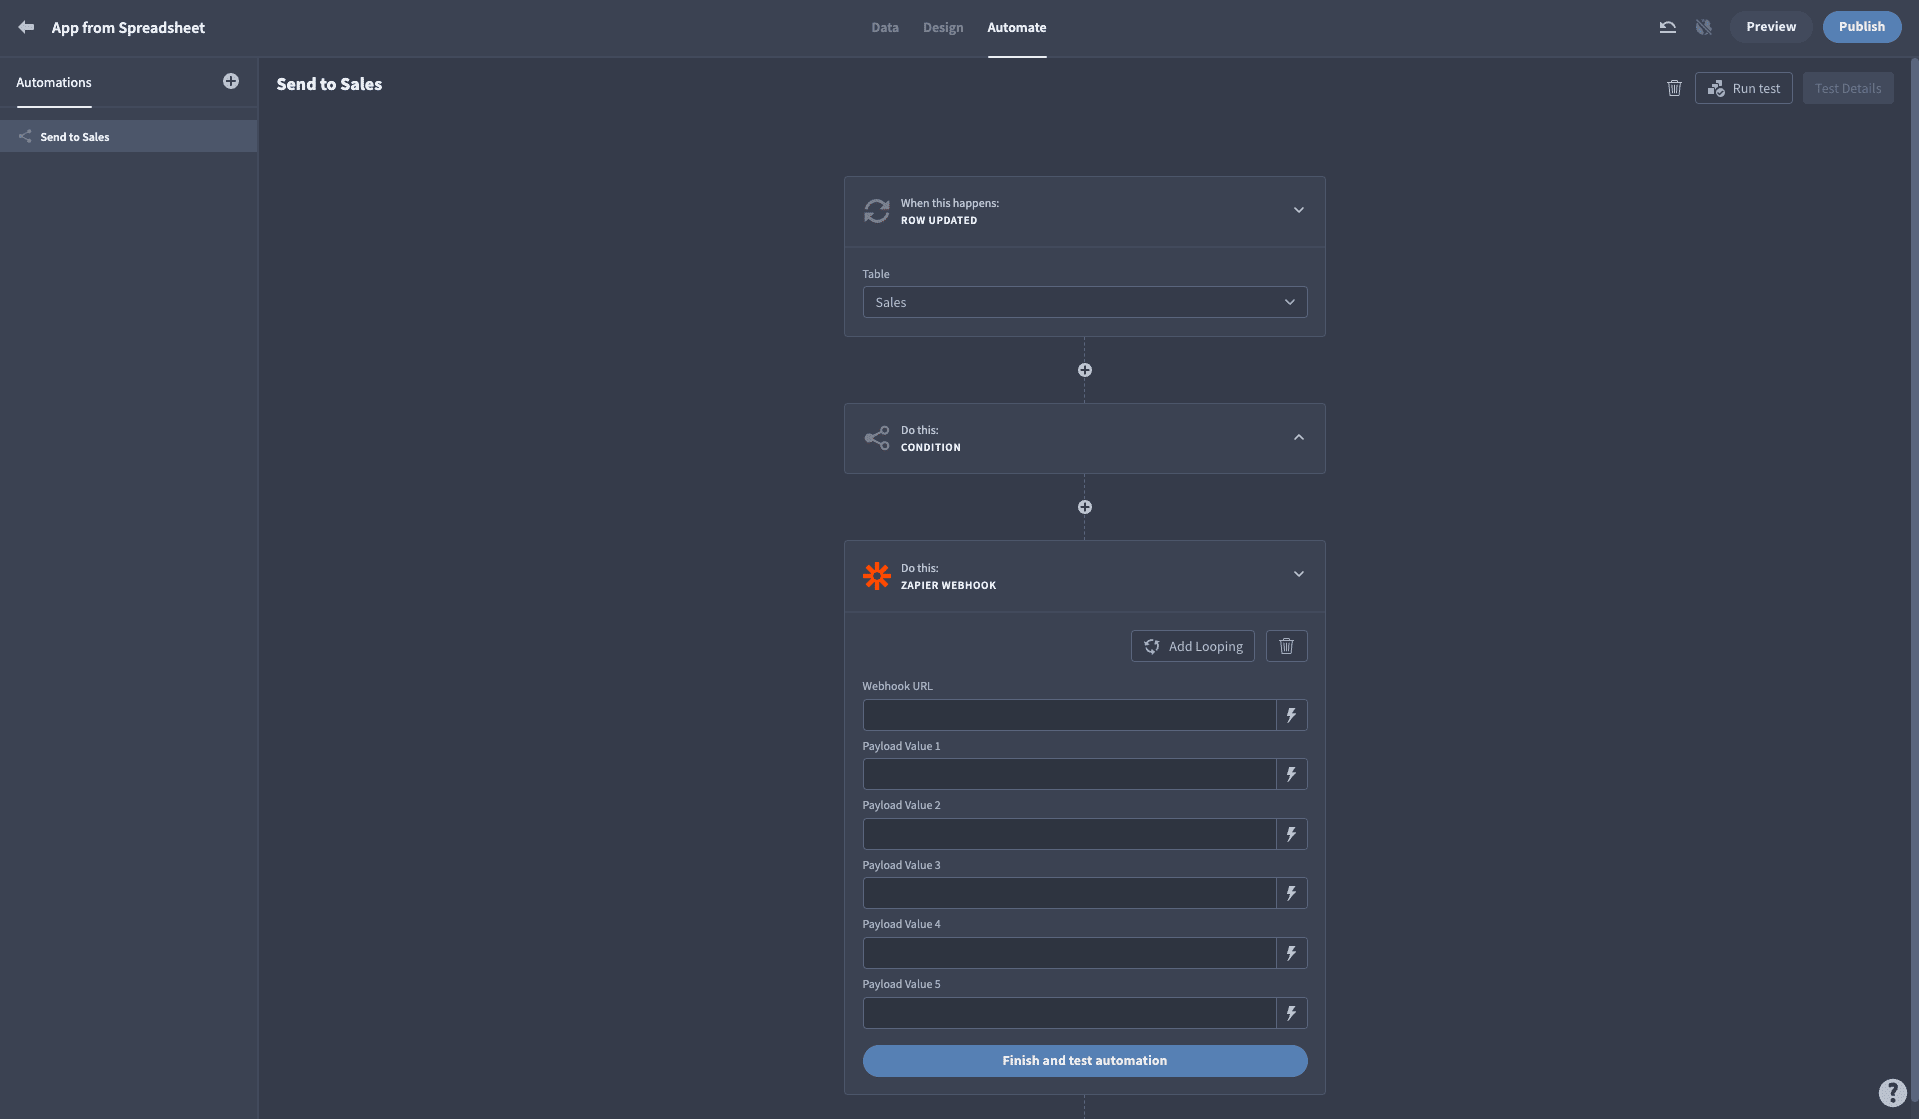
We’ll add a Zapier block:

Then, we can simply paste in the URL of our Zap, and bind each of the Sales entity’s attributes as payload values:
7. Set up access control
We touched on access control a little earlier. Now that our app is more fully fleshed out, we can dig deeper into this. Access control is all about determining which users can use different resources within your app.
Again, this is something that you don’t have much say over within proprietary spreadsheet tools.
Budibase offers flexible role-based access control , with permissions assignable at the level of data, interfaces, or even individual components. Let’s take a look at how each of these works in turn.
First up, data. As we said earlier, we can hit the Manage access button on each individual table under the Data tab. This opens the following modal:
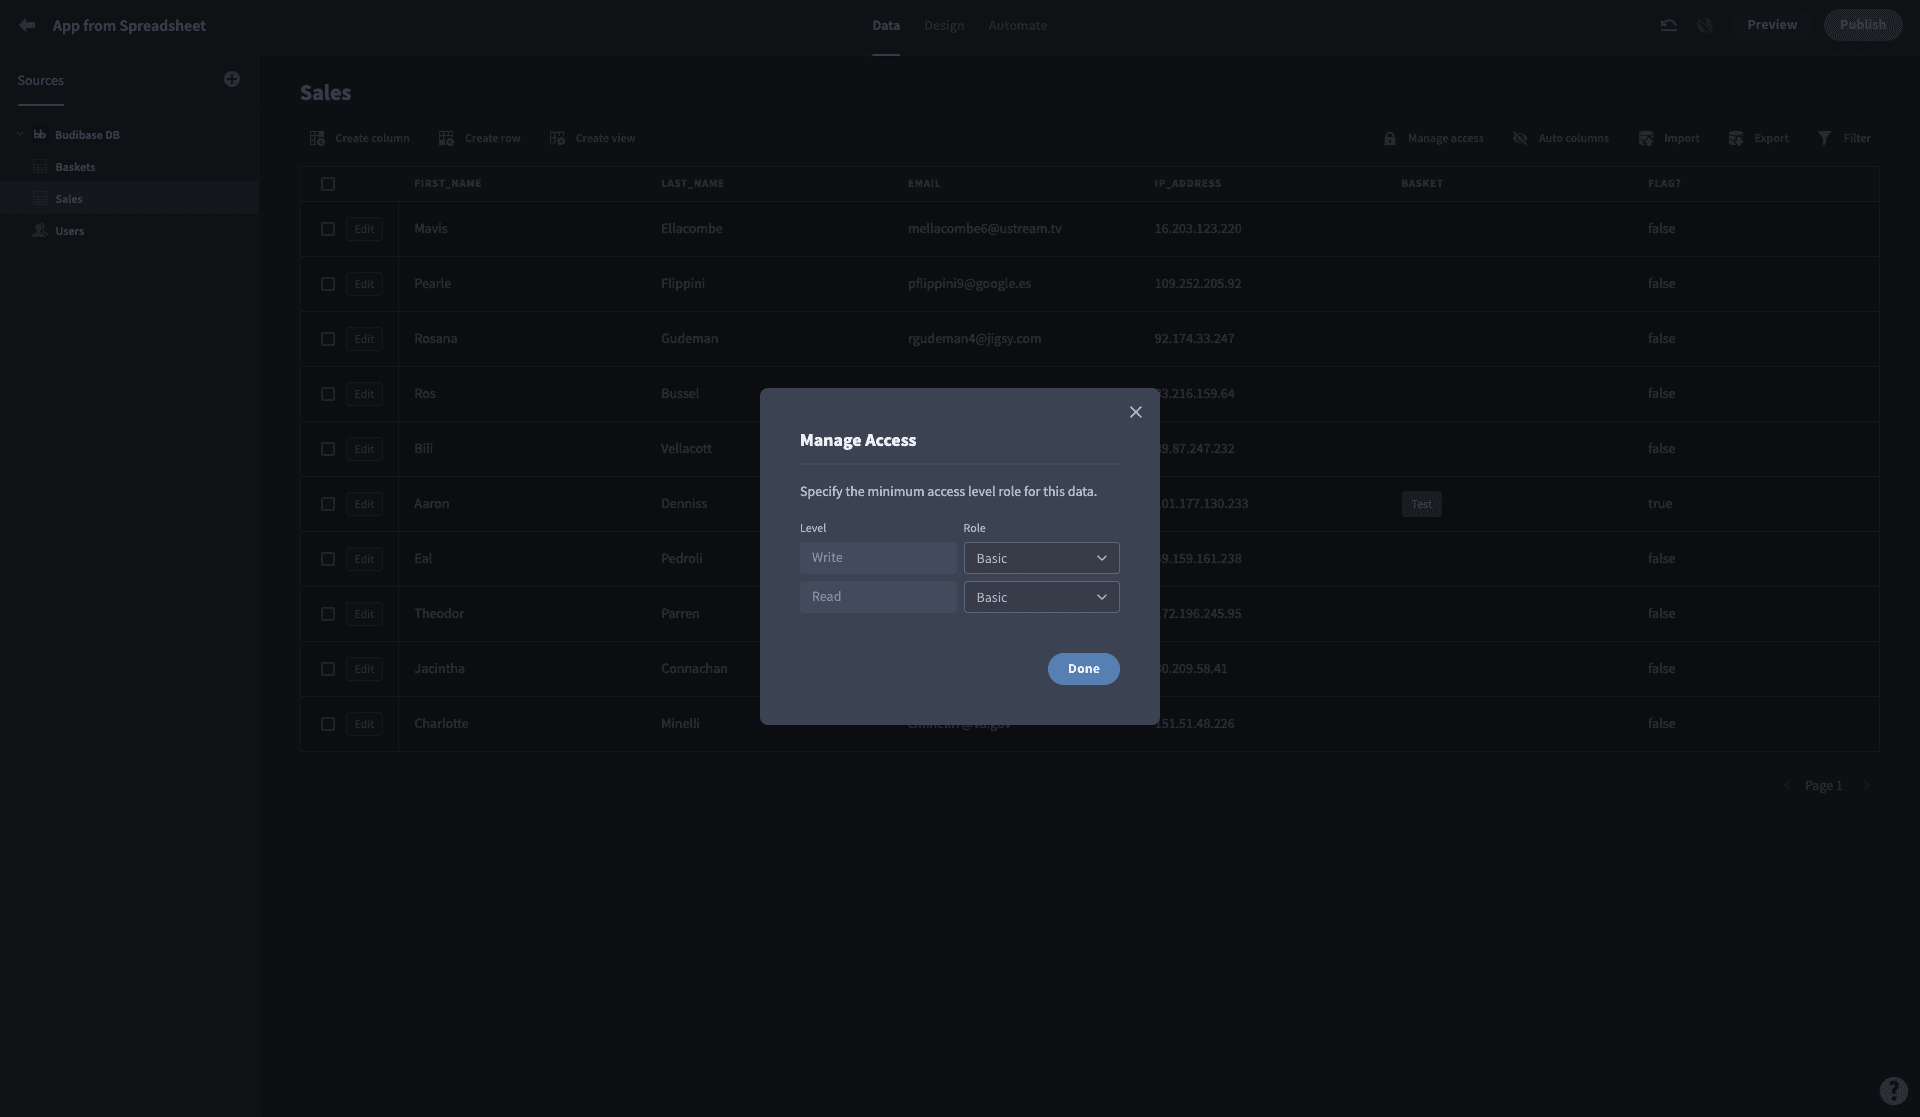
Here, we can set the minimum role needed to perform different kinds of data queries, for a broad approach to access control.
If we want to get more granular, we can achieve something similar with individual screens.
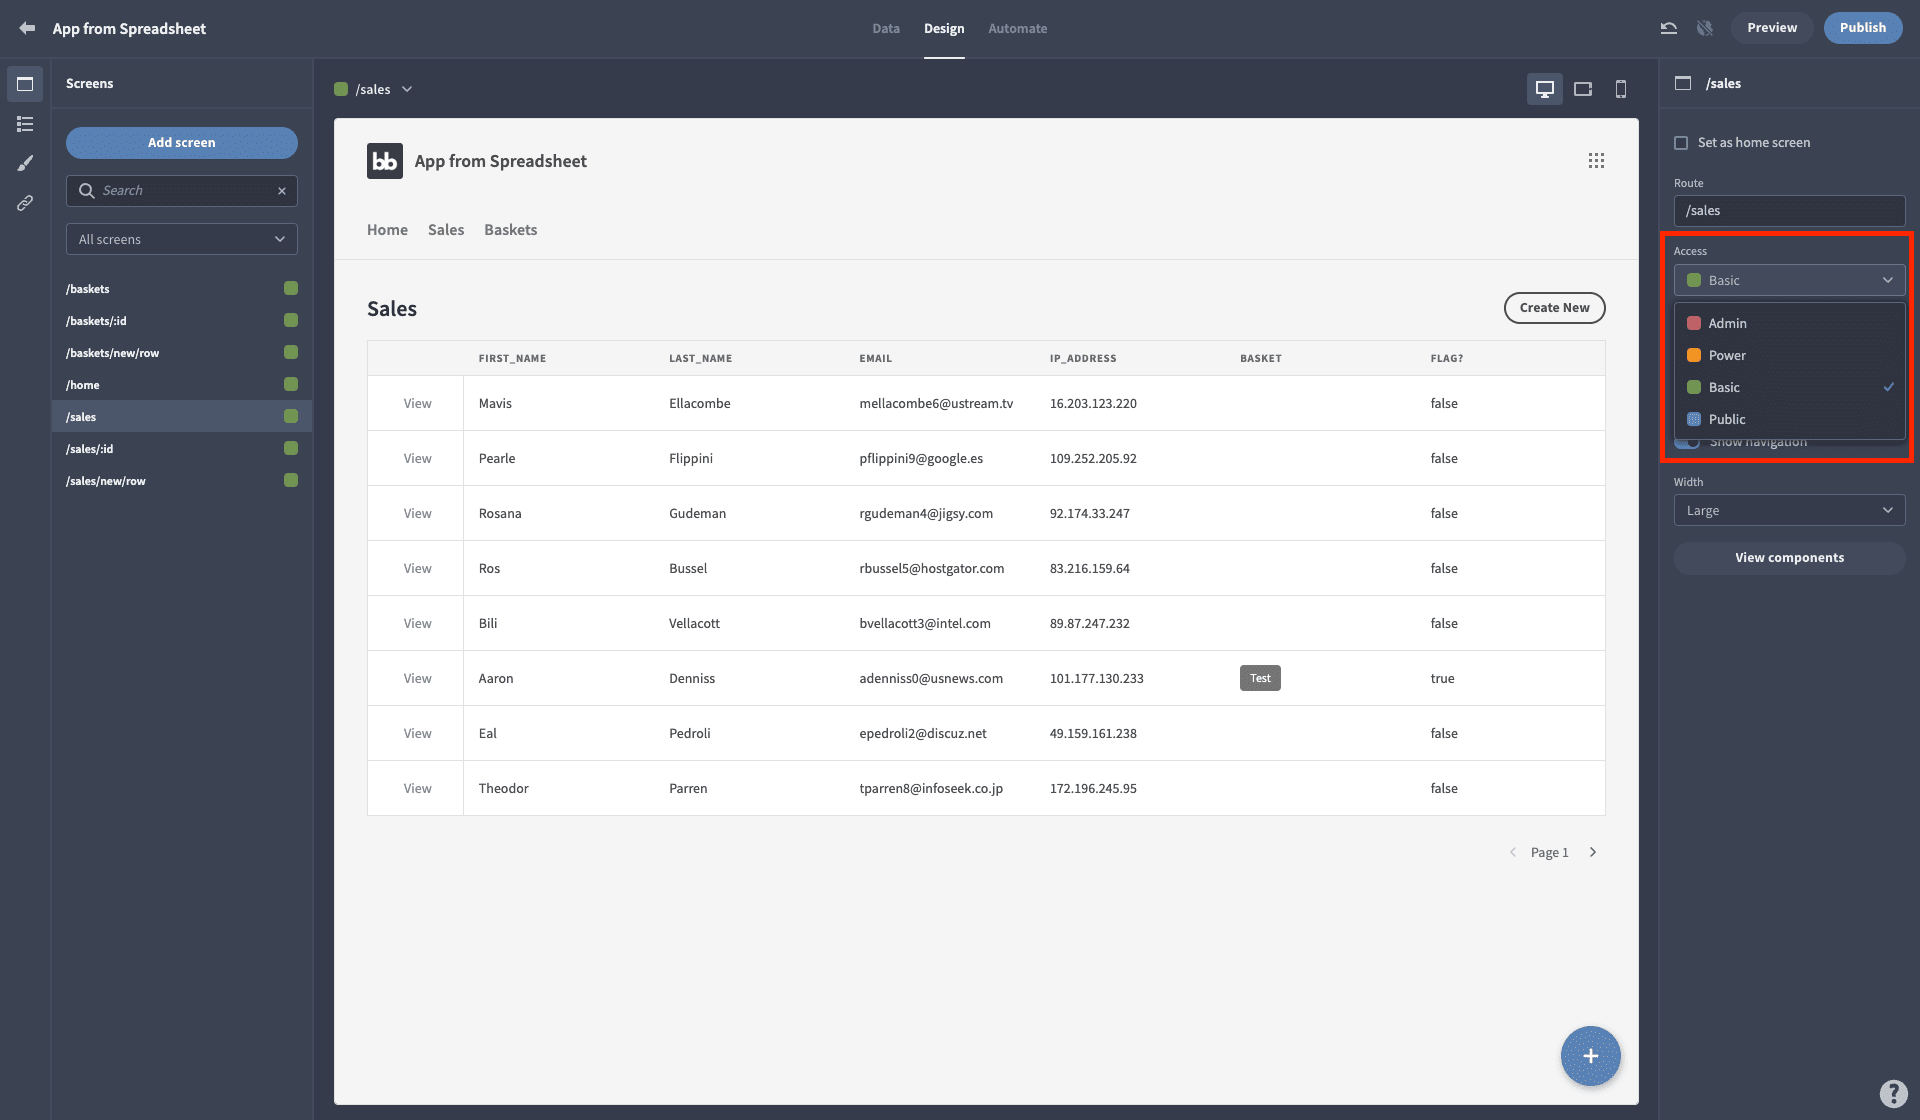
So, we can also set the minimum role that users need to navigate to each screen. Under the Design tab, you can use a dropdown selector to choose your desired access role:
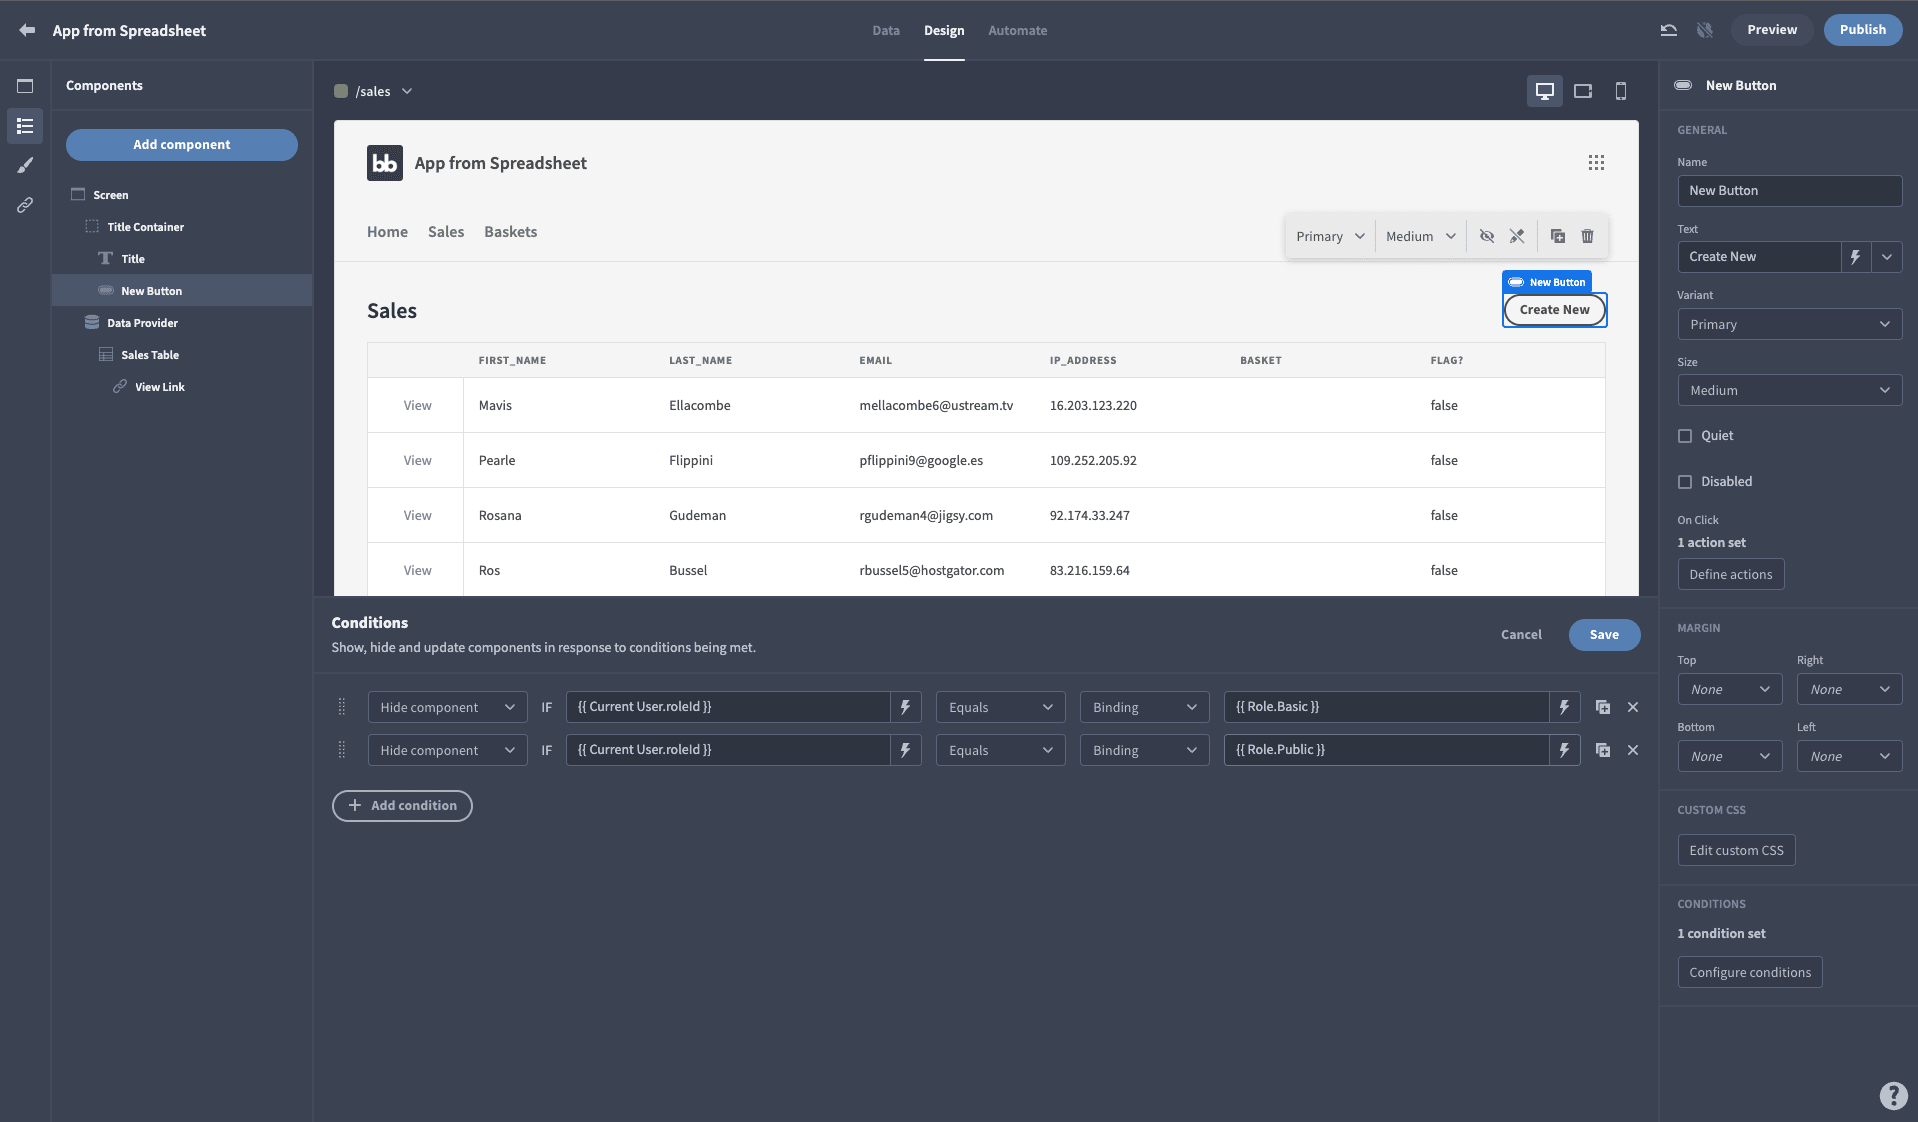
Finally, we can also hide, display, or update individual components based on the current user’s role. Pick any component, and click on Configure conditions on the right-hand side:

If we wanted to hide the Create New button from Public and Basic users, we’d add the following two conditions:
Check out our in-depth guide on how to implement RBAC for more information.
8. Deploy your new app
Finally, it’s time to roll your new app out to real-world users. By now, you won’t be surprised to learn that Budibase offers a few different options here. One is using Budibase Cloud. As you can guess from the name, this is our proprietary cloud hosting tool.
If you signed up as a cloud user, all you need to do is click Publish to push your app live.
Then, you can sit back and let us worry about everything.
Of course, the whole point of Budibase is empowering you to create the perfect tools for your own needs. And maybe cloud deployment isn’t your thing.
We also offer optional self-hosting.
Deploy to your own infrastructure with Kubernetes, Docker, Docker Compose, and Digital Ocean. This could be a private cloud, local network, or even a single device. With Budibase, you’re in control.
Enterprises, major organizations, and other security-conscious users choose self-hosting for complete control over how and where their apps are deployed.
Turning Excel spreadsheets into software applications in less than 5 minutes
Budibase is a developer’s best friend.
Low-code development is changing the way businesses build custom internal tools and customer-facing applications alike. We’re proud to be leading the charge.
We’re taking the hard work out of building incredible tools. With Budibase, you can build deployable solutions for all kinds of business problems, in minutes rather than months.
We’ve even built over 50 free, deployable app templates to show off what Budibase can do.
Sign up today for free.
You might also like our guide to building a MongoDB CRUD app .