How to Build a Data Collection Form in 5 Steps
Data collection forms are critical to countless workflows - as diverse as client onboarding, field services, project discovery, incident responses, qualitative research, product surveys, and much more.
In fact, they’re the building blocks of any data-centric process.
Today, we’re diving deep into everything you need to know.
Specifically, we’ll be covering the basics of what data collection forms are and where they’re used - as well as what our priorities are for creating effective solutions.
Then, we’ll pivot to checking out how Budibase makes it easier than ever before to build flexible, advanced forms on top of just about any data source.
Let’s dive in.
What is a data collection form?
A data collection form is a tool for recording information in a defined, systematic way. In the most basic use cases, this could be a pen-and-paper form. Nowadays, though, most data collection workflows rely on digital forms.
This is a simple application that comes in three parts:
- An interface where users can input data in a controlled schema.
- A backend where this data is stored.
- Optionally, some defined processes that are applied to the data - such as validation rules or routing.
Essentially, the goal is to create a new data entry. Most often, this means that form inputs are used to populate a CREATE query in a database or a POST request to an API.
It’s also worth thinking about the kinds of data we’re most likely to be dealing with here.
This includes:
- Personal information,
- Field data and sensor readings,
- Inventories,
- Survey responses,
- Qualitative data,
- Reports and investigations.
However, these are only illustrative categories. In the real world, data collection forms can relate to just about any entity that we need to record information about in a secure, systematic way.
So…
How is this different from a typical form UI?
Forms can be used for a wide range of purposes besides just creating database entries. For instance, performing update actions, triggering automations, performing calculations, authenticating users, and more.
Creating entries is the most common way to use forms - but it’s still only a subsection of what’s possible.
But, we can also distinguish between a data collection form and a normal create form - at least to an extent.
Usually, when we talk about data collection, we’re dealing with information that already exists but is somehow external to our organization. For instance, a vacation request form creates a database entry, but we wouldn’t describe this as data collection.
Rather, something like a patient intake form would be classed as data collection - since we’re gathering existing information about an external entity.
Following on from this, data collection forms will normally have heightened security requirements.
We’re often handling either sensitive or business-critical information. So, we’ll typically need to connect our forms to external databases or host them on our own infrastructure - options that aren’t available with most traditional form builders.
Check out our guide comparing the market for form builder tools .
Building forms with Budibase
Budibase empowers teams to build advanced forms on top of any data source. Our open-source, low-code platform is the easy way to turn data into action.
We offer dedicated connectors for a huge range of RDMBSs, NoSQL tools, custom API requests, Airtable, Google Sheets, and more - alongside our internal low-code database and custom data source plugins.
Budibase acts as a proxy, querying your external data from its source without storing it.
When we connect to SQL databases or use BudibaseDB, we can autogenerate working data collection forms using the configurable Form Block and Multi-Step Form Block components. Or, we have total flexibility to build forms from scratch for any data source.
Unlike major form builder platforms, you can also build form schemas independently of the connected data model.
So, we can include fields in our database without requiring user inputs - or we can use bindings and front-end logic to store values based on other form inputs and contextual data.
Budibase also features a dedicated automation builder, optional self-hosting, flexible RBAC, free SSO, and more. It’s never been easier to build fully custom, intelligent forms and deploy them however you need.
Even better, you can build as many forms as you want for free.
How to build a data collection form in 5 steps
Let’s see how this works in the real world. To do this, we’re going to walk through the process of building a custom data collection form on top of an external SQL database using Budibase.
As we know, data collection forms can deal with a huge variety of types of information - including personal, professional, health, sensor, or industrial data.
For our example, we want to show off the full scope of what’s possible in Budibase.
We’re going to create an industrial data collection form - based on gathering information for a new project site. This will comprise a range of personal, address, numerical, qualitative, and boolean values.
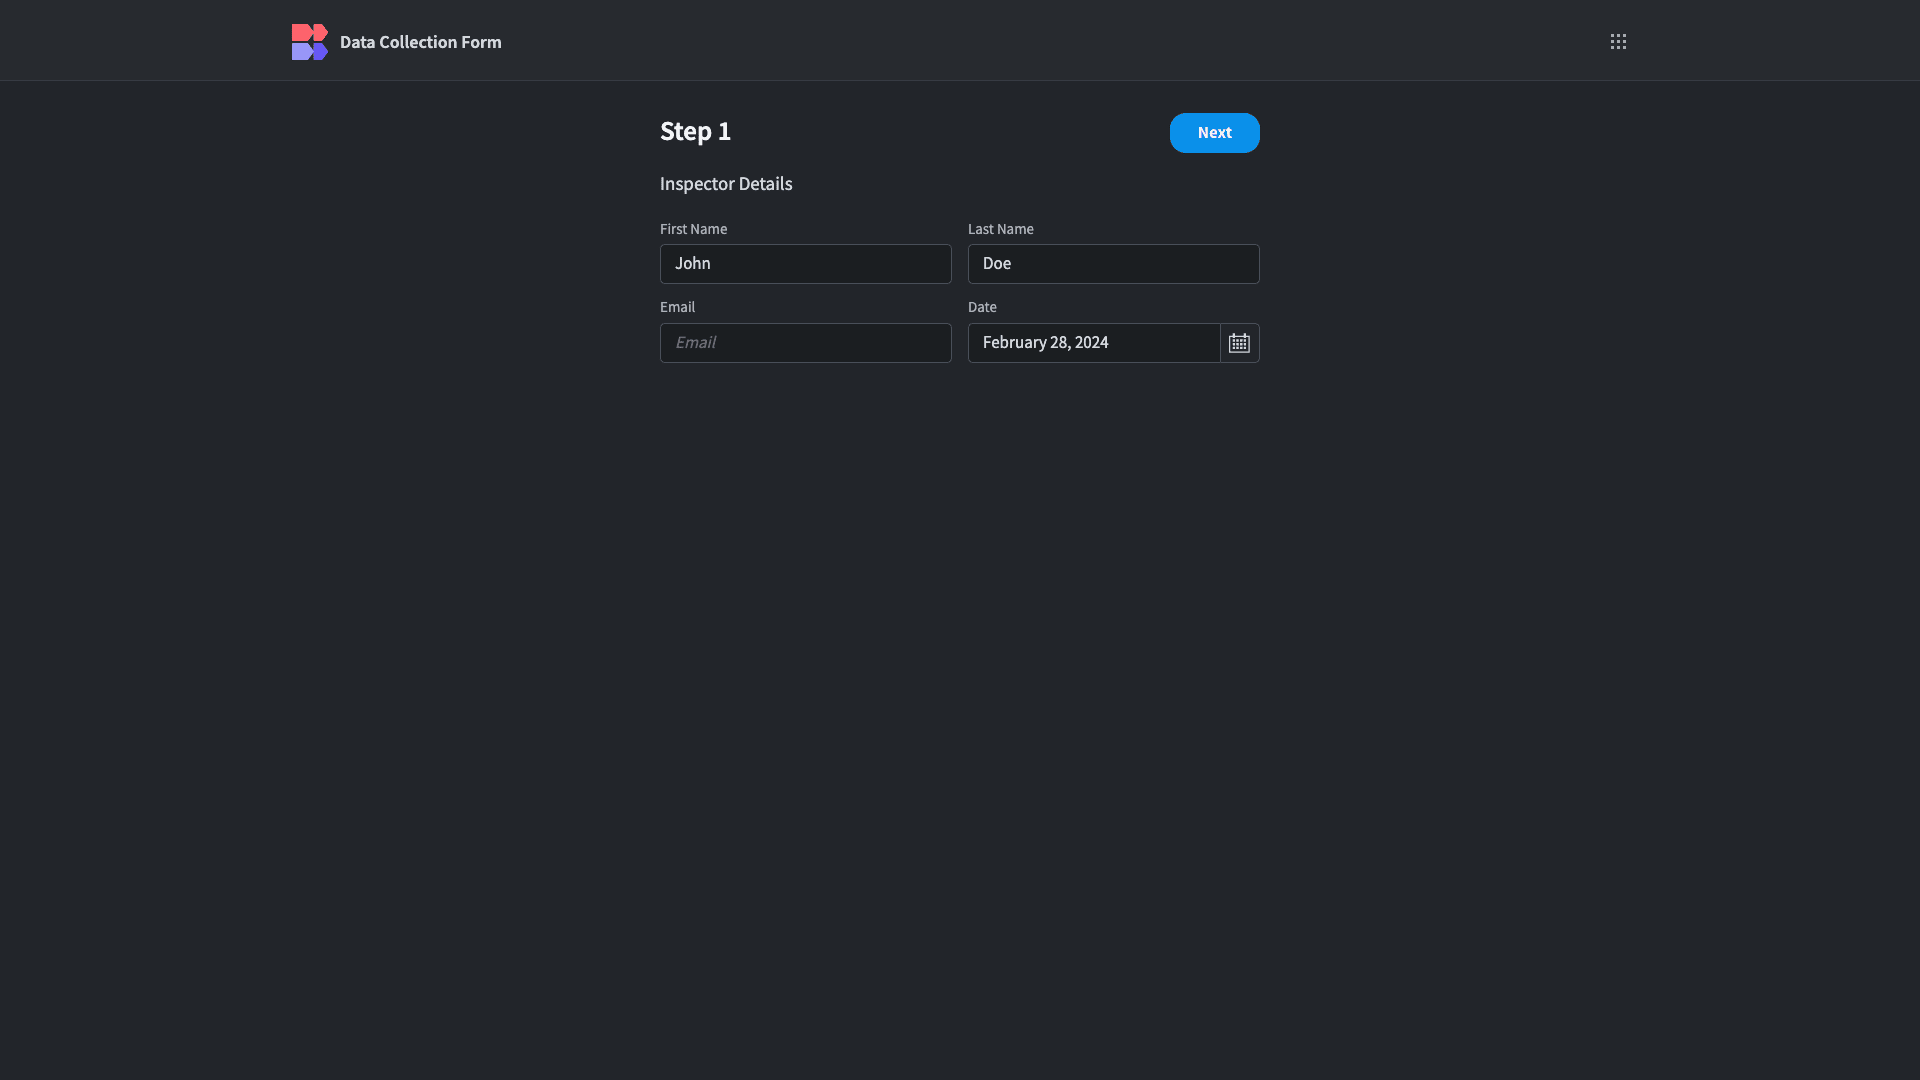
We’re building it on top of an existing MySQL database. Here’s how our completed form will look:
Let’s jump in.
1. Choose your data source
The first thing we want to do is create a new Budibase application. We can use a template or import an existing app dump, but today, we’re starting from scratch. When we choose this option, we’re prompted to choose a name and URL extension.
We’re going to call our app Data Collection Form.
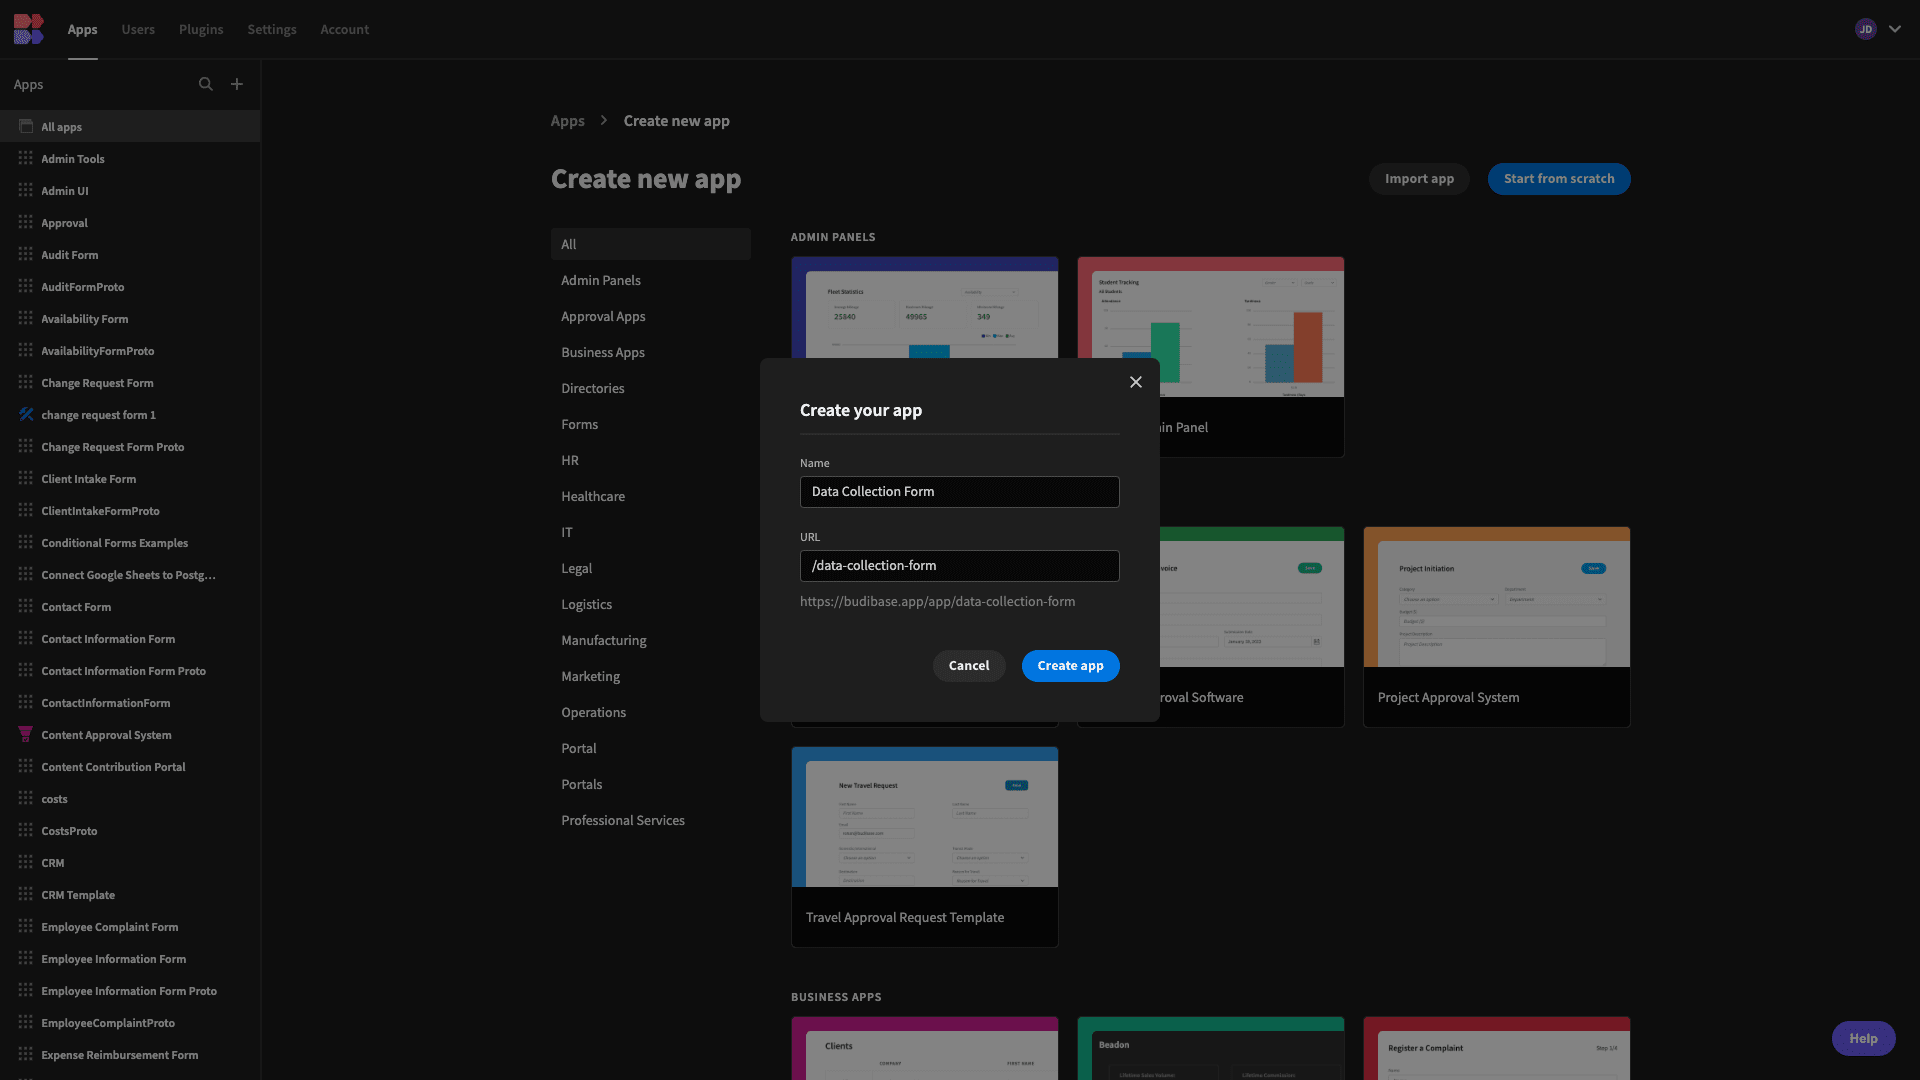
We’re then prompted to choose our data source.
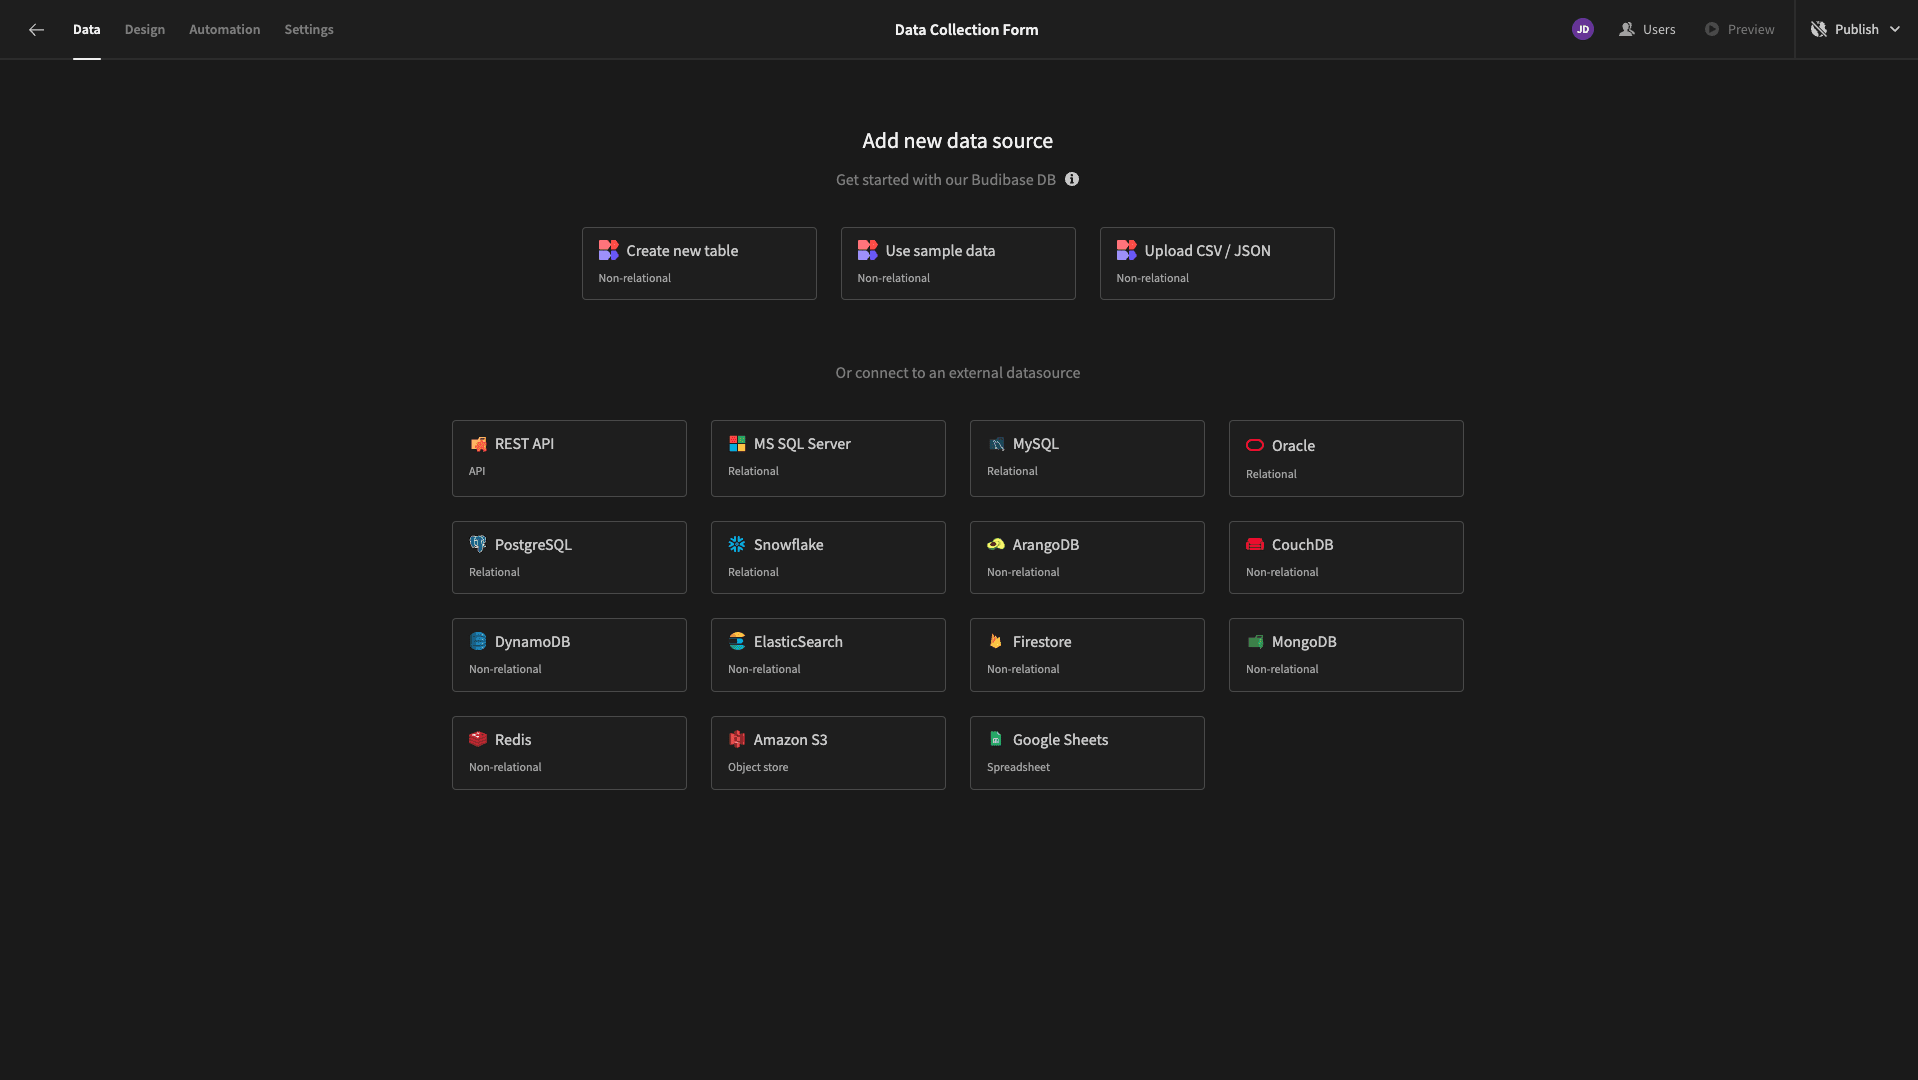
Budibase supports direct queries to SQL databases, NoSQL tools, REST APIs, Google Sheets, Airtable, and more. You can also create custom data sources or use our internal database to create a form schema from scratch.
Today, we’re using an existing MySQL database.
When we select this option, we’re prompted to input our configuration details.
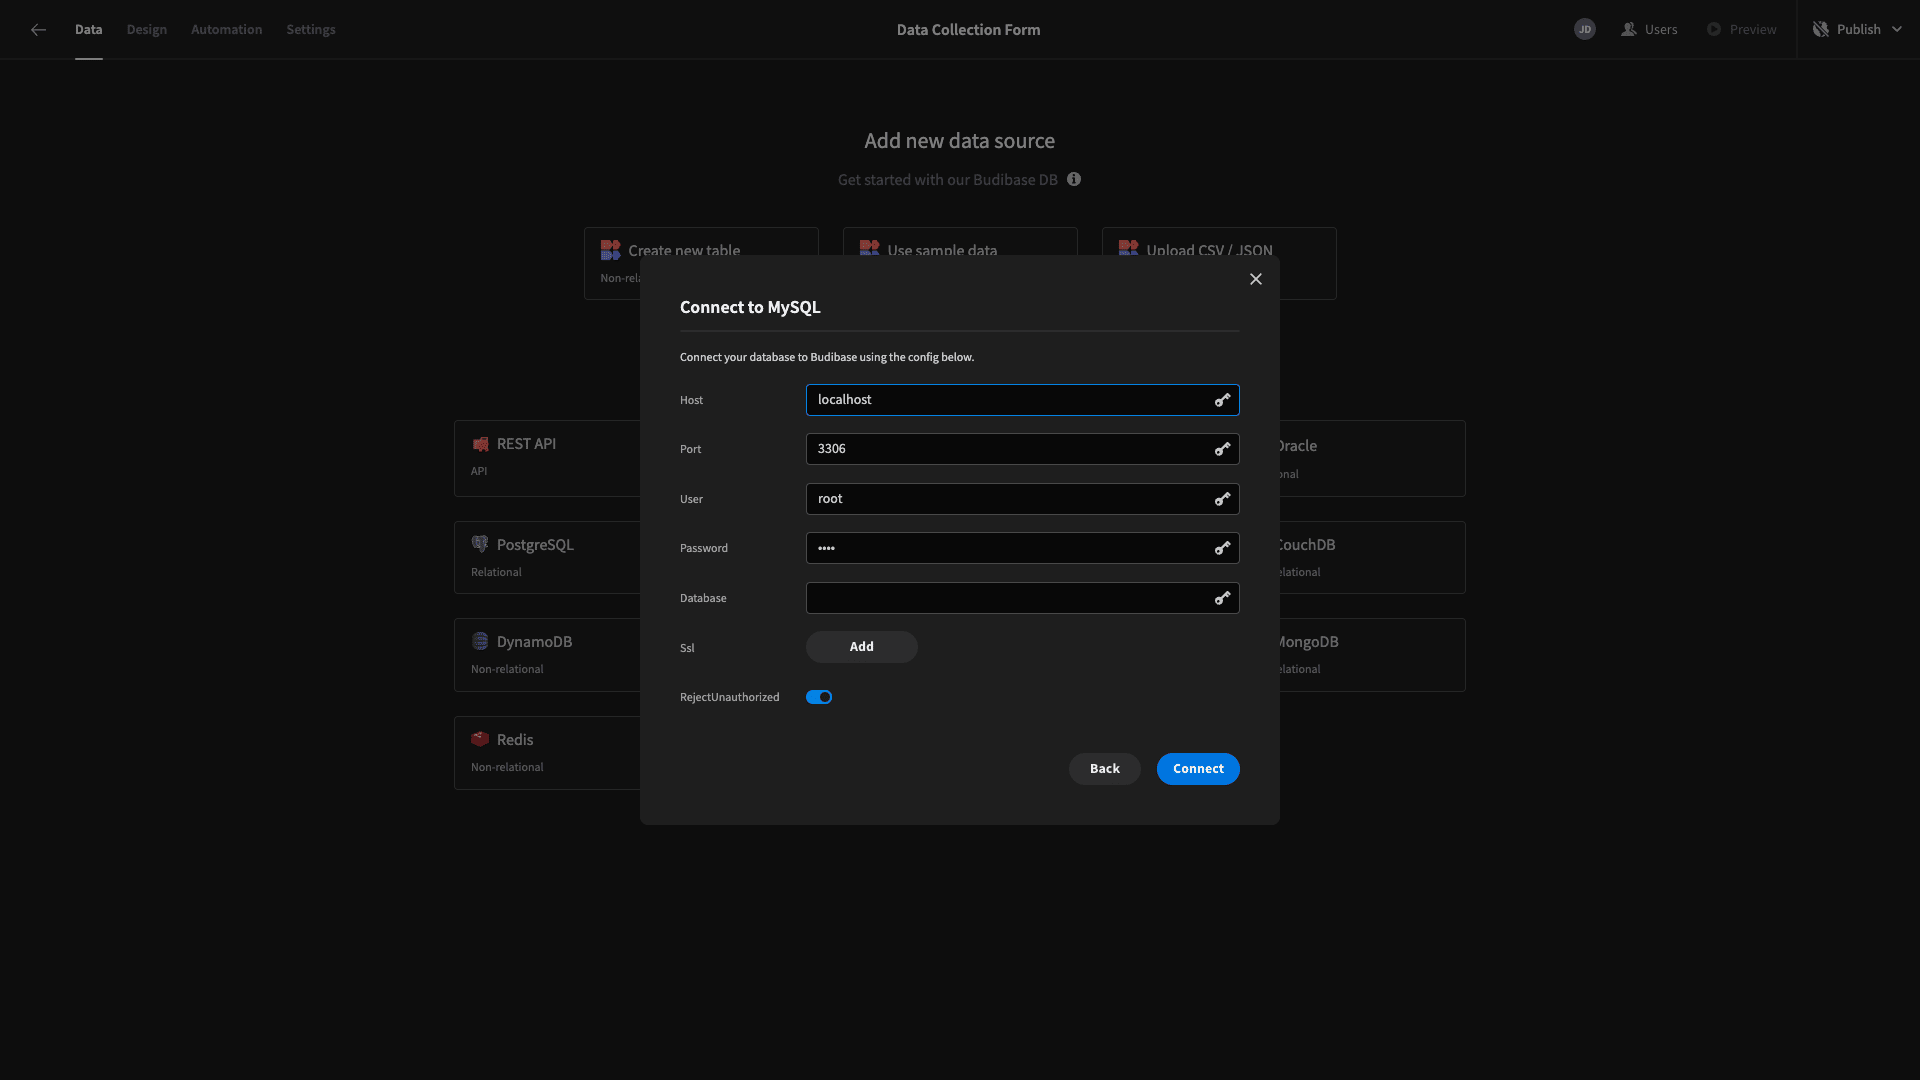
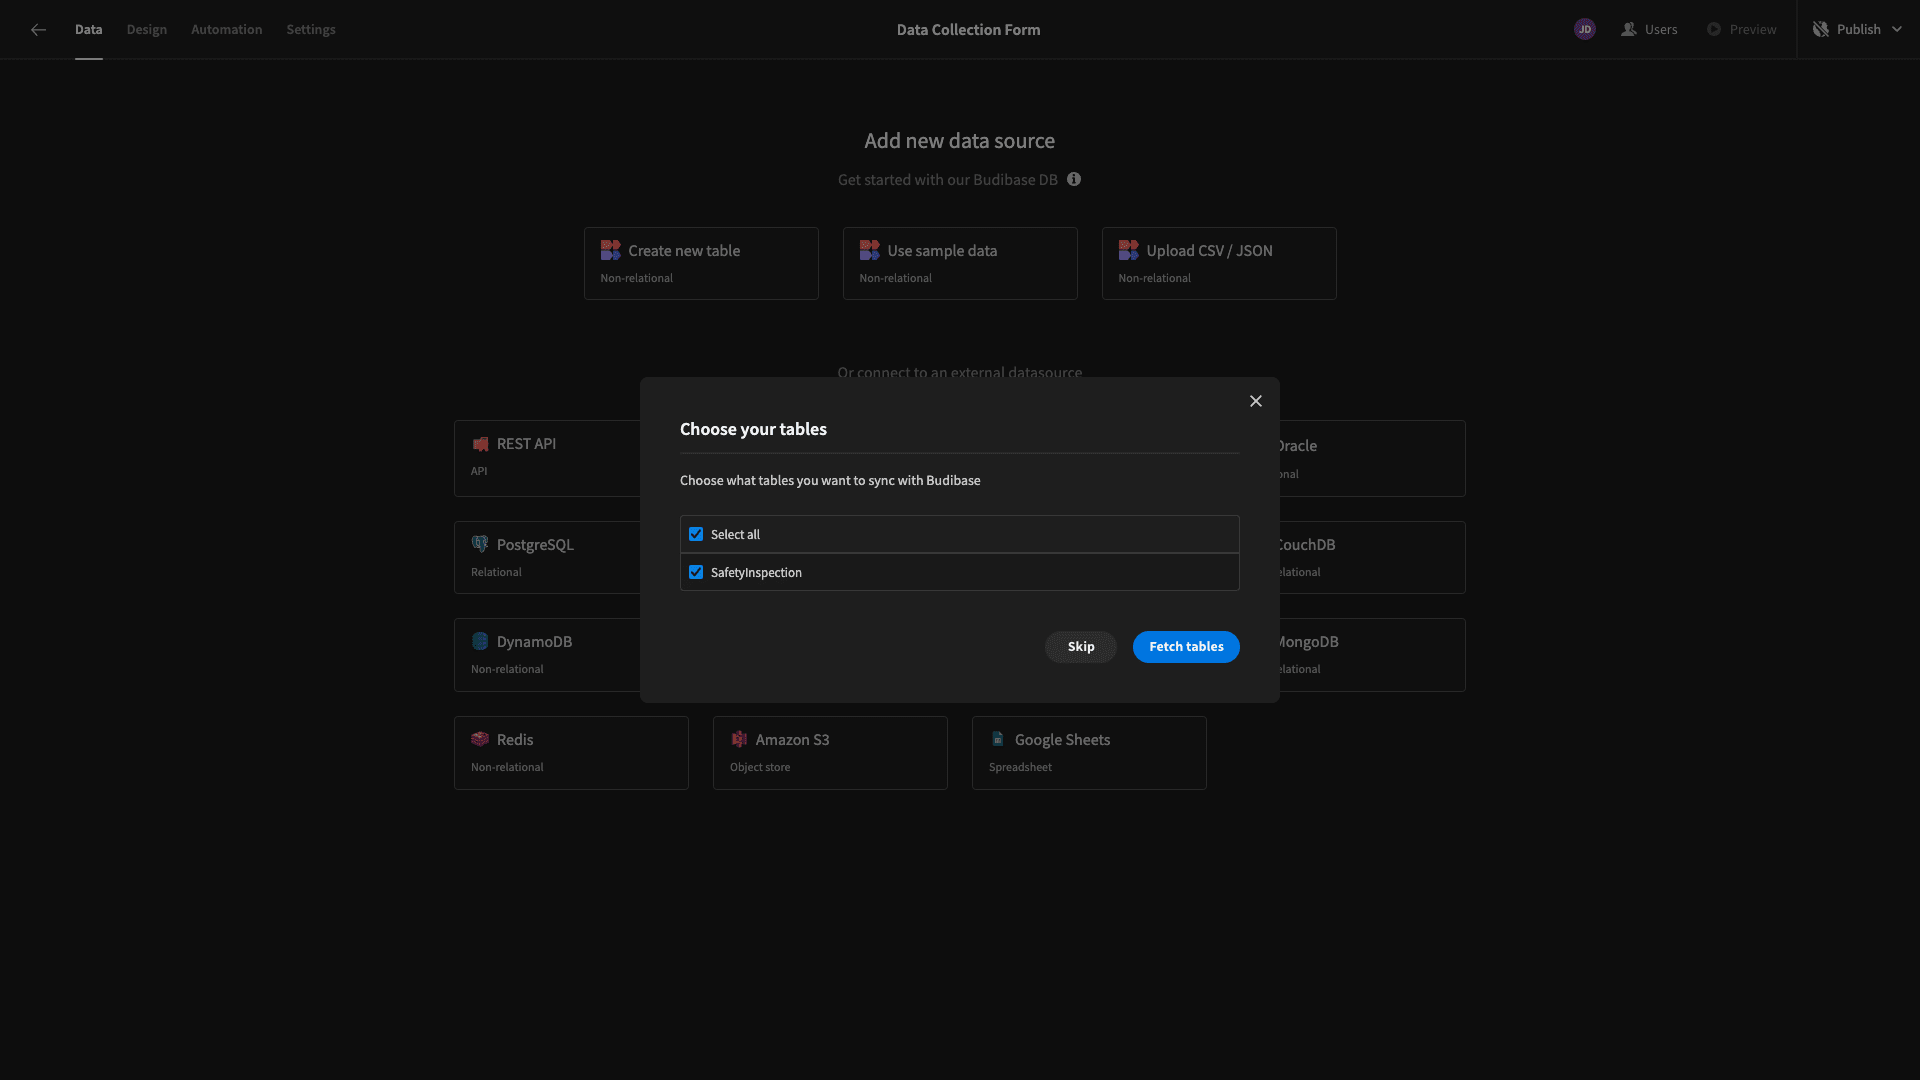
We can then Fetch any of the tables that are stored within our database. Budibase acts as a proxy for querying external data directly within our platform without storing it.
Our database contains a single table called SafetyInspection, which we’re fetching.
For our form today, we’re using a relatively complex data model. Specifically, our table contains 42 columns. These deal with the user’s details, the site’s basic information, electric equipment, structural condition, emergency exits, utilities, and overall condition.
We also have two automatically generated timestamps and a unique identifier for each row.
If you’d like to build along with our guide today, you can use the following MySQL query to create a lookalike table.
  1CREATE TABLE SafetyInspection (
  2
  3  inspection_id INT AUTO_INCREMENT PRIMARY KEY,
  4
  5  -- Inspector Information
  6
  7  inspector_first_name VARCHAR(50),
  8
  9  inspector_last_name VARCHAR(50),
 10
 11  inspector_email VARCHAR(255),
 12
 13  inspection_date DATE,
 14
 15  -- Site Information
 16
 17  site_name VARCHAR(100),
 18
 19  site_location VARCHAR(255),
 20
 21  ceiling_height DECIMAL(5,2),
 22
 23  site_address_street VARCHAR(255),
 24
 25  site_address_city VARCHAR(100),
 26
 27  site_address_state VARCHAR(100),
 28
 29  site_address_zip VARCHAR(20),
 30
 31  site_address_country VARCHAR(100),
 32
 33  square_footage INT,
 34
 35  -- Electrical Safety
 36
 37  electrical_voltage INT,
 38
 39  electrical_outlets_count INT,
 40
 41  rcd_inspection_up_to_date BOOLEAN,
 42
 43  circuit_breaker_type VARCHAR(50),
 44
 45  circuit_breaker_capacity INT,
 46
 47  fuses_present BOOLEAN,
 48
 49  fuses_inspection_up_to_date BOOLEAN,
 50
 51  electrical_observation_text TEXT,
 52
 53  -- Ventilation
 54
 55  ventilation_system_present BOOLEAN,
 56
 57  air_quality_rating INT,
 58
 59  temperature DECIMAL(5,2),
 60
 61  humidity DECIMAL(5,2),
 62
 63  ventilation_observation_text TEXT,
 64
 65  -- Structural Safety
 66
 67  structural_inspection_up_to_date BOOLEAN,
 68
 69  foundation_condition VARCHAR(50),
 70
 71  load_bearing_capacity INT,
 72
 73  structural_observation_text TEXT,
 74
 75  -- Emergency Exits
 76
 77  emergency_exit_signage BOOLEAN,
 78
 79  emergency_exit_paths_clear BOOLEAN,
 80
 81  emergency_exit_observation_text TEXT,
 82
 83  -- Utilities
 84
 85  water_supply_available BOOLEAN,
 86
 87  gas_supply_available BOOLEAN,
 88
 89  water_pressure DECIMAL(5,2),
 90
 91  utility_observation_text TEXT,
 92
 93  -- Overall Fields
 94
 95  working_environment_rating INT,
 96
 97  overall_observation_text TEXT,
 98
 99  -- Timestamps for Record Keeping
100
101  created_at TIMESTAMP DEFAULT CURRENT_TIMESTAMP,
102
103  updated_at TIMESTAMP DEFAULT CURRENT_TIMESTAMP ON UPDATE CURRENT_TIMESTAMP
104
105);
Here’s what this looks like in Budibase’s Data section.

Straight away, we can update stored values or the table’s schema using Budibase’s spreadsheet-like interface.
Before we move on to creating our data collection form UI, we’re going to make one minor change that will make our lives easier.
There are several data columns where users can input longer text. In our database, these are given the TEXT type, but we want to designate them as Long-Form Text within Budibase so that suitable fields are included when we generate our form.
These attributes are:
- electrical_observation_text,
- ventilation_observation_text,
- structural_observation_text,
- emergency_exit_observation_text,
- utilitity_observation_text,
- overall_observation_text.
Under each of these, we’ll hit Edit Column and update the Type from Text to Long-Form Text.
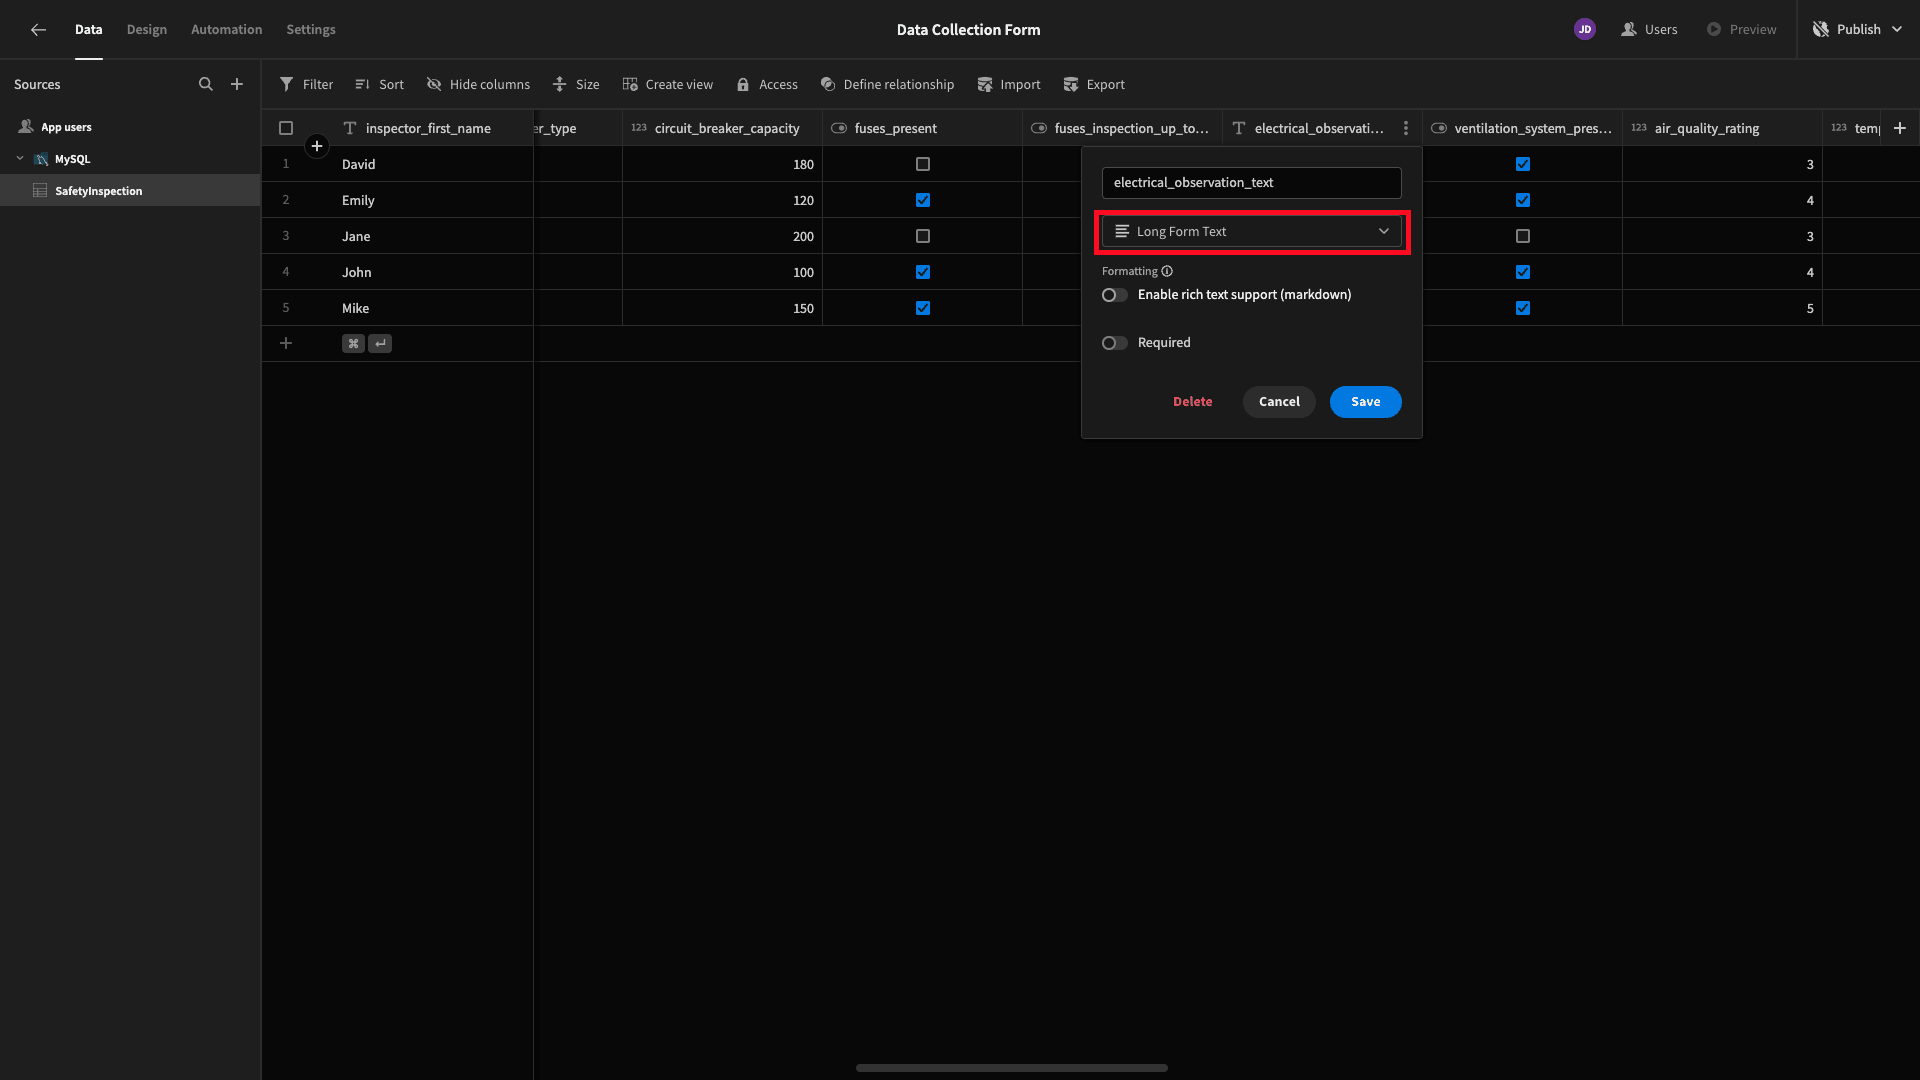
Once we’ve repeated this process for all six attributes, we’re ready to start building our form.
2. Generating a form UI
Head to Budibase’s Design tab.
Here, we’ll be offered several choices for how we can build our first UI, including starting with a prebuilt layout.

Today, though, we’re going to start with a blank screen.
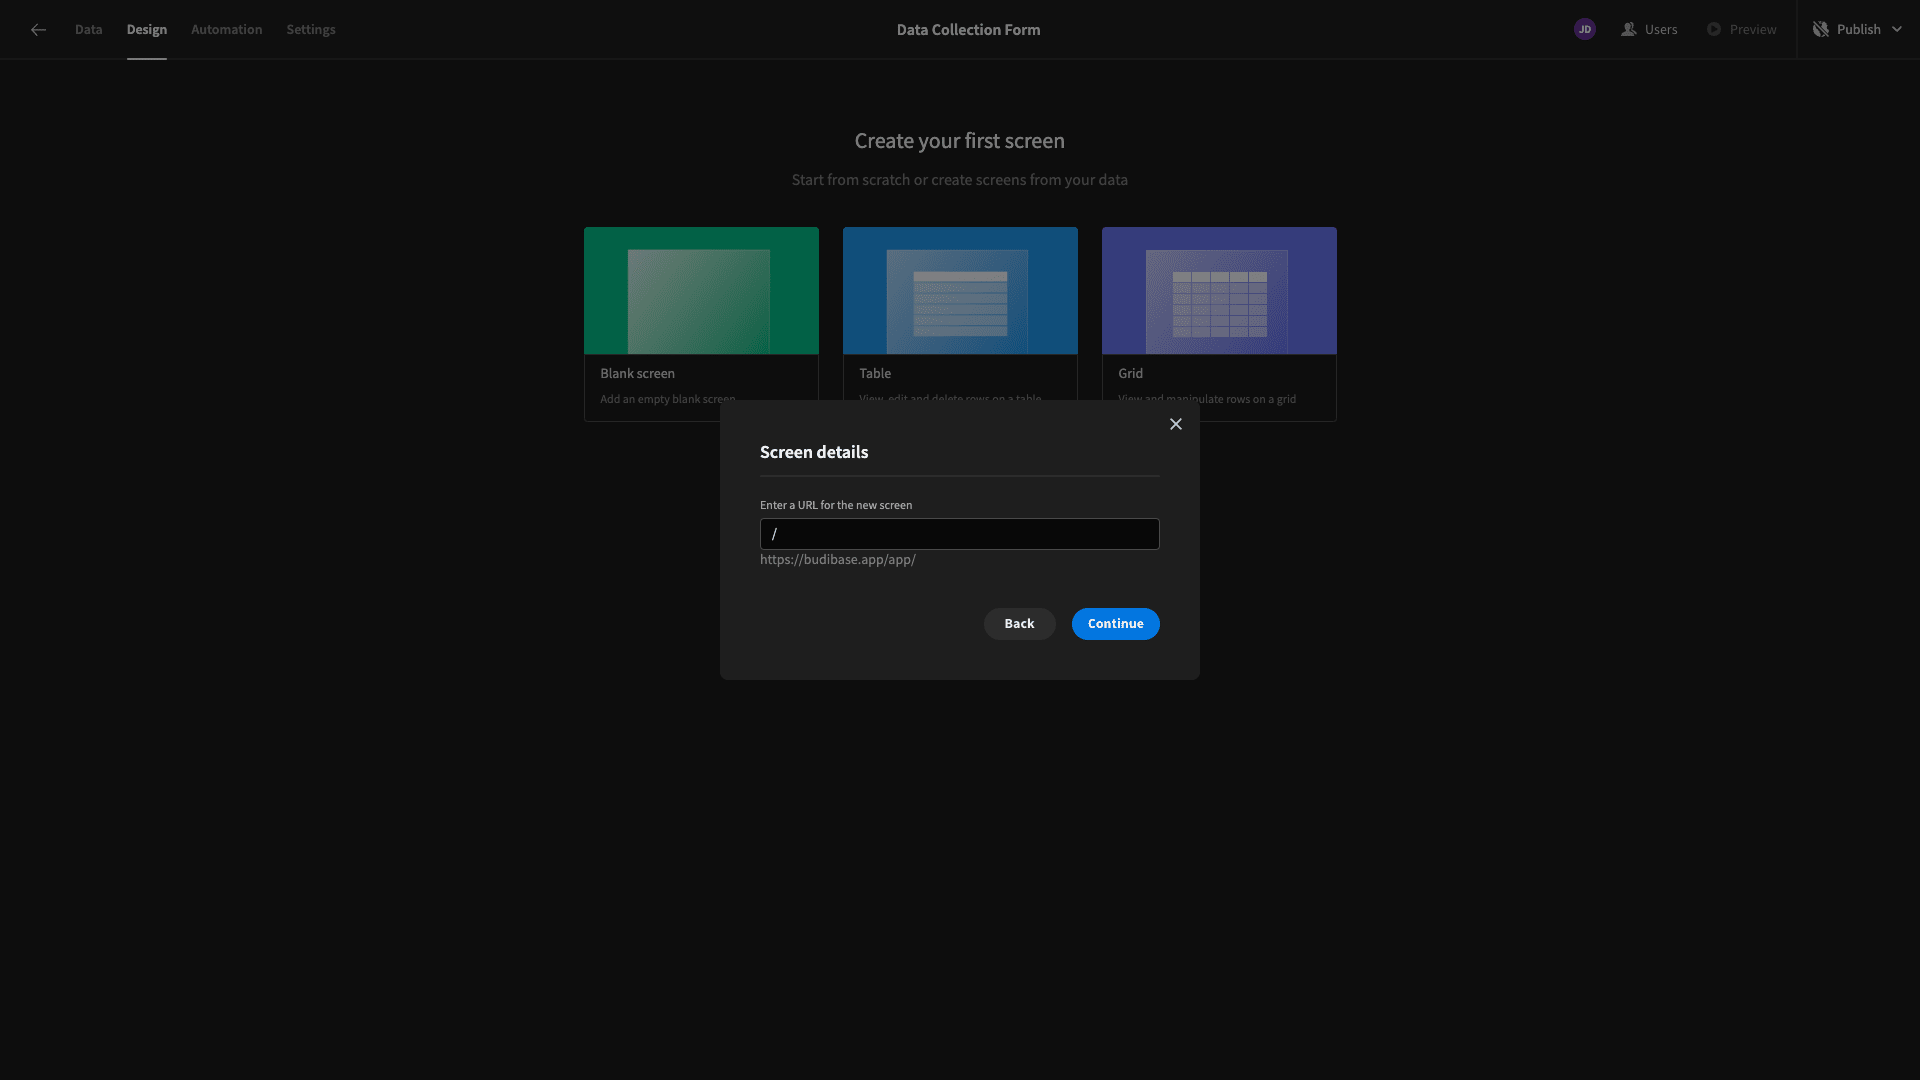
When we choose this option, we’re asked to provide a URL extension. We’re building a single-screen app, so we’ll simply use a trailing slash.
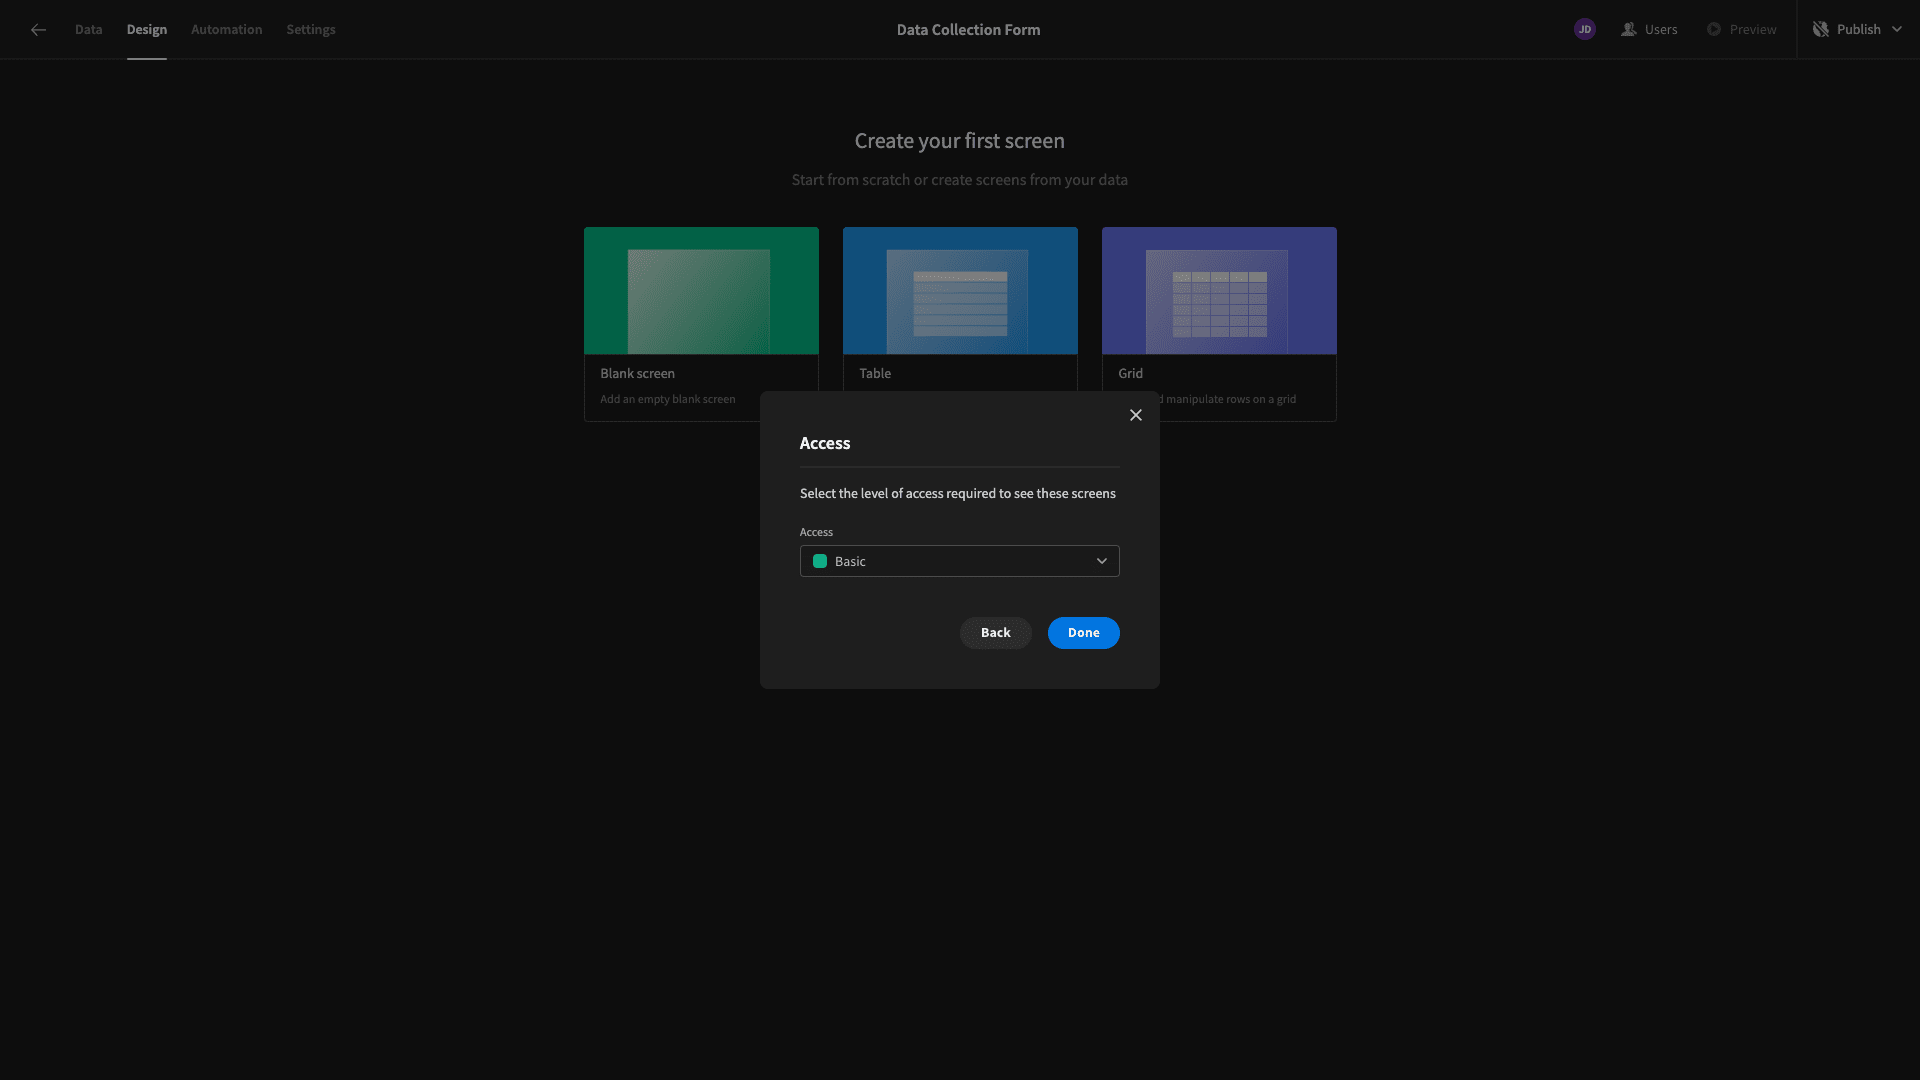
We can also assign a minimum access role for our screen - but we’re leaving this set to the default option - Basic.
Here’s what our blank screen looks like in the Budibase builder.
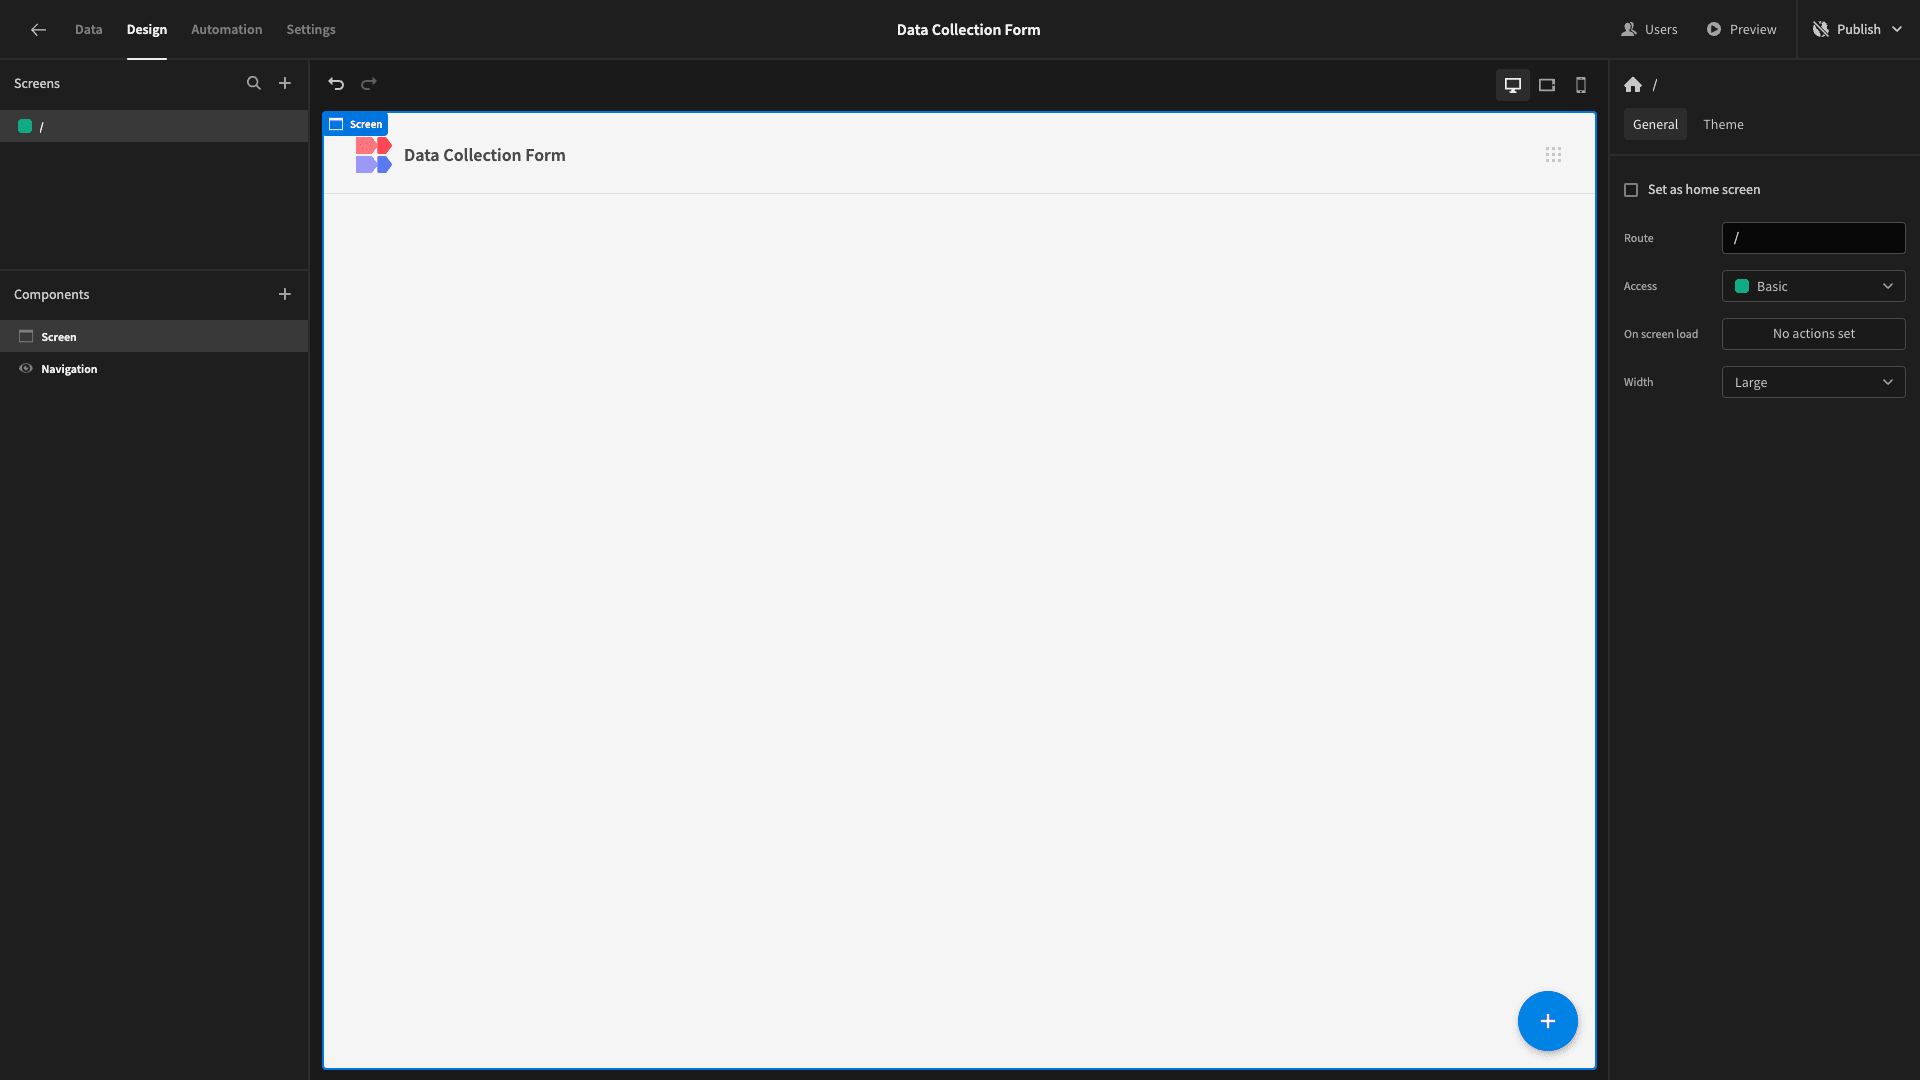
We can use the plus icon to start adding components.
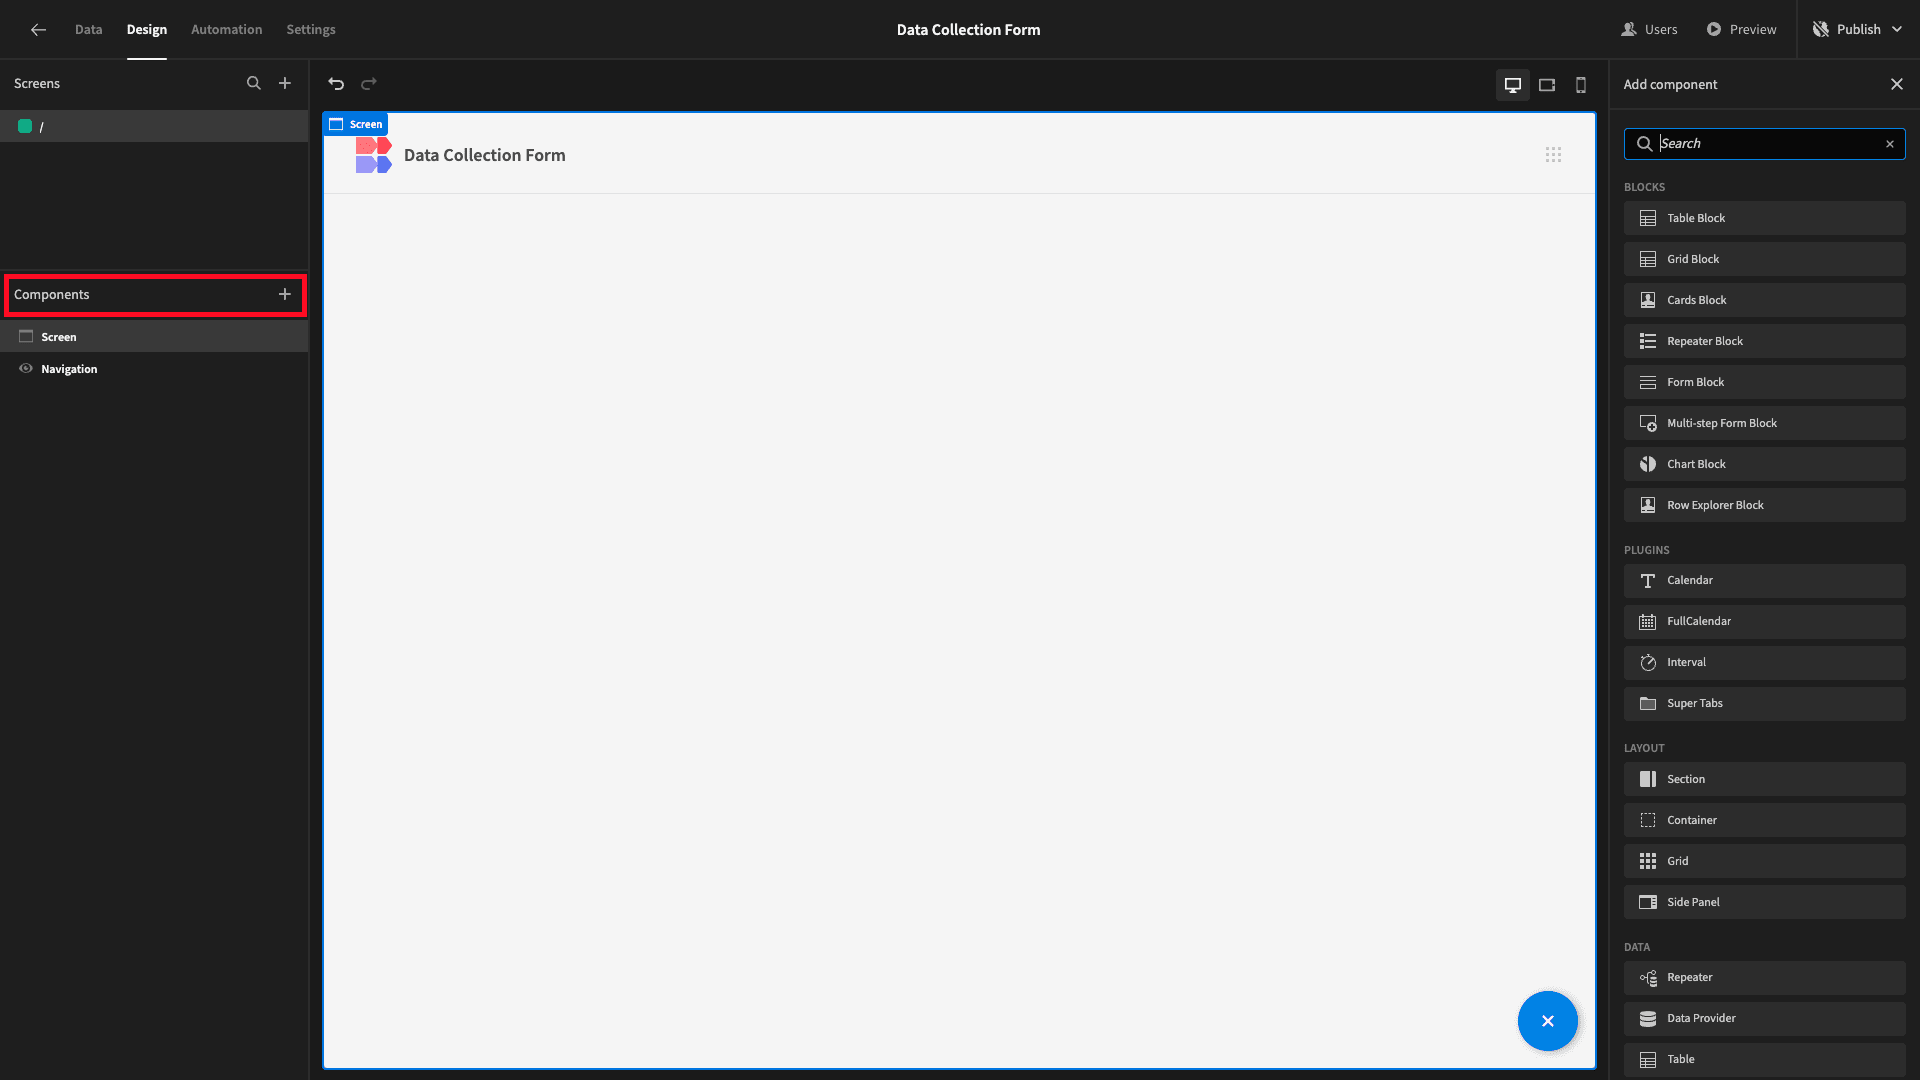
As we said earlier, there are two ways to add forms to a screen in Budibase - either building them from scratch or automatically generating them based on a connected schema.
We’re going to do the latter by adding a Multi-Step Form Block. As the name suggests, this will output a working multi-step form based on the columns stored in any SQL or internal table.

By default, all fields are included on a single form step - but we have the flexibility to configure this however we want. Each attribute is given a form field that’s appropriate for its data type. So the VARCHARs have text boxes, the dates have date pickers, and so on.
Our first task is to arrange our form fields into distinct steps.
Since this is a relatively complex data collection form, our priority is to cluster related fields into logical groupings.
In our case, we have the following categories of fields - which we’ll build our form steps around:
- User information,
- Site information,
- Electrical,
- Ventilation,
- Structural,
- Emergency exits,
- Utilities,
- Overall.
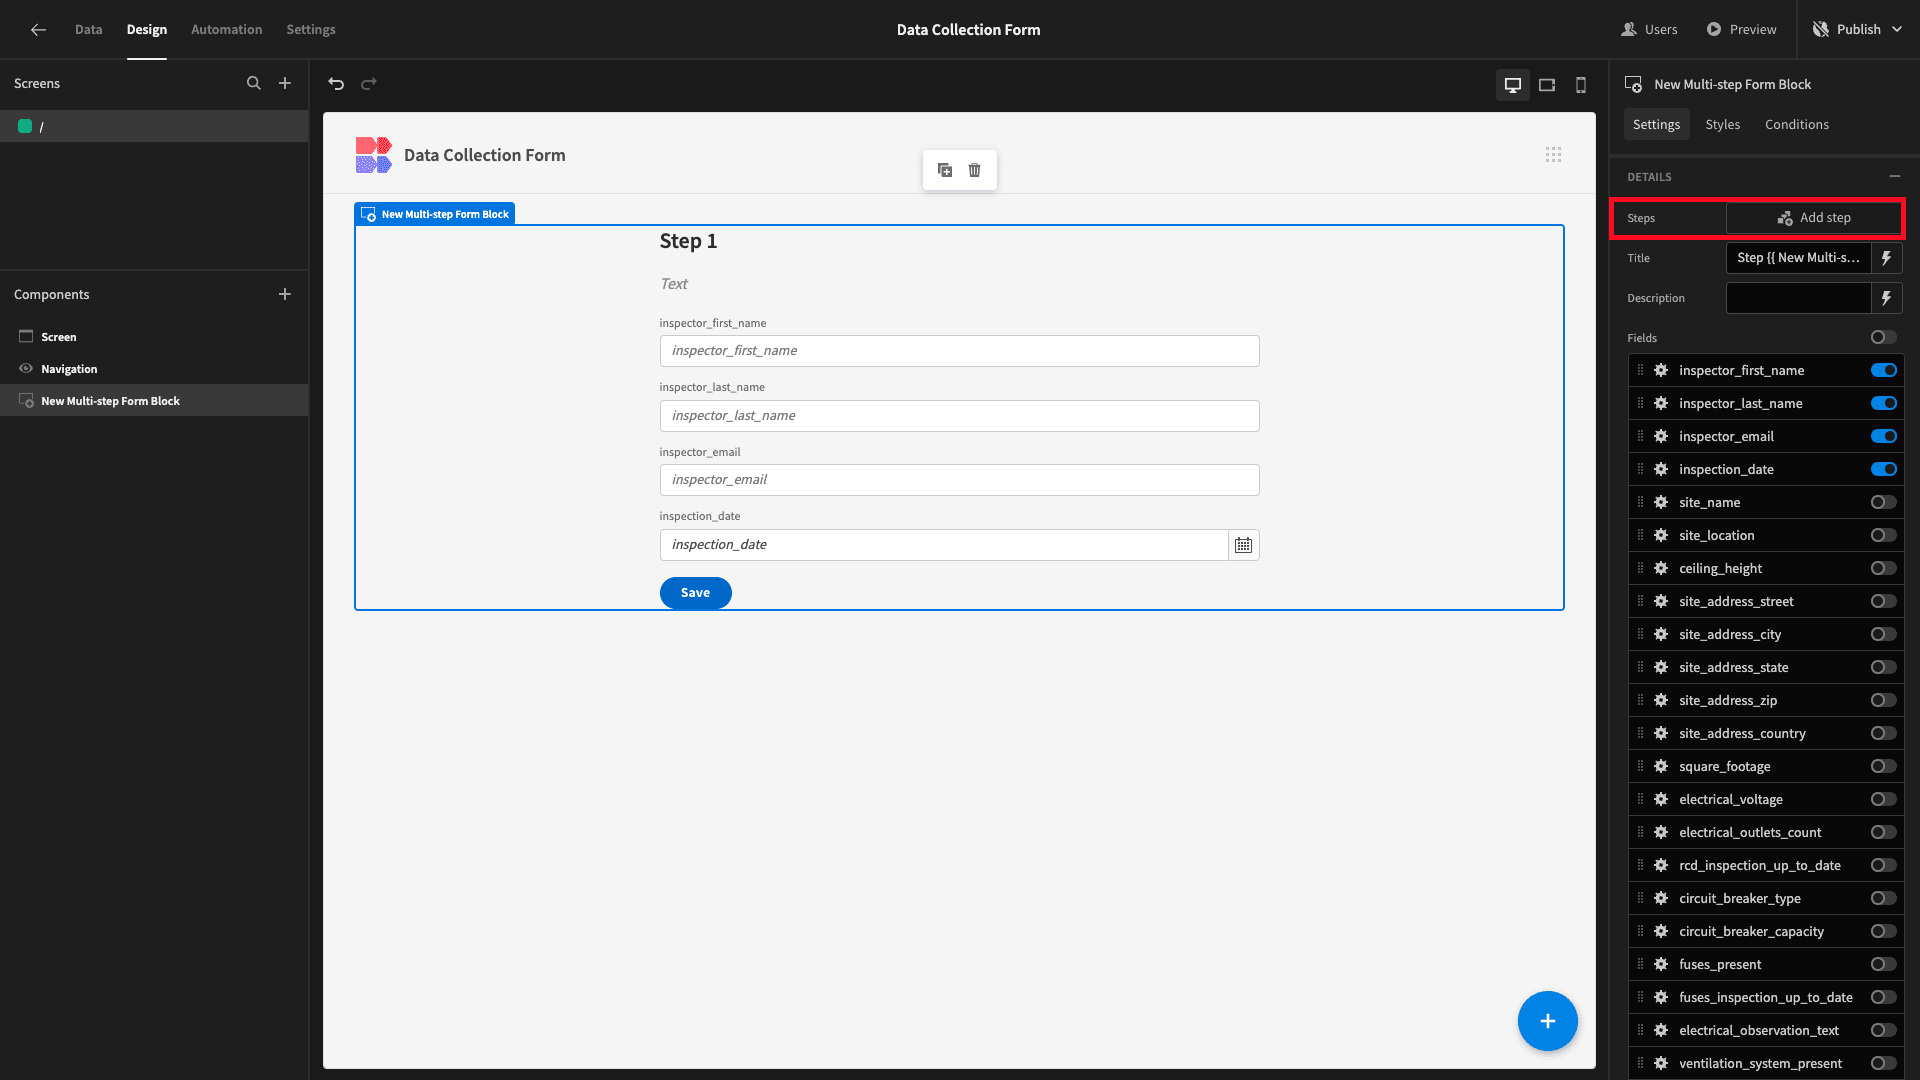
So, for our first step, we’re going to deselect all of the form fields except for inspector_first_name, inspector_last_name, inspector_email, and inspection_date.

Then, we’ll hit Add Step.
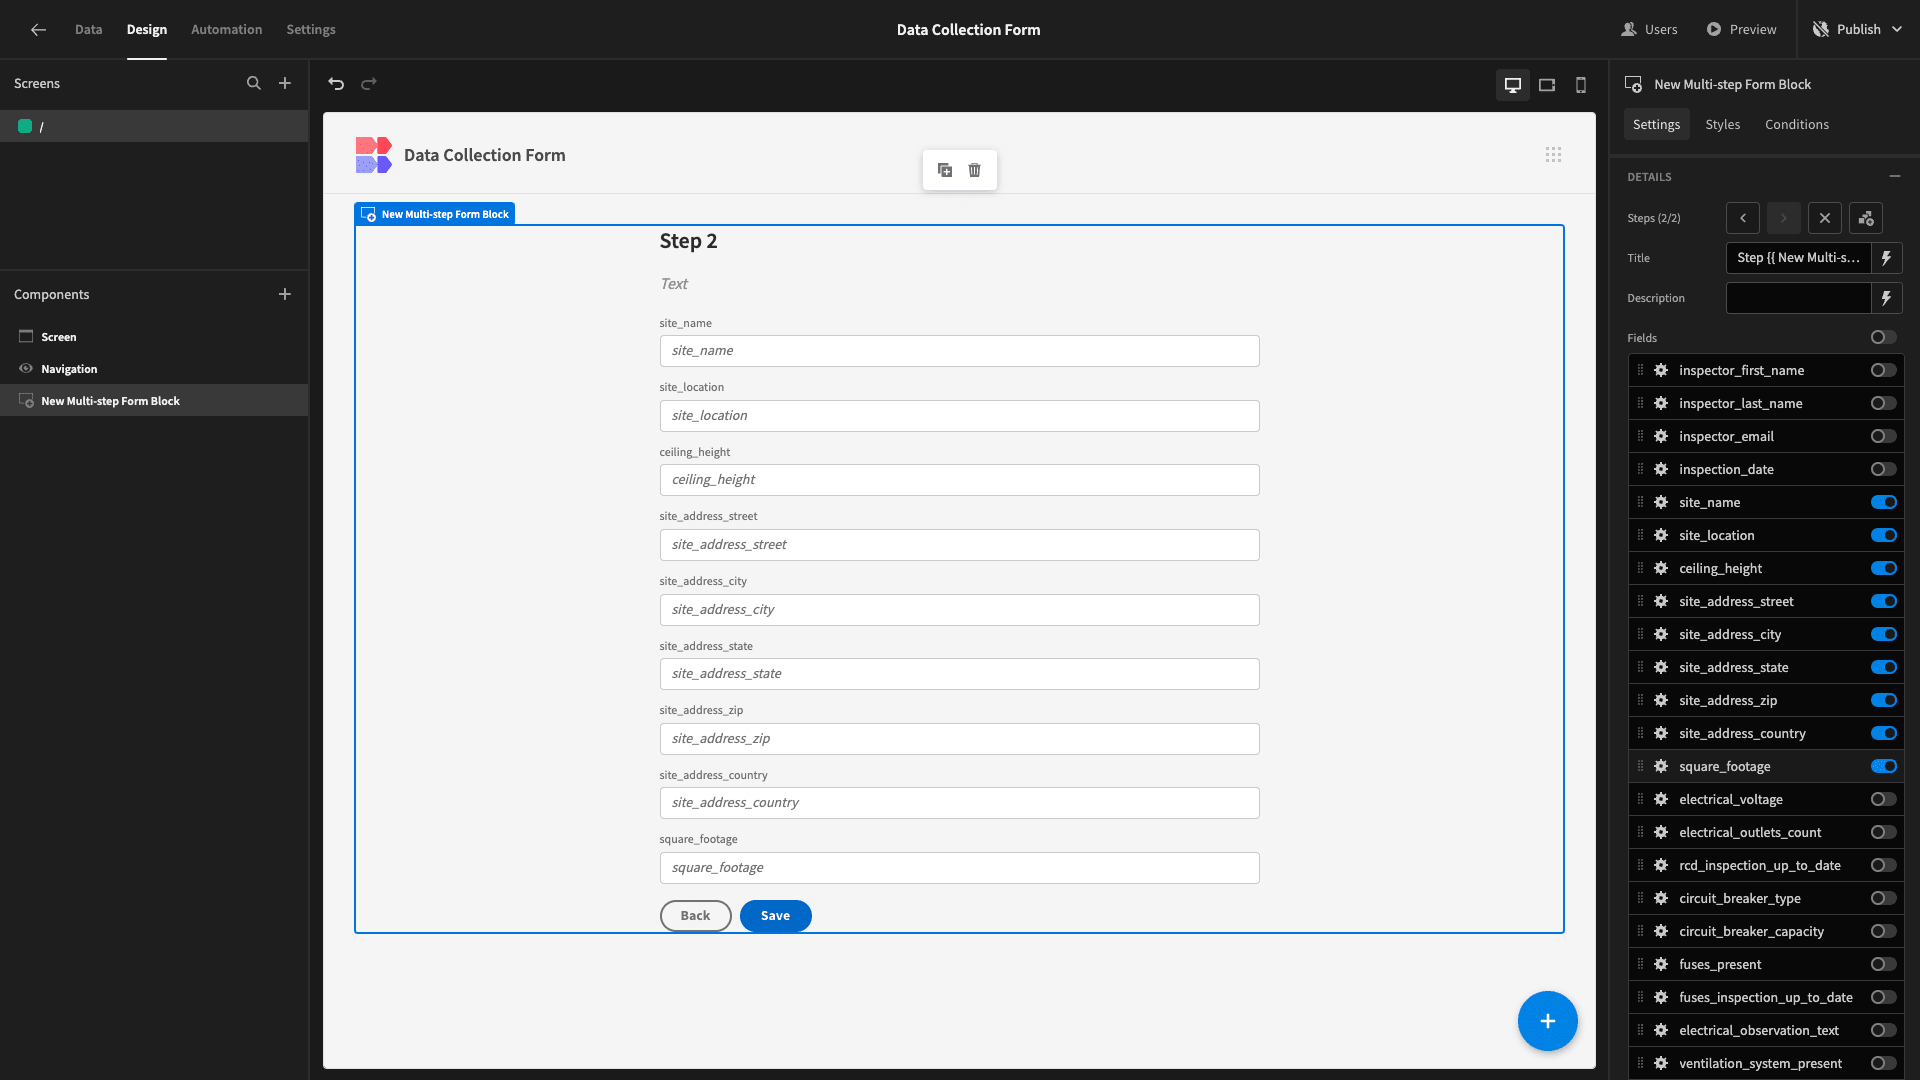
This time, we’re selecting all of our site attributes.
And we’ll repeat this process for the electrical, ventilation, structural, utilities, and overall groups of fields.
By the end of this process, we should have eight distinctive form steps.
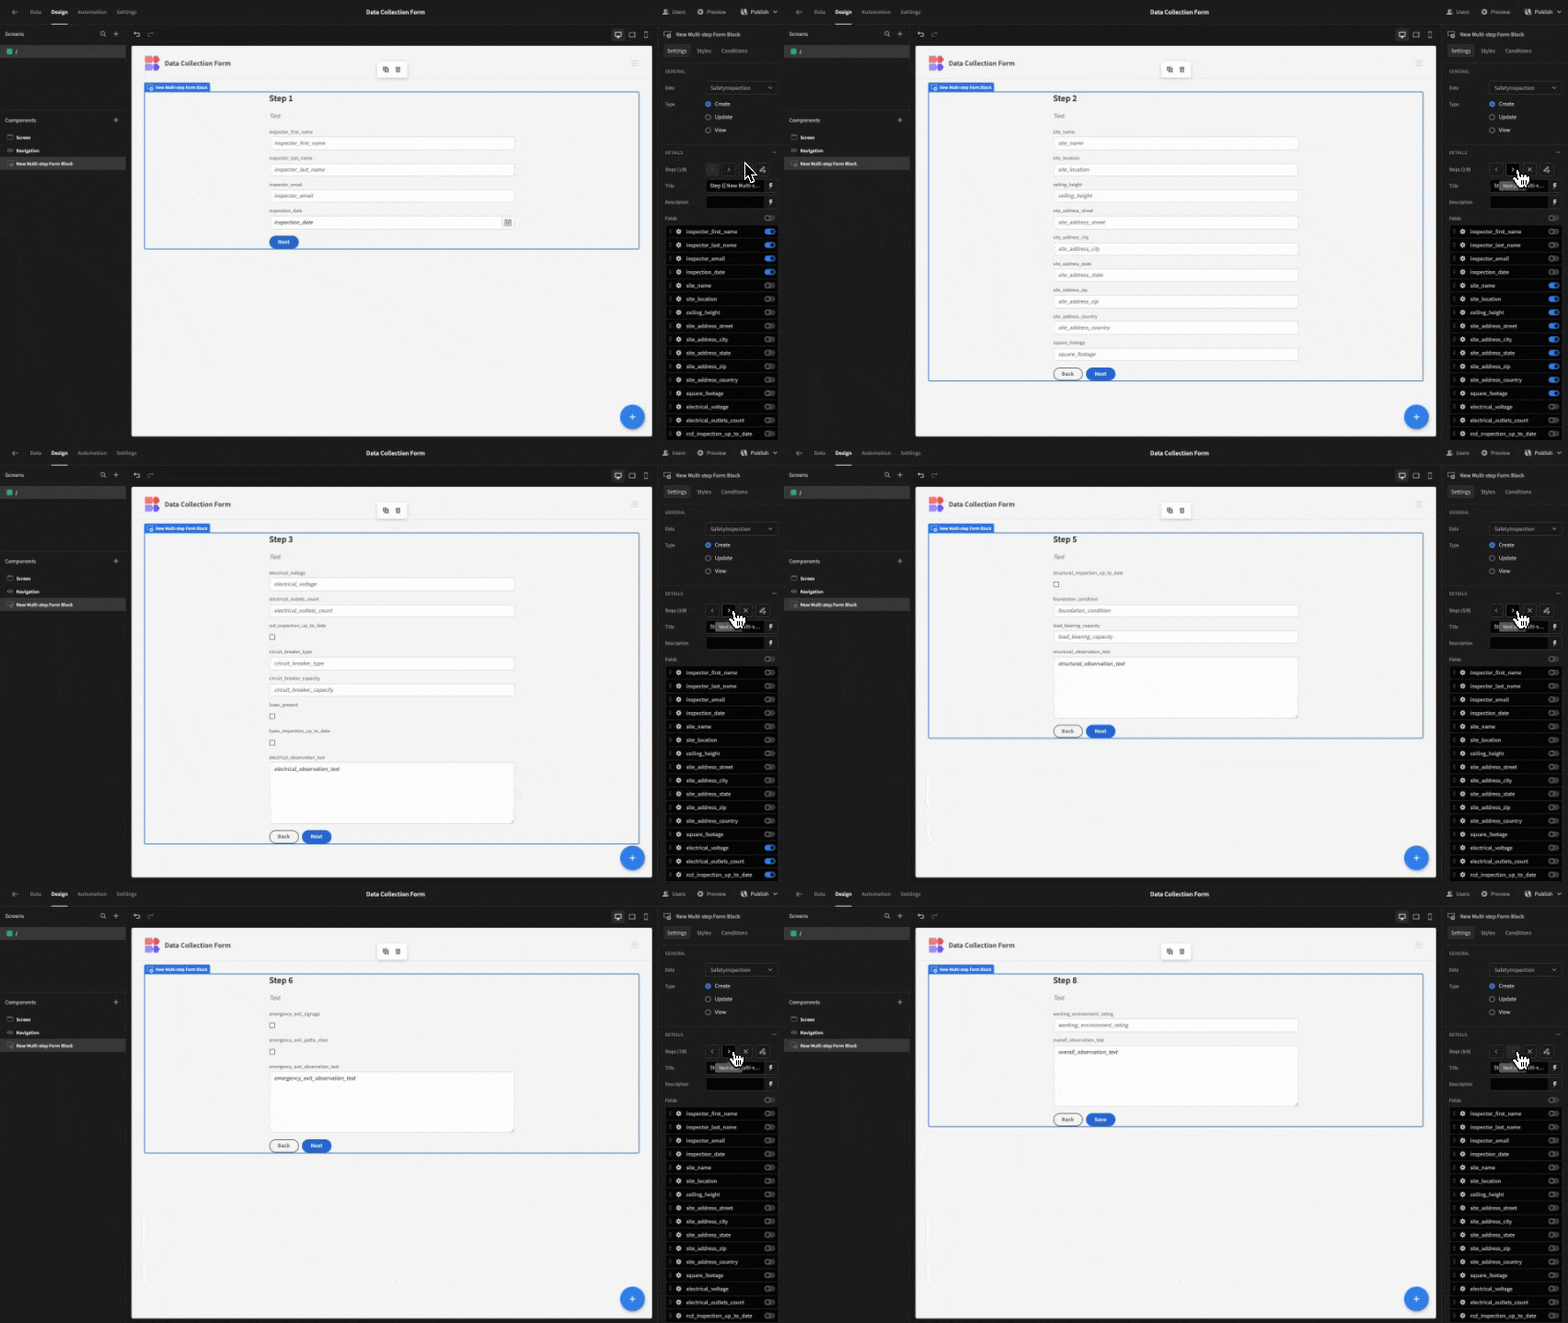
We already have a fully functioning data collection form.
3. Customizing your form design
Next, we want to make some improvements to our form’s UI.
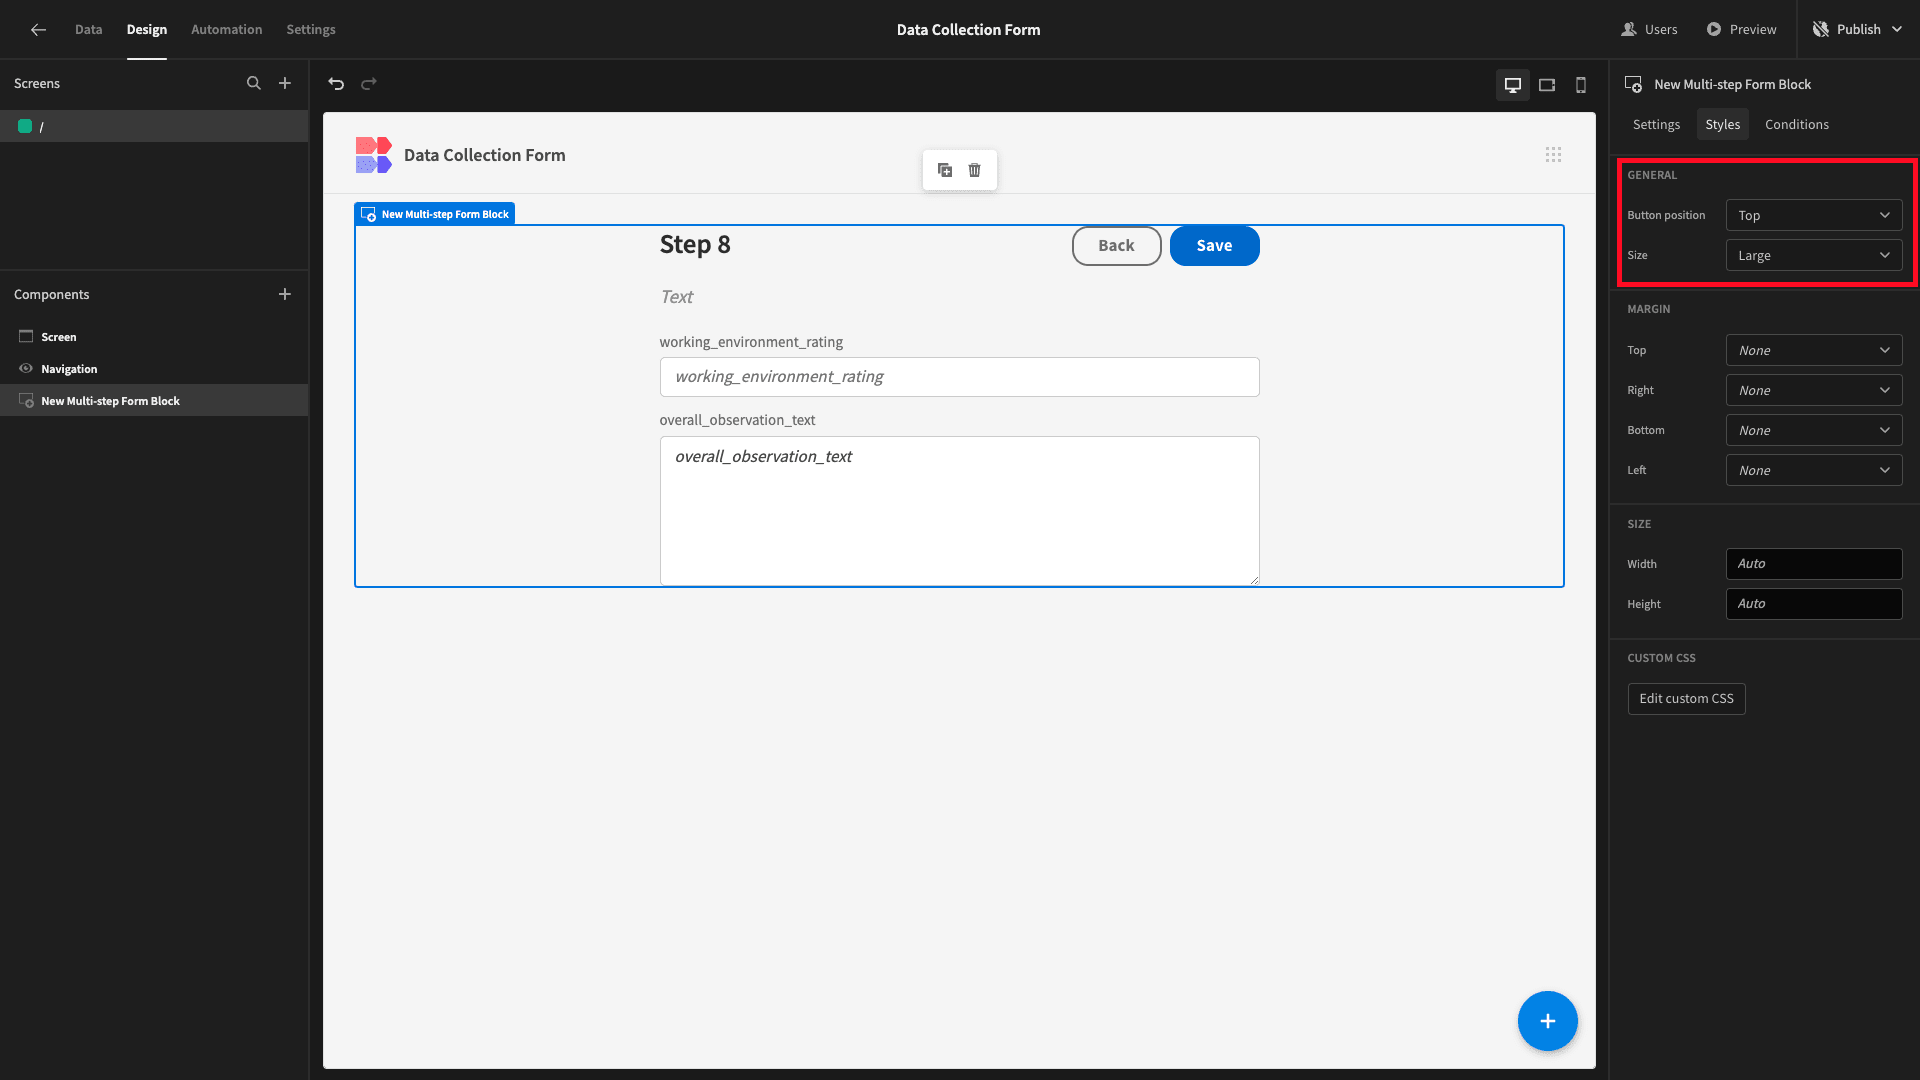
The first thing we’re going to do is head to the Styles tab for our Multi-Step Form Block. Here, we’ll set our Size option to Large and move our buttons to the top of the screen.
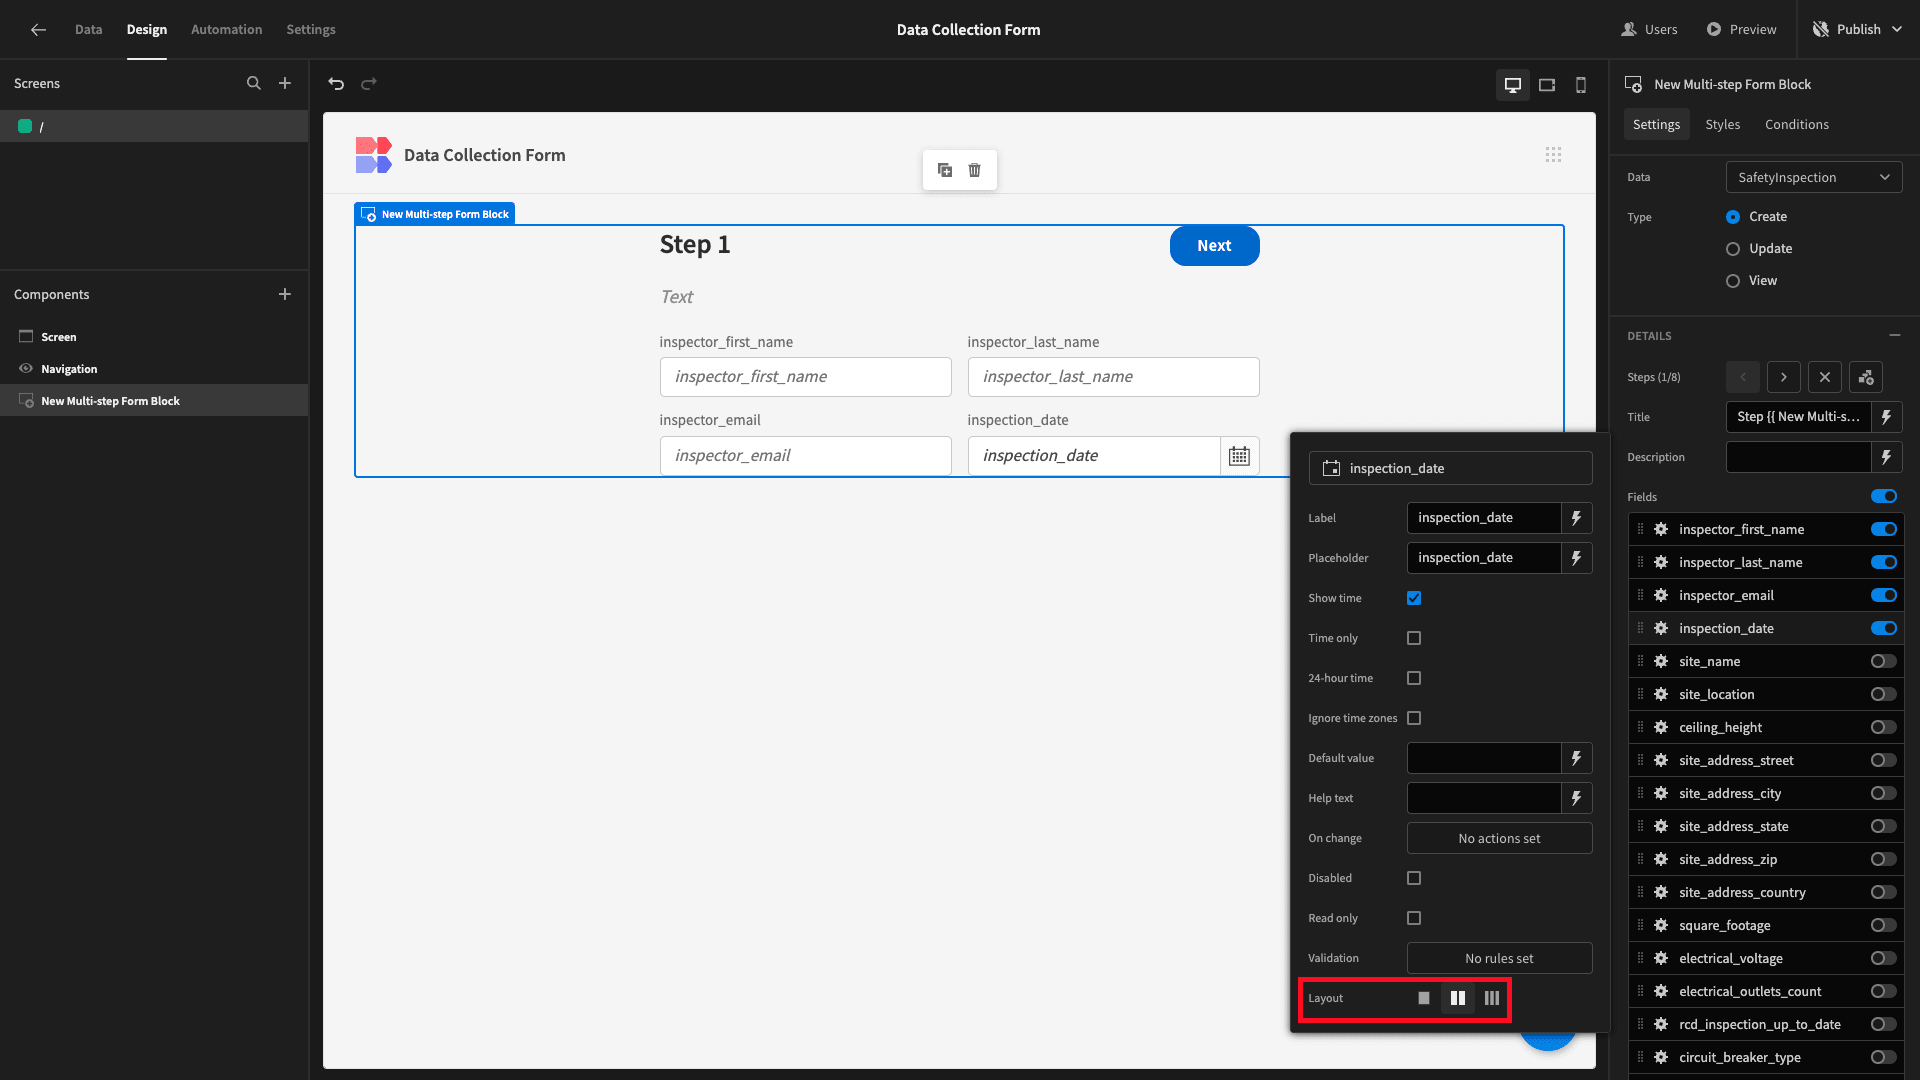
Next, we want to rearrange how some of our individual form fields appear on the screen. For instance, the fields on our first form step are unlikely to need as much horizontal space as they’re currently occupying.
So, we’ll use the Layout option under each of these to arrange them into two columns.
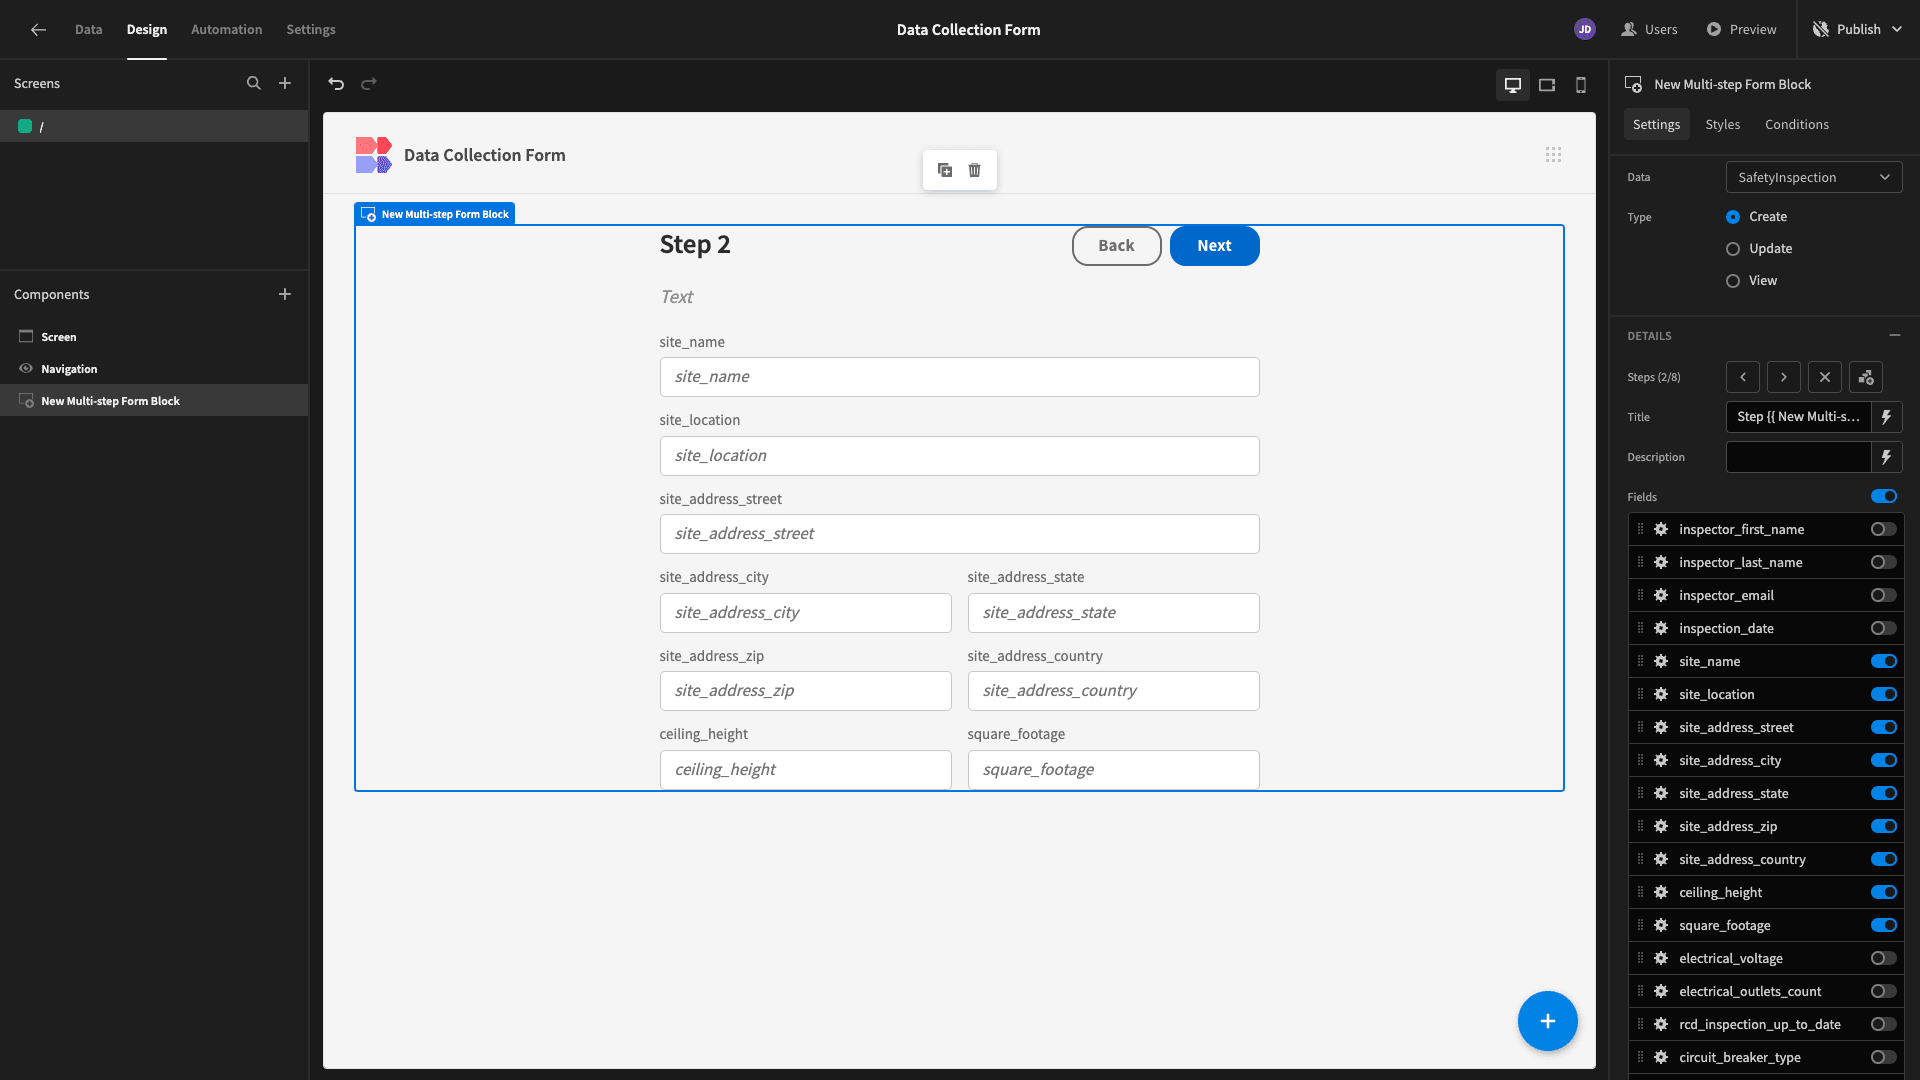
We’ll also do the same for the shorter fields in our second step.
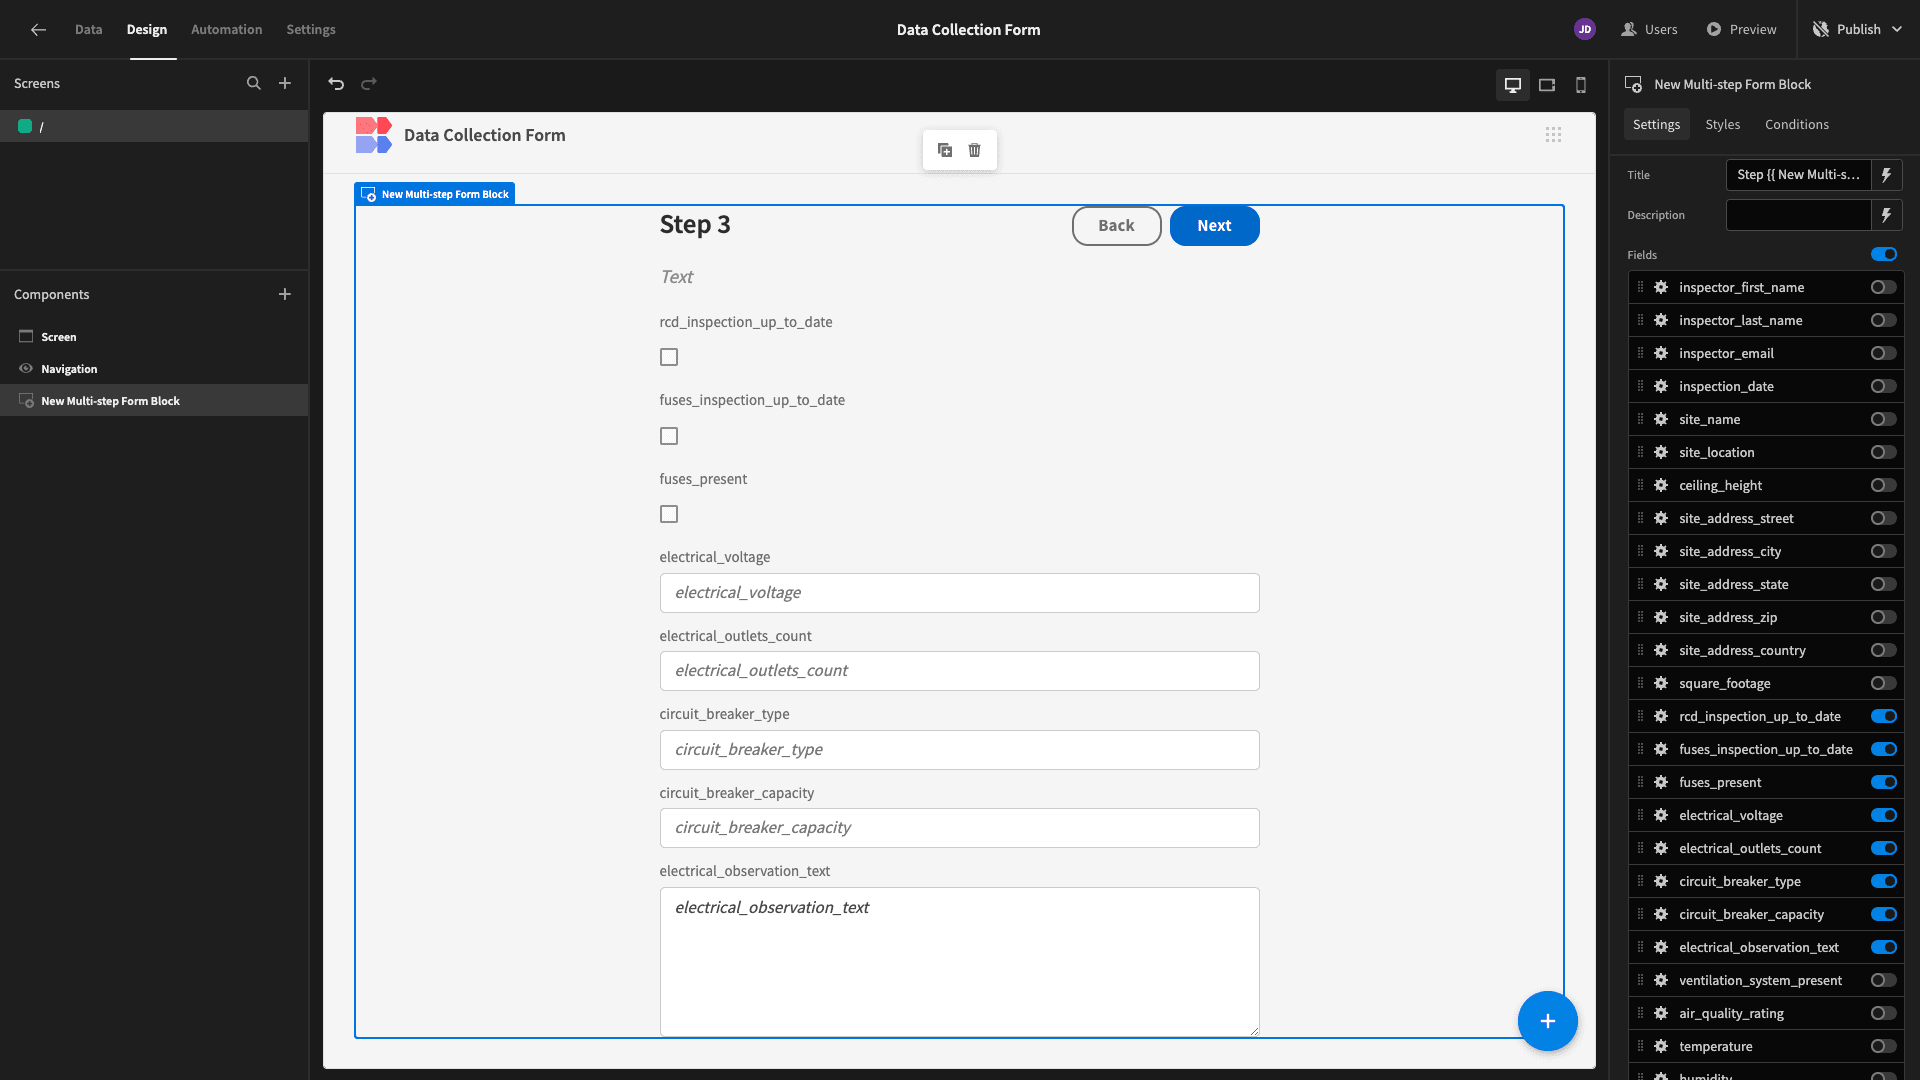
For consistency, we want to display all boolean checkboxes at the top of their respective form steps. We can do this by simply dragging them up the list of enabled fields.
We also want to update the display text across our data collection form for an enhanced UI.
First, we’re going to add descriptions to each of our form steps relating to the category of information they deal with.
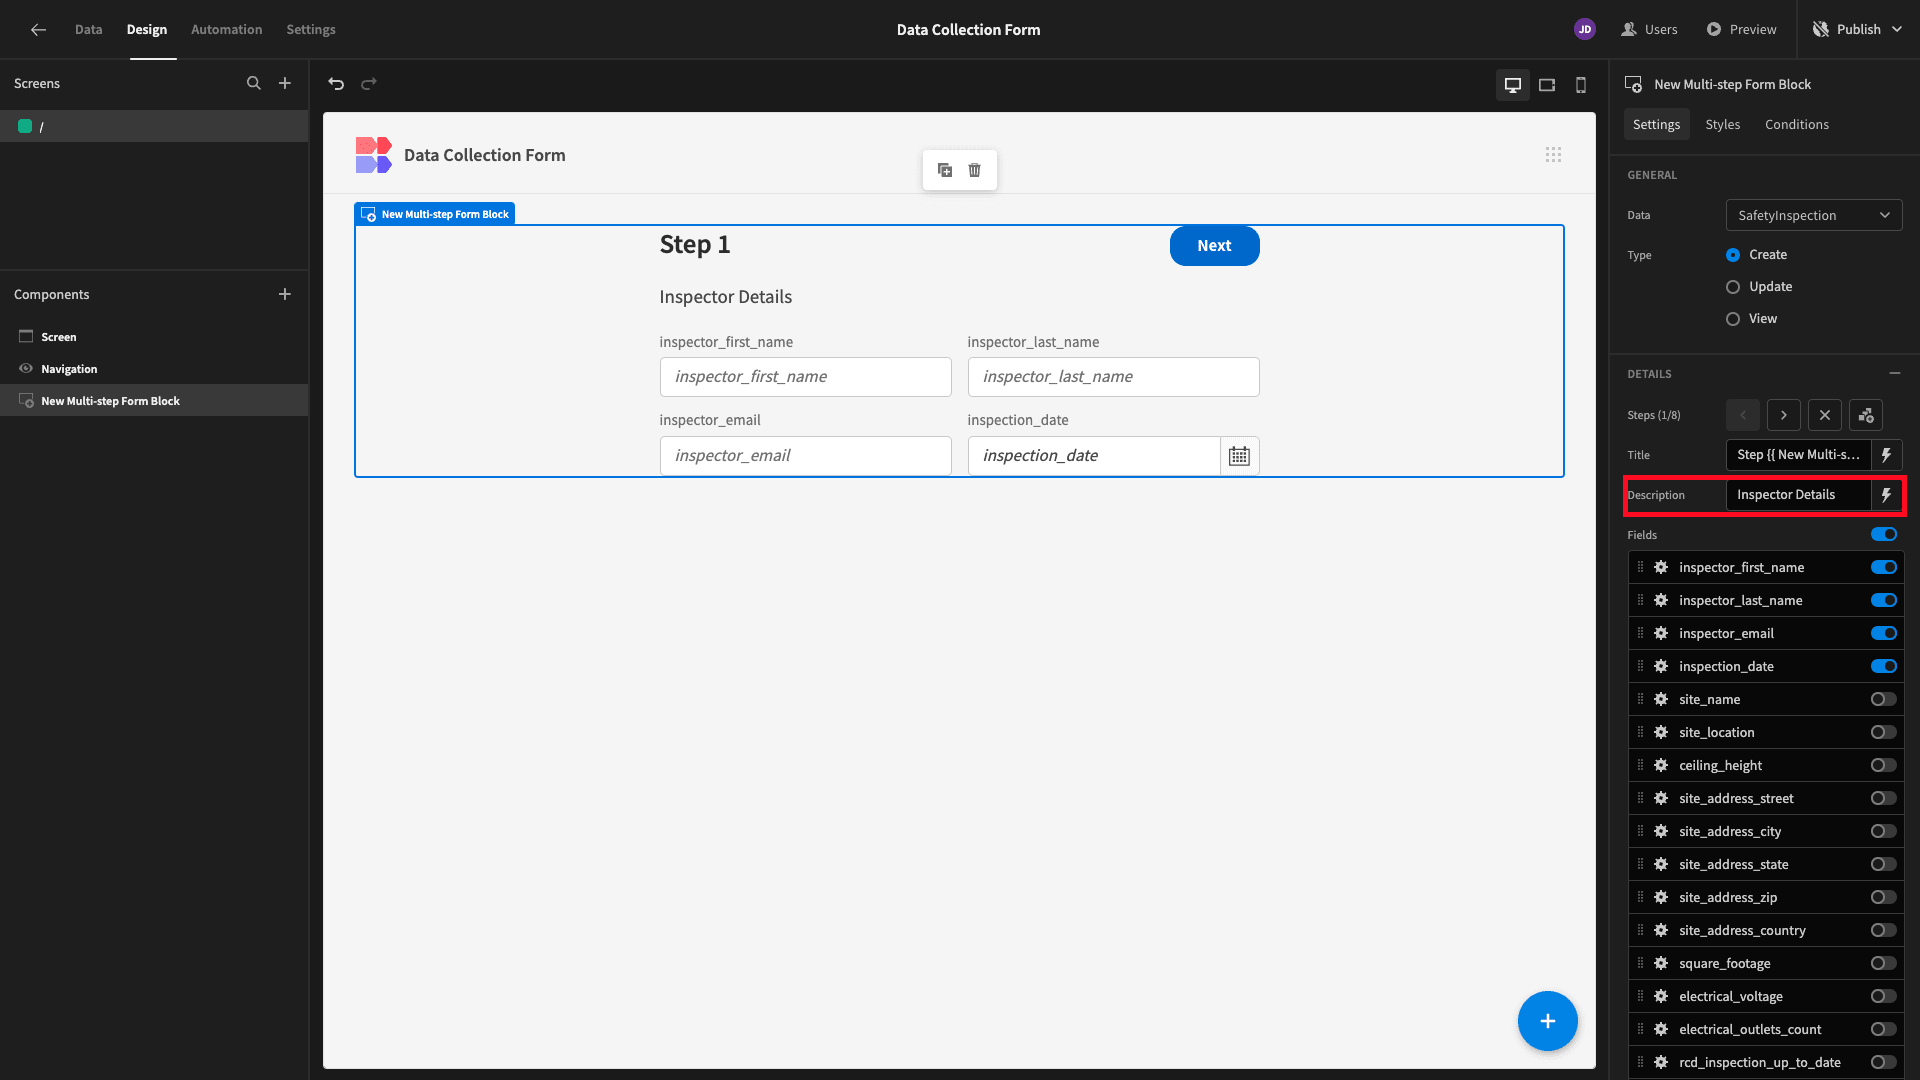
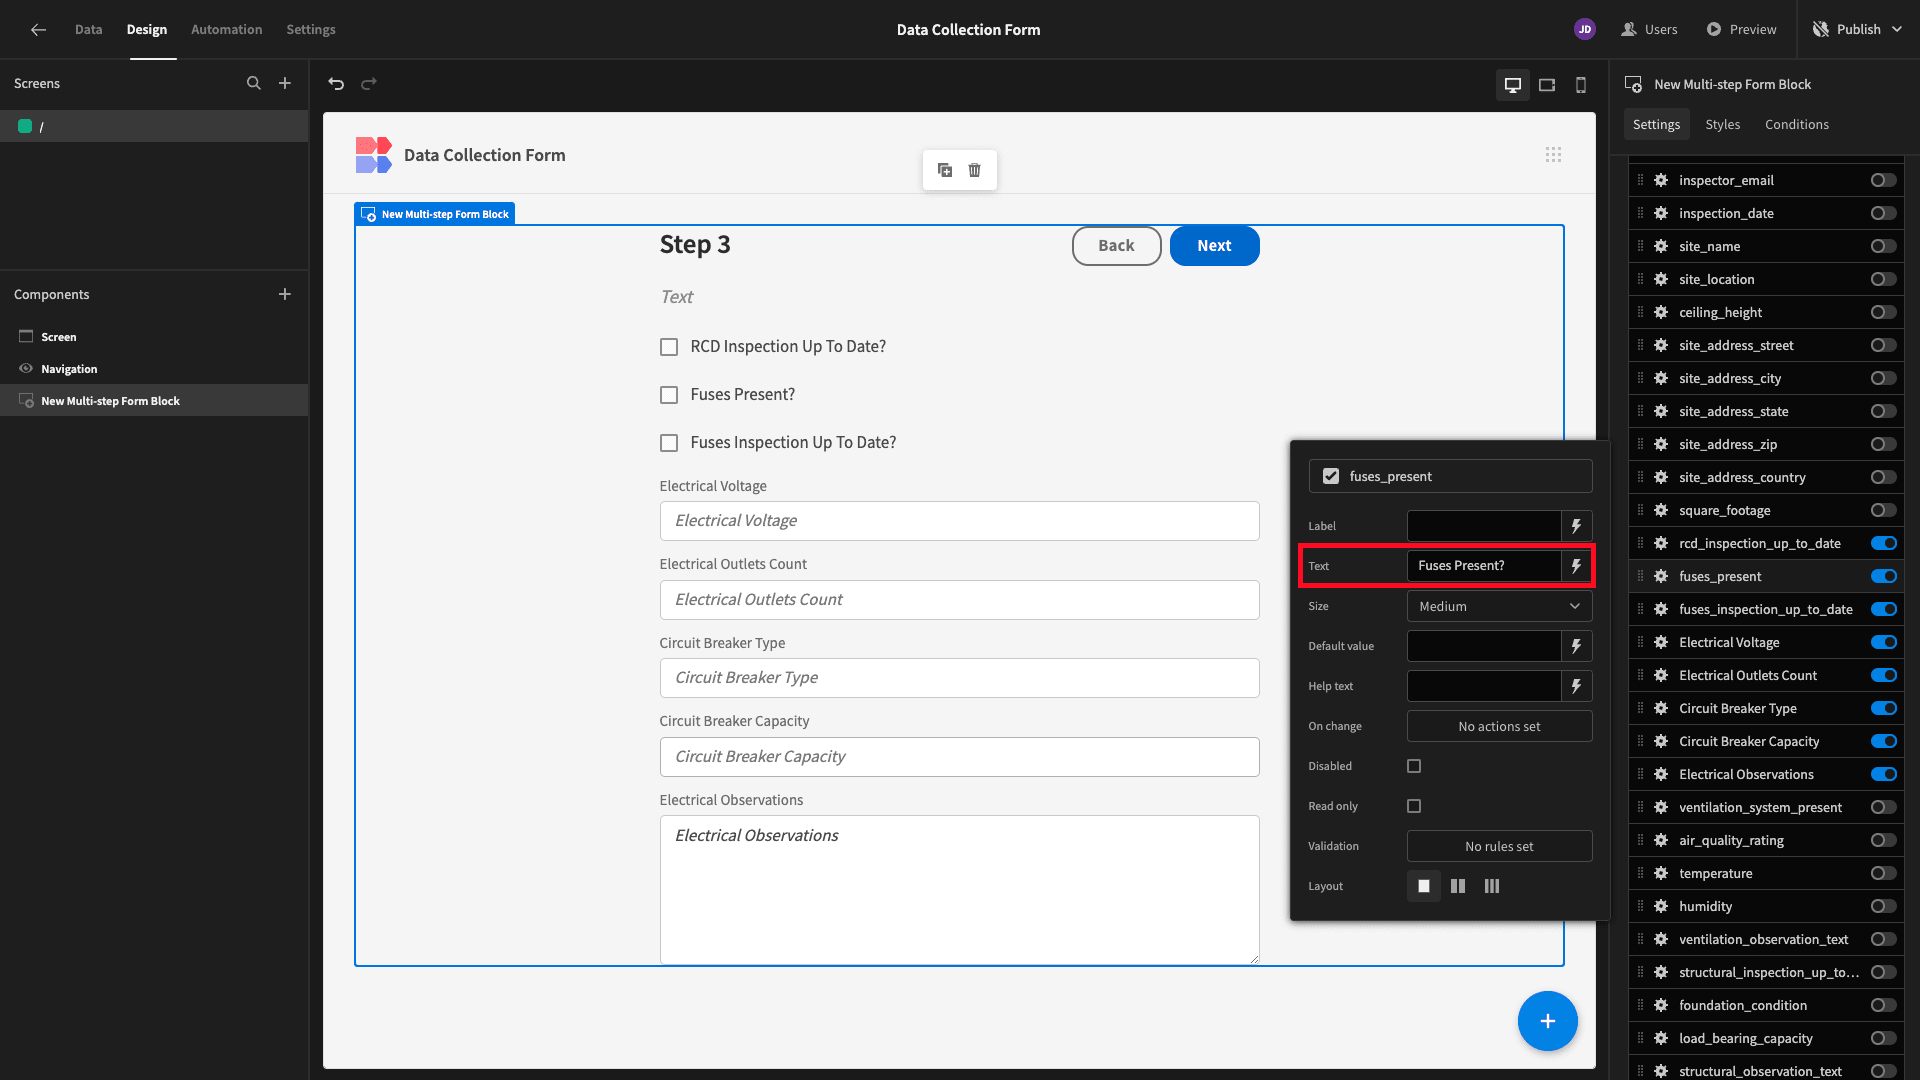
We’ll also use the Label and Placeholder text within each attribute to provide more human-readable copy - rather than simply displaying the names of the attributes in our database table.

We’ll repeat this process for each of our eight form steps. One additional change we’ll also make is using the Text setting instead of the Label for our Boolean fields so they occupy less vertical space.
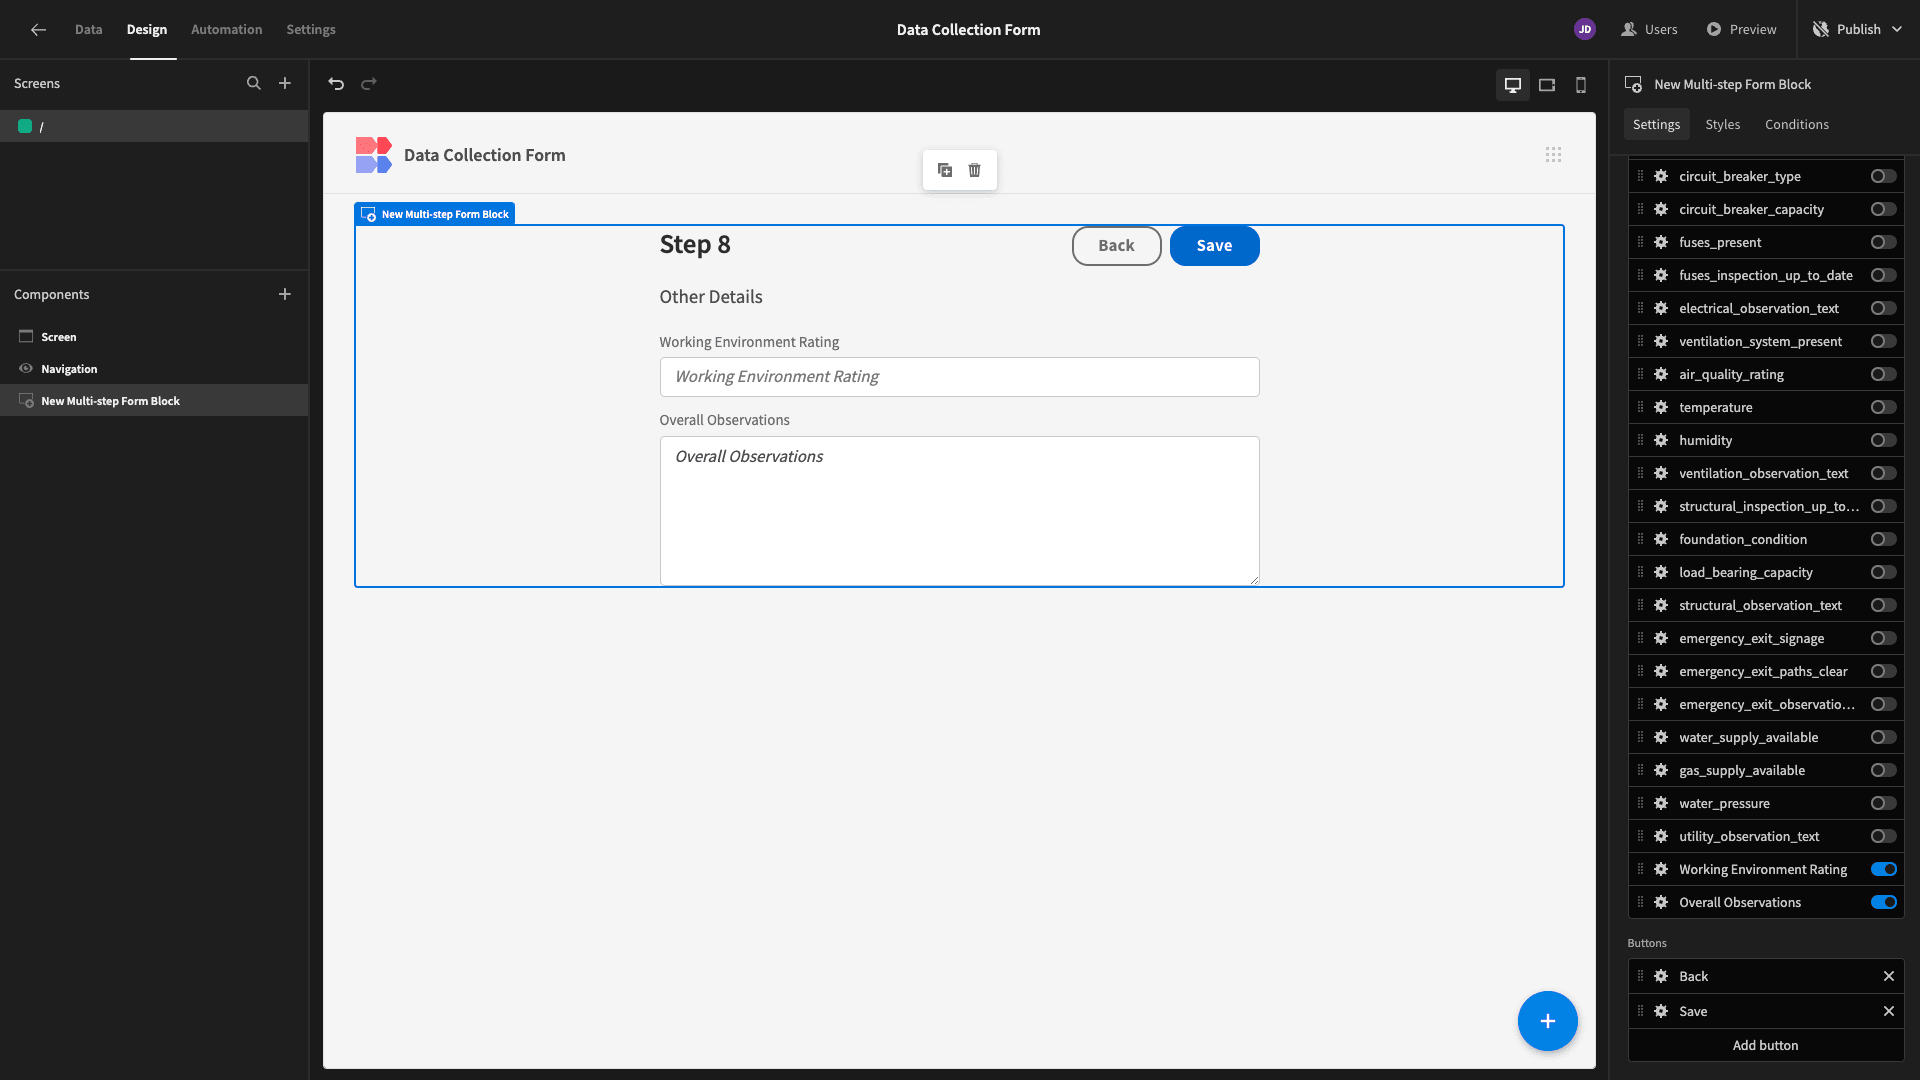
Here’s our final step.
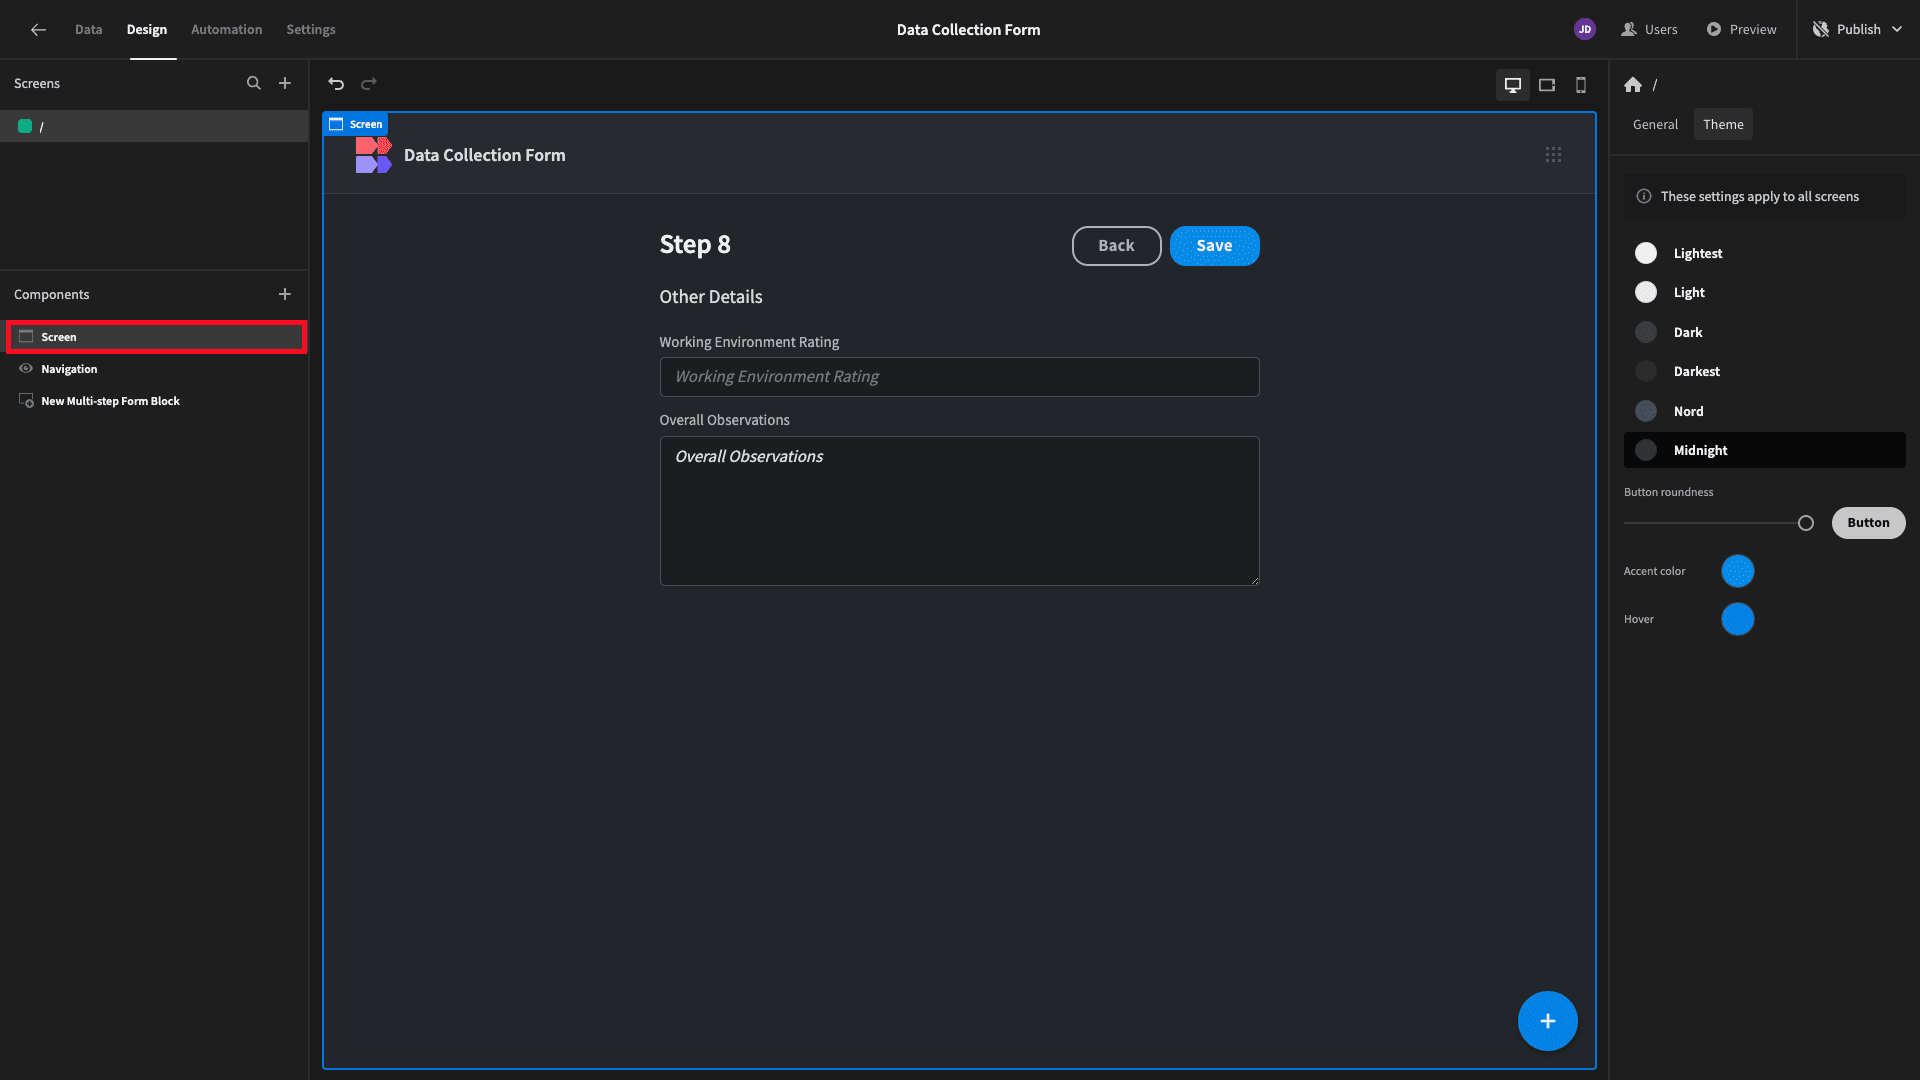
The last UI change we’ll make is updating the theme of our data collection form. We can do this under the Screen menu.
Budibase comes with a range of built-in app themes. Today, we’ll opt for Midnight.
4. Adding logic and validation
Budibase is the ideal solution for building advanced forms with ease. Our open-source, low-code platform offers so much more than just a tool for building intuitive data input UIs.
To demonstrate a little bit of what’s possible, we’re going to add some front-end logic to our data collection form.
Specifically, we’re going to do three things:
- Create and display a confirmation message using conditional UIs.
- Automatically populate form values based on contextual data.
- Add custom validation rules.
Let’s take a look at how we can do each of these.
Conditional logic
Budibase offers powerful, custom conditionality rules that can be used to hide or display components - as well as updating any of their native settings.
We’re going to use conditionality to hide our form once it’s been submitted and display a confirmation message in its place.
The first thing we need to do is add a headline component beneath our Multi-Step Form Block. We’ll set its Text to our confirmation message and align it to the center.

In a second, when we create our conditions, we’ll need to provide a reference value and a comparison value - along with an operator and an action.
For example, if X equals Y, do this…
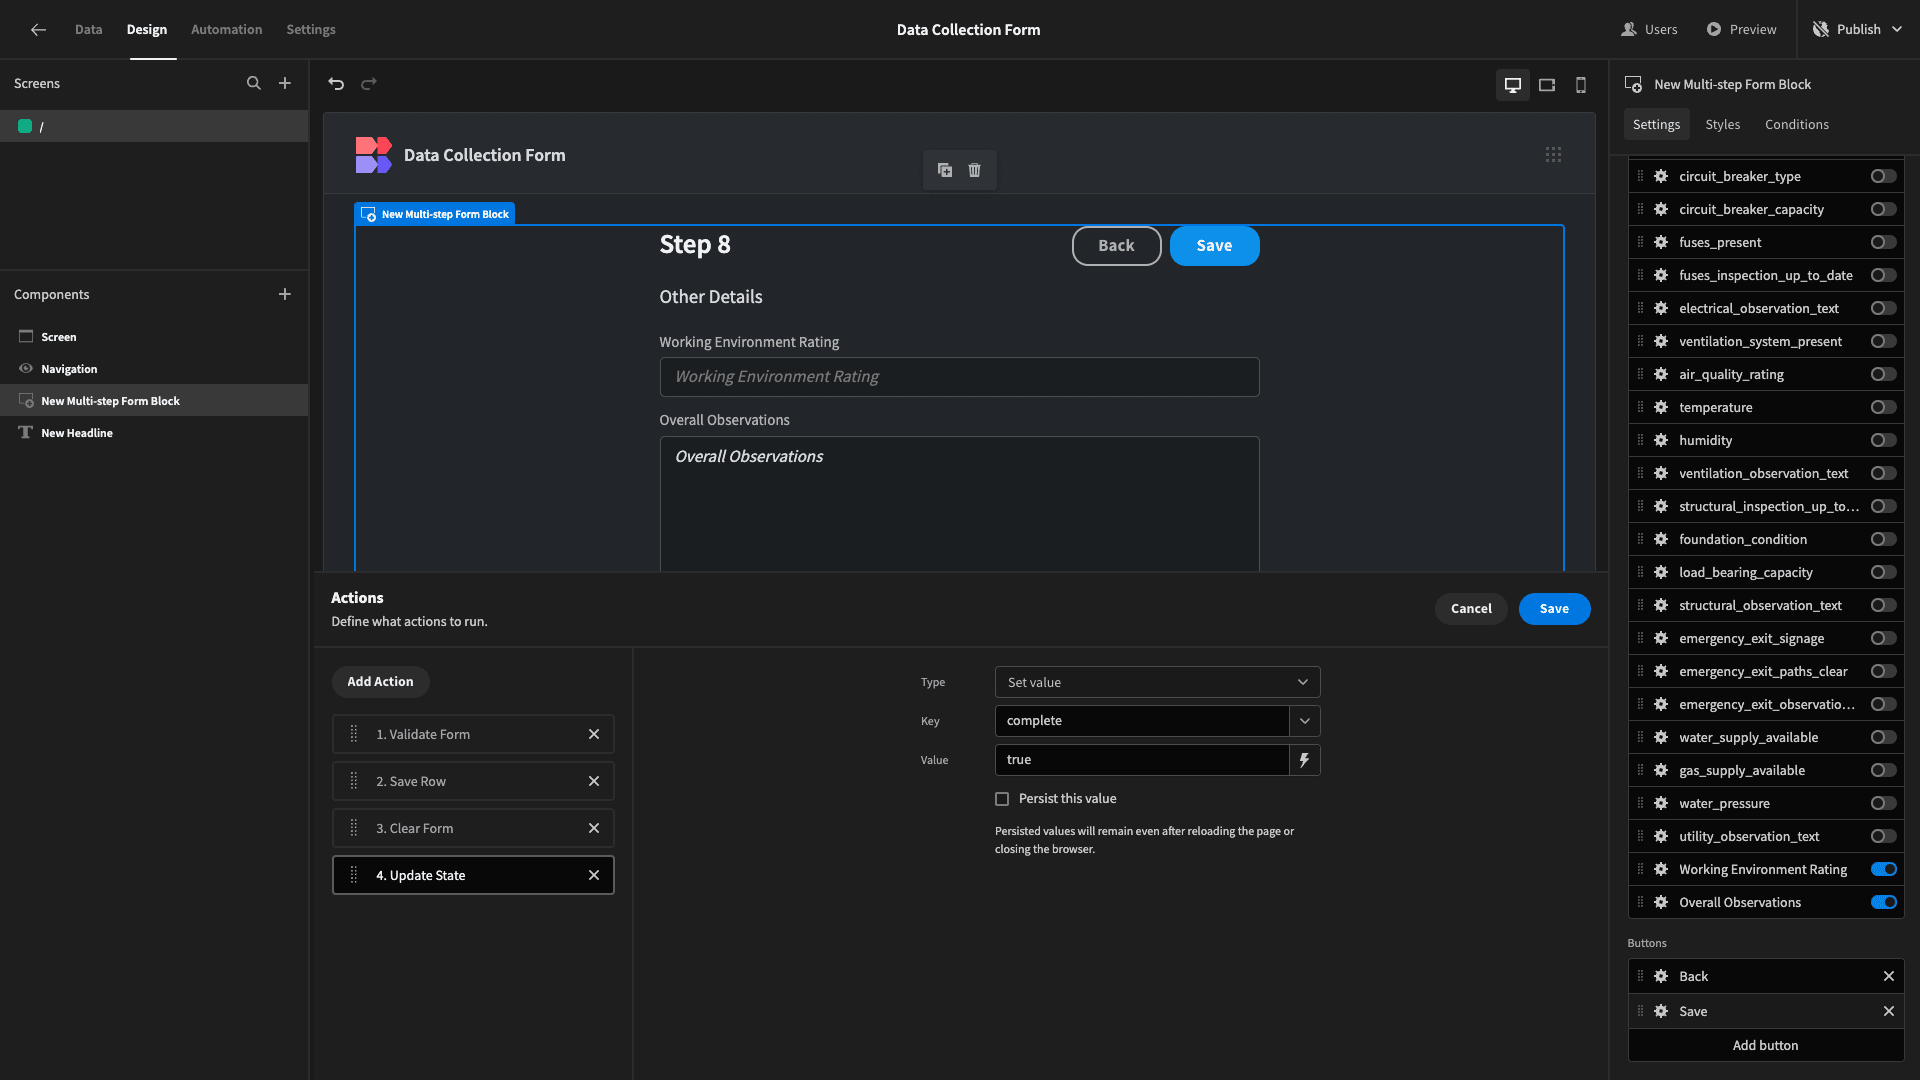
We’re going to create the values we need by adding an Update State action to our Save button. A state is a variable that we can store and utilize elsewhere in our front-end logic.
Start by opening the Actions drawer for the Save button.

The Update State action accepts two arguments called Key and Value. We’re setting our Key to ‘complete’ and our value to ‘true’.
Now, we can use this state within custom conditions.
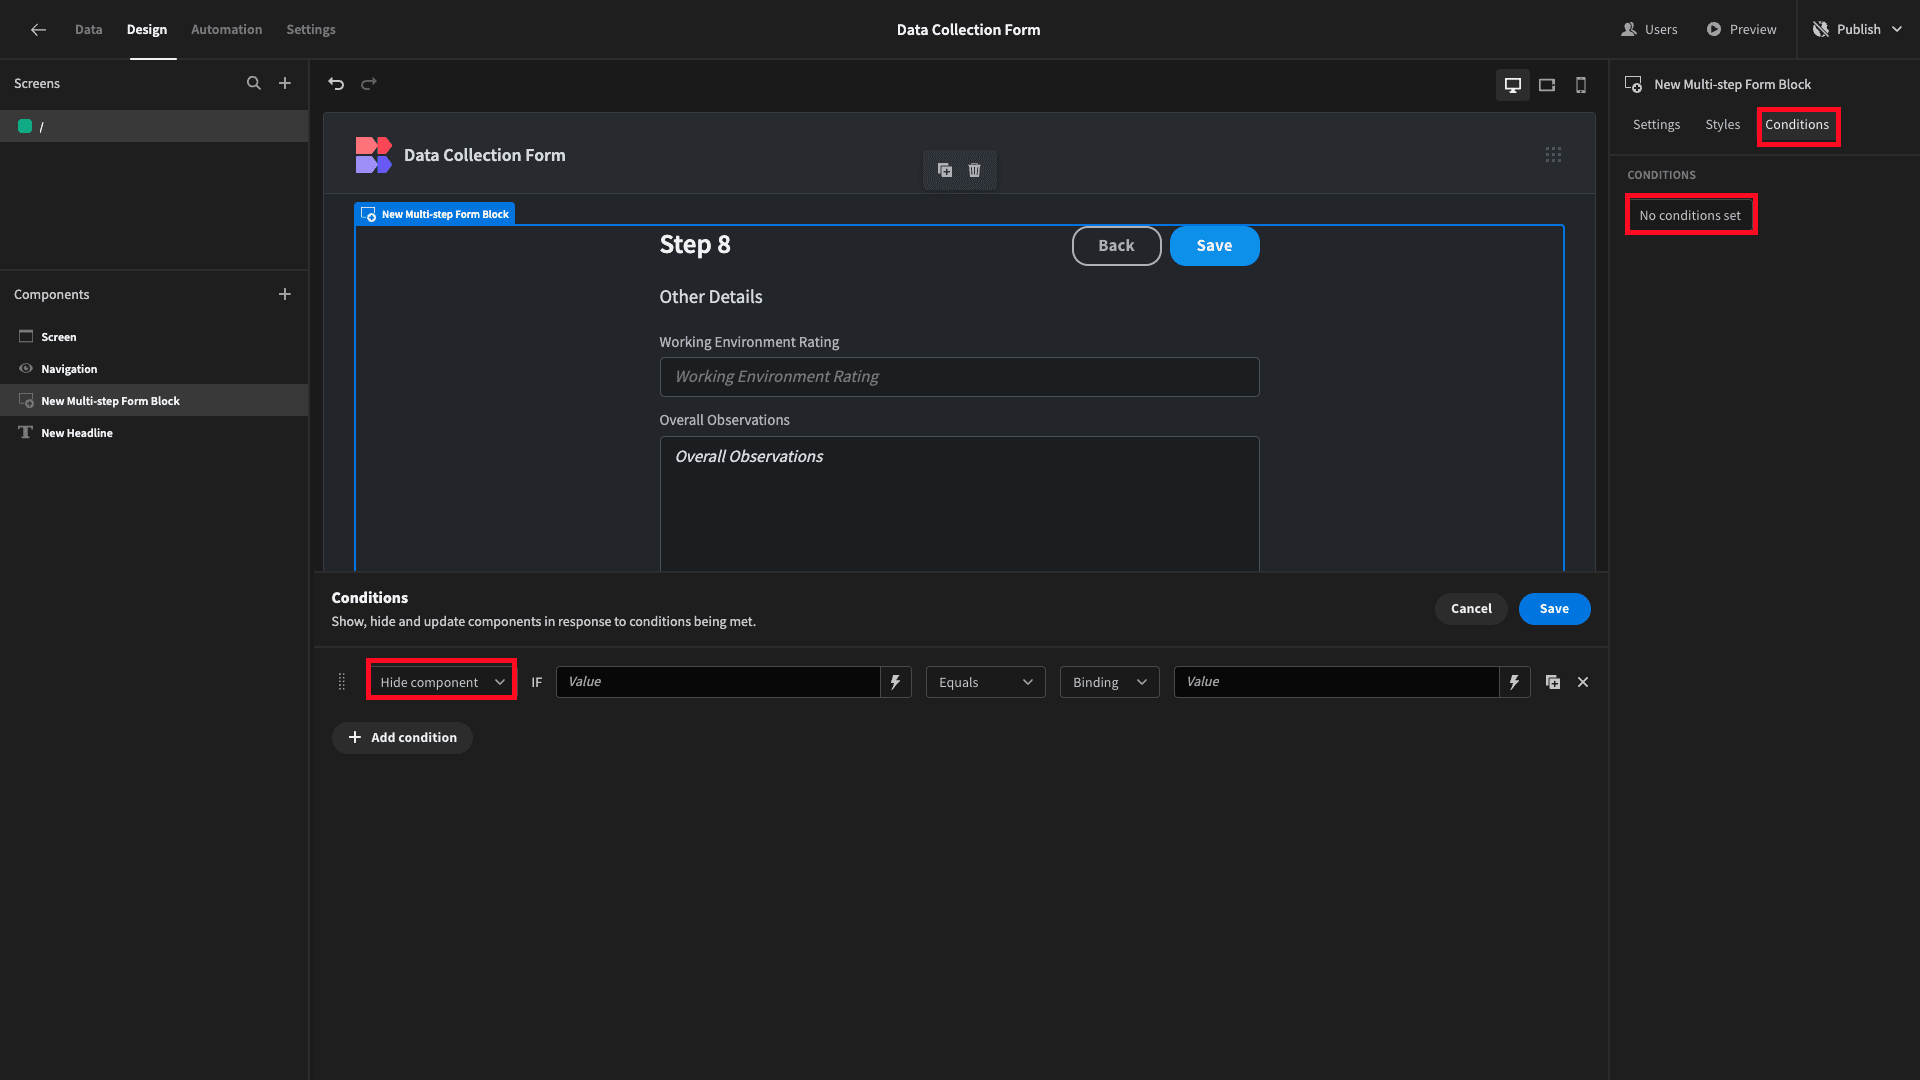
We’ll open the Conditionality drawer for our Form Block and add a Hide Component rule.
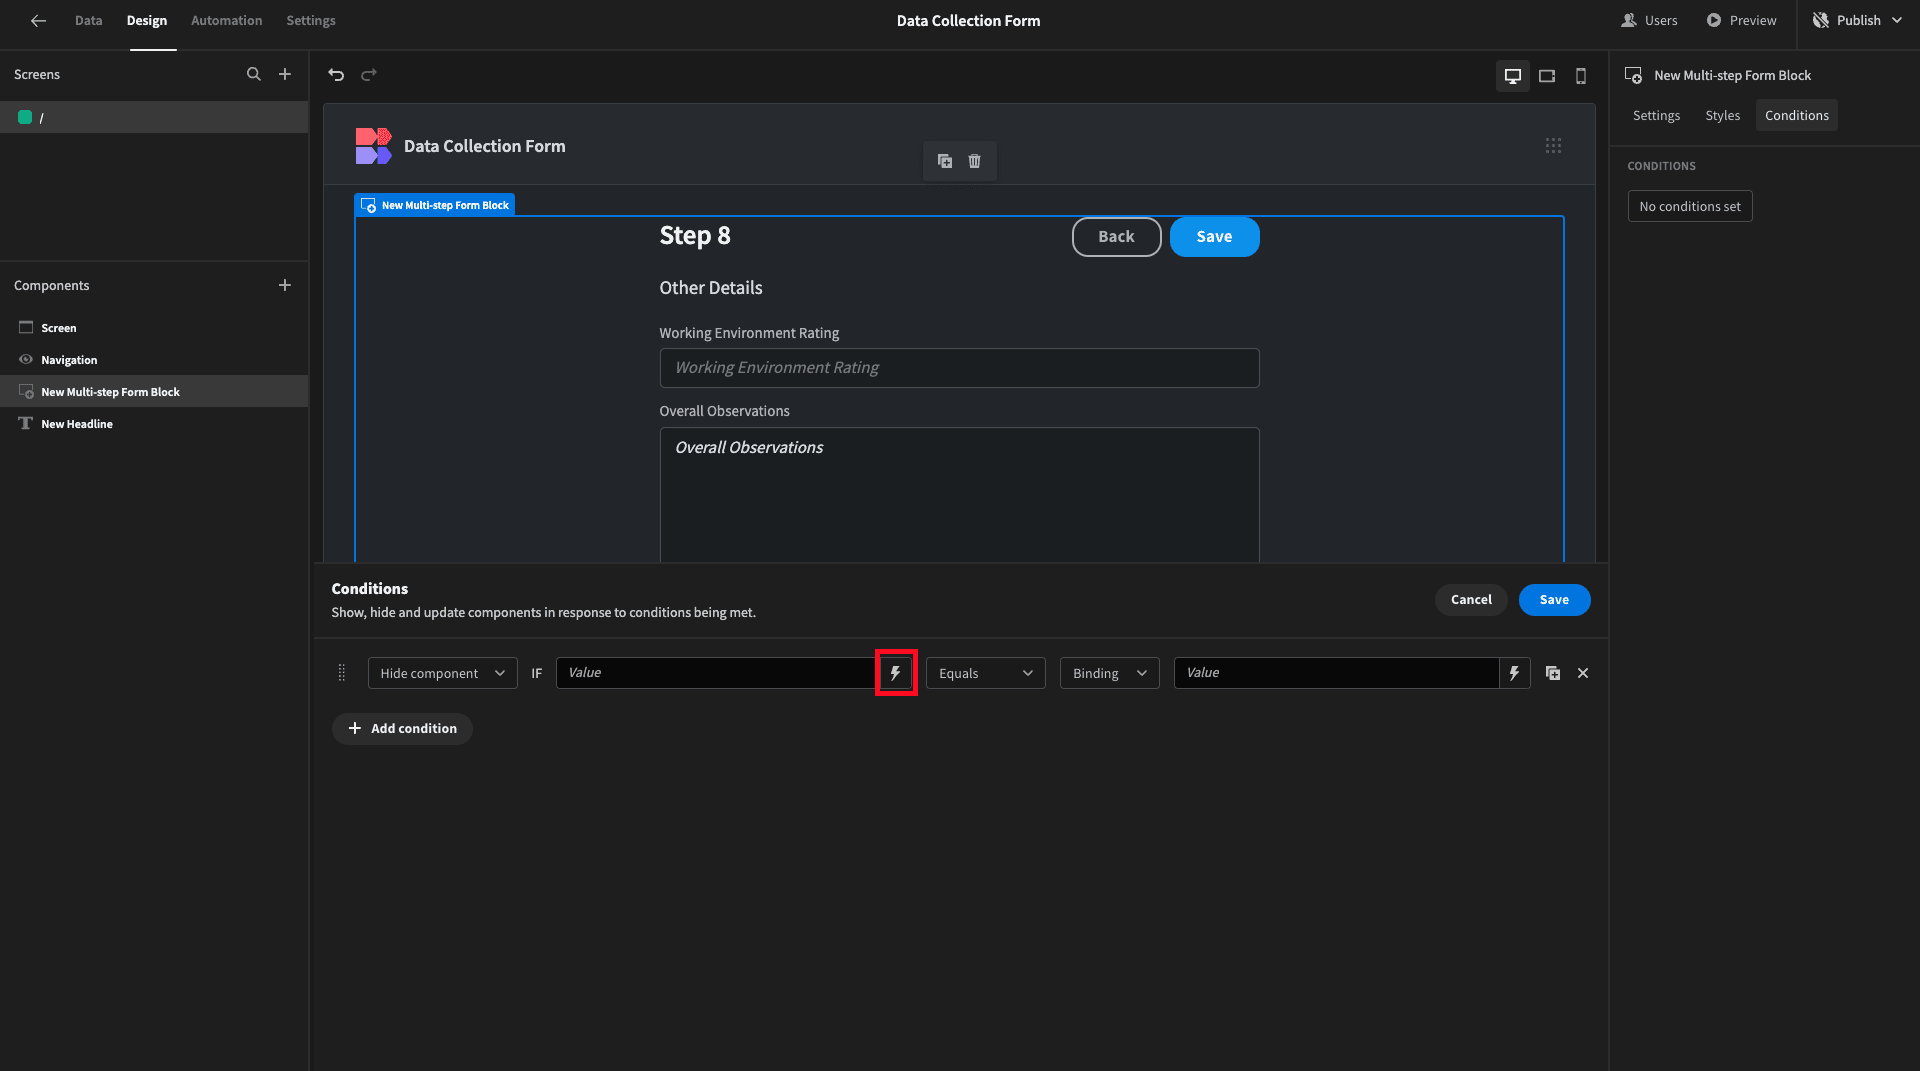
Then, we’ll use the lightning bolt icon to open the Bindings drawer for our first value.
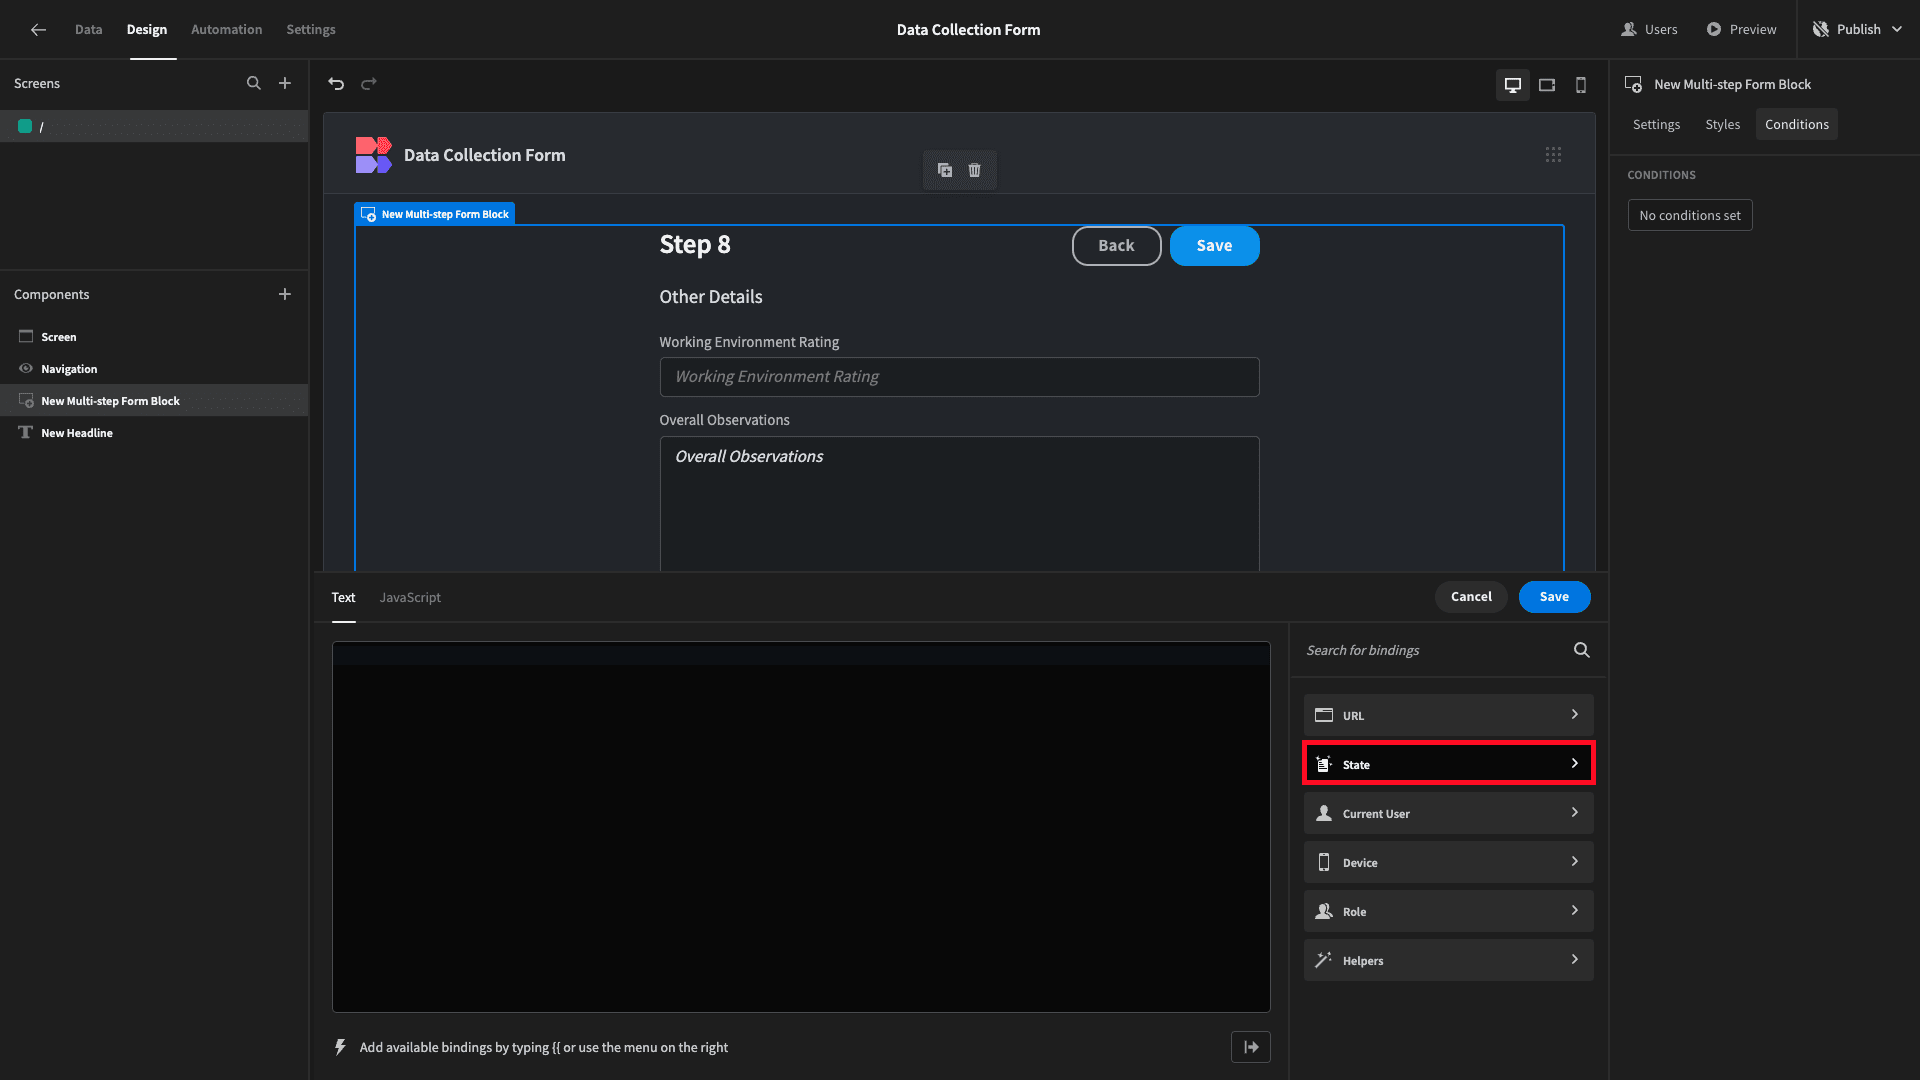
Here, we can see all of the categories of values that we can use within our binding. We can either use these as they are or within more complex Handlebars or JavaScript expressions.
We’re selecting State.
And then Complete.

For our other value, we’ll simply input the string ‘true’.

Then, we’ll repeat this process with our Headline, except this time, we’ll use a Show Component rule instead of hiding it.
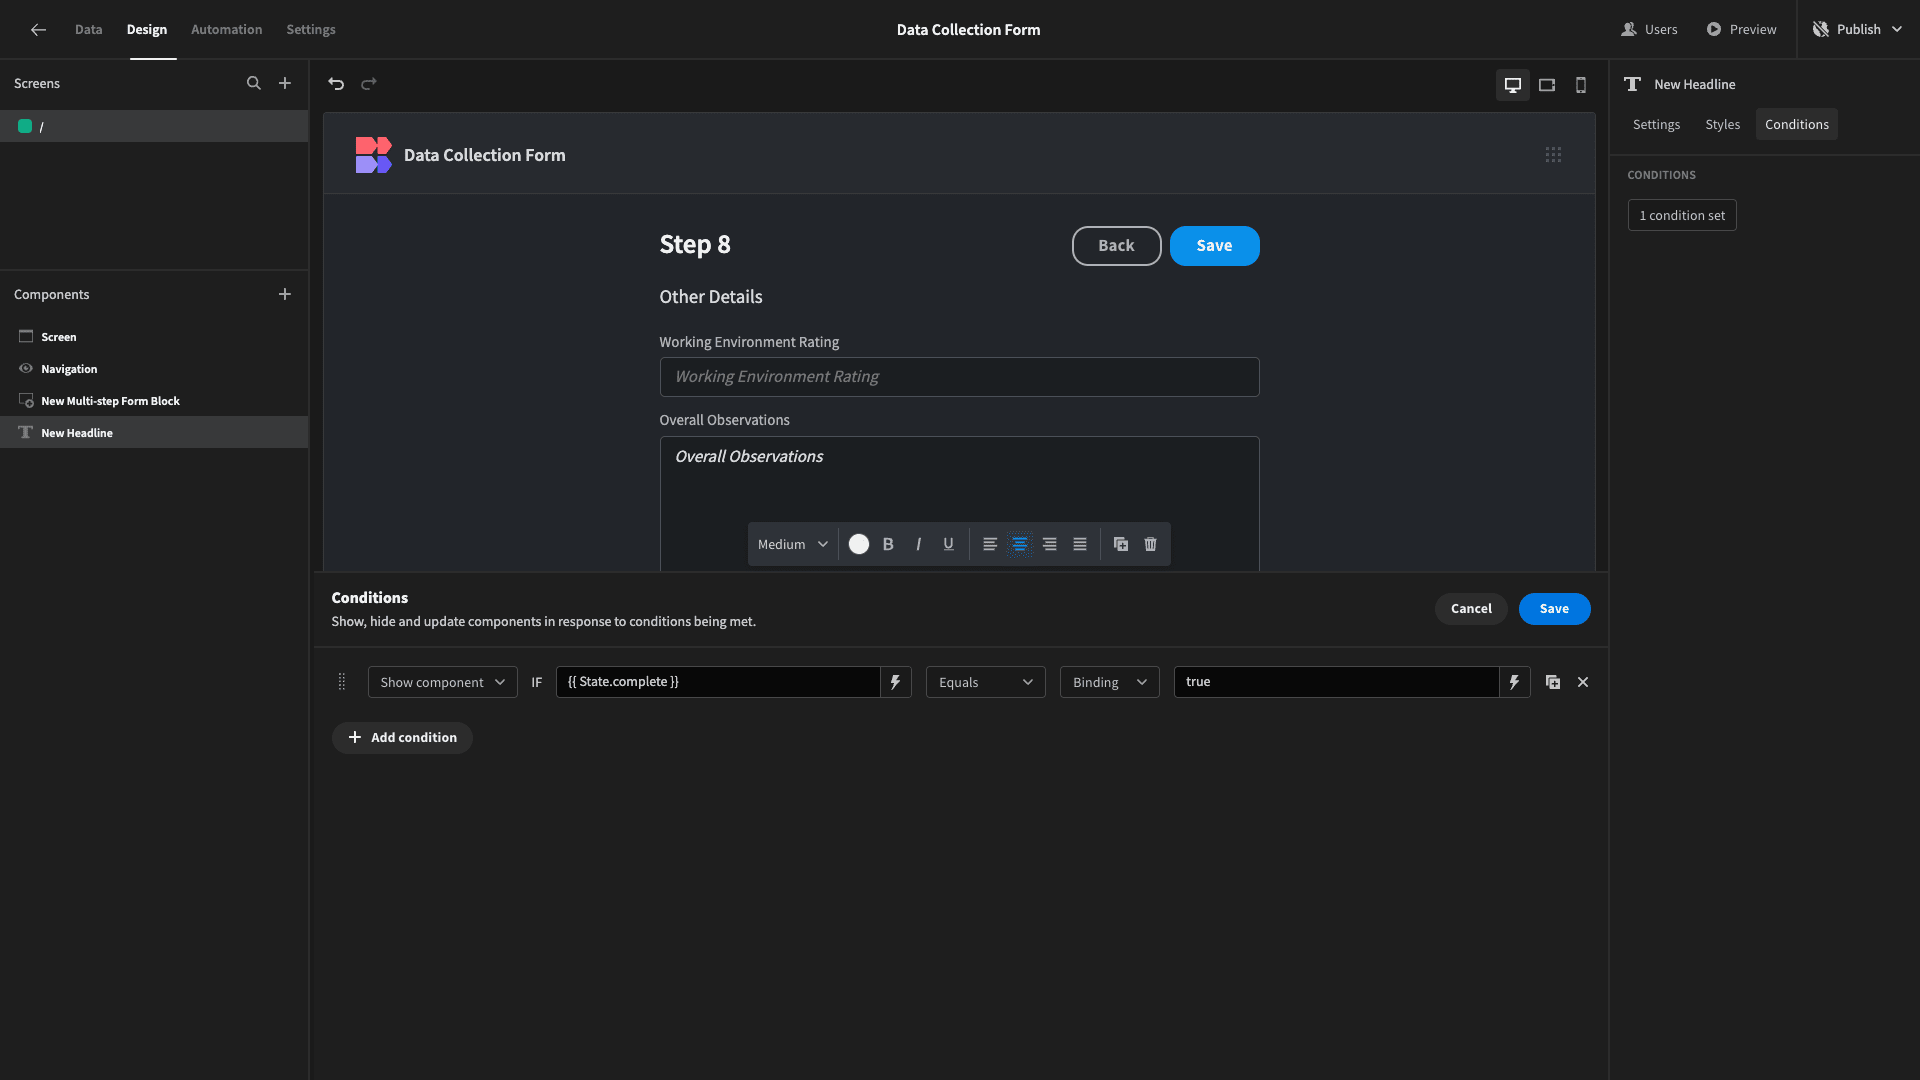
Now, our headline component is hidden in the Budibase builder because {{ State.complete }} doesn’t equal true.

But, if we preview our app and submit a row to our data collection form, it looks like this.

Auto-population
Next, we’re going to set our form up to auto-populate certain values based on context - saving our users time when submitting an entry. We’ll do this for the name and date fields on our first form step.
Our form is set to only be accessible by users with the Basic role assigned to them. These are all authenticated users with their own Budibase accounts - so we know their names already. We also know what date it is.
We’ll use this information as default values - but we’ll still allow users to update them manually.
We’ll start with the name attributes since this is slightly simpler.
Each form field has a setting called Default Value. Use the lightning bolt icon to open the bindings drawer for this under the First Name field.
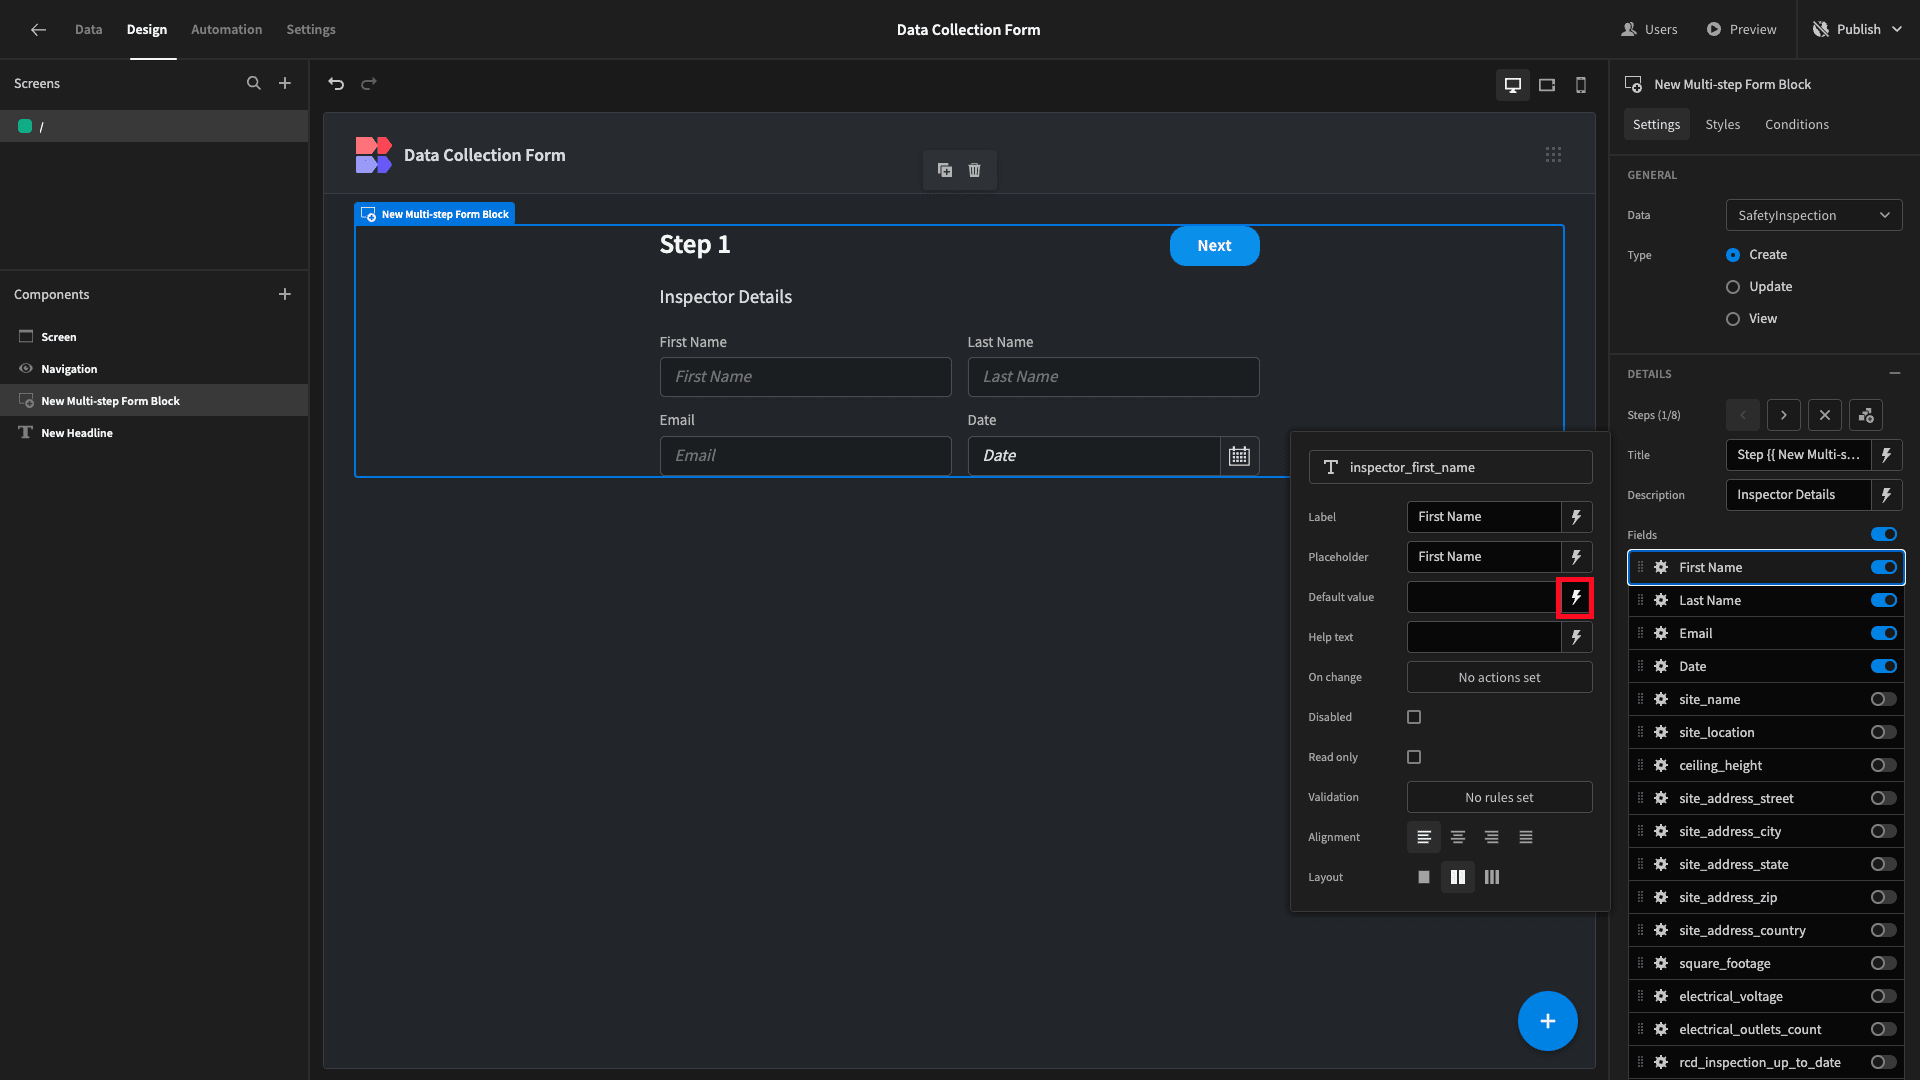
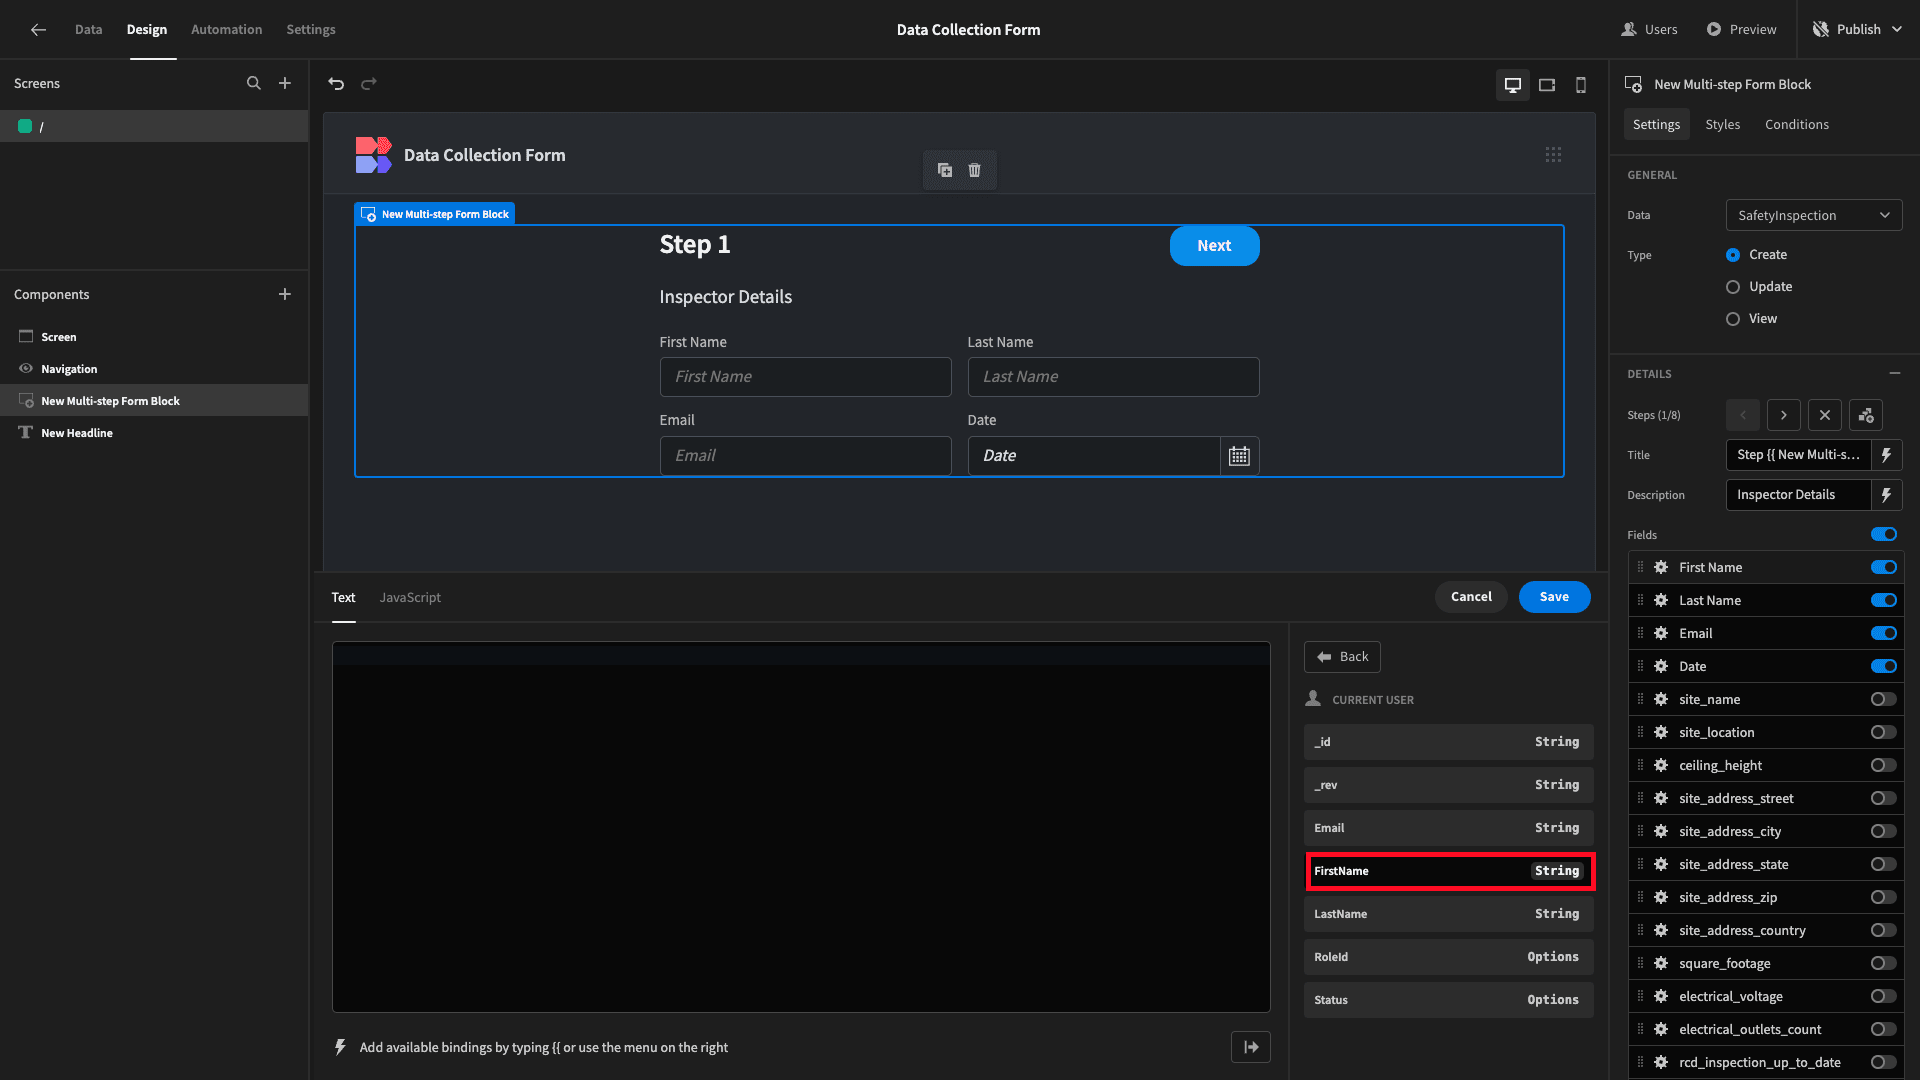
This time, we’ll select the Current User category of bindable values.

And we’ll choose FirstName.
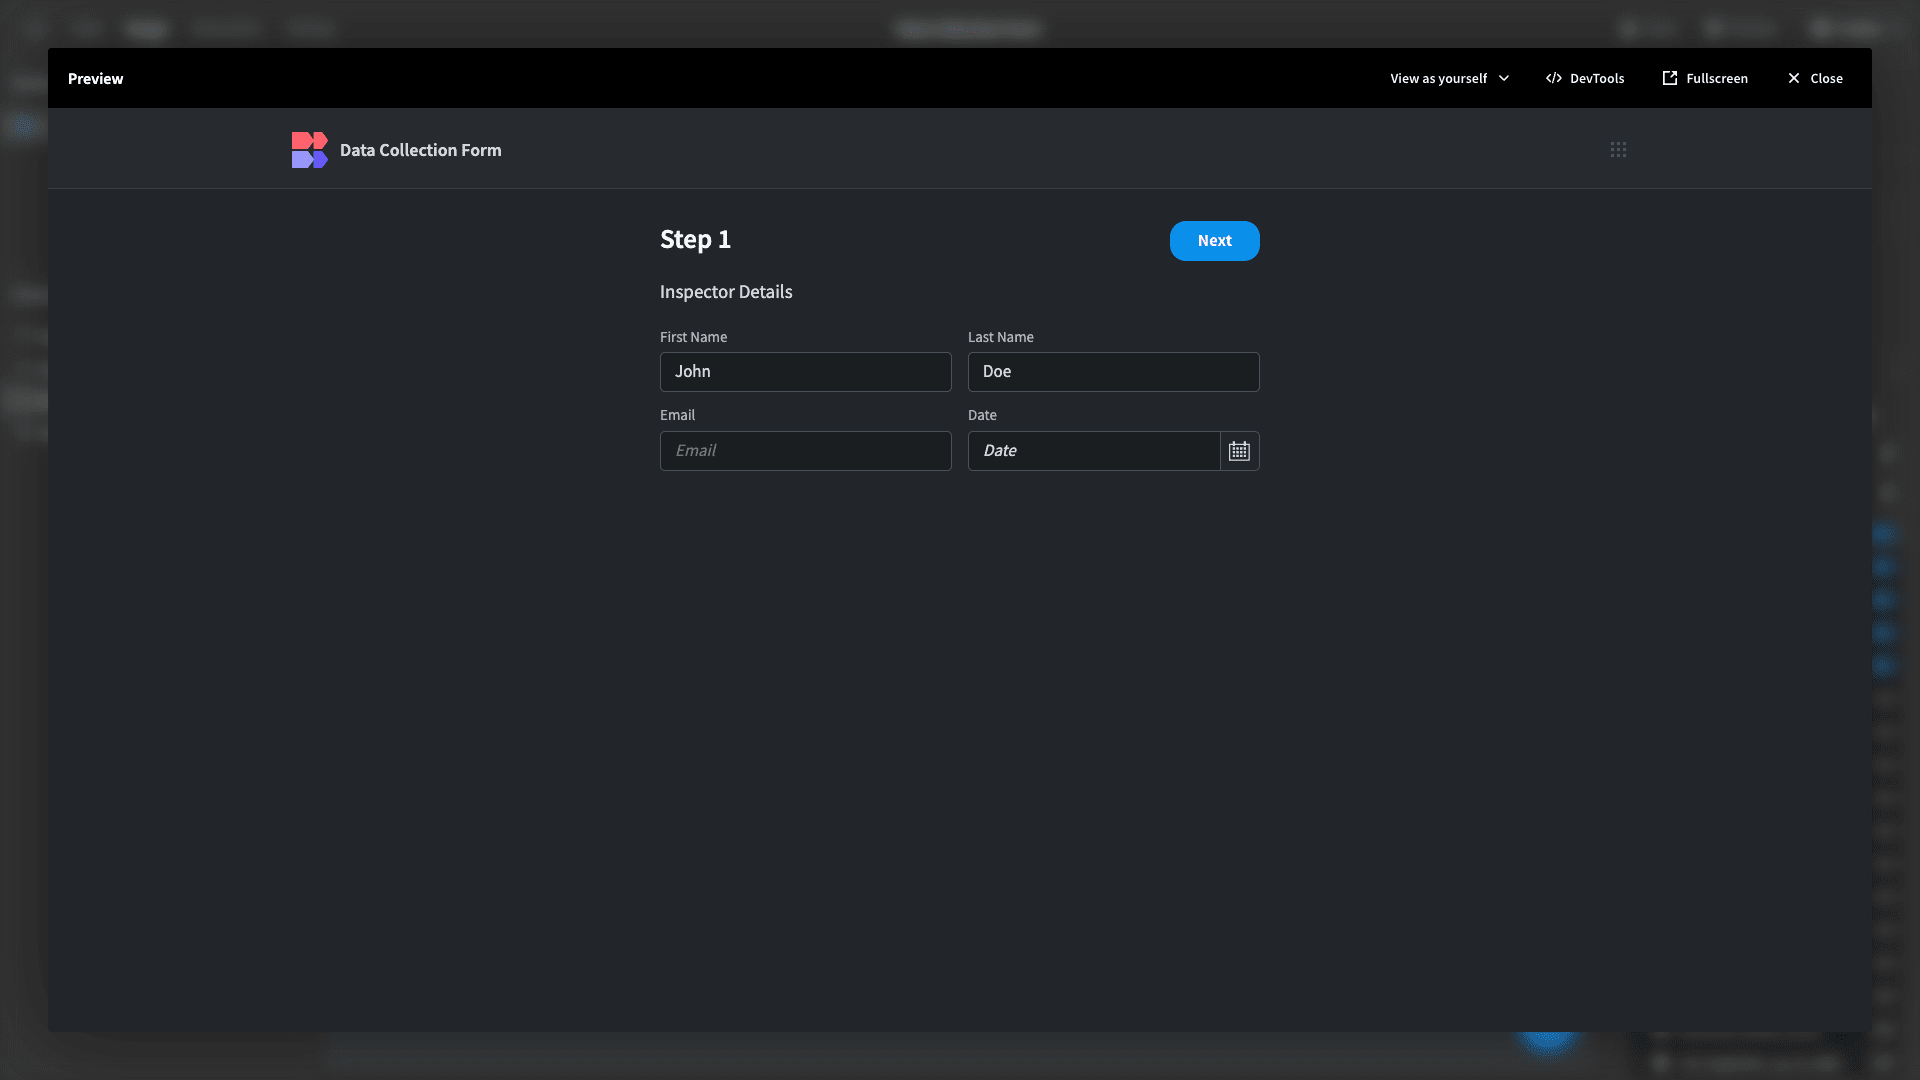
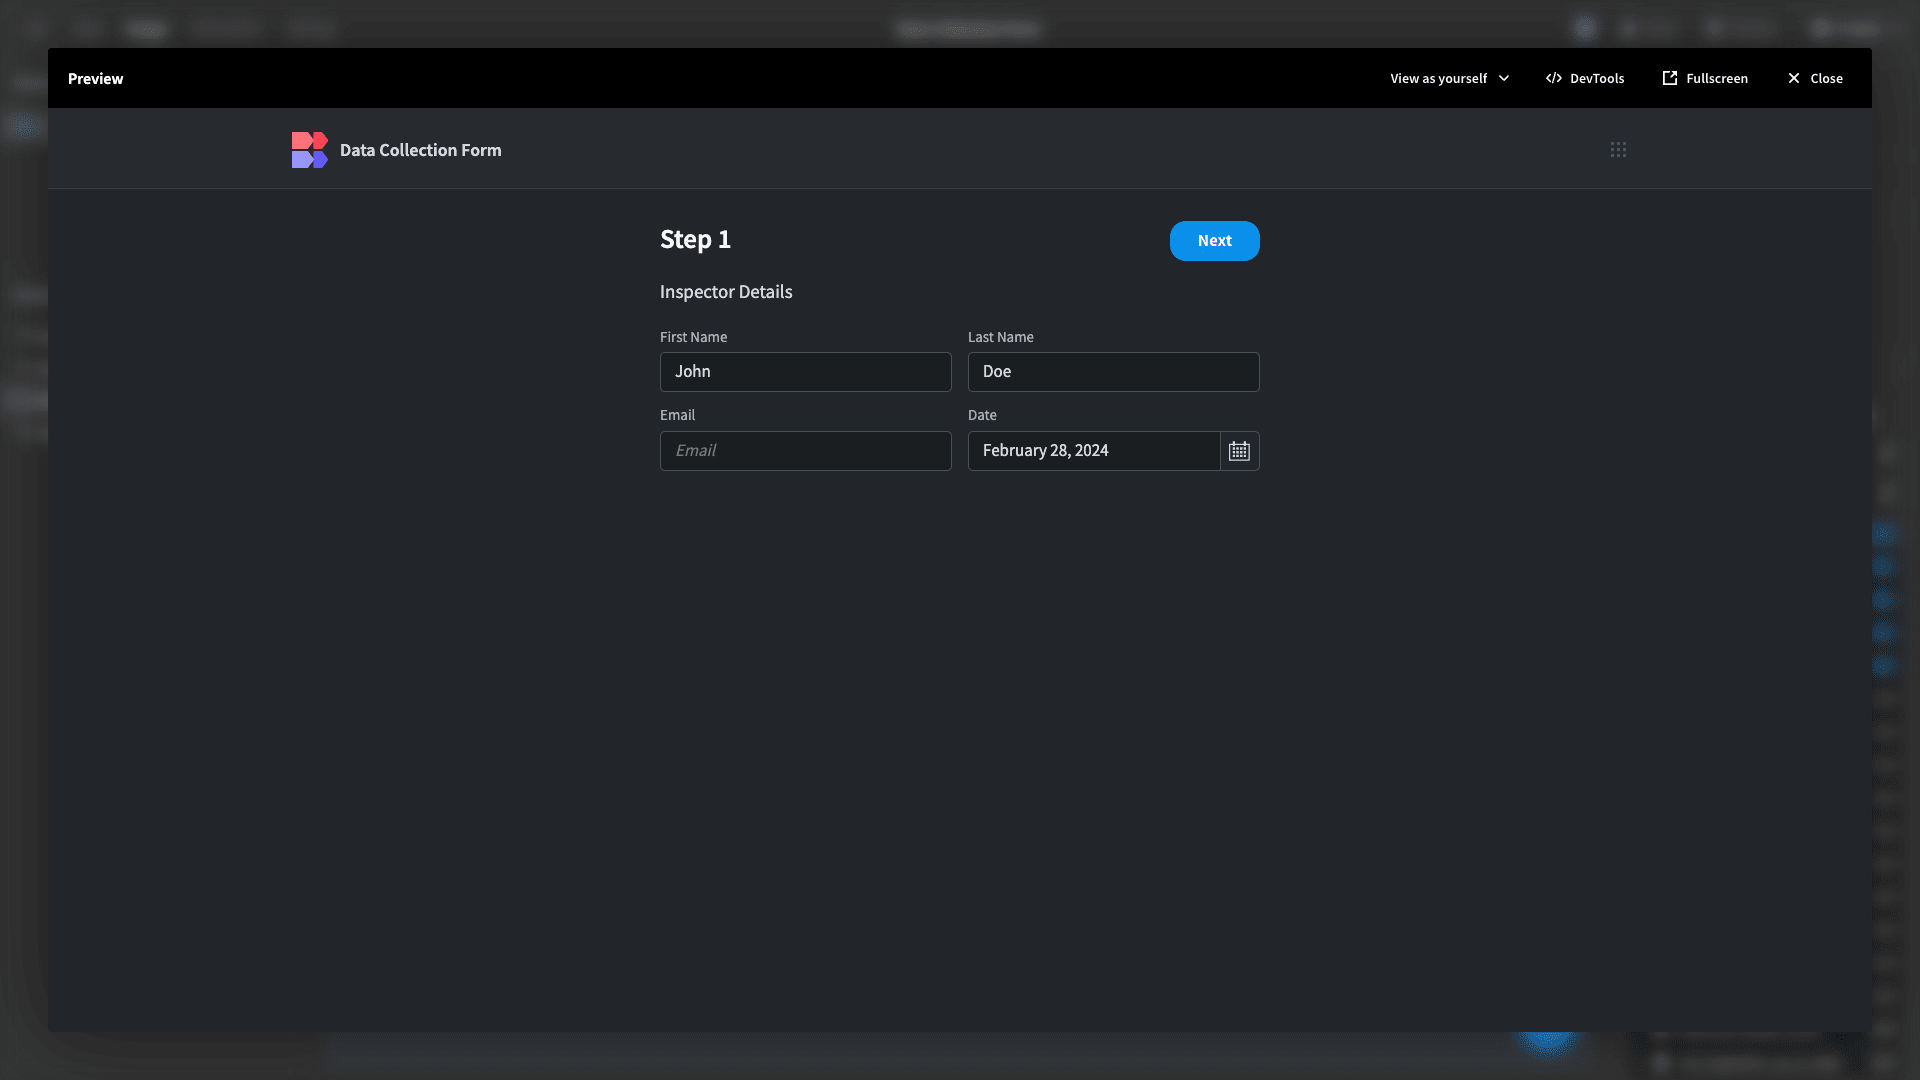
We can repeat the same process for our user’s last name. When we preview our form, these values will be populated automatically.
For the date field, we’re going to use Budibase’s built-in JavaScript editor rather than a static value.

The full expression we’re using is:
1var date = new Date()
2
3return date;
This creates a variable called date, sets it to the current moment in time, and returns it whenever our screen is loaded.
Now, when we preview our app, the date field is also auto-populated.
Validation rules
Lastly, Budibase forms can perform both custom and schema-based validation. By default, in our Multi-Step Form Block, all of the fields on the current step are validated each time a user hits Next or Save.

This will validate user-provided values against any rules that we have stored in our schema, along with any custom rules that we create relating to individual form fields.
So, let’s take a look at both methods of adding validation rules.
Within the Data section, we can add basic validation rules by hitting the Edit Column. For instance, on Text fields, we can specify a maximum length or that a particular field is required.
Let’s make our inspector_email attribute a required field.

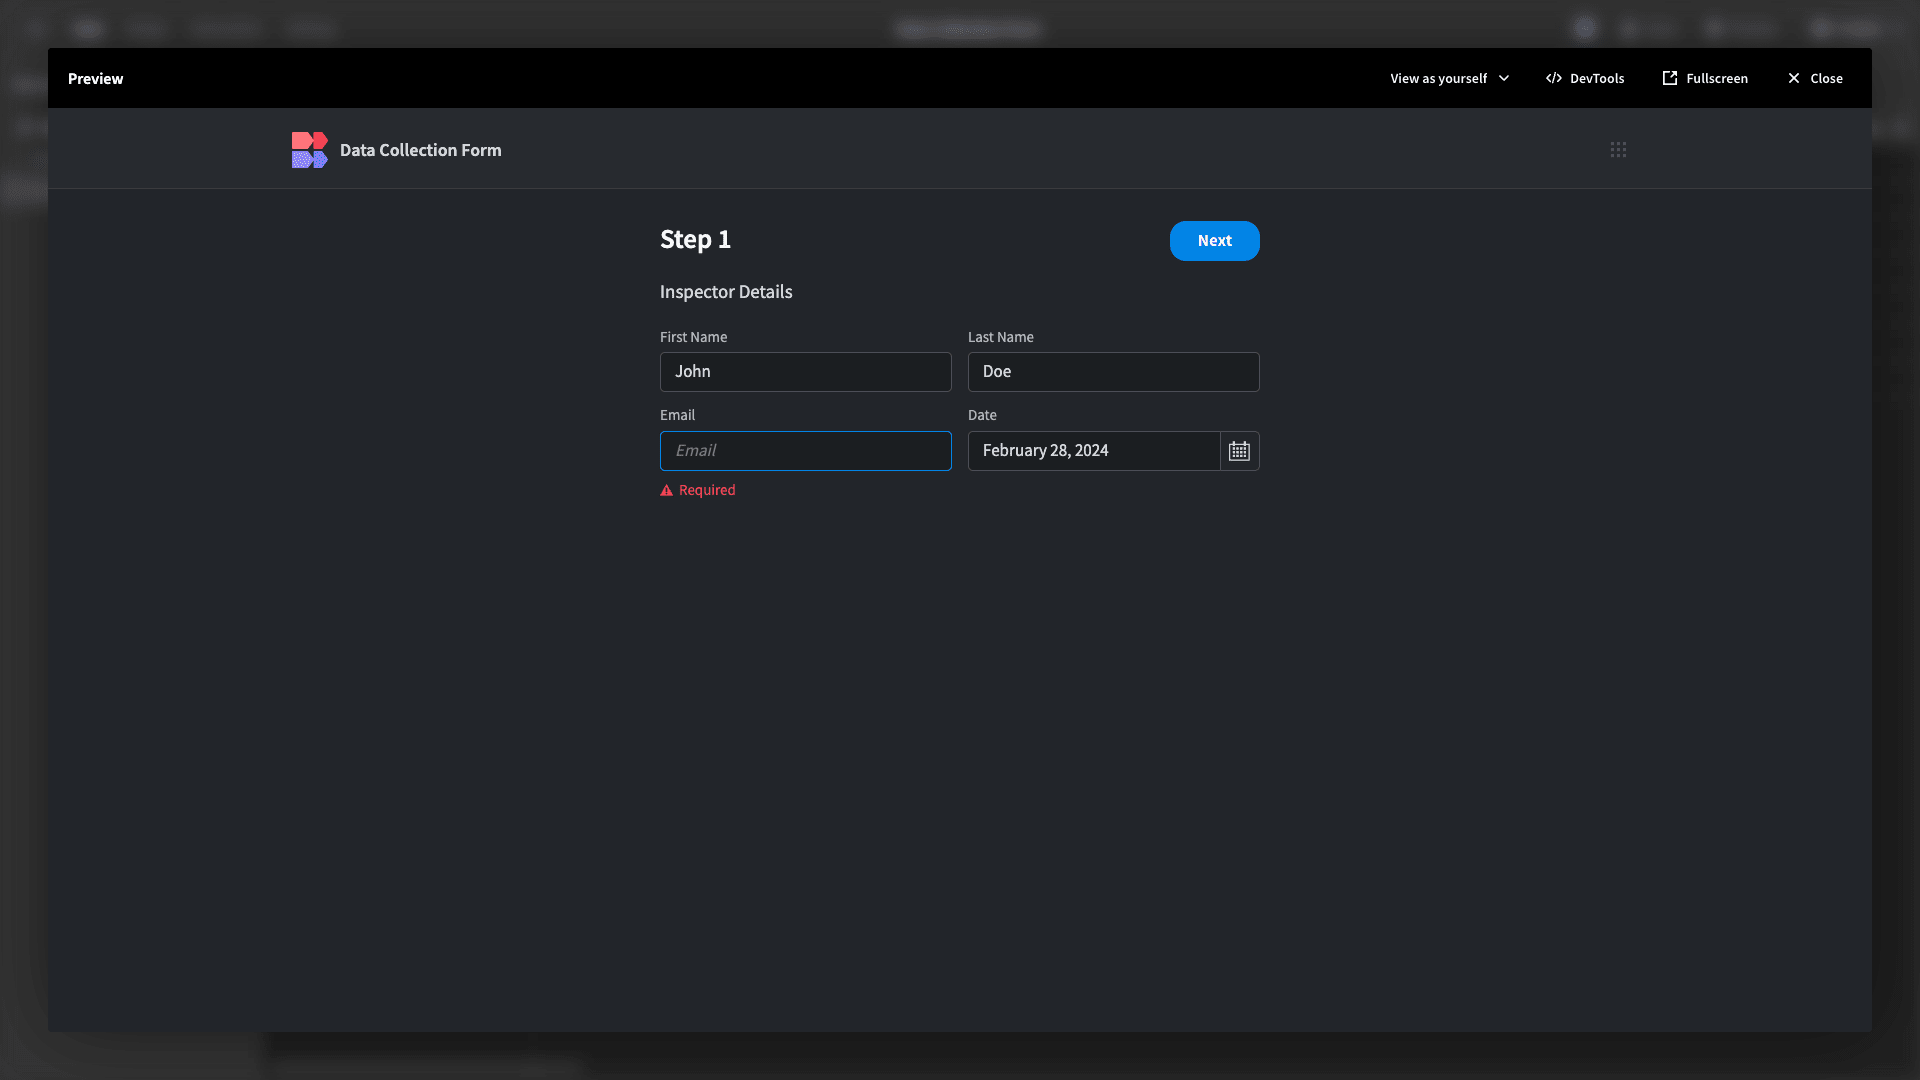
Now, if we try to complete the initial form step without providing an email address, we’ll see an error message.
In the Design section, we can open the Validation drawer for any form field to create more complex custom rules.

For Text fields, we can use minimum and maximum lengths, as well as Regular Expressions, to create highly sophisticated rules. For instance, requiring or banning certain formats or characters.
For numbers, we can specify permitted ranges, values, and forbidden values.
Say we wanted our Working Environment Rating to accept only numbers between 1 and 5.
We’d create two rules. One is for the minimum value, and one is for the maximum value.
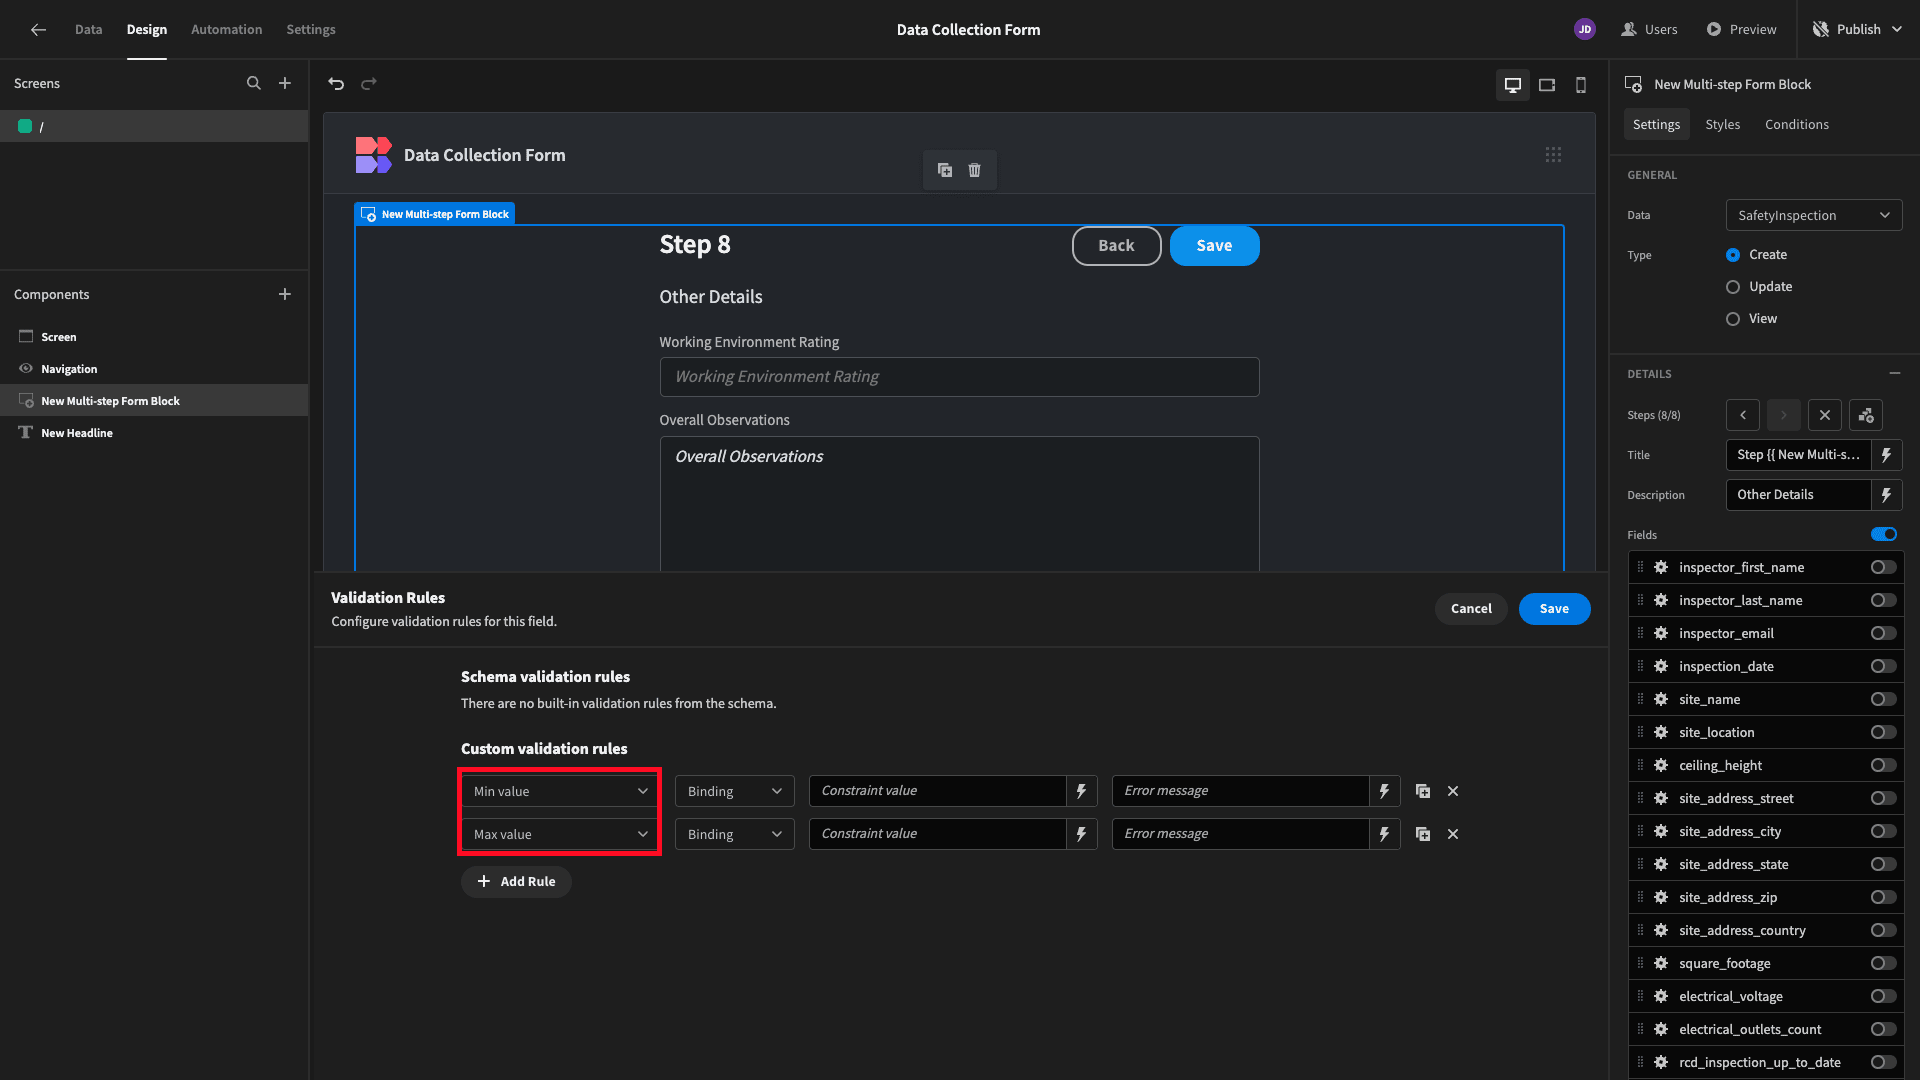
We’ll set our constraint values to 1 and 5, respectively.

Lastly, we can add a custom error message for each.

We can test this by previewing our app and trying to submit a disallowed value as well.
5. Publishing and deployment
That’s our data collection form, ready to go. Before we push it live, though, it’s good practice to preview it on mobile to make sure we’re happy with how it looks.

When we’re satisfied, we can hit Publish to push our app live.
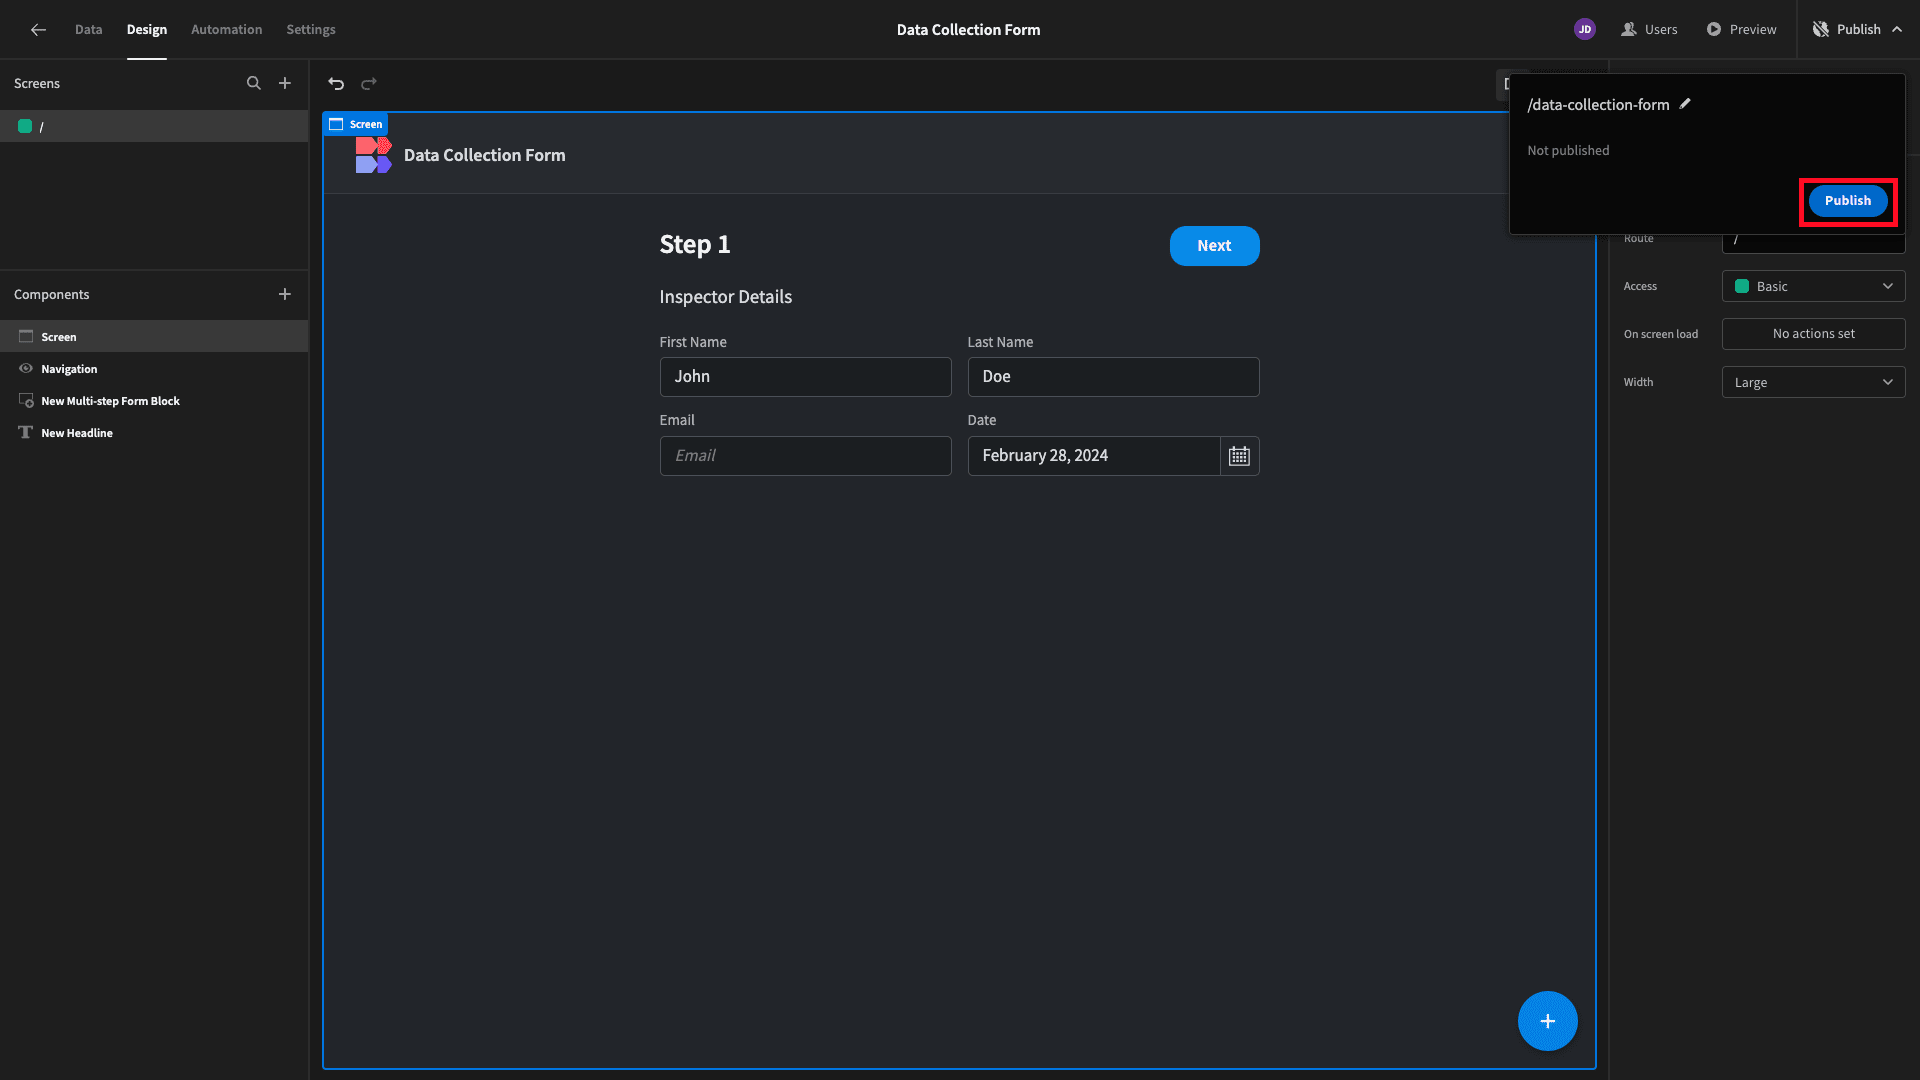
Here’s a reminder of what the finished form UI will look like.
Turn data into action with Budibase
Budibase is the fast, flexible way to build advanced forms on top of any data source.
Our platform stands apart from traditional form builders with extensive customization, powerful automations, support for external databases, optional self-hosting, role-based access control, free SSO, and much more.
To learn more, check out our forms page .