Building a CRUD app with Budibase and Next.js
In this example, we will build a small CRUD app that allows users to view sales records and create new ones.
We will use the power of the Budibase backend and its public API to connect to a Postgres database, display sales records, and create a form to create a new sales record. Rather than defining your database connection, table queries, security, REST API in Next.js, we can instead utilize Budibase to simplify our backend. Using Budibase as our backend, we only need to build a few endpoints to make API calls.
Pre-requisites
For this walkthrough, you will need to install
Getting started
The first step is getting the example from Github . We will need this to set up our database and our Next.js app. You can download the example by either; downloading the Budibase repository as a zip, or checking it out using Git. For the rest of this example, we will be working from the examples/nextjs-api-sales directory.
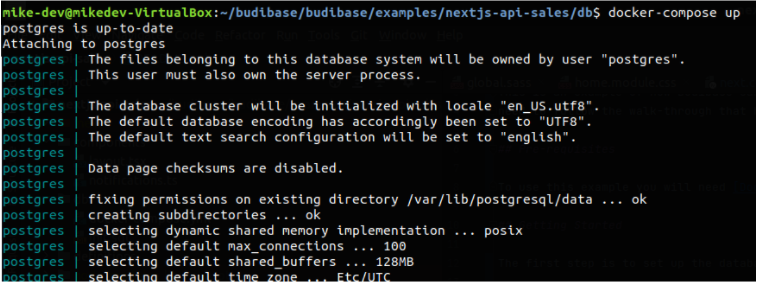
For this example, we have provided an example database. This is run using Docker Compose and can be found in the “db/” directory - start the database using the command “docker-compose up”. Now that we have a Postgres database to work from we can jump into Budibase!
Budibase setup
Open up your Budibase builder - if running Budibase locally this will be accessible at: http://localhost:10000. You then need to create a new app, call the app “sales” - this is the app that we are going to use to configure a backend for our sales database.
Once the app has been created we will set up a new Postgres datasource - the configuration should look something like below.
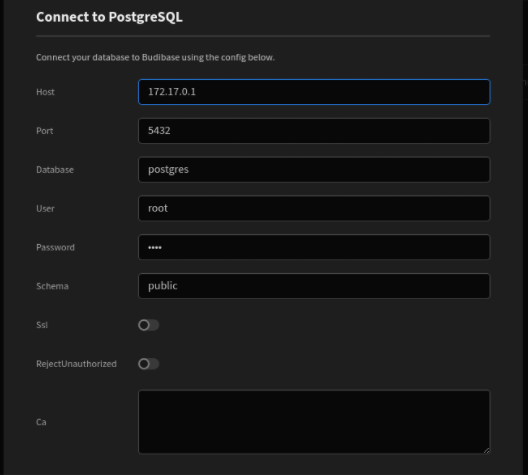
All of the settings for our database should be the defaults assumed by Budibase, using the default :
database:
Postgres
user/password:
root
port:
5432
The only thing you will need to change is the host depending on where your Budibase installation is running. If it is running on your local machine, using Docker compose, you can use:
Windows/Mac:
host.docker.internal
Linux:
172.17.0.1
If your Budibase installation is running remotely, or you are using the Budibase Cloud, you will need to make the database publicly available.
Once the database has been successfully imported to Budibase you’ll find that the two tables “sales” and “sales_people” have been imported to the app, as below.

The last thing that we need to do is set up a relationship between the two tables, there is a reference in each sale to the salesperson that made the sale and we want Budibase to be aware of this. To do this click the “Define relationship” button on the Postgres datasource screen, and fill out the form as follows.
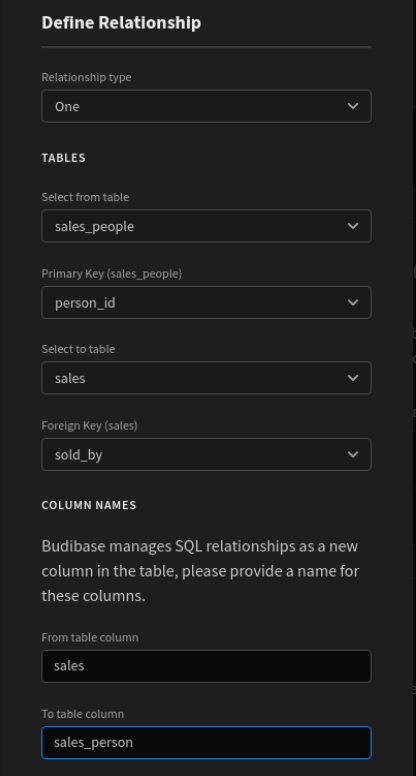
Be careful to fill out the form exactly as shown, making sure to change the “to table column” to “sales_person”.
Once this is set up we now have a backend for our Postgres database, the Postgres tables will be available through the Budibase API!
Setting up the Next.js app
The next step is to insert all of the relevant information about your Budibase system into the Next.js sales app. You will need to retrieve your API key from Budibase, which can be found on the portal, amongst your user settings.

From here you can click “View API key” and copy the API key from within the menu that opens.
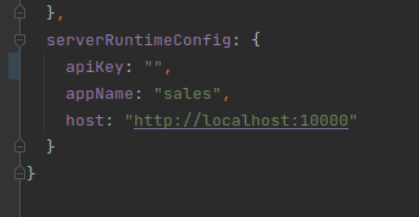
Once you have this, we can go back to the Next.js app codebase, you’ll find a file “next.config.js” at the top level of the directory. Here you can edit the “serverRuntimeConfig” to provide your API key, where your Budibase install is hosted and the name of the app which provides the sales backend. The config should look something like the config before initially, if running your Budibase install locally you should only need to insert your API key.
We can now run the Next.js app and check out our sales records within it, to do this you’ll need to install carry out the following commands:
- “yarn”/”npm install” - install the dependencies required to run the app.
- “yarn dev”/”npm run dev” - this will run the Next.js app.
You can now visit “localhost:3001” which will have the app running, you should see something like below.

You can switch between viewing the list of sales, or creating a new sale by using the navbar in the top left. Check out our guide to table UI design for more tips.
How it all works
To see how this all works we can look in the “utilities/index.ts”, “pages/api/sales.ts”, and “pages/api/salespeople.ts” you can see how we’ve connected the app up to Budibase. We’ve utilized two Next.js API endpoints to perform the connection to Budibase, this hides the Budibase integration away from the UI, keeping the API key secret.
The integration is quite simple, we’ve defined a “makeCall” function which makes a HTTP call to your Budibase install. We’ve also implemented “getApp” and “findTable”, the first takes the app name that was provided in the Next.js app config and gets its app ID, find table looks up a tables ID by its name. For both of these utility functions we make use of the “/applications/search” and “/tables/search” endpoints respectively; you can find definitions for these in the Budibase API reference.
Once we have the ID of the table for the “sales” and “sales_people” tables we can then search for rows within the respective tables, using the “/tables//rows/search” endpoint. We have to query the salespeople for creating relationships, we need a list of sales peoples’ names and IDs for this; this can be seen in the select dropdown on the new sale page.
In our sales fetch call we have utilized server-side pagination and sorting, this is a good example of one of the primary benefits of using Budibase as a backend, by simply setting up our database in Budibase we have fully paginated HTTP API, we can sort, search and retrieve related rows without needing to write a single line of SQL or setting up an ORM.
We also have utilized the Typescript definitions generated from our OpenAPI specification, you can see that we’ve used the “App”, “AppSearch”, “Table”, “TableSearch” and “RowSearch” types to provide a greatly enriched development experience, we get type safety and auto-completion around our API calls; normally we would need to jump back and forth between the API reference and our codebase, but the Budibase types simplify this quite a bit.
Conclusion
In this example we have set up a Postgres database, connected it to a Budibase app, set up the relationships between the tables, and finally, we’ve used Budibase as a backend API for an entirely custom app built in Next.js. Hopefully, we’ve given you some ideas about how you can use the Budibase API to simplify your app development, allowing you to focus on your business-specific use cases, rather than building boilerplate code!